SoftGLRender源码:相机(Camera)
特性
文件:Camera.h,Camera.cpp
Camera(相机)类,用于管理3D场景中的视角和投影矩阵,支持透视投影、视图变换、视锥体(Frustum)计算等功能.
Camera类由ViewManager管理,由OrbitController模块控制其运动,由Viewer系列类将其用于渲染时的计算.
Camera主要功能:
1)计算投影矩阵,计算视图矩阵. 对面mvp变换中的vp.
2)将坐标变换到相机空间(视图空间),从相机空间变换回世界空间
3)计算出视景体,其他模块可能会用到视景体做剔除操作.
相机模型
工程实践中,相机的模型是一个针孔相机模型,如下图所示:
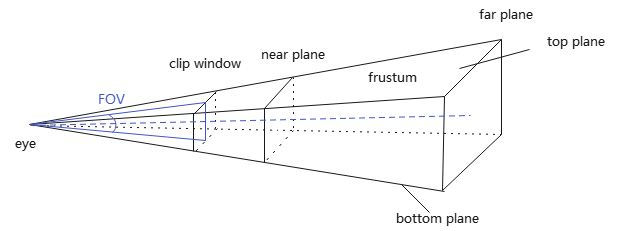
相机通过透视投影观察到的范围,是一个棱台观察体,常简称称为视景体(Frustum). 而且经常将clip window放置在near plane上. 这个模型所对应的空间,称为相机空间(Camera space),对应坐标系称为观察坐标系.
from P145, Fundamentals of Computer Graphics 4th - Steve Marschner and Peter Shirley
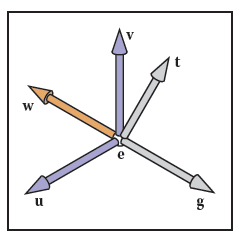
如何得到观察坐标系?
这就需要用到3个信息:
- 相机位置\(\bm{e}\)
- 注视方向\(\bm{g}=\bm{center}-\bm{e}\),其中\(\bm{center}\)是注视点(目标点)坐标
- 初始观察向上向量\(\bm{t}=\bm{up}\)
我把这些用于建立观察坐标系的信息,称为"观察体者信息",即观察者自身信息.
关于项目如何得到观察者信息并控制Camera运动,可参见:SoftGLRender源码:轨道控制器(OrbitController)
Camera声明
class Camera {
    ...
private:
    // 透视投影参数
	float fov_    = glm::radians(60.f); // 视场角
	float aspect_ = 1.0f; // clipping window width / height
	float near_   = 0.01f;
	float far_    = 100.f;

	bool reverseZ_ = false; // 是否反转z缓冲

    // 视图参数
	glm::vec3 eye_{};    // 眼睛位置(相机位置)
	glm::vec3 center_{}; // 注视点(目标点)
	glm::vec3 up_{};     // 观察向上向量

    // 存储相机的视锥体
	Frustum frustum_;    // 视景体
};
重要数据成员:
1)用于计算投影矩阵、确定视景体:
- fov_ 视场角(field of view),默认60°
- aspect_ *裁剪窗口的宽高比,默认1.0
- near_, far_ */远裁剪*面到相机的距离,默认0.01到100
2)观察者信息,用于确定观察坐标系
- eye_ 相机位置,即观察点
- center_ 相机看向的目标点
- up_ 相机的向上向量,通常为\((0,1,0)\)
3)特殊功能
- reverseZ_:支持反向Z缓冲(Reverse Z)技术,用于提高深度缓冲精度(尤其在远距离渲染时)
- frustum_ 存储相机的视锥体,可用于可见性剔除
核心成员函数:
setPerspective(fov, aspect, near, far)设置透视投影参数lookAt(eye,center,up)设置相机的视图参数,用于生成观察坐标系projectionMatrix()返回当前透视投影变换矩阵(需要结合reserveZ)viewMatrix()返回相机变换矩阵(视图变换)getWorldPositionFromView(pos)将视图空间坐标转换为世界坐标update()更新视锥体,从透视投影参数、视图参数,计算出视景体信息
Camera成员函数
构造与析构
Camera类数据成员,在声明式中直接给定初值,而且没有申请动态内存,因此没有构造函数、析构函数.
Camera对参数的设置,是按组进行的,即功能相关的若干参数,通过一个接口一次进行赋值.
设置投影参数
谁会调用Camera::setPerspective,设置投影参数?
1)ViewManager会为主相机设置投影参数
2)Viewer会为深度相机(cameraDepth_)设置投影参数,用于生成shadow map
// perspective param
void Camera::setPerspective(float fov, float aspect, float near, float far) {
	fov_    = fov;
	aspect_ = aspect;
	near_   = near;
	far_    = far;
}
设置视图参数
谁会调用Camera::lookAt,设置视图参数?
1)轨道控制器(OrbitController)控制了相机的运动,就是通过Camera::lookAt控制相机视图参数实现的.
2)阴影贴图中的深度相机(ViewManager::cameraDepth_),也是通过Camera::lookAt实现光源视角的shadow map
3)环境光照(Environment)(暂略)
// view param
void Camera::lookAt(const glm::vec3& eye, const glm::vec3& center, const glm::vec3& up) {
	eye_    = eye;
	center_ = center;
	up_     = up;
}
视图变换矩阵
// World space to camera space
// view =
// ( side.x     side.y     side.z    -side*eye
//   up.x       up.y       up.z      -up*eye
//  -forward.x -forward.y -forward.z  forward*eye
//   0          0          0          1 )
//
// https://www.cnblogs.com/fortunely/p/18709389
glm::mat4 Camera::viewMatrix() const {
	glm::vec3 forward(glm::normalize(center_ - eye_));
	glm::vec3 side(glm::normalize(cross(forward, up_)));
	glm::vec3 up(glm::cross(side, forward));

	glm::mat4 view(1.f);

	view[0][0] = side.x;
	view[1][0] = side.y;
	view[2][0] = side.z;
	view[3][0] = -glm::dot(side, eye_);

	view[0][1] = up.x;
	view[1][1] = up.y;
	view[2][1] = up.z;
	view[3][1] = -glm::dot(up, eye_);

	view[0][2] = -forward.x;
	view[1][2] = -forward.y;
	view[2][2] = -forward.z;
	view[3][2] = glm::dot(forward, eye_);

	return view;
}
由计算机图形:mvp变换(模型、视图、投影变换),我们知道,视图矩阵:
而函数Camera::viewMatrix()中视图矩阵形式却为:
注意:glm::mat4默认是列主序矩阵,即glm::mat4 m[col][row],第一个索引代表列号,第二个索引代表行号.
为什么形式不太一样?
在\(M_{view}\)中,\(\bm{u},\bm{v},\bm{w}\)是视图坐标系的基向量,它们是正交的.
而\(side,up,forward\)是根据相机的视图参数求出来,用于构建视图坐标系的向量,也就说,它们不是基向量. 关系如下:
forward代表相机的观察方向,即-z轴方向(\(-\bm{w}\)),因此\(\bm{w}=-forward\)
于是,view可以写成\(M_{view}\)一样形式.
透视投影变换矩阵
// Camera Space(View space) to Clip space
// c = 1.0/tan(fov/2), a = aspect
// P (reverse Z) =
// ( c/a  0   0    0
//   0    c   0    0
//   0    0   0    near
//   0    0  -1    0 )
// Or
// P (no reverse Z) =
// ( c/a  0   0    0
//   0    c   0    0
//   0    0  -1   -near
//   0    0  -1    0 )
//
// https://www.cnblogs.com/fortunely/p/18709389
glm::mat4 Camera::projectionMatrix() const {
	float tanHalFovInverse = 1.f / std::tan((fov_ * 0.5f));

	glm::mat4 projection(0.f);
	projection[0][0] = tanHalFovInverse / aspect_;
	projection[1][1] = tanHalFovInverse;

	if (reverseZ_) {
		projection[2][2] = 0.f;
		projection[2][3] = -1.f;
		projection[3][2] = near_;
	}
	else {
		projection[2][2] = -1.f;
		projection[2][3] = -1.f;
		projection[3][2] = -near_;
	}
	return projection;
}
设\(c=tan FOV/2,a=aspect\)
那么,代码对应透视矩阵:
注意:
1)glm::mat4默认是列主序矩阵;
2)项目中,near, far都是正值,为方便公式推导,令\(n=-near,f=-far\).
看起来为什么跟我们在mvp变换中接触的投影变换矩阵都不一样?
下面来探讨下.
设视景体内一点p,经投影变换P得到点v.
由于\(P[3:2]=-1\)
∴\(v_w=-1\)与OpenGL的\(w\)一致,因此考虑OpenGL投影公式
由mvp变换知,FOV形式投影公式(OpenGL):
此时,\(n\to -1, f\to 1\)
如果要使用Reverse-Z技术,就需要\(n\to 0, f\to 1\). 可以在OpenGL投影基础上,将变换后的点右移1,然后再沿z轴反向.
对应变换:
当要使用天空盒的时,远*面位于无穷远,即\(f= -∞\),但是规范化后,\(n\to 0, f\to 1\)
- 对于不使用Reverse-Z的情形
此时,映射关系:\(n\to 0, f=∞\to 1\),符合映射到[0,1]的要求.
- 对于使用Reverse-Z的情形
要使用Reverse-Z,需要规范化观察体满足映射关系:\(n\to 1,f=∞\to 0\)∵\(z_{reverse}=1-z_{ndc}\)). 下面求该变换P.
如何在\(P_{no,reverseZ}\)的基础上,由\(n\to 0, f=∞\to 1\)变换为\(n\to 1, f=∞\to 0\)?
映射变换\([0,1]\to [1,0]\),可先向右*移1个单位,然后沿着z轴反向
于是,
此时,映射关系:\(n\to 1, f\to 0\),符合映射到\([1,0]\)的要求.
坐标变换
getWorldPositionFromView(pos) 将pos坐标从Clip Space或NDC转换到World Space,也就是说,要经过P、V变换的逆变换.
注意:个人认为,函数名起的不恰当,应该取getWorldPositionFromClip比较合适.
// Clip space to world space
glm::vec3 Camera::getWorldPositionFromView(glm::vec3 pos) const {
	glm::mat4 proj, view, projInv, viewInv;
	proj = projectionMatrix(); // P
	view = viewMatrix(); // V

	projInv = glm::inverse(proj);
	viewInv = glm::inverse(view);

	glm::vec4 pos_world = viewInv * projInv * glm::vec4(pos, 1);
	pos_world /= pos_world.w;

	return glm::vec3{ pos_world };
}
更新视景体
Camera类一个重要作用,就是由透视投影参数、视图参数得出视景体,最终结果保存到Frustum对象中,这就是update()的工作.
它在主循环中调用.
透视投影的视景体的几个重要参数:
- near, far, top, bottom, left, right clipping plane(6个裁剪*面),在这6个*面形成的视景体外的物体不可见;
- nearTopLeft, nearTopRight, nearBottomLeft, nearBottomRight,farTopLeft, farTopRight, farBottomLeft, farBottomRight 代表规范化立方体的8个顶点
- 视角(Field of View, FOV):定义视野的张开角度(通常分为水*FOV和垂直FOV)
- 宽高比(Aspect):*裁剪*面的宽度与高度之比
- bbox(包围盒),主要用于相交检测
视景体的6个裁剪*面(plane[0..5])用点法式表示,法向量垂直*面指向视景体内部.
8个角点是视景体对应棱台观察体的顶点.
// update frustum
void Camera::update() {
	glm::vec3 forward(glm::normalize(center_ - eye_));   // 摄像机的前向向量(从眼睛位置指向中心点)
	glm::vec3 side(glm::normalize(cross(forward, up_))); // 摄像机的右向量(前向向量和上向量叉积得到)
	glm::vec3 up(glm::cross(side, forward)); // 摄像机的实际上向量(通过右向量和前向向量叉积重新计算)

	// 计算*/远*面的半高和半宽
	float nearHeightHalf = near_ * std::tan(fov_ / 2.f);
	float farHeightHalf  = far_ * std::tan(fov_ / 2.f);
	float nearWidthHalf  = nearHeightHalf * aspect_;
	float farWidthHalf   = farHeightHalf * aspect_;

	// near plane
	glm::vec3 nearCenter = eye_ + forward * near_;
	glm::vec3 nearNormal = forward;
	frustum_.planes[0].set(nearNormal, nearCenter);

	// far plane
	glm::vec3 farCenter = eye_ + forward * near_;
	glm::vec3 farNormal = -forward;
	frustum_.planes[1].set(farNormal, farCenter);

	// top plane
	glm::vec3 topCenter = nearCenter + up * nearHeightHalf;
	glm::vec3 topNormal = glm::cross(glm::normalize(topCenter - eye_), side);
	frustum_.planes[2].set(topNormal, topCenter);

	// bottom plane
	glm::vec3 bottomCenter = nearCenter - up * nearHeightHalf;
	glm::vec3 bottomNormal = glm::cross(side, glm::normalize(bottomCenter - eye_));
	frustum_.planes[3].set(bottomNormal, bottomCenter);

	// left plane
	glm::vec3 leftCenter = nearCenter - side * nearWidthHalf;
	glm::vec3 leftNormal = glm::cross(glm::normalize(leftCenter - eye_), up);
	frustum_.planes[4].set(leftNormal, leftCenter);

	// right plane
	glm::vec3 rightCenter = nearCenter + side * nearWidthHalf;
	glm::vec3 rightNormal = glm::cross(up, glm::normalize(rightCenter - eye_));
	frustum_.planes[5].set(rightNormal, rightCenter);

	// 8 corners
	glm::vec3 nearTopLeft     = nearCenter + up * nearHeightHalf - side * nearWidthHalf;
	glm::vec3 nearTopRight    = nearCenter + up * nearHeightHalf + side * nearWidthHalf;
	glm::vec3 nearBottomLeft  = nearCenter - up * nearHeightHalf - side * nearWidthHalf;
	glm::vec3 nearBottomRight = nearCenter - up * nearHeightHalf + side * nearWidthHalf;

	glm::vec3 farTopLeft      = farCenter + up * farHeightHalf - side * farWidthHalf;
	glm::vec3 farTopRight     = farCenter + up * farHeightHalf + side * farWidthHalf;
	glm::vec3 farBottomLeft   = farCenter - up * farHeightHalf - side * farWidthHalf;
	glm::vec3 farBottomRight  = farCenter - up * farHeightHalf + side * farWidthHalf;

	frustum_.corners[0] = nearTopLeft;
	frustum_.corners[1] = nearTopRight;
	frustum_.corners[2] = nearBottomLeft;
	frustum_.corners[3] = nearBottomRight;
	frustum_.corners[4] = farTopLeft;
	frustum_.corners[5] = farTopRight;
	frustum_.corners[6] = farBottomLeft;
	frustum_.corners[7] = farBottomRight;

	// bounding box
	frustum_.bbox.min = glm::vec3(std::numeric_limits<float>::max());
	frustum_.bbox.max = glm::vec3(std::numeric_limits<float>::min()); // TODO: lowest() ?
	for (auto& corner : frustum_.corners) {
		frustum_.bbox.min.x = std::min(frustum_.bbox.min.x, corner.x);
		frustum_.bbox.min.y = std::min(frustum_.bbox.min.y, corner.y);
		frustum_.bbox.min.z = std::min(frustum_.bbox.min.z, corner.z);

		frustum_.bbox.max.x = std::max(frustum_.bbox.max.x, corner.x);
		frustum_.bbox.max.y = std::max(frustum_.bbox.max.y, corner.y);
		frustum_.bbox.max.z = std::max(frustum_.bbox.max.z, corner.z);
	}
}
看下他的客户端ViewManager::drawFrame,说明是在每一帧绘制时直接调用的.
int ViewManager::drawFrame() {
    orbitController_->update();
    camera_->update();
    ...
参考
[1] Shirley P .Fundamentals of Computer Graphics[M]. 2015.
[2] 计算机图形:三维观察之投影变换

 浙公网安备 33010602011771号