
HDevEngine in .NET Applications MultiThreading
Basics
To use HDevEngine in Visual Studio .NET, you must
- add a reference to the HALCON/.NET assembly, either by adding an instance of HSmartWindowControlto the form or by adding the reference directly via the Solution Explorer
- add a reference to the HDevEngine/.NET assembly HDevEngine/.NET DLL via the Solution Explorer
- specify the namespace with the following line
using HalconDotNet;Executing an HDevelop Program
In this section, we explain how to load and execute an HDevelop program with HDevEngine. The code fragments checks the boundary of a plastic part for fins.

Step 1: Initialization
First, we create a global instance of the main HDevEngine class HDevEngine.
private HDevEngine MyEngine = new HDevEngine();Upon loading the form, we store the path to the HDevelop program and set the external procedure pathwith the method SetProcedurePath(Note that the latter is only necessary if the HDevelop program calls external procedures.):
string ProgramPathString;

private void ExecProgramForm_Load(object sender, System.EventArgs e)
{
    var halconExamples = HSystem.GetSystem("example_dir");
    var ProcedurePath  = halconExamples + @"\hdevengine\procedures";

    ProgramPathString  = halconExamples + @"\hdevengine\hdevelop\fin_detection.hdev";

    MyEngine.SetProcedurePath(ProcedurePath);
}
Step 2: Load Program
When you load the HDevelop program, an instance of the class HDevProgram is created. Furthermore, an instance of HDevProgramCall is created for later use. Note that the working directory will be changed if a program is loaded.
Exceptions occurring in the constructors, e.g., because the file name was not specified correctly, are handled with the standard C# error handling mechanism:
private void LoadBtn_Click(object sender, System.EventArgs e)
{
    try
    {
        var Program = new HDevProgram(ProgramPathString);
        ProgramCall = new HDevProgramCall(Program);
    }
    catch (HDevEngineException Ex)
    {
        MessageBox.Show(Ex.Message, "HDevEngine Exception");
        return;
    }
    catch
    {
        return;
    }
}
Step 3: Execute Program
private void ExecuteBtn_Click(object sender, System.EventArgs e)
{

    try
    {
        ProgramCall.Execute();
    }
    catch (HDevEngineException Ex)
    {
        MessageBox.Show(Ex.Message, "HDevEngine Exception");
    }
}
Step 4: Get Results
Note that program variables can only be accessed when the program has terminated.
double FinArea;
FinArea = ProgramCall.GetCtrlVarTuple("FinArea");
Window.SetTposition(150, 20);
Window.WriteString("Fin Area: ");
Executing HDevelop Procedures
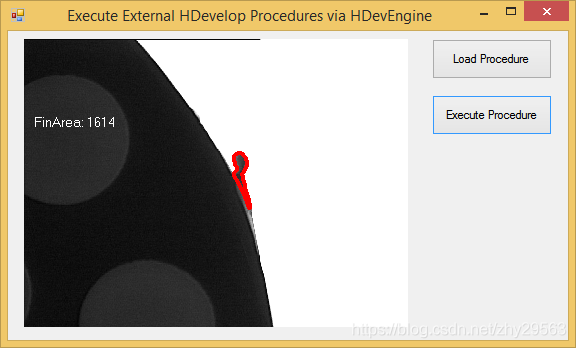
Executing an External HDevelop Procedure
How to load and execute an external HDevelop procedure with HDevEngine. In contrast to the previous example, the result display is programmed explicitly instead of relying on the internal display operators.
Step 1: Initialization
As when executing an HDevelop program, we create a global instance of the main HDevEngine class HDevEngine and set the external procedure path with the method SetProcedurePath upon loading the form. If the external procedure is from a procedure library, the external procedure path may include the name of the library file.
private HDevEngine MyEngine = new HDevEngine();
private void ExecExtProcForm_Load(object sender, System.EventArgs e)
{
    var ProcedurePath = halconExamples + @"\hdevengine\procedures";
    ...
    MyEngine.SetProcedurePath(ProcedurePath);
}
For calling the HALCON operators, we declare a global variable of the class HWindow for the underlying HALCON window;
private HWindow Window;

private void WindowControl_Load(object sender, EventArgs e)
{
    Window = WindowControl.HalconWindow;

    Window.SetDraw("margin");
    Window.SetLineWidth(4);
}
Step 2: Load Procedure
private void LoadBtn_Click(object sender, System.EventArgs e)
{
    try
    {
        var Procedure = new HDevProcedure("detect_fin");
        ProcCall      = new HDevProcedureCall(Procedure);
    }
    catch (HDevEngineException Ex)
    {
        MessageBox.Show(Ex.Message, "HDevEngine Exception");
    }
}
Executing a procedure consists of multiple steps. First, we load an example image sequence:
private void ExecuteBtn_Click(object sender, System.EventArgs e)
{
    var Framegrabber = new HFramegrabber();
    Framegrabber.OpenFramegrabber("File",1,1,0,0,0,0,"default",-1,"default",-1,"default","fin.seq","default",-1,-1);
Step 3: Set Input Parameters Of Procedure
It expects an image as (iconic) input parameter and returns the detected fin region and its area as iconic and control output parameter, respectively:procedure detect_fin (Image: FinRegion: : FinArea)
HImage Image = new HImage();
HRegion FinRegion;
HTuple FinArea;

for (int i=0; i<=2; i++)
{
    Image.GrabImage(Framegrabber);
    Image.DispObj(Window);

    ProcCall.SetInputIconicParamObject("Image", Image);
Step 4: Execute Procedure
ProcCall.Execute();Step 5: Get Output Parameters Of Procedure
FinRegion = ProcCall.GetOutputIconicParamRegion("FinRegion");
FinArea   = ProcCall.GetOutputCtrlParamTuple("FinArea");
Step 6: Display Results Of Procedure
    Image.DispObj(Window);
    Window.SetColor("red");
    Window.DispObj(FinRegion);
    Window.SetColor("white");
    Window.SetTposition(150, 20);
    Window.WriteString("FinArea: " + FinArea.D);
}
Executing Local and External HDevelop Procedures
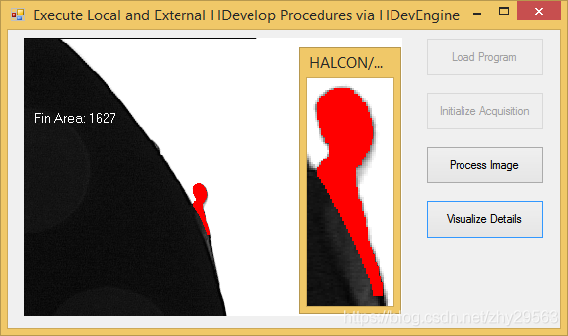
Local and external procedures are created and executed in exactly the same way. The only difference is that in order to use a local procedure, you must load the program it is contained in, whereas to load external procedures you must set the procedure path.
private HDevProcedureCall InitAcqProcCall;
private HDevProcedureCall ProcessImageProcCall;
private HDevProcedureCall VisualizeDetailsProcCall;

private void ExecProceduresForm_Load(object sender, System.EventArgs e)
{
    string ProcedurePath = halconExamples + @"\hdevengine\procedures";
    ...
    MyEngine.SetProcedurePath(ProcedurePath);
}
private void LoadBtn_Click(object sender, System.EventArgs e)
{
try
{
var Program = new HDevProgram(ProgramPathString);
var InitAcqProc = new HDevProcedure(Program, "init_acquisition");
var ProcessImageProc = new HDevProcedure(Program, "detect_fin");
var VisualizeDetailsProc = new HDevProcedure(Program, "display_zoomed_region");
InitAcqProcCall = new HDevProcedureCall(InitAcqProc);
ProcessImageProcCall = new HDevProcedureCall(ProcessImageProc);
VisualizeDetailsProcCall = new HDevProcedureCall(VisualizeDetailsProc);
...
}One of the procedures opens the image acquisition device. It returns the corresponding handle, which we store in an instance of the class HFramegrabber.
HFramegrabber Framegrabber;

private void InitAcqBtn_Click(object sender, System.EventArgs e)
{
    InitAcqProcCall.Execute();
    Framegrabber = new HFramegrabber(InitAcqProcCall.GetOutputCtrlParamTuple("AcqHandle"));
    ...
}
As in the previous example, the results of image processing are displayed “manually” by calling HALCON/.NET operators. In contrast, when you click the button Visualize Details, an HDevelop procedure is executed that zooms onto the extracted fin. For this, we pass an implementation of HDevelop's internal display operators and remove it again after the procedure has been executed.
private void VisualizeDetailsBtn_Click(object sender, System.EventArgs e)
{
    MyEngine.SetHDevOperators(MyHDevOperatorImpl);
    VisualizeDetailsProcCall.SetInputIconicParamObject("Image", Image);
    VisualizeDetailsProcCall.SetInputIconicParamObject("Region", FinRegion);
    VisualizeDetailsProcCall.SetInputCtrlParamTuple("ZoomScale", 2);
    VisualizeDetailsProcCall.SetInputCtrlParamTuple("Margin", 5);
    VisualizeDetailsProcCall.Execute();
    MyEngine.SetHDevOperators(null);
}
The instance of the implementation class is initialized with the HALCON window of the form.
private HDevOpMultiWindowImpl MyHDevOperatorImpl;

private void WindowControl_Load(object sender, EventArgs e)
{
    Window = WindowControl.HalconWindow;
    ...
    MyHDevOperatorImpl = new HDevOpMultiWindowImpl(Window);
}
If the class HDevOpMultiWindowImpl is initialized without specifying the window, a new HALCON window will open automatically to emulate the behavior of HDevelop.
Display
HDevOpFixedWindowImpl directs all display operators to a single graphics window.
HDevOpMultiWindowImpl can handle multiple graphics windows. You can pass an arbitrary number of graphics windows in the constructor; if the HDevelop program or procedure uses more than them, HDevEngine opens additional free-floating windows.
Please note that these classes must not be used in multithreaded applications because they are not reentrant. If you need a reentrant version, please discuss your application requirements with your local distributor.
private void WindowControl_Load(object sender, EventArgs e)
{
    Window = WindowControl.HalconWindow;

    MyEngine.SetHDevOperators(new HDevOpMultiWindowImpl(Window));
}
If your application has special display requirements that are not satisfied by the two classes, you can provide your own implementation of the display operators. Please note that currently you cannot use any form of display operator implementation with Mono.
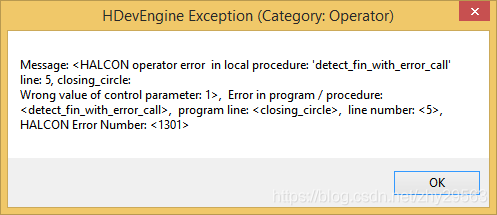
Error Handling

private void DisplayException(HDevEngineException Ex)
{
    string FullMessage = "   Message: <"                      + Ex.Message + ">" +
                         ",  Error in program / procedure: <" + Ex.ProcedureName + ">" +
                         ",  program line: <"                 + Ex.LineText + ">" +
                         ",  line number: <"                  + Ex.LineNumber + ">" +
                         ",  HALCON Error Number: <"          + Ex.HalconError + ">";

    string Title = "HDevEngine Exception (Category: " + Ex.Category.ToString() + ")";

    MessageBox.Show(FullMessage, Title);
}


try
{
    var Program = new HDevProgram(ProgramPathString);
    new HDevProgramCall(Program);
}
catch (HDevEngineException Ex)
{
    DisplayException(Ex);
}
Load a non-existing HDevelop program.

Input parameter is not initialized
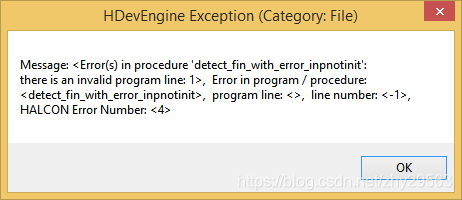
Parameter is not valid
Creating Multithreaded Applications
In the following, we briefly list the most important rules to observe when creating multithreaded HDevEngine applications. When multiple threads execute HDevelop programs in parallel, each thread must create its own instance of the corresponding HDevProgramCall.
External procedure path and the implementation of HDevelop's display operators are always set globally for all instances of HDevEngine. We recommend to set them via a separate HDevEngine instance to keep the code more readable.
Because the implementation of HDevelop's display operators can only be set globally, it must be thread-safe and reentrant.
Executing a Procedure in Parallel by Multiple Threads
It consists of four threads: The main thread is in charge of the graphical user interface (GUI).
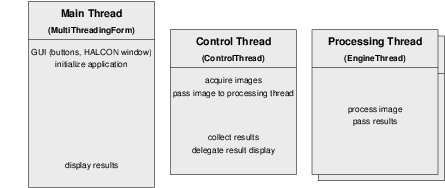
The main thread also initializes the application by training the shape model via an HDevelop procedure and by creating and initializing the other three threads: two processing threads and the so-called control thread, whichs controls the two processing threads.
The control thread acquires the images and passes them to the processing threads, which then process the images and pass back the results. The control thread collects the results, but does not display them itself, because all activities in the HALCON window must be performed by the thread that created.
Initialization
private void InitButton_Click(object sender, System.EventArgs e)
- Switch off automatic operator parallelization
- HOperatorSet.SetSystem("parallelize_operators", "false");
- First, the automatic operator parallelization is switched off, otherwise the two mechanisms would use more than the available number of cores / processors and thus slow down the application instead of speeding it up. If you have a system with more than two cores or processors, you can consider to allocate some of them to the automatic operator parallelization as described in section.
- Set external procedure path
- Then, we create an instance of HDevEngine and set the path for searching the HDevelop procedures. If the external procedure is from a procedure library, the external procedure path may include the name of the library file.
  HDevEngine         MyEngine = new HDevEngine();
  string ProcedurePath = halconExamples + @"\hdevengine\procedures";
  ...
MyEngine.SetProcedurePath(ProcedurePath);- Train the shape model
 HDevProcedureCall  ProcTrain;

  HDevProcedure Procedure = new HDevProcedure("train_shape_model");
  ProcTrain = new HDevProcedureCall(Procedure);
ProcTrain.Execute();- Store the model data
public HTuple           ModelID;
public HXLD             ModelContours;

ModelID = ProcTrain.GetOutputCtrlParamTuple("ModelID");
ModelContours = ProcTrain.GetOutputIconicParamXld("ModelContours");- Create and initialize the processing engines
public class EngineThread
{
    Thread WorkerObject = null;
    HDevProcedureCall ProcCall;
    HTuple ModelID;
    HXLD ModelContours;
    public AutoResetEvent EngineIsReady;

    public EngineThread(MultiThreadingForm mainForm)
    {
        ModelID = mainForm.ModelID;
        ModelContours = mainForm.ModelContours;
        EngineIsReady = new AutoResetEvent(true);
    }
EngineThread  WorkerEngine1;        // processing thread
EngineThread  WorkerEngine2;        // processing thread
AutoResetEvent Engine1Ready;
AutoResetEvent Engine2Ready;

WorkerEngine1 = new EngineThread(this);
WorkerEngine1.Init();
Engine1Ready = WorkerEngine1.EngineIsReady;

WorkerEngine2 = new EngineThread(this);
WorkerEngine2.Init();
Engine2Ready = WorkerEngine2.EngineIsReady;
An EngineThread initializes itself by creating the procedure call for detecting the caps in the images. Because the input parameters of the procedure that concern the shape model are the same for each call, they can be set once in advance (file: EngineThread.cs).
public void Init()
{
  HDevProcedure Procedure = new HDevProcedure("detect_shape");
  ProcCall = new HDevProcedureCall(Procedure);
  ProcCall.SetInputCtrlParamTuple("ModelID", ModelID);
  ProcCall.SetInputIconicParamObject("ModelContours", ModelContours);
}- Initialize image acquisition
Finally, we initialize the image acquisition. The handle is stored in a variable of the form, so that the control thread can access it (file: MultiThreadingForm.cs).
private HFramegrabber   AcqHandle;
string ImagePath = halconExamples + "/images/cap_illumination";
AcqHandle = new HFramegrabber("File", 1, 1, 0, 0, 0, 0, "default", -1,"default", -1, "default", ImagePath, "default", -1, -1);
Image Processing
When you click the Run button, the application starts to process images in a loop.
- Starting the processing threads and the control thread
First, the main thread starts the processing engines (file: MultiThreadingForm.cs).
private void RunButton_Click(object sender, System.EventArgs e)
{
  WorkerEngine1.Run();
  WorkerEngine2.Run();
The corresponding method creates and starts their thread and sets the “ready” signal (file: EngineThread.cs).
public void Run()
{
  EngineIsReady.Set();
  WorkerObject = new Thread(new ThreadStart(Process));
  WorkerObject.Start();
}
Then, the main thread starts the control thread (file: MultiThreadingForm.cs):
ControlThread = new Thread(new ThreadStart(Run));
ControlThread.Start();- Triggering the processing threads from the control thread
The control thread's action is contained in the method Run (file: MultiThreadingForm.cs). As long as the Stop is not pressed (please take a look at the project's code for more information), it waits until one of the processing engine is ready.
EngineThread WorkerEngine;         // variable to switch between processing threads

public void Run()
{
    HImage Image;

    while (!StopEventHandle.WaitOne(0, true))
    {
        if (Engine1Ready.WaitOne(0, true))
            WorkerEngine = WorkerEngine1;
        else if (Engine2Ready.WaitOne(0, true))
            WorkerEngine = WorkerEngine2;
        else
            continue;

        Image = AcqHandle.GrabImageAsync(-1);
        WorkerEngine.SetImage(Image);
Then, it acquires the next image and passes it to the engine, which stores it in a member variable (file: EngineThread.cs).
private HImage          InputImage = null;

public void SetImage(HImage Img)
{
  InputImage = Img;
}
Processing the image
In their action method (Process), the processing threads wait for the image to be set (file: EngineThread.cs). The actual image processing is performed by the HDevelop procedure, passing the image as input parameter.
public void Process()
{
    while (!DelegatedStopEvent.WaitOne(0, true))
    {
        if (InputImage == null)
            continue;

        ProcCall.SetInputIconicParamObject("Image", InputImage);
ProcCall.Execute();- Passing the results to the control thread
To pass the results, a class is defined that stores the relevant data: the processed image and the position, orientation, and the contours of the found cap.
public class ResultContainer
{
  public HImage  InputImage;
  public HXLD    FoundContours;
  public double  Row;
  public double  Column;
  public double  Angle;
}
After executing the procedure, the processing thread accesses its results and stores them in a new instance of the result class (“result container”), together with the processed image.
ResultContainer Result;
HTuple          ResultTuple;

Result = new ResultContainer();
Result.InputImage = InputImage;
Result.FoundContours = ProcCall.GetOutputIconicParamXld("ResultObject");
ResultTuple = ProcCall.GetOutputCtrlParamTuple("ResultData");
Result.Row = ResultTuple[0];
Result.Column = ResultTuple[1];
Result.Angle = ResultTuple[2];
The processing thread then passes the result container to the control thread by appending it to a list.
ResultMutex.WaitOne();
ResultList.Add(Result);
ResultMutex.ReleaseMutex();
This list is a member variable of the main thread (file: MultiThreadingForm.cs). It is protected by a mutex so that the threads can access it safely.
public ArrayList                ResultList;
public Mutex                    ResultDataMutex;

public MultiThreadingForm()
{
  ResultDataMutex   = new Mutex();
  ResultList = new ArrayList();
}
The processing threads store references to the list and to the mutex in own member variables (file: EngineThread.cs).
ArrayList               ResultList;
Mutex                  ResultMutex;

public EngineThread(MultiThreadingForm mainForm)
{
  ResultList        = mainForm.ResultList;
  ResultMutex        = mainForm.ResultDataMutex;
}
“Ready again”
Finally, the processing thread signals that it is ready for the next image by setting the corresponding event and by setting the input image to null.
InputImage = null;
this.EngineIsReady.Set();
Result Display- Checking whether new results are available
Let's return to the action method (Run) of the control thread (file: MultiThreadingForm.cs). After triggering a processing thread by passing the image to process, it checks whether the result list contains new items.
int    Count = -1;

ResultDataMutex.WaitOne();
Count = ResultList.Count;
ResultDataMutex.ReleaseMutex();
Delegating the display
The control thread does not perform the display of results itself but delegates it to the main thread (running the form) with the method Invoke.
for( ;Count > 0;Count--)
  Invoke(DelegatedDisplay);
The necessary members are defined by the form.

delegate void  FuncDelegate();
FuncDelegate   DelegatedDisplay;

public MultiThreadingForm()
{
  DelegatedDisplay = new FuncDelegate(DisplayResults);
}
Note that, since HALCON 12, all HALCON visualization operators are automatically delegated to the correct thread as described in chapter section “Threading Issues with Graphics”.
- Displaying the results
The actual display is performed by the method DisplayResults. Each time it is called, it removes an item from the result list and displays the processed image with the contours of the found cap. Then, it frees the corresponding HALCON -internal memory.
public void DisplayResults()
{
  ResultDataMutex.WaitOne();
  Result = (ResultContainer) ResultList[0];
  ResultList.Remove(Result);
  ResultDataMutex.ReleaseMutex();

  Window.ClearWindow();
  Window.DispImage(Result.InputImage);
  Window.DispObj(Result.FoundContours);

  Result.InputImage.Dispose();
  Result.FoundContours.Dispose();
}
Executing Multiple Procedures in Parallel by Multiple Threads
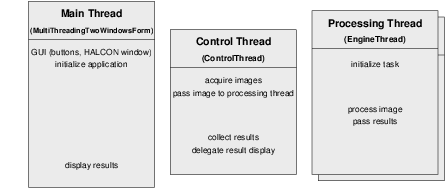
In contrast to the previous section, the example application MultiThreadingTwoWindows presented here executes different HDevelop procedures (tasks) in parallel by two threads. One task is to find bottle caps using shape-based matching, the other to read ECC 200 data codes.
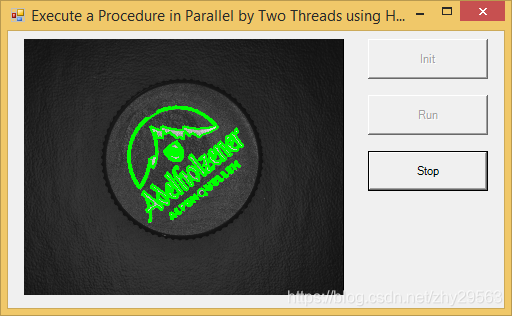
Figure shows an overview of the structure of the application. Like the application described in the previous section, it consists of four threads: The main thread (i.e., the form) is in charge of the graphical user interface (GUI), which is depicted in figure. It consists of a HALCON window for the display of results and buttons to initialize, start, and stop the application.
The main thread also initializes the application by creating and initializing the other three threads: two processing threads and the so-called control thread, whichs controls the two processing threads. In contrast to the previous application, here the processing threads initialize the image processing tasks by training the shape model and the data code model, respectively, via HDevelop procedures.
The control thread acquires the images and passes them to the processing threads, which then process the image and pass back the results. The control thread collects the results, but does not display them itself, because all activities in the HALCON window must be performed by the thread that created it, i.e., the main thread. In contrast to the previous application the results of the two tasks are displayed in two separate windows.
Below, we take a closer look at the corresponding code, restricting ourselves, however, to the parts that are diferent to the previous application.

Initialization
As in the previous example, the application is initialized in the event handler of the Init button (file: MultiThreadingTwoWindowsForm.cs).
- Create and initialize the processing engines
The processing engines are created and initialized similarly to the previous example, with some exceptions: First, the shape and the data code model are now trained by the processing threads instead of the control thread (see the step below). Secondly, the processing engines now also have a variable that indicates “their” HALCON window (file: EngineThread.cs).
public class EngineThread
{
  ...
  public int                      WindowIndex = -1;
  ...
The control thread sets this variable after creating the engines (file:MultiThreadingTwoWindowsForm.cs).
private void InitButton_Click(object sender, System.EventArgs e)
{
  ...
  WorkerEngine1.WindowIndex = 1;
  ...
WorkerEngine2.WindowIndex = 2;- Train the shape and data code model
The training of the shape and data code model is now performed by the initialization method of the processing threads, which now has a parameter that specifies the task of the processing thread (file: MultiThreadingTwoWindowsForm.cs).
WorkerEngine1.Init("shape");
...
WorkerEngine2.Init("datacode");
The HDevelop procedures for training the models and for performing the image processing have similar names for the two tasks, so that their names can be generated automatically (file: EngineThread.cs). The task name itself is stored in a variable of the class EngineThread.
public class EngineThread
{
  HDevProcedureCall       ProcCall;
  string                  Task;
  HTuple                  ModelID;
  HXLD                    ModelContours;
  ...

public void Init(string Task)
{
  string             TrainMethod = "train_" + Task + "_model";
  string             ProcessingMethod = "detect_" + Task;
  HDevProcedureCall  ProcTrain;

  this.Task = Task;
Then, the model of the shape or datacode, respectively, is trained by executing the corresponding HDevelop procedure and the returned model data is stored in variables of the class.
HDevProcedure Procedure = new HDevProcedure(TrainMethod);
  ProcTrain = new HDevProcedureCall(Procedure);
  ProcTrain.Execute();
  ModelID = ProcTrain.GetOutputCtrlParamTuple("ModelID");
  if (Task.Equals("shape"))
  {
    ModelContours = ProcTrain.GetOutputIconicParamXld("ModelContours");
}- Store the model data
Finally, those input parameters of the image processing procedure that are the same for each call are set (file: EngineThread.cs).
 HDevProcedure Procedure = new HDevProcedure(ProcessingMethod);
  ProcCall = new HDevProcedureCall(Procedure);
  ProcCall.SetInputCtrlParamTuple("ModelID", ModelID);
  if (Task.Equals("shape"))
  {
    ProcCall.SetInputIconicParamObject("ModelContours", ModelContours);
}- Initialize image acquisition
The two image processing tasks are performed in different images, therefore, two image acquisition devices are opened by the main thread (file:MultiThreadingTwoWindowsForm.cs, code not shown).
Image Processing
- Triggering the processing threads
The control thread's action is contained in the method Run (file:MultiThreadingTwoWindowsForm.cs). As long as the Stop is not pressed, it checks whether the processing engines are ready and, if this is the case, acquires and passes images..
public void Run()
{
  HImage  Image;

  while (!StopEventHandle.WaitOne(0,true))
  {
    if (Engine1Ready.WaitOne(0,true))
    {
      Image = AcqHandle1.GrabImageAsync(-1);
      WorkerEngine1.SetImage(Image);
    }
    if (Engine2Ready.WaitOne(0,true))
    {
      Image = AcqHandle2.GrabImageAsync(-1);
      WorkerEngine2.SetImage(Image);
}- Passing the results to the control thread
The class storing the result data differs significantly from the one in the previous example: It now also contains a variable that indicates the window in which to display the results and a flag that shows whether the processing was successful. Because the processing results differ between the two tasks, they are encapsulated in a tuple (file: EngineThread.cs).
public class ResultContainer
{
  public int     WindowIndex;   // 1 -> shape, 2 -> datacode
  public HImage  InputImage;
  public HXLD    FoundContours;
  public HTuple  ResultData;
  public bool    DetectionSuccessful;
}
After executing the procedure, the processing thread accesses its results and stores them in a new instance of the result container, together with the processed image and the window index.
public void Process()
{
  ResultContainer  Result;

  Result = new ResultContainer();
  ...
  Result.InputImage    = InputImage;
  DetectionSuccessful = ProcCall.GetOutputCtrlParamTuple("DetectionSuccessful").S;
  if (DetectionSuccessful.Equals("true"))
  {
    Result.DetectionSuccessful = true;
    Result.FoundContours = ProcCall.GetOutputIconicParamXld("ResultObject");
    Result.ResultData    = ProcCall.GetOutputCtrlParamTuple("ResultData");
  }
  else
  {
    Result.DetectionSuccessful = false;
  }
  Result.WindowIndex = WindowIndex;
Result Display
As in the previous example, the display of results is performed by the main thread in the method ResultDisplay (file: MultiThreadingTwoWindowsForm.cs). The main difference is that the display now is switched between the two HALCON windows, based on the variable in the result container.
public void DisplayResults()
{
  HWindow  Window;

  if (Result.WindowIndex == 1)
  {
    Window = Window1;
  }
  else
  {
    Window = Window2;
  }
Furthermore, the display method now checks the success of the image processing to avoid accessing non-existing result elements. For both tasks, the resulting contours, i.e., the found shape or data code region, respectively, are displayed. For the data code task, also the read code is displayed.
Window.ClearWindow();
  Window.DispImage(Result.InputImage);
  if (Result.DetectionSuccessful)
  {
    Window.DispObj(Result.FoundContours);
    // additional display for data code result: code
    if (Result.WindowIndex == 2)
    {
      Row = (int) Result.ResultData[0].D;
      Col = (int) Result.ResultData[1].D;
      Window.SetTposition(Row,Col);
      Window.WriteString((string) Result.ResultData[2].S);
    }
  }
  else
  {
    Window.SetColor("red");
    Window.SetTposition(20, 20);
    Window.WriteString("Detection failed!");
    Window.SetColor("green");
  }
Executing an HDevelop Program with Vector Variables
The example application UseVectorVariables shows how to load and execute an HDevelop example that contains vector variables in HDevengine/C#. In the example two vectors are used for processing: one containing the input images and one containing scaling factors. When executing the program the gray values of the input images are scaled according to the scaling factors. Please have a look at the source file UseVectorVariablesForm.cs for more details on how to work with vector variables in HDevengine/.NET.
Using the Just-in-time Compiler with HDevEngine/.NET
The just-in-time compilation of procedures needs to be enabled in your instance of the HDevEngine class:
...
Engine = new HDevEngine();

// enable or disable execution of compiled procedures
Engine.SetEngineAttribute("execute_procedures_jit_compiled", "true");
Procedures (and procedures referenced by it) are compiled at the moment a corresponding instance of HDevProcedureCall or HDevProgramCall is created.
You can also explicitly pre-compile all used procedures of a HDevelop program or procedure using the method CompileUsedProcedures of HDevProgram or HDevProcedure, respectively.
In the following example, all used procedures of a procedure call are just-in-time compiled:
Program = new HDevProgram(ProgramPathString);

// Get local procedure
Proc = new HDevProcedure(Program, name);
...
Proc.CompileUsedProcedures();- 我做的各种程序们
- 小y的QQ:28657321 (欢迎交流)

 浙公网安备 33010602011771号