机器人仿真笔记[6]-基于视觉大模型的无人机室内自主侦察
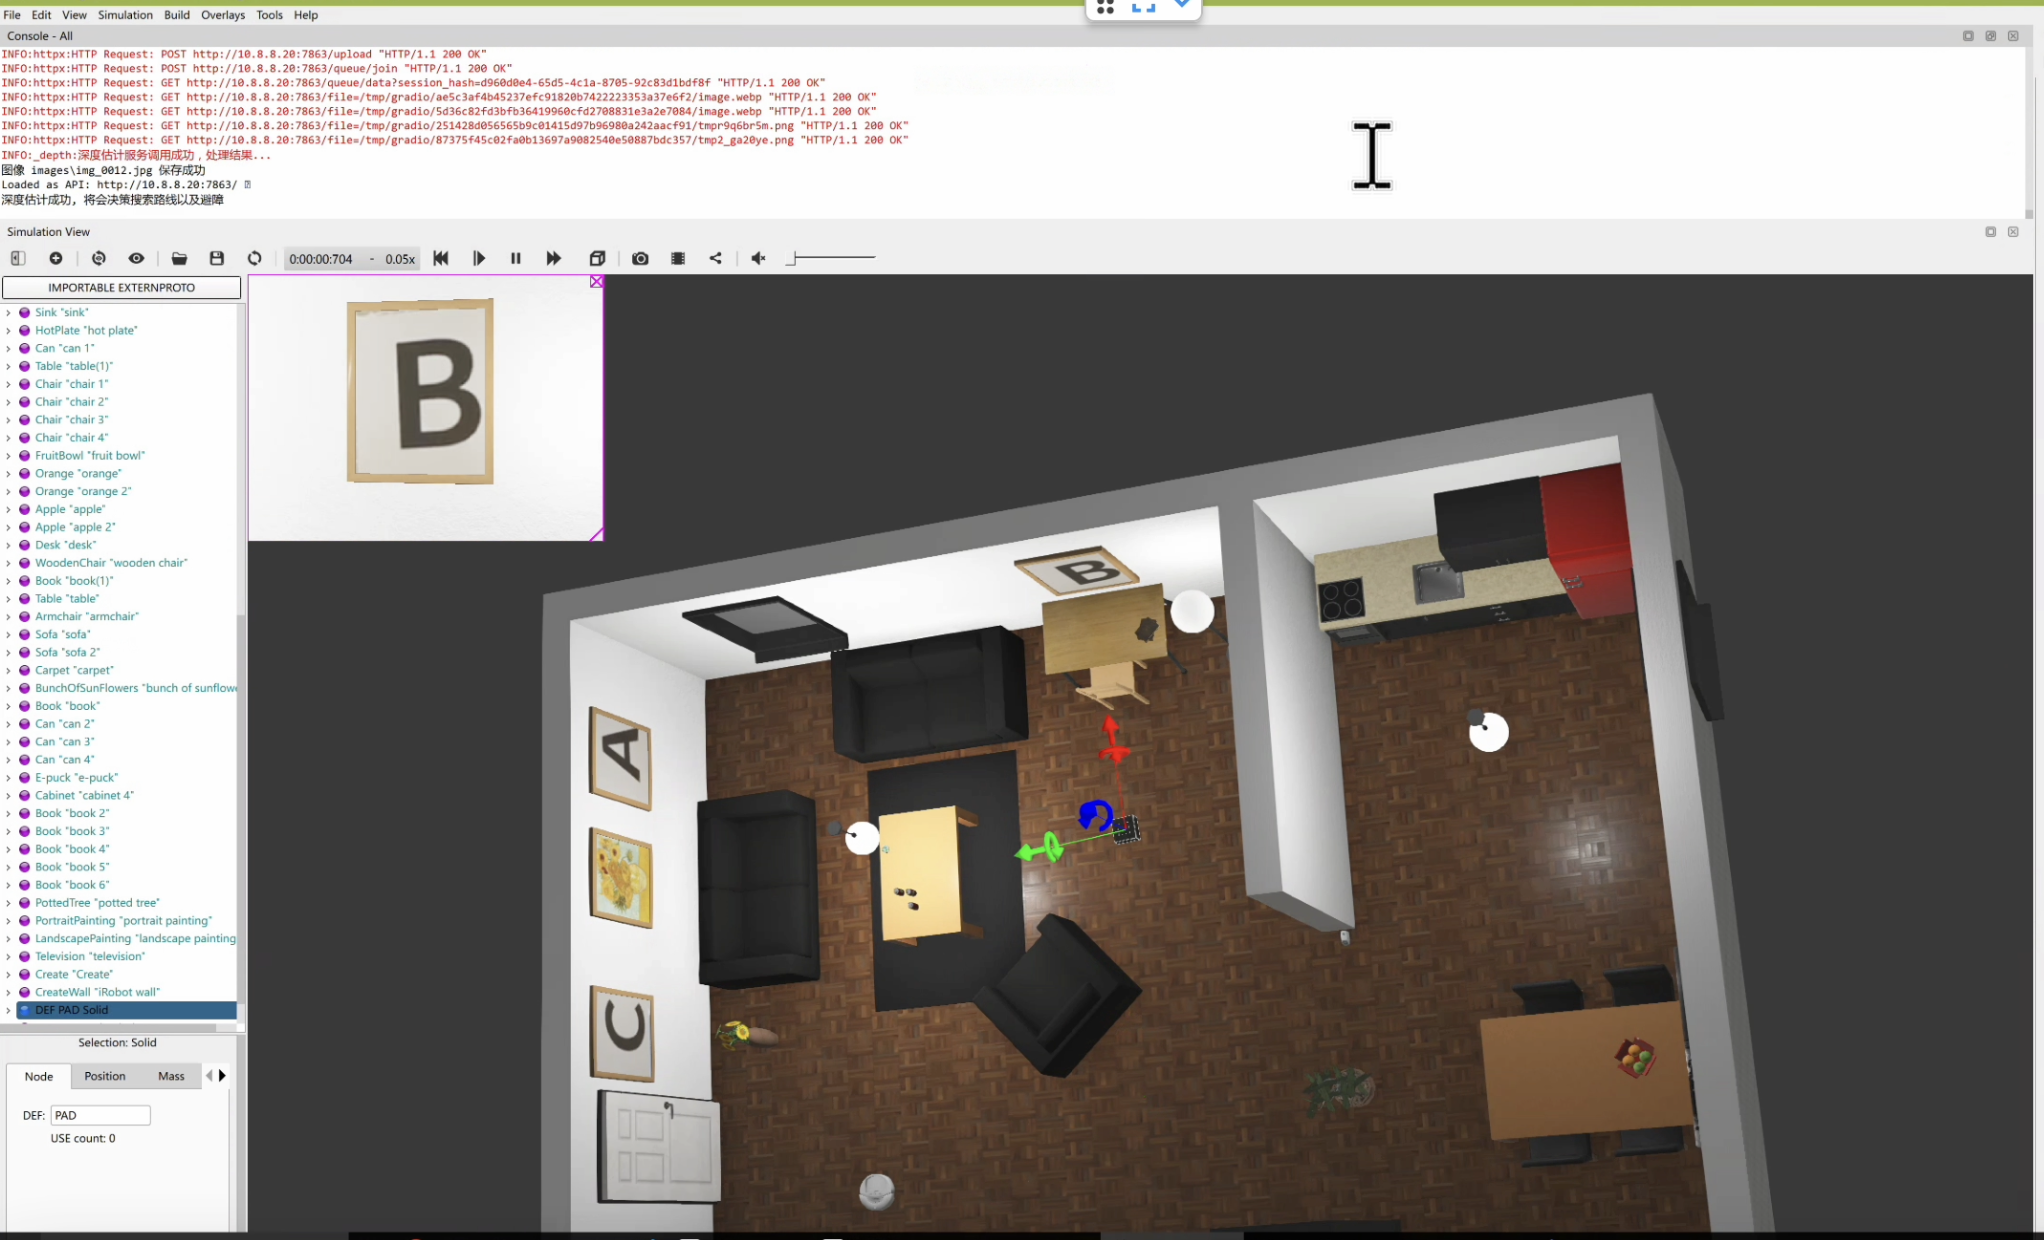
![机器人仿真笔记[6]-基于视觉大模型的无人机室内自主侦察](https://img2024.cnblogs.com/blog/1048201/202504/1048201-20250425095823953-1185820161.png) 基于视觉语言大模型(VLM)的无人机室内自主侦察仿真.实现无人机自主起飞, 避开障碍物以及穿过门洞进入第二个房间, 移动到字母`B`前面发射激光.
基于视觉语言大模型(VLM)的无人机室内自主侦察仿真.实现无人机自主起飞, 避开障碍物以及穿过门洞进入第二个房间, 移动到字母`B`前面发射激光.
摘要
基于视觉语言大模型(VLM)的无人机室内自主侦察仿真.实现无人机自主起飞, 避开障碍物以及穿过门洞进入第二个房间, 移动到字母B前面发射激光.
关键词
ros;vlm;aircraft;xtdrone;ocr;auto;
关键信息
项目源码:[https://github.com/ByeIO/bye.orbslam3.rs/tree/dev1/crates/seekslam_webots]
项目配置:
[project]
name = "mission1"
version = "0.0.1"
description = "测试pid悬停"
readme = "README.md"
requires-python = ">=3.13"
dependencies = [
    # 异步处理
    "asyncio>=3.4.3",
    # 控制算法
    "control>=0.10.1",
    # gradio客户端
    "gradio-client>=1.8.0",
    # 线性代数
    "numpy>=2.2.5",
    # ollama客户端
    "ollama>=0.4.8",
    # 图像处理
    "opencv-python>=4.11.0.86",
    # 图像处理
    "pillow>=11.2.1",
    # 单元测试
    "pytest>=8.3.5",
    # 科学计算
    "scipy>=1.15.2",
    # webots接口
    "webots>=0.0.1",
    # pid算法封装
    "simple-pid>=2.0.1",
    # 网页代码编辑器
    "jupyter>=1.1.1",
]
整体架构
使用docker封印各个复杂算法模块, 实现函数式调用.
-
核心算法:
-
核心传感器:
- 10轴传感器(加速度计+陀螺仪+磁力计+气压计)
- 单目摄像头
-
核心执行器
- 电机x4
- 激光器
详细描述
- 无人机起飞前初始化传感器及算法模块, 预热ollama模型
- 起飞后先悬停稳定, 然后缓慢环绕四周侦察并将图片送入建图模块进行初次室内建图
- 建图完成后调用深度估计模块估计四周的深度信息, 然后直接将深度图发布视觉大模型模块进行下一步方向的决策
- 决策完成后使用函数调用大模型调用封装的动作函数进行移动
- 使用
关键途径点修正机器人轨迹 - 相机模块以1Hz速率向目标识别模块发布信息, 目标识别模块识别到目标后通知决策模块进行移动
- 决策模块在到达目标前方后使用深度估计模块估计与目标距离, 到达有效攻击范围后调用函数打开激光
- 原路返回然后降落
核心代码
_ollama.py
# 智慧无人机决策控制系统
# 特点: 接入ollama大模型能力, 实现智能决策
# 功能: 通过视觉大模型识别场景,使用函数调用模型进行多阶段决策和控制
# 攻击目标(与tasks中一致)
_TARGET = "B"
# 系统提示词
_SYSTEM_PROMPT = f"你是一架智慧无人机, 你的任务是找到{_TARGET}并进行攻击, 然后返回到起飞点.你可以通过深度图、OCR识别图、三维重建图进行决策.你可以使用up, down, left, right, forward, backward, rotate, attack函数; 优先使用forward以前进; 函数参数只需要提供数字, 不要带单位.你需要不断地进行思考以应对各种情况."
# 阶段1(起飞后在第一个房间建图后决策)提示词
_PROMPT1 = "现在你在第一个房间起飞了, 悬停在1.5米高度. 刚刚使用三维重建算法对房间进行了建图, 你需要找到通往第二个房间的方向并调用函数移动."
# 阶段2(在两个房间交界处悬停决策)提示词
_PROMPT2 = "你来到了两个房间的交界处, 悬停在1.5米高度, 先侦察一下第二个房间的状况. 刚刚使用深度估计算法获取了朝向面的深度图(通过颜色区分深度), 你需要判断深度信息{_DEPTH_INFO}以判断应该如何前进, 注意避开障碍物.刚刚使用OCR算法识别目标, 结果为{_OCR_RESULT}, 你需要调用函数移动到目标或者前进以继续搜索目标."
# 阶段3(在第二个房间建图后决策)提示词
_PROMPT3 = "刚刚对第二个房间建图成功, 发现目标方位{_OCR_RESULT}, 应该马上调用函数移动到目标进行攻击.移动时注意深度信息进行避障."
# 阶段4(在目标前判断是否攻击)提示词
_PROMPT4 = f"你来到了目标{_TARGET}前面, 在有效攻击范围内, 使用函数对其进行攻击, 然后原路撤离, 回到起飞点降落."
# 对话记录
_CHAT_HISTORY = [{"q":"", "a":""},]
# 视觉大模型
MODEL_VISION = 'minicpm-v:latest'
# 函数调用模型
MODEL_TOOL = 'MFDoom/deepseek-r1-tool-calling:1.5b'
# OLLAMA服务地址
OLLAMA_SERVER = "http://10.8.8.20:11435"
#####################################
# 大模型接口
from ollama import Client
# python版本兼容
from typing_extensions import MutableMapping
# 单元测试
import pytest
# 图像处理
from PIL import Image
# 内置库
import time
import json
import requests
import base64
import io
import os
import sys
import tempfile
#####################################
# 输入: 原图, 深度图, ocr结果
# 输出: 控制指令 up, down, forward, backward, left, right, rotate, attack
class _Ollama():
def __init__(self, robot, controller):
# 初始化ollama客户端
self.client = Client(host=OLLAMA_SERVER)
# 用于函数调用的精简函数集合
self.fn = _Move(robot, controller)
# 添加完成数据的prompt
self.prompt = ["", ]
# 当前决策阶段
self.current_stage = 1
# 对话历史记录
self.chat_history = []
# 起飞前预加载模型
self._preload_models()
#########################################
def _preload_models(self):
"""预加载并保持模型常驻内存"""
try:
print("[系统] 开始预加载AI模型...")
# 预加载视觉模型
requests.post(
f'{OLLAMA_SERVER}/api/generate',
json={'model': MODEL_VISION, 'prompt': ' ', 'keep_alive': -1}
)
# 预加载函数调用模型
requests.post(
f'{OLLAMA_SERVER}/api/generate',
json={'model': MODEL_TOOL, 'prompt': ' ', 'keep_alive': -1}
)
print("[系统] 模型预加载完成")
except Exception as e:
print(f"[错误] 模型预加载失败: {str(e)}")
raise
#########################################
# 对外接口, 预处理prompt
def preprecess_prompt(self, *args, **kwargs):
'''
接受任意类型和任意数量的参数, 转换为str并格式化到prompt中
参数:
*args: 位置参数列表
**kwargs: 关键字参数字典
返回:
str: 格式化后的prompt字符串
'''
prompt_parts = []
# 处理位置参数
for i, arg in enumerate(args):
if isinstance(arg, (list, dict)):
# 对列表和字典使用json格式化
prompt_parts.append(f"参数{i+1}:\n{json.dumps(arg, indent=2, ensure_ascii=False)}")
else:
# 其他类型直接转字符串
prompt_parts.append(f"参数{i+1}: {str(arg)}")
# 处理关键字参数
for key, value in kwargs.items():
if isinstance(value, (list, dict)):
# 对列表和字典使用json格式化
prompt_parts.append(f"{key}:\n{json.dumps(value, indent=2, ensure_ascii=False)}")
else:
# 其他类型直接转字符串
prompt_parts.append(f"{key}: {str(value)}")
# 将所有部分用换行符连接
formatted_prompt = "\n".join(prompt_parts)
# 更新当前prompt
if hasattr(self, 'prompt'):
self.prompt.append(formatted_prompt)
else:
self.prompt = [formatted_prompt]
return formatted_prompt
#########################################
# 对外接口, 每个阶段明确思考内容
def process_stage(self, stage=0, image_base64=None, depth_imgs_base64=None, ocr_result=None):
"""
处理当前任务阶段
参数:
image_base64: 原始视觉图像(图像base64数据)
depth_imgs_base64: 深度估计结果png_base64
ocr_result: OCR识别结果json
返回:
dict: 控制指令
"""
try:
# 根据阶段处理提示词
if stage == 1:
prompt = _PROMPT1
elif stage == 2:
# 将OCR结果格式化进入
prompt = _PROMPT2.replace("_OCR_RESULT", str(ocr_result))
elif stage == 3:
prompt = _PROMPT3.format(_OCR_RESULT=ocr_result)
elif stage == 4:
prompt = _PROMPT4
else:
prompt = f"你是自主侦察无人机, 你的任务是在室内搜索{_TARGET}并攻击."
# 1. 调用视觉模型分析图像
vision_result = []
# 拼接并分析图片
vision_result_plain = self._analyze_ori_and_depth_imgs(image_base64, depth_imgs_base64)
# 将视觉大模型返回的结果添加到prompt中(判断结果非空)
this_prompt = ''
if "_DEPTH_INFO" in prompt and vision_result_plain:
this_prompt = prompt.replace("_DEPTH_INFO", str(vision_result_plain))
else:
print("可能不需要深度信息")
this_prompt = prompt
# 构建对话消息
messages = [
# 角色提示词
{"role": "system", "content": _SYSTEM_PROMPT},
# 对话历史
*self._format_history(),
# 阶段提示词
{"role": "user", "content": this_prompt}
]
# 2. 调用函数调用模型进行决策
response = self.client.chat(
model=MODEL_TOOL,
messages=messages,
tools=[self.fn.up, self.fn.down, self.fn.left,
self.fn.right, self.fn.forward, self.fn.backward,
self.fn.rotate, self.fn.attack],
stream=True
)
# 处理响应
tool_calls = []
full_response = []
for chunk in response:
if 'message' in chunk:
msg = chunk['message']
# 收集文本响应
if 'content' in msg:
print(msg['content'], end='', flush=True)
full_response.append(msg['content'])
# 收集函数调用
if 'tool_calls' in msg:
tool_calls.extend(msg['tool_calls'])
# 执行函数调用
if tool_calls:
print("\n[系统] 执行函数调用...")
for call in tool_calls:
self._execute_function_call(call)
# 更新对话历史
self._update_history(prompt, ''.join(full_response))
# 检查阶段是否完成
self._check_stage_completion()
return {"status": "success", "stage": self.current_stage}
except Exception as e:
print(f"[错误] 决策处理失败: {str(e)}")
return {"status": "error", "message": str(e)}
#########################################
def _execute_function_call(self, call):
"""执行函数调用"""
func_name = call['function']['name']
args = call['function']['arguments']
try:
# 转换参数格式
if isinstance(args, str):
args = json.loads(args.replace("'", '"'))
print(f"[执行] {func_name}({args})")
# 调用对应函数
func = getattr(self.fn, func_name)
if func_name == "attack":
func() # 无参数
else:
# 运动函数参数处理
arg_name = 'cm' if func_name != 'rotate' else 'degrees'
value = args.get(arg_name, 0)
# 处理字符串值中的单位
if isinstance(value, str):
if 'degrees' in value:
value = value.replace('degrees', '').strip()
elif 'cm' in value:
value = value.replace('cm', '').strip()
# 转换为float
value = float(value)
func(value)
except Exception as e:
print(f"[错误] 函数执行失败: {str(e)}")
raise
#########################################
def _format_history(self):
"""格式化对话历史"""
return [
dict_obj
for item in self.chat_history[-20:] # 保留最近20条
for dict_obj in (
{"role": "user", "content": item["q"]},
{"role": "assistant", "content": item["a"]}
)
]
#########################################
def _update_history(self, question, answer):
"""更新对话历史"""
self.chat_history.append({"q": question, "a": answer})
# 打印最后一条记录
print("最新对话记录:", self.chat_history[-1])
#########################################
def _check_stage_completion(self):
"""检查并更新任务阶段"""
# 简单决策树:根据当前状态和响应判断是否进入下一阶段
if self.current_stage == 1 and "move" in str(self.chat_history[-1]["a"]):
pass
# self.current_stage = 2
elif self.current_stage == 2 and _TARGET in str(self.chat_history[-1]["a"]):
pass
# self.current_stage = 3
elif self.current_stage == 3 and "attack" in str(self.chat_history[-1]["a"]):
pass
# self.current_stage = 4
elif self.current_stage == 4 and "move" in str(self.chat_history[-1]["a"]):
pass
print("[系统] 任务完成!")
# self.current_stage = 1 # 重置
#############################################
def _vlm_analyze_single_img(self, prompt, img_data_base64) -> str:
'''使用VLM分析单张图片'''
prompt_vision = prompt
vision_result = ""
try:
print("\n[系统] 开始视觉深度分析处理...")
# 假设image_base64_list是已经准备好的base64编码图像数据列表
# 调用视觉模型进行深度分析,保持模型常驻
stream = self.client.generate(
model=MODEL_VISION,
prompt=prompt_vision,
# 注意: 一次只能推理一张图!!!
images=[img_data_base64],
stream=True,
# 保持模型常驻内存
keep_alive=-1,
# 设置上下文长度为最大值(根据模型和硬件限制调整)
options={"num_ctx": 32768},
)
# 收集和处理响应
full_response = []
print("[系统] 已提交视觉深度分析请求,等待响应...")
for chunk in stream:
print(chunk['response'], end='', flush=True)
full_response.append(chunk['response'])
# 获取完整的深度分析结果
vision_result = ''.join(full_response)
# 记录分析结果到日志
with open('./result/depth_analysis.log', 'a', encoding='utf-8') as log_file:
log_file.write(vision_result)
log_file.write('\n')
# 返回结果
return vision_result
except Exception as e:
print(f"[错误] 视觉分析失败: {str(e)}")
raise
#############################################
def _analyze_ori_and_depth_imgs(self, image_base64, depth_imgs_base64) -> str:
'''拼接图片并分析原图和深度图'''
vision_result = []
if image_base64 and depth_imgs_base64:
try:
# 创建结果目录(如果不存在)
os.makedirs("result", exist_ok=True)
# 解码两张图片
img1 = Image.open(io.BytesIO(base64.b64decode(image_base64))) # 环境图片
img2 = Image.open(io.BytesIO(base64.b64decode(depth_imgs_base64))) # 深度图片
# 获取两张图片中较大的宽度
width = max(img1.width, img2.width)
# 创建新图片(高度为两张图片之和)
combined = Image.new('RGB', (width, img1.height + img2.height))
# 拼接图片(如果宽度不同则居中放置)
offset1 = (width - img1.width) // 2 # 第一张图片的水平偏移量(居中)
combined.paste(img1, (offset1, 0)) # 粘贴第一张图片到顶部
offset2 = (width - img2.width) // 2 # 第二张图片的水平偏移量(居中)
combined.paste(img2, (offset2, img1.height)) # 粘贴第二张图片到底部
# 保存到磁盘
timestamp = str(time.time()).replace('.', '_') # 生成时间戳作为文件名
save_path = f"result/temp_images_{timestamp}.png" # 保存路径
combined.save(save_path) # 保存合并后的图片
# 将合并后的图片转换为base64编码
buffered = io.BytesIO() # 创建内存缓冲区
combined.save(buffered, format="PNG") # 将图片写入缓冲区
combined_base64 = base64.b64encode(buffered.getvalue()).decode('utf-8') # 编码为base64字符串
# 分析合并后的图片
combined_analysis = self._vlm_analyze_single_img("分析合并图片的环境和深度信息", combined_base64)
vision_result.append(combined_analysis) # 添加分析结果
except Exception as e:
print(f"图片合并失败: {e}")
# 如果合并失败,回退到单独分析模式
if image_base64:
vision_result.append(self._vlm_analyze_single_img("分析图片的环境信息", image_base64))
if depth_imgs_base64:
vision_result.append(self._vlm_analyze_single_img("分析图片的深度信息", depth_imgs_base64))
else:
# 如果只有一张图片可用,执行原始单独分析逻辑
if image_base64:
vision_result.append(self._vlm_analyze_single_img("分析图片的环境信息", image_base64))
if depth_imgs_base64:
vision_result.append(self._vlm_analyze_single_img("分析图片的深度信息", depth_imgs_base64))
# 合并所有视觉分析结果
vision_result_plain = ''.join(vision_result)
return vision_result_plain
#############################################
#####################################
class _Move():
'''给大模型函数调用(Function Call)的精简函数'''
def __init__(self, robot, controller):
self.controller = controller
self.robot = robot
self.drone = self.robot
def up(self, cm):
'''上升'''
# 仿真步进
if self.drone.step(self.drone.time_step) != -1:
self.controller.move_up(cm)
print(f"函数up:{cm}厘米")
def down(self, cm):
'''下降'''
if self.drone.step(self.drone.time_step) != -1:
self.controller.move_down(cm)
print(f"函数down:{cm}厘米")
def left(self, cm):
'''左移'''
# 仿真步进
if self.drone.step(self.drone.time_step) != -1:
self.controller.move_left(cm)
print(f"函数left:{cm}厘米")
def right(self, cm):
'''右移'''
# 仿真步进
if self.drone.step(self.drone.time_step) != -1:
self.controller.move_right(cm)
print(f"函数right:{cm}厘米")
def forward(self, cm):
'''前进'''
# 仿真步进
if self.drone.step(self.drone.time_step) != -1:
self.controller.move_forward(cm)
print(f"函数forward:{cm}厘米")
def backward(self, cm):
'''后退'''
# 仿真步进
if self.drone.step(self.drone.time_step) != -1:
self.controller.move_backward(cm)
print(f"函数backward:{cm}厘米")
def rotate(self, degrees):
'''旋转'''
# 仿真步进
if self.drone.step(self.drone.time_step) != -1:
self.controller.rotate(degrees)
print(f"函数rotate:{degrees}度")
def attack(self):
'''攻击'''
# 打开激光
if self.drone.step(self.drone.time_step) != -1:
self.controller.attack(True)
# 等待一会
time.sleep(5)
# 关闭激光
if self.drone.step(self.drone.time_step) != -1:
self.controller.attack(False)
print("函数attack完成")
#####################################
# 单元测试
# 测试例程
if __name__ == "__main__":
# 阶段1的图片
stage1_original = "./stage_images/1.png"
stage1_depth = "./stage_images/1_depth.webp"
stage1_ocr = """{"boxes":[[[[764,8],[787,8],[787,33],[764,33]]]],"texts":["X"],"scores":[0.8657664656639099]}"""
# 阶段2的图片
stage2_original = "./stage_images/2.png"
stage2_depth = "./stage_images/2_depth.webp"
stage2_ocr = """{"boxes":[[[[763,3],[790,3],[790,31],[763,31]]],[[[242,229],[330,231],[327,343],[239,340]]]],"texts":["X","C"],"scores":[0.7861287593841553,0.5938434600830078]}"""
# 阶段3的图片
stage3_original = "./stage_images/3.png"
stage3_depth = "./stage_images/3_depth.webp"
stage3_ocr = """{"boxes":[[[[345,184],[485,180],[490,382],[350,386]]]],"texts":["B"],"scores":[0.9931768178939819]}"""
# 阶段4的图片
stage4_original = "./stage_images/4.png"
stage4_depth = "./stage_images/4_depth.webp"
stage4_ocr = "错误"
# 测试决策
# 模拟测试
#########################################
class MockController:
def move_up(self, cm): pass
def move_down(self, cm): pass
def move_left(self, cm): pass
def move_right(self, cm): pass
def move_forward(self, cm): pass
def move_backward(self, cm): pass
def rotate(self, degrees): pass
def laser_on(self): print("激光开启")
def laser_off(self): print("激光关闭")
# 智能体
_agent = _Ollama(None, MockController())
#########################################
# 辅助函数:将任意格式图像转换为PNG字节流
def convert_to_png_bytes(image_path):
"""将任意格式图像转换为PNG格式的字节流"""
try:
with Image.open(image_path) as img:
# 转换为RGB模式(兼容不支持透明通道的模型)
if img.mode != 'RGB':
img = img.convert('RGB')
# 转换为字节流
img_byte_arr = io.BytesIO()
img.save(img_byte_arr, format='PNG')
return img_byte_arr.getvalue()
except Exception as e:
print(f"[错误] 图像转换失败({image_path}): {str(e)}")
return None
#########################################
# 辅助函数:将图片转换为base64
def image_to_base64(image_path):
with open(image_path, "rb") as image_file:
return base64.b64encode(image_file.read()).decode('ascii')
#########################################
# 辅助函数: 将任意格式图片转为png格式base64
def any_image_to_base64(image_path):
"""将任意格式图像转换为PNG格式的base64编码字符串
Args:
image_path (str): 图像文件路径
Returns:
str: base64编码的PNG图像字符串,失败时返回None
"""
try:
with Image.open(image_path) as img:
# 转换为RGB模式(兼容不支持透明通道的模型)
if img.mode != 'RGB':
img = img.convert('RGB')
# 转换为字节流
img_byte_arr = io.BytesIO()
img.save(img_byte_arr, format='PNG')
img_bytes = img_byte_arr.getvalue()
# 转换为base64编码
base64_str = base64.b64encode(img_bytes).decode('ascii')
return base64_str
except Exception as e:
print(f"[错误] 图像转换失败({image_path}): {str(e)}", file=sys.stderr)
return None
##################################################
# 模拟阶段1处理
print("\n=== 阶段1测试 ===")
_agent.process_stage(
stage=1,
image_base64=image_to_base64(stage1_original),
depth_imgs_base64=image_to_base64(stage1_depth),
ocr_result=stage1_ocr
)
# 模拟阶段2处理
print("\n=== 阶段2测试 ===")
_agent.process_stage(
stage=2,
image_base64=any_image_to_base64(stage2_original),
depth_imgs_base64=any_image_to_base64(stage2_depth),
ocr_result=stage2_ocr
)
# 模拟阶段3处理
print("\n=== 阶段3测试 ===")
_agent.process_stage(
stage=3,
image_base64=any_image_to_base64(stage3_original),
depth_imgs_base64=any_image_to_base64(stage3_depth),
ocr_result=stage3_ocr
)
# 模拟阶段4处理
print("\n=== 阶段4测试 ===")
_agent.process_stage(
stage=4,
image_base64=any_image_to_base64(stage4_original),
depth_imgs_base64=any_image_to_base64(stage4_depth),
ocr_result=stage4_ocr
)
_ocr.py
# OCR识别模块
# 输入: 图片base64数据
# 输出: [{'txt':'识别文本', 'box': [[x1,y1],[x2,y2],[x3,y3],[x4,y4]], 'score': 置信度 }, ...]

# 坐标系说明: 图片左上角为原点(0,0),向右为x轴正方向,向下为y轴正方向

OCR_SERVICE_URL = "http://192.168.31.20:7861/"

#############################################
# 第三方库
from gradio_client import Client, handle_file
from PIL import Image, ImageDraw
# 内置库
import base64
import io
import os
import json
import requests
import logging
import time
#############################################

# 配置日志
logging.basicConfig(level=logging.INFO)
logger = logging.getLogger(__name__)

def check_ocr_service_available():
    """检查OCR服务是否可用"""
    try:
        response = requests.get(f"{OCR_SERVICE_URL}/", timeout=5)
        if response.status_code == 200:
            logger.info("OCR服务连接成功")
            return True
        logger.error(f"OCR服务返回状态码: {response.status_code}")
        return False
    except Exception as e:
        logger.error(f"连接OCR服务失败: {str(e)}")
        return False

def ocr_service(img_data_base64: str) -> list:
    """
    OCR识别服务接口
    :param img_data_base64: 图片的base64编码数据
    :return: 识别结果列表,每个元素包含文本、坐标框和置信度
    """
    temp_img_path = "./temp_ocr_input.png"
    print("hello_from_ocr_service")

    # 首先检查服务是否可用
    if not check_ocr_service_available():
        raise ConnectionError("OCR服务不可用, 请检查服务是否运行或URL是否正确")

    # 初始化Gradio客户端
    global client
    client = Client(OCR_SERVICE_URL)
    print("初始化gradio客户端成功")

    # 将base64数据转换为临时图片文件
    img_bytes = base64.b64decode(img_data_base64)
    with open(temp_img_path, "wb") as f:
        f.write(img_bytes)
    # exit(0)

    # 调用OCR接口
    logger.info("正在调用OCR服务...")
    result = client.predict(
        img=handle_file(temp_img_path),
        lang="en",  # 默认使用英文识别
        api_name="/predict"
    )

    logger.info("OCR服务调用成功,解析结果...")

    # 解析返回结果
    if not result or len(result) < 1:
        raise ValueError("OCR服务返回了无效的结果格式")

    _, ocr_data = result
    if not isinstance(ocr_data, dict):
        raise ValueError(f"OCR服务返回了意外的数据类型: {type(ocr_data)}")

    # 确保所有必要字段都存在
    required_fields = ['boxes', 'texts', 'scores']
    for field in required_fields:
        if field not in ocr_data:
            raise ValueError(f"OCR结果缺少必要字段: {field}")

    boxes = ocr_data['boxes']
    texts = ocr_data['texts']
    scores = ocr_data['scores']

    # 验证数据长度一致
    if not (len(boxes) == len(texts) == len(scores)):
        raise ValueError("OCR结果中boxes、texts和scores长度不一致")

    # 格式化输出结果
    output = []
    for box, text, score in zip(boxes, texts, scores):
        # 验证box格式
        if len(box) != 4 or any(len(point) != 2 for point in box):
            logger.warning(f"忽略无效的box格式: {box}")
            continue

        output.append({
            'txt': text,
            'box': [[float(point[0]), float(point[1])] for point in box],  # 转换为坐标点列表
            'score': float(score)
        })

    print("清理临时文件")
    # 清理临时文件
    if os.path.exists(temp_img_path):
        os.remove(temp_img_path)

    return output

def img_with_box(ocr_results: list, img_data_base64: str) -> str:
    """
    在图片上绘制OCR识别结果框和文本
    :param ocr_results: ocr_service返回的识别结果
    :param img_data_base64: 原始图片的base64数据
    :return: 带标注框的图片base64数据
    """
    # 将base64图片数据转换为PIL图像对象
    img_bytes = base64.b64decode(img_data_base64)
    img = Image.open(io.BytesIO(img_bytes))
    draw = ImageDraw.Draw(img)

    # 设置绘制样式
    box_color = (0, 0, 255)  # 蓝色框
    text_color = (255, 0, 0)  # 红色文字

    # 遍历所有识别结果并绘制
    for result in ocr_results:
        box = result['box']
        text = result['txt']
        score = result['score']

        # 绘制四边形框
        draw.polygon([
            (box[0][0], box[0][1]),
            (box[1][0], box[1][1]),
            (box[2][0], box[2][1]),
            (box[3][0], box[3][1])
        ], outline=box_color)

        # 在框上方添加识别文本和置信度
        text_with_score = f"{text}({score:.2f})"
        draw.text((box[0][0], box[0][1] - 25),
                 text_with_score,
                 fill=text_color)

    # 将处理后的图片转换为base64
    buffered = io.BytesIO()
    img.save(buffered, format="PNG")
    img_base64 = base64.b64encode(buffered.getvalue()).decode('utf-8')

    return img_base64

def ocr_img_with_box_and_save(img_data_base64:str) -> list:
    # 调用ocr服务
    ocr_result = ocr_service(img_data_base64)
    # 保存结果
    img_result_base64 = img_with_box(ocr_result, img_data_base64)
    # 保存结果图片
    output_path = f"images/ocr_result_{time.time()}.png"
    with open(output_path, "wb") as f:
        f.write(base64.b64decode(img_result_base64))
    return ocr_result

########################################
########################################
def _test():
    '''
    测试图片: img_0001.jpg
    '''
    img_data_base64 = ''
    # 读取测试图片并转换为base64
    test_img_path = "./img_0001.jpg"
    if not os.path.exists(test_img_path):
        raise FileNotFoundError(f"测试图片不存在: {test_img_path}")

    with open(test_img_path, "rb") as f:
        img_data_base64 = base64.b64encode(f.read()).decode('utf-8')

    # 调用OCR服务
    print("正在进行OCR识别...")
    ocr_results = ocr_service(img_data_base64)

    # 打印识别结果
    print("\n识别结果:")
    for i, result in enumerate(ocr_results, 1):
        print(f"{i}. 文本: {result['txt']}")
        print(f"   坐标: {result['box']}")
        print(f"   置信度: {result['score']:.2f}")

    # 生成带标注框的图片
    print("\n生成可视化结果...")
    annotated_img_base64 = img_with_box(ocr_results, img_data_base64)

    # 保存结果图片
    output_path = "ocr_result.png"
    with open(output_path, "wb") as f:
        f.write(base64.b64decode(annotated_img_base64))

    print(f"\n测试完成! 结果已保存到: {output_path}")

    # 尝试打开结果图片(仅当在支持的环境中)
    img = Image.open(output_path)
    img.show()

if __name__ == "__main__":
    _test()
_mapping.py
# 建图模块
# 输入: 列表-图片base64数据
# 输出: 三维模型glb格式: base64数据

# Gradio服务地址
OCR_SERVICE_URL = "http://192.168.31.20:7862/"

#############################################
# 第三方库
from gradio_client import Client, handle_file
from PIL import Image, ImageDraw
# 内置库
import base64
import io
import os
import json
import requests
import logging
import shutil
import time
#############################################

# 配置日志
logging.basicConfig(level=logging.INFO)
logger = logging.getLogger(__name__)

def check_mapping_service_available():
    """检查建图服务是否可用"""
    try:
        response = requests.get(f"{OCR_SERVICE_URL}/", timeout=5)
        if response.status_code == 200:
            logger.info("建图服务连接成功")
            return True
        logger.error(f"建图服务返回状态码: {response.status_code}")
        return False
    except Exception as e:
        logger.error(f"连接建图服务失败: {str(e)}")
        return False

def process_images_to_3dmodel(images_base64: list) -> str:
    """
    将多张图片转换为3D模型
    :param images_base64: 图片base64编码数据列表
    :return: glb格式3D模型的base64数据
    """
    # 检查服务是否可用
    if not check_mapping_service_available():
        raise ConnectionError("建图服务不可用, 请检查服务是否运行或URL是否正确")

    try:
        # 初始化Gradio客户端
        client = Client(OCR_SERVICE_URL)
        logger.info("Gradio客户端初始化成功")

        # 创建临时目录存放图片, 使用时间戳
        temp_dir = f"temp_images_{time.time()}"
        if not os.path.exists(temp_dir):
            os.makedirs(temp_dir)

        # 将base64图片保存为临时文件
        image_paths = []
        for i, img_data in enumerate(images_base64):
            img_bytes = base64.b64decode(img_data)
            img_path = os.path.join(temp_dir, f"image_{i}.png")
            with open(img_path, "wb") as f:
                f.write(img_bytes)
            image_paths.append(img_path)

        # 调用建图API
        # 1. 上传文件到服务端
        gradio_files = [handle_file(img_path) for img_path in image_paths]
        _, target_dir, _, _ = client.predict(
            input_video=None,
            input_images=gradio_files,
            api_name="/update_gallery_on_upload_1"
        )

        # 2. 处理建图
        result = client.predict(
            target_dir=target_dir,
            conf_thres=50,
            frame_filter="All",
            mask_black_bg=False,
            mask_white_bg=False,
            show_cam=True,
            mask_sky=False,
            prediction_mode="Depthmap and Camera Branch",
            api_name="/gradio_demo"
        )

        # 获取GLB文件路径
        glb_path = result[0] if isinstance(result, (list, tuple)) else result
        print("本机glb路径: ", glb_path)

        # 读取GLB文件并转换为base64
        with open(glb_path, "rb") as f:
            glb_data = base64.b64encode(f.read()).decode('utf-8')

        # 清理临时文件
        for img_path in image_paths:
            if os.path.exists(img_path):
                os.remove(img_path)
        if os.path.exists(temp_dir):
            os.rmdir(temp_dir)

        return glb_data

    except Exception as e:
        logger.error(f"建图处理失败: {str(e)}")
        raise

def save_glb_base64(glb_base64: str, save_path: str):
    """
    保存base64格式的GLB文件到本地
    :param glb_base64: 输入GLB文件的base64数据
    :param save_path: 保存路径
    """
    try:
        # 确保目录存在
        # os.makedirs(os.path.dirname(save_path), exist_ok=True)

        # 解码并保存
        with open(save_path, "wb") as f:
            f.write(base64.b64decode(glb_base64))

        logger.info(f"GLB文件已保存到: {save_path}")
        return True
    except Exception as e:
        logger.error(f"保存GLB文件失败: {str(e)}")
        return False

def _test():
    """测试函数"""
    # 读取测试图片并转换为base64
    # test_images = ["../../../../assets/scene1.png"]
    test_images = ["./seekslam_apartment_1.png"]
    test_images_base64 = []

    if not test_images:
        raise ValueError("测试目录中没有找到图片文件")

    for image in test_images:
         with open(image, "rb") as f:
                test_images_base64.append(base64.b64encode(f.read()).decode('utf-8'))

    # 调用建图服务
    print("正在进行3D建图...")
    output_path = "output_model.glb"
    try:
        glb_base64 = process_images_to_3dmodel(test_images_base64)

        # 保存结果
        if save_glb_base64(glb_base64, output_path):
            print(f"\n测试完成! 3D模型已保存到: {output_path}")
        else:
            print("\n测试完成,但保存模型失败")

    except Exception as e:
        print(f"\n建图过程中出错: {str(e)}")

if __name__ == "__main__":
    _test()
_depth.py
# 深度估计模块
# 输入: 图片base64数据
# 输出: 深度图base64数据

DEPTH_SERVICE_URL = "http://10.8.8.20:7863/"

#############################################
# 第三方库
from gradio_client import Client, handle_file
from PIL import Image
# 内置库
import base64
import io
import os
import logging
import time
import requests
#############################################

# 配置日志
logging.basicConfig(level=logging.INFO)
logger = logging.getLogger(__name__)

def check_depth_service_available():
    """检查深度估计服务是否可用"""
    try:
        response = requests.get(f"{DEPTH_SERVICE_URL}/", timeout=5)
        if response.status_code == 200:
            logger.info("深度估计服务连接成功")
            return True
        logger.error(f"深度估计服务返回状态码: {response.status_code}")
        return False
    except Exception as e:
        logger.error(f"连接深度估计服务失败: {str(e)}")
        return False

def depth_service(img_data_base64: str) -> str:
    """
    深度估计服务接口
    :param img_data_base64: 输入图片的base64编码数据
    :return: 深度图的base64编码数据
    """
    temp_img_path = "./temp_depth_input.png"

    # 检查服务是否可用
    if not check_depth_service_available():
        raise ConnectionError("深度估计服务不可用, 请检查服务是否运行或URL是否正确")

    # 初始化Gradio客户端
    client = Client(DEPTH_SERVICE_URL)

    # 将base64数据转换为临时图片文件
    img_bytes = base64.b64decode(img_data_base64)
    with open(temp_img_path, "wb") as f:
        f.write(img_bytes)

    # 调用深度估计接口
    logger.info("正在调用深度估计服务...")
    result = client.predict(
        image=handle_file(temp_img_path),
        api_name="/on_submit"
    )

    logger.info("深度估计服务调用成功,处理结果...")

    # 处理返回结果(可能包含多个文件路径)
    depth_img_path = None
    for item in result:
        if isinstance(item, list):
            # 取第二个文件作为深度图
            if len(item) > 0:
                depth_img_path = item[1]
                break
        elif isinstance(item, str) and item.endswith(('.png', '.jpg', '.jpeg')):
            depth_img_path = item
            break

    if not depth_img_path or not os.path.exists(depth_img_path):
        raise ValueError("深度估计服务未返回有效的深度图路径")

    # 读取深度图并转换为base64
    with open(depth_img_path, "rb") as f:
        depth_img_bytes = f.read()
    depth_img_base64 = base64.b64encode(depth_img_bytes).decode('utf-8')

    # 清理临时文件
    if os.path.exists(temp_img_path):
        os.remove(temp_img_path)

    return depth_img_base64

def depth_img_and_save(img_data_base64:str, output_dir: str = "depth_results") -> str:
    """
    保存深度图结果到文件
    :param depth_img_base64: 深度图的base64数据
    :param output_dir: 输出目录路径
    :return: base64数据
    """
    # 获取深度图
    depth_img_base64 = depth_service(img_data_base64)

    # 创建输出目录
    os.makedirs(output_dir, exist_ok=True)

    # 生成带时间戳的输出文件名
    timestamp = int(time.time())
    output_path = os.path.join(output_dir, f"depth_result_{timestamp}.png")

    # 保存深度图
    with open(output_path, "wb") as f:
        f.write(base64.b64decode(depth_img_base64))

    return depth_img_base64

########################################
########################################
def _test():
    """
    测试深度估计模块
    测试图片: test_depth.jpg
    """
    # 读取测试图片并转换为base64
    test_img_path = "./seekslam_apartment_1.png"
    if not os.path.exists(test_img_path):
        raise FileNotFoundError(f"测试图片不存在: {test_img_path}")

    with open(test_img_path, "rb") as f:
        img_data_base64 = base64.b64encode(f.read()).decode('utf-8')

    # 调用深度估计服务
    print("正在进行深度估计...")
    depth_img_base64 = depth_img_and_save(img_data_base64)

    # 保存结果
    print(f"\n深度估计完成! 结果已保存")


if __name__ == "__main__":
    _test()
_pid.py
# 例程的pid控制器封装

# _pid.py
"""PID控制算法实现模块"""

#############################################
# 内置库
import time
# 第三方库
import numpy as np
import pytest
import simple_pid
#############################################
class _PIDController:
    """
    PID控制器实现类
    提供比例-积分-微分控制功能

    参数:
        kp (float): 比例增益
        ki (float): 积分增益
        kd (float): 微分增益
        output_limits (tuple): 输出限制 (min, max)
        sample_time (float): 采样时间(秒)
        auto_mode (bool): 是否自动模式(True=自动,False=手动)
    """

    def __init__(self, kp=1.0, ki=0.0, kd=0.0, output_limits=(None, None),
                 sample_time=0.01, auto_mode=True):
        # 增益参数
        self.kp = kp
        self.ki = ki
        self.kd = kd

        # 输出限制
        self.output_limits = output_limits

        # 采样时间(秒)
        self.sample_time = sample_time

        # 控制器模式
        self.auto_mode = auto_mode

        # 控制器状态
        self._proportional = 0
        self._integral = 0
        self._derivative = 0
        self._last_error = 0
        self._last_output = 0
        self._last_time = None

        # 抗积分饱和
        self._integral_windup_guard = 20.0

        # 初始化
        self.reset()

    def __call__(self, error, dt=None):
        """
        计算PID输出

        参数:
            error (float): 当前误差(设定值-测量值)
            dt (float): 时间步长(秒)。如果为None,则使用预设的sample_time

        返回:
            float: PID控制输出
        """
        if not self.auto_mode:
            return self._last_output

        # 获取当前时间
        current_time = time.time()

        # 计算时间步长
        if dt is None:
            dt = current_time - self._last_time if self._last_time is not None else self.sample_time
        else:
            dt = float(dt)

        # 检查时间步长是否有效
        if dt <= 0:
            raise ValueError('dt必须为正数')

        # 存储当前时间用于下次计算
        self._last_time = current_time

        # 比例项
        self._proportional = self.kp * error

        # 积分项(使用梯形积分)
        self._integral += self.ki * (error + self._last_error) * 0.5 * dt

        # 抗积分饱和
        if self._integral > self._integral_windup_guard:
            self._integral = self._integral_windup_guard
        elif self._integral < -self._integral_windup_guard:
            self._integral = -self._integral_windup_guard

        # 微分项(防止设定值变化导致的微分冲击)
        self._derivative = self.kd * (error - self._last_error) / dt if dt > 0 else 0

        # 存储当前误差用于下次计算
        self._last_error = error

        # 计算输出
        output = self._proportional + self._integral + self._derivative

        # 应用输出限制
        if self.output_limits[0] is not None and output < self.output_limits[0]:
            output = self.output_limits[0]
            # 抗积分饱和(反向限制)
            if self._integral > 0:
                self._integral = 0
        elif self.output_limits[1] is not None and output > self.output_limits[1]:
            output = self.output_limits[1]
            # 抗积分饱和(反向限制)
            if self._integral < 0:
                self._integral = 0

        # 存储最后输出
        self._last_output = output

        return output

    def update(self, error, dt=None):
        """
        更新PID控制器(与__call__相同)
        """
        return self(error, dt)

    def reset(self):
        """
        重置PID控制器状态
        """
        self._proportional = 0
        self._integral = 0
        self._derivative = 0
        self._last_error = 0
        self._last_output = 0
        self._last_time = None

    def set_auto_mode(self, auto_mode, last_output=None):
        """
        设置控制器模式

        参数:
            auto_mode (bool): 是否自动模式
            last_output (float): 切换到自动模式时的初始输出值
        """
        if auto_mode and not self.auto_mode:
            # 从手动切换到自动
            self.reset()
            if last_output is not None:
                self._last_output = last_output

        self.auto_mode = auto_mode

    def set_tunings(self, kp=None, ki=None, kd=None):
        """
        设置PID参数

        参数:
            kp (float): 比例增益
            ki (float): 积分增益
            kd (float): 微分增益
        """
        if kp is not None:
            self.kp = float(kp)
        if ki is not None:
            self.ki = float(ki)
        if kd is not None:
            self.kd = float(kd)

    @property
    def components(self):
        """
        获取PID各项分量

        返回:
            tuple: (比例项, 积分项, 微分项)
        """
        return self._proportional, self._integral, self._derivative

    @property
    def tunings(self):
        """
        获取当前PID参数

        返回:
            tuple: (kp, ki, kd)
        """
        return self.kp, self.ki, self.kd
效果图
| 室内模拟环境 | 第二个房间的地图 |
|---|---|
 |
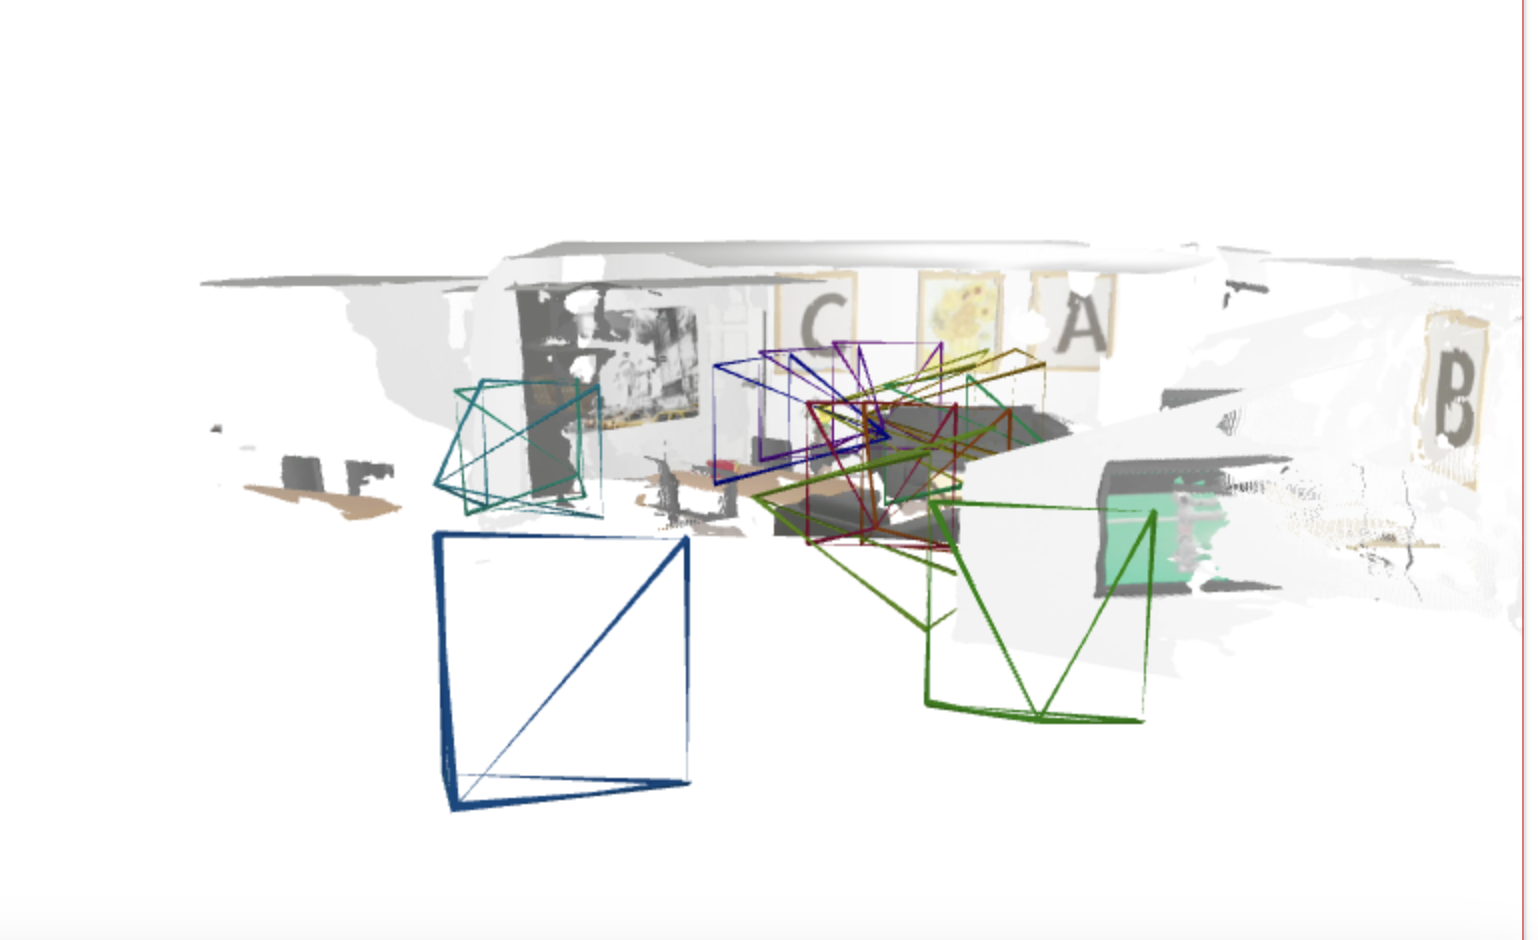 |
参考文献
- [1] K. Xiao, L. Ma, S. Tan, Y. Cong , X. Wang, "Implementation of UAV Coordination Based on a Hierarchical Multi-UAV Simulation Platform," Advances in Guidance, Navigation and Control. Lecture Notes in Electrical Engineering, 2022, vol 644. Springer, Singapore. doi: 10.1007/978-981-15-8155-7_423
- [2] K. Xiao, S. Tan, G. Wang, X. An, X. Wang and X. Wang, "XTDrone: A Customizable Multi-rotor UAVs Simulation Platform," 2020 4th International Conference on Robotics and Automation Sciences (ICRAS), 2020, pp. 55-61, doi: 10.1109/ICRAS49812.2020.9134922.
- [3] 使用OCR检测和识别字母[https://www.cnblogs.com/qsbye/p/18831983]
- [4] 使用VGGT进行基于图像的室内建图[https://www.cnblogs.com/qsbye/p/18830067]
- [5] 大模型函数调用[https://www.cnblogs.com/qsbye/p/18835026]
- [6] 基于单目图像的深度估计[https://www.cnblogs.com/qsbye/p/18840431]
- [7] Chi P, Wei J, Zhao J, et al. Autonomous UAV Exploration in Unknown Environments Using Octomap[C]//International Conference on Guidance, Navigation and Control. Singapore: Springer Nature Singapore, 2024: 357-365.
- [8] H. Zhang, S. Wang, Y. Liu, P. Ji, R. Yu and T. Chao, "EFP: Efficient Frontier-Based Autonomous UAV Exploration Strategy for Unknown Environments," in IEEE Robotics and Automation Letters, vol. 9, no. 3, pp. 2941-2948, March 2024, doi: 10.1109/LRA.2024.3363531.
keywords: {Quadrotors;Clustering algorithms;Planning;Autonomous aerial vehicles;Trajectory optimization;Three-dimensional displays;Computational efficiency;Aerial systems: applications;aerial systems: perception and autonomy;autonomous vehicle navigation}, - [9] Zhang Z, Hu C, Lye S, et al. A VLM-Drone System for Indoor Navigation Assistance with Semantic Reasoning for the Visually Impaired[C]//2025 IEEE/SICE International Symposium on System Integration (SII). IEEE, 2025: 1260-1265.

 浙公网安备 33010602011771号