曹工说Spring Boot源码(26)-- 学习字节码也太难了,实在不能忍受了,写了个小小的字节码执行引擎
曹工说Spring Boot源码(26)-- 学习字节码也太难了,实在不能忍受了,写了个小小的字节码执行引擎
写在前面的话
相关背景及资源:
曹工说Spring Boot源码(1)-- Bean Definition到底是什么,附spring思维导图分享
曹工说Spring Boot源码(2)-- Bean Definition到底是什么,咱们对着接口,逐个方法讲解
曹工说Spring Boot源码(3)-- 手动注册Bean Definition不比游戏好玩吗,我们来试一下
曹工说Spring Boot源码(4)-- 我是怎么自定义ApplicationContext,从json文件读取bean definition的?
曹工说Spring Boot源码(5)-- 怎么从properties文件读取bean
曹工说Spring Boot源码(6)-- Spring怎么从xml文件里解析bean的
曹工说Spring Boot源码(7)-- Spring解析xml文件,到底从中得到了什么(上)
曹工说Spring Boot源码(8)-- Spring解析xml文件,到底从中得到了什么(util命名空间)
曹工说Spring Boot源码(9)-- Spring解析xml文件,到底从中得到了什么(context命名空间上)
曹工说Spring Boot源码(10)-- Spring解析xml文件,到底从中得到了什么(context:annotation-config 解析)
曹工说Spring Boot源码(11)-- context:component-scan,你真的会用吗(这次来说说它的奇技淫巧)
曹工说Spring Boot源码(12)-- Spring解析xml文件,到底从中得到了什么(context:component-scan完整解析)
曹工说Spring Boot源码(13)-- AspectJ的运行时织入(Load-Time-Weaving),基本内容是讲清楚了(附源码)
曹工说Spring Boot源码(14)-- AspectJ的Load-Time-Weaving的两种实现方式细细讲解,以及怎么和Spring Instrumentation集成
曹工说Spring Boot源码(15)-- Spring从xml文件里到底得到了什么(context:load-time-weaver 完整解析)
曹工说Spring Boot源码(16)-- Spring从xml文件里到底得到了什么(aop:config完整解析【上】)
曹工说Spring Boot源码(17)-- Spring从xml文件里到底得到了什么(aop:config完整解析【中】)
曹工说Spring Boot源码(18)-- Spring AOP源码分析三部曲,终于快讲完了 (aop:config完整解析【下】)
曹工说Spring Boot源码(19)-- Spring 带给我们的工具利器,创建代理不用愁(ProxyFactory)
曹工说Spring Boot源码(20)-- 码网恢恢,疏而不漏,如何记录Spring RedisTemplate每次操作日志
曹工说Spring Boot源码(21)-- 为了让大家理解Spring Aop利器ProxyFactory,我已经拼了
曹工说Spring Boot源码(22)-- 你说我Spring Aop依赖AspectJ,我依赖它什么了
曹工说Spring Boot源码(23)-- ASM又立功了,Spring原来是这么递归获取注解的元注解的
曹工说Spring Boot源码(24)-- Spring注解扫描的瑞士军刀,asm技术实战(上)
曹工说Spring Boot源码(25)-- Spring注解扫描的瑞士军刀,ASM + Java Instrumentation,顺便提提Jar包破解
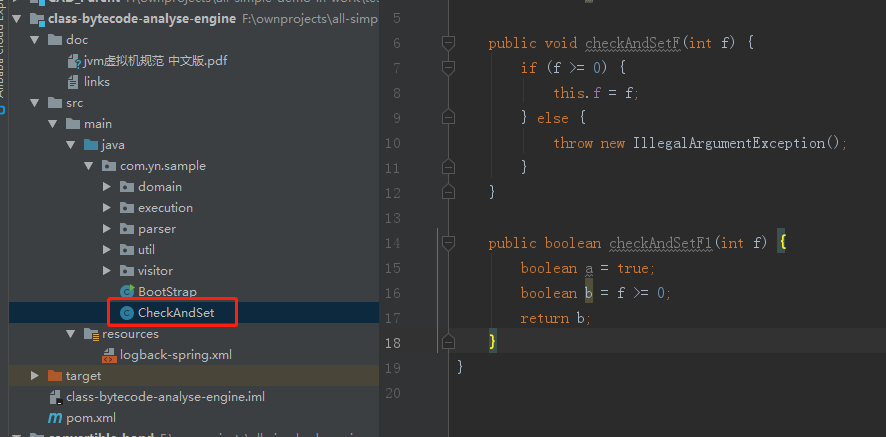
工程结构图:

概要
本来,这两三讲,不是和asm有些关系吗,但是asm难的地方,从来不在他自身,而是难在如何读懂字节码。我给大家举个例子,如下这个简单的类:
public class CheckAndSet {
    private int f;

    public void checkAndSetF(int f) {
        if (f >= 0) {
            this.f = f;
        } else {
            throw new IllegalArgumentException();
        }
    }

    public boolean checkAndSetF1(int f) {
        boolean a = true;
        boolean b = f >= 0;
        return b;
    }
}
我们假设要用asm来写出这个代码,要怎么写?可以利用我们上一讲提到的asm插件:ASM ByteCode Outline来辅助,但是,如果不懂字节码,还是有很多坑的,一时半会趟不出来那种。字节码这个东西,如果始终绕不开的话,那还是要学。
上面那个简单的类,用javap -v CheckAndSet.class 来反编译的话,checkAndSetF1方法,会生成如下的字节码:
public boolean checkAndSetF1(int);
    descriptor: (I)Z
    flags: ACC_PUBLIC
    Code:
      stack=1, locals=4, args_size=2
         0: iconst_1
         1: istore_2
         2: iload_1
         3: iflt          10
         6: iconst_1
         7: goto          11
        10: iconst_0
        11: istore_3
        12: iload_3
        13: ireturn
这些字节码看起来,是不是抠脑壳?怎么知道字节码对应的意思呢,这个当然是看文档。
或者
https://docs.oracle.com/javase/specs/jvms/se10/html/jvms-4.html#jvms-4.1
针对第一个pdf,大家可以从后往前查找(pdf最后附了个所有字节码指令的介绍),如:
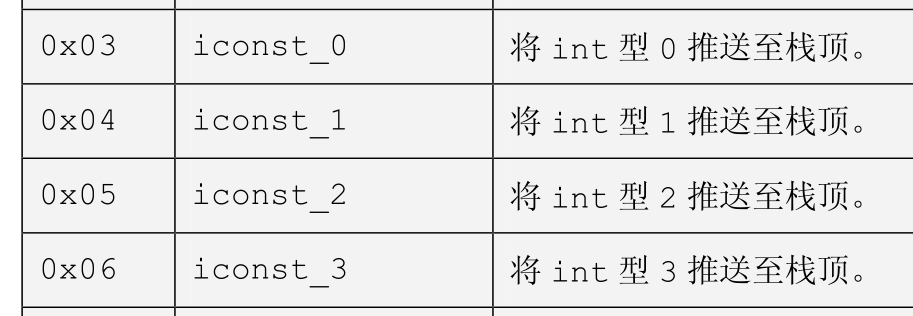
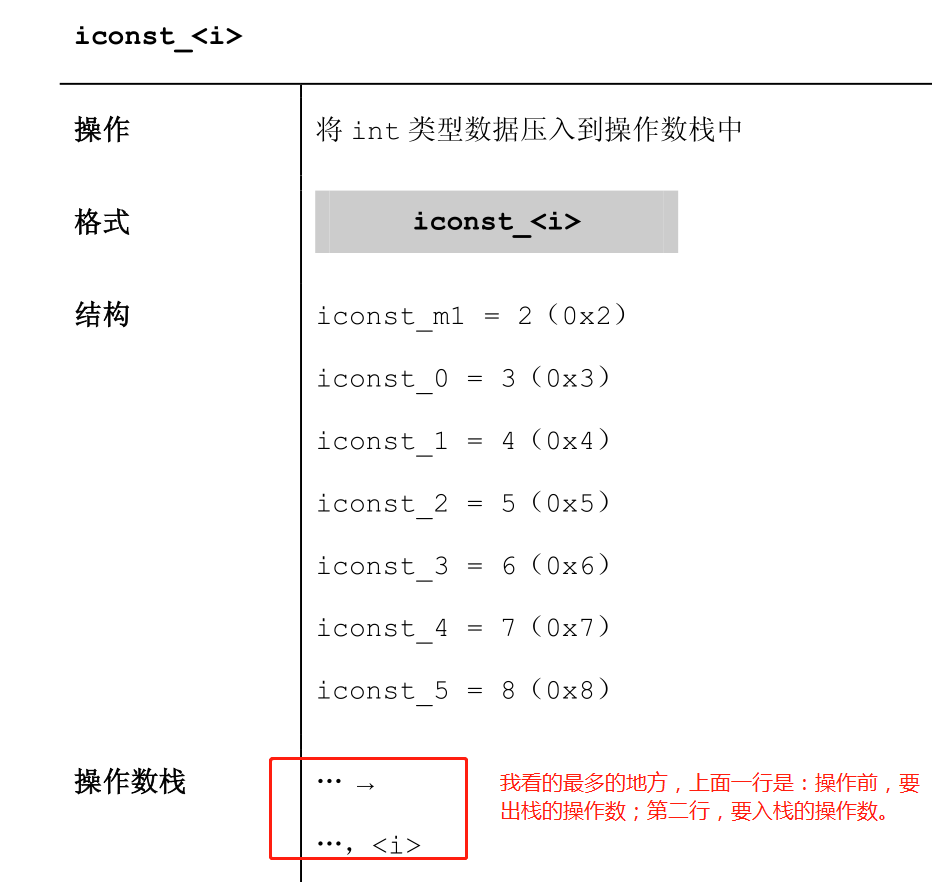
再往上查找,还会有详细的说明:
靠着这个文档,我开始了逐行手动计算:执行这个字节码之前,栈和本地变量表是什么样的;执行这个指令后,栈和本地变量表是什么样的。过程,那是相当痛苦,大概和下面的图差不多(图片来源于网络,我只是拿来描述下):
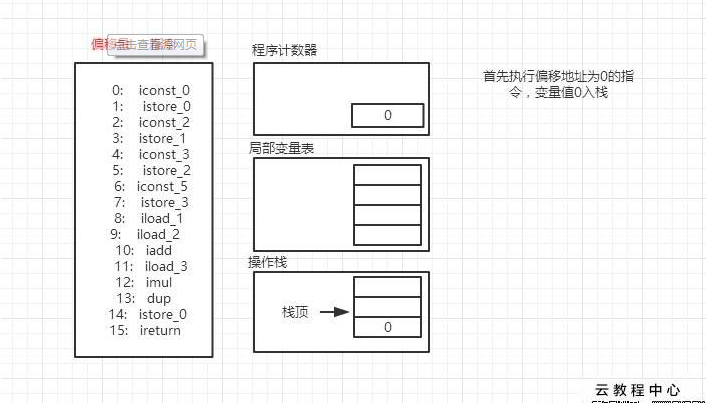
我可能还要原始一点,图也没画,直接在notepad++里,记录执行每一步之后,本地变量表和操作数栈的情况。这样的效率真的太低了,而且看一会,我就忘了。。
然后我觉得,这个东西,好像可以写个程序来帮我执行,无非就是一条条地执行字节码,然后维护一个本地变量list,维护一个栈;执行字节码的时候,我就照着字节码的意思来做:要取本地变量我就取本地变量,要入栈我就入栈,要出栈我就出栈,反正文档很详细嘛,照着来即可。
说干就干。
效果展示
最终实现出来,效果如下,可以展示每一步的字节码和执行之后的本地变量表和操作数栈的状态。
比如执行如下方法:
    public void checkAndSetF(int f) {
        if (f >= 0) {
            this.f = f;
        } else {
            throw new IllegalArgumentException();
        }
    }
字节码:
  public void checkAndSetF(int);
    descriptor: (I)V
    flags: ACC_PUBLIC
    Code:
      stack=2, locals=2, args_size=2
         0: iload_1
         1: iflt          12
         4: aload_0
         5: iload_1
         6: putfield      #2                  // Field f:I
         9: goto          20
        12: new           #3                  // class java/lang/IllegalArgumentException
        15: dup
        16: invokespecial #4                  // Method java/lang/IllegalArgumentException."<init>":()V
        19: athrow
        20: return
执行效果:

大致思路与实现
-
编译目标class,我这里拿前面的CheckAndSet.class举例
-
javap -v CheckAndSet.class > a.txt,后续我们就会读取a.txt来获取方法的指令集合
-
编写字节码执行引擎,一条一条地执行字节码
用javap -v来反编译class,可以拿到class的字节码,大概有两块东西比较重要:
-
方法的指令集合,这是我们最需要的东西,我拿一条指令来举例:
public void checkAndSetF(int);
    descriptor: (I)V
    flags: ACC_PUBLIC
    Code:
      stack=2, locals=2, args_size=2
         0: iload_1
         1: iflt          12
         4: aload_0
         5: iload_1
         6: putfield      #2                  // Field f:I
         9: goto          20
        12: new           #3                  // class java/lang/IllegalArgumentException
        15: dup
        16: invokespecial #4                  // Method java/lang/IllegalArgumentException."<init>":()V
        19: athrow
        20: return
比如,其中的
6: putfield #2 // Field f:I这条,其中,真正的指令,其实只有下面这部分:6: putfield #2剩下的
// Field f:I是javap给我们提供的注释,真正的class中是没有这部分的。那么,6: putfield #2要怎么看呢,其中的
#2是什么鬼意思?别慌,接着看另一块很重要的东西:常量池。 -
常量池
Constant pool:
   #1 = Methodref          #6.#26         // java/lang/Object."<init>":()V
   #2 = Fieldref           #5.#27         // com/yn/sample/CheckAndSet.f:I
   #3 = Class              #28            // java/lang/IllegalArgumentException
   ...
   #5 = Class              #29            // com/yn/sample/CheckAndSet
   ...
   #27 = NameAndType        #7:#8          // f:I
前面的#2,就是上面的:
#2 = Fieldref #5.#27 // com/yn/sample/CheckAndSet.f:I其中,
// com/yn/sample/CheckAndSet.f:I也是注释,前面的#5.#27才是class中真实存在的。不管怎么说,大家反正也知道#2的意思,就是
CheckAndSet的f这个field。
有了这两块东西,基本可以开搞了。
单条指令的执行
比如,我要执行:
6: putfield #2
利用#2拿到要执行指令的field(利用反射),然后再从栈里,弹出来:目标对象、要设置的field的入参。就可以像下面这样执行了:
	Field field;
	...

	/**
         * 从堆栈依次出栈:
         * value,objectref
         */
        Object value = context.getOperandStack().removeLast();
        Object target = context.getOperandStack().removeLast();
        try {
            field.set(target,value);
        } catch (IllegalAccessException e) {
            throw new RuntimeException(e);
        }
执行引擎核心逻辑与指令的执行顺序控制
本来,我一开始是直接遍历某个方法的指令集的:
public boolean checkAndSetF1(int);
descriptor: (I)Z
flags: ACC_PUBLIC
Code:
  stack=1, locals=4, args_size=2
     0: iconst_1
     1: istore_2
     2: iload_1
     3: iflt          10
     6: iconst_1
     7: goto          11
    10: iconst_0
    11: istore_3
    12: iload_3
    13: ireturn
就是按顺序执行,0 1 2 ...13 。但是这是有bug的,因为我忽略了下面这种跳转指令:
     3: iflt          10
	 ...
     7: goto          11
所以,后来我改成了,将这个指令集合,弄成一个链表,每个指令中,维护下一条指令的引用。
@Data
public class MethodInstructionVO {
    /**
     * 序列号
     */
    private String sequenceNumber;

    /**
     * 操作码
     */
    private String opcode;

    /**
     * 操作码的说明
     */
    private String opCodeDesc;

    /**
     * 操作数
     */
    private String operand;

    /**
     * 操作数的说明
     */
    private String comment;

    /**
     * 按顺序执行的情况下的下一条指令,比如,javap反编译后,字节码如下:
     *          0: iconst_1
     *          1: istore_2
     *          2: iload_1
     *          3: iflt          10
     *          6: iconst_1
     *          7: goto          11
     * 那么,0: iconst_1 这条指令的nextInstruction就会执行偏移为1的那个;
     */
    @JSONField(serialize = false)
    MethodInstructionVO nextInstruction;
}
上面的最后一个字段,就是用来指向下一条指令的。默认就是指向下一条,比如:
  stack=1, locals=4, args_size=2
     0: iconst_1     -- next指向 1
     1: istore_2     -- next指向 2
     2: iload_1      -- next指向 3,最后一条的next为null
大概的核心执行框架如下:
		1.
		MethodInstructionVO currentInstruction = instructionVOList.get(0);

        while (true) {
            // 2.
            ExecutorByOpCode executorByOpCode = executorByOpCodeMap.get(currentInstruction.getOpcode());
            if (executorByOpCode == null) {
                log.info("currentInstruction:{}", currentInstruction);
            }
            // 3.
            InstructionExecutionContext context = new InstructionExecutionContext();
            context.setTarget(target);
            context.setConstantPoolItems(constantPoolItems);
            context.setLocalVariables(localVariables);
            context.setOperandStack(operandStack);
            String desc = OpCodeEnum.getDescByNameIgnoreCase(currentInstruction.getOpcode());
            currentInstruction.setOpCodeDesc(desc);
            context.setInstructionVO(currentInstruction);

            /**
             * 4. 如果该字节码执行后,返回值不为空,则表示,需要跳转到其他指令执行
             */
            InstructionExecutionResult instructionExecutionResult =
                    executorByOpCode.execute(context);
            log.info("after {},\noperand stack:{},\nlocal variables:{}", JSONObject.toJSONString(currentInstruction, SerializerFeature.PrettyFormat),
                    operandStack, localVariables);

			// 5
            if (instructionExecutionResult == null) {
                currentInstruction = currentInstruction.getNextInstruction();
                if (currentInstruction == null) {
                    System.out.println("execute over---------------");
                    break;
                }
                continue;
            } else if (instructionExecutionResult.isReturnInstruction()) {
                // 6
                return instructionExecutionResult.getResult();
            } else if (instructionExecutionResult.isExceptional()) {
                // 7
                log.info("method execute over,throw exception:{}", instructionExecutionResult.getResult());
                throw (Throwable) instructionExecutionResult.getResult();
            }
          // 8
                String sequenceNum = instructionExecutionResult.getInstructionSequenceNum();
            currentInstruction = instructionVOHashMap.get(sequenceNum);
            log.info("will skip to {}", currentInstruction);
        }
-
1处,默认获取第一条指令
-
2处,获取指令对应的处理器,比如,获取iconst_1指令对应的处理器
-
3处,构造要传入处理器的参数上下文,包括了当前指令、操作数栈、本地变量表、常量池等
-
4处,调用第二步的处理器的execute方法,传入第三步的参数;将执行结果赋值给局部变量
instructionExecutionResult。
-
5处,如果返回结果为null,说明不需要跳转,则将当前指令的next,赋值给当前指令。
if (instructionExecutionResult == null) { currentInstruction = currentInstruction.getNextInstruction(); -
6处,如果返回结果不为空,且是return指令,则直接返回结果
-
7处,如果返回结果不为空,且是抛出了异常,则将异常继续抛出
-
8处,如果返回结果不为空,比如遇到goto 指令,处理器返回时,会在instructionExecutionResult的instructionSequenceNum字段,设置要跳转到的指令;则查找到该指令,赋值给currentInstruction
如何根据字节码指令,查找处理器
定义了一个通用的处理器:
public interface ExecutorByOpCode {
    String getOpCode();

    /**
     *
     * @param context
     * @return 如果需要跳转,则返回要跳转的指令的偏移量;否则返回null
     */
    InstructionExecutionResult execute(InstructionExecutionContext context);
}
然后,我这边针对各种指令,写了一堆实现类:

拿一个最简单的iconst_0举例:
@Component
public class ExecutorForIConst0 extends BaseExecutorForIConstN implements ExecutorByOpCode{

    @Override
    public String getOpCode() {
        return OpCodeEnum.iconst_0.name();
    }

    @Override
    public InstructionExecutionResult execute(InstructionExecutionContext context) {
        super.execute(context, 0);
        return null;
    }
}

public class BaseExecutorForIConstN {
	// 1
    public void execute(InstructionExecutionContext context,Integer counter) {
        context.getOperandStack().addLast(counter);
    }
}
- 1处,将常量0,压入操作数栈。
每个字节码处理器,都注解了@Component,然后在执行引擎类中,注入了全部的处理器:
@Component
@Slf4j
public class MethodExecutionEngine implements InitializingBean {
    ClassInfo classInfo;

    // 1
    @Autowired
    private List<ExecutorByOpCode> executorByOpCodes;

  	private Map<String, ExecutorByOpCode> executorByOpCodeMap = new HashMap<>();

  // 2
  @Override
    public void afterPropertiesSet() throws Exception {
        if (executorByOpCodes != null) {
            for (ExecutorByOpCode executorByOpCode : executorByOpCodes) {
                executorByOpCodeMap.put(executorByOpCode.getOpCode().toLowerCase(), executorByOpCode);
            }

        }
    }
- 1处,注入全部的处理器
- 2处,将处理器写入map,key:字节码指令;value:处理器本身。
- 后续执行引擎,就可以根据字节码指令,查找到对应的处理器。
遍历读取文件所有行,采用visitor模式回调visitor接口
就是普通的读文件,写得比较随意,读成了行的集合。
	String filepath = "F:\\ownprojects\\all-simple-demo-in-work\\class-bytecode-analyse-engine\\target\\classes\\com\\yn\\sample\\a.txt";
        JavapClassFileParser javapClassFileParser = context.getBean(JavapClassFileParser.class);
        ClassInfo classInfo = javapClassFileParser.parse(filepath);
在parse方法内,代码如下:
		// 1
		lines = FileReaderUtil.readFile2Lines(filePath);
        if (CollectionUtils.isEmpty(lines)) {
            return null;
        }

		// 2
        ClassMethodCodeVisitor classMethodCodeVisitor = null;
        for (int i = 0; i < lines.size(); i++) {
            String currentLine = lines.get(i);
            if (i == 0) {
              ...
-
1处,读取文件,获取全部行
-
遍历所有行,这块写得比较乱一点,比如,当前行包含了“Constant pool:”时,将当前解析状态修改为
常量池解析开始:/** * 当本行包含Constant pool:时,接下来就是一堆的常量: * Constant pool: * #1 = Methodref #6.#25 // java/lang/Object."<init>":()V * #2 = Fieldref #5.#26 // com/yn/sample/CheckAndSet.f:I * 切换状态到常量池解析开始的状态 */ if (currentLine.contains("Constant pool:")) { classConstantPoolInfoVisitor.visitConstantPoolStarted(); state = ParseStateEnum.CONSTANT_POOL_STARTED.state; continue; }下一次循环,就会进入解析状态为
常量池解析开始时的逻辑:if (state == ParseStateEnum.CONSTANT_POOL_STARTED.state) { // 1. ConstantPoolItem item = ParseEngineHelper.parseConstantPoolItem(currentLine); if (item == null) { // 2. classConstantPoolInfoVisitor.visitConstantPoolEnd(); state = ParseStateEnum.METHOD_INFO_STARTED.state; continue; } else { // 3 classConstantPoolInfoVisitor.visitConstantPoolItem(item); continue; } }-
1处,当前行的格式应该为,
#1 = Methodref #6.#26 // java/lang/Object."<init>":()V根据正则,解析当前行为如下结构:
public class ConstantPoolItem { /** * 格式如: * #1 */ private String id; /** * 如: * Methodref */ private ConstantPoolItemTypeEnum constantPoolItemTypeEnum; /** * #6.#25 */ private String value; /** * 对于value的注释,因为value字段一般就是对常量池的id引用, * javap反编译后,为了方便大家阅读,这里会显示为相应的常量 */ private String comment; } -
2处,如果返回的常量池对象为null,说明当前常量池解析结束,则修改解析状态为:
方法解析开始。 -
3处,如果解析出来了常量池对象,则回调visitor接口。
-
在解析过程中,会不断回调我们的visitor接口,比如:
package com.yn.sample.visitor;

import com.yn.sample.domain.ConstantPoolItem;

import java.util.ArrayList;

public interface ClassConstantPoolInfoVisitor {
    /**
     * 常量池解析开始
     */
    void visitConstantPoolStarted();

    /**
     * 解析到每一个常量池对象时,回调本方法
     * @param constantPoolItem
     */
    void visitConstantPoolItem(ConstantPoolItem constantPoolItem);

    /**
     * 常量池解析结束
     */
    void visitConstantPoolEnd();

    /**
     * 获取最终的常量池对象
     * @return
     */
    ArrayList<ConstantPoolItem> getConstantPoolItemList();
}
整体流程
-
读取文件,获取字节码
package com.yn.sample;


@Component
@ComponentScan("com.yn.sample")
public class BootStrap {
    public static void main(String[] args) throws Throwable {
        AnnotationConfigApplicationContext context = new AnnotationConfigApplicationContext(BootStrap.class);
        /**
         * 解析文件
         */
        String filepath = "F:\\ownprojects\\all-simple-demo-in-work\\class-bytecode-analyse-engine\\target\\classes\\com\\yn\\sample\\a.txt";
        JavapClassFileParser javapClassFileParser = context.getBean(JavapClassFileParser.class);
        ClassInfo classInfo = javapClassFileParser.parse(filepath);

    }
}
字节码读取后,存在classInfo中。
-
调用CheckAndSet类的实例的checkAndSetF(int)接口,参数为12,即,调用如下方法:
public void checkAndSetF(int f) { if (f >= 0) { this.f = f; } else { throw new IllegalArgumentException(); } } -
构造本地变量list、操作数栈
private Object doExecute(Object target, MethodInfo methodInfo, List<ConstantPoolItem> constantPoolItems, List<Object> arguments) throws Throwable { List<MethodInstructionVO> instructionVOList = methodInfo.getInstructionVOList(); /** * 构造next字段,将字节码指令list转变为链表 */ assemblyInstructionList2LinkedList(instructionVOList); /** * 本地变量表,按照从javap中解析出来的: * Code: * stack=1, locals=4, args_size=2 * 来创建本地变量的堆栈 */ Integer localVariablesSize = methodInfo.getMethodCodeStackSizeAndLocalVariablesTableSize().getLocalVariablesSize(); List<Object> localVariables = constructLocalVariableList(target, arguments, localVariablesSize); /** * 构造指令map,方便后续跳转指令使用 * key:指令的sequenceNum * value:指令 */ HashMap<String, MethodInstructionVO> instructionVOHashMap = new HashMap<>(); for (MethodInstructionVO vo : instructionVOList) { instructionVOHashMap.put(vo.getSequenceNumber(), vo); } return null; } -
调用执行引擎逐行解释执行字节码
这部分参见前面,已经讲过。
总结
源码放在:
https://gitee.com/ckl111/class-bytecode-analyse-engine
目前没实现的有:
- 方法调用方法,只支持调用单个方法。方法堆栈待实现。
- 很多其他各种指令
目前只能执行下面这个类中的方法,后续遇到其他字节码指令,再慢慢加吧:
后续有时间再写其他的吧,如果大家有兴趣,可以自己写。

 浙公网安备 33010602011771号