曹工说Spring Boot源码(15)-- Spring从xml文件里到底得到了什么(context:load-time-weaver 完整解析)
写在前面的话
相关背景及资源:
曹工说Spring Boot源码(1)-- Bean Definition到底是什么,附spring思维导图分享
曹工说Spring Boot源码(2)-- Bean Definition到底是什么,咱们对着接口,逐个方法讲解
曹工说Spring Boot源码(3)-- 手动注册Bean Definition不比游戏好玩吗,我们来试一下
曹工说Spring Boot源码(4)-- 我是怎么自定义ApplicationContext,从json文件读取bean definition的?
曹工说Spring Boot源码(5)-- 怎么从properties文件读取bean
曹工说Spring Boot源码(6)-- Spring怎么从xml文件里解析bean的
曹工说Spring Boot源码(7)-- Spring解析xml文件,到底从中得到了什么(上)
曹工说Spring Boot源码(8)-- Spring解析xml文件,到底从中得到了什么(util命名空间)
曹工说Spring Boot源码(9)-- Spring解析xml文件,到底从中得到了什么(context命名空间上)
曹工说Spring Boot源码(10)-- Spring解析xml文件,到底从中得到了什么(context:annotation-config 解析)
曹工说Spring Boot源码(11)-- context:component-scan,你真的会用吗(这次来说说它的奇技淫巧)
曹工说Spring Boot源码(12)-- Spring解析xml文件,到底从中得到了什么(context:component-scan完整解析)
曹工说Spring Boot源码(13)-- AspectJ的运行时织入(Load-Time-Weaving),基本内容是讲清楚了(附源码)
曹工说Spring Boot源码(14)-- AspectJ的Load-Time-Weaving的两种实现方式细细讲解,以及怎么和Spring Instrumentation集成
工程结构图:

概要
本篇是spring源码的第15篇,前面13/14两篇,重点讲了load-time-weaver的使用和底层原理。load-time-weaver,通俗地说,就是在JVM加载class时做文章,本来加载一个class A,但是实际JVM加载的class A,可能是被增强过的,被修改过的,所以,这是一种应用面更广,适用场景更多的,性能也更加优秀的aop方案,避免了运行时aop的性能消耗。
使用
使用demo,我这边有两个:
-
tomcat war包场景:
https://gitee.com/ckl111/all-simple-demo-in-work/tree/master/test-load-time-weaver
本应用为war包应用,ide里使用tomcat启动即可,访问:
http://localhost:20000/test.do (端口修改为自己的)。
访问上述url后,可以看到效果:

-
java独立应用场景:
https://gitee.com/ckl111/all-simple-demo-in-work/tree/master/spring-load-time-weave-demo
本应用为独立应用,直接启动foo.Main中的main方法即可。
值得注意的是,此时启动时,需要指定:-javaagent:E:\repo\org\springframework\spring-instrument\4.3.7.RELEASE\spring-instrument-4.3.7.RELEASE.jar
执行main方法后,效果如下:
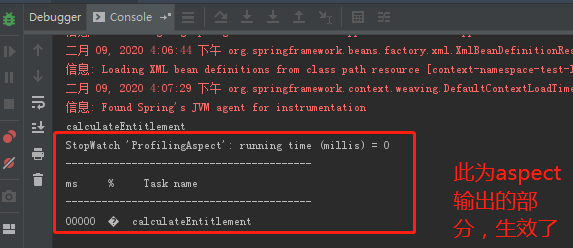
代码我就不仔细拉下来讲了,和前面13、14两讲差不多。
context:load-time-weaver的解析
上面两个demo,都是在spring的配置文件里,进行了如下配置:
<beans xmlns="http://www.springframework.org/schema/beans"
       xmlns:xsi="http://www.w3.org/2001/XMLSchema-instance"
       xmlns:context="http://www.springframework.org/schema/context"
       xsi:schemaLocation="http://www.springframework.org/schema/beans
        http://www.springframework.org/schema/beans/spring-beans.xsd
                http://www.springframework.org/schema/context
                 http://www.springframework.org/schema/context/spring-context.xsd">
	// 运行时加载的核心,就在于此
    <context:load-time-weaver/>

</beans>
我们知道,解析context命名空间的,主要是org.springframework.context.config.ContextNamespaceHandler。
package org.springframework.context.config;

public class ContextNamespaceHandler extends NamespaceHandlerSupport {

   @Override
   public void init() {
      registerBeanDefinitionParser("property-placeholder", new PropertyPlaceholderBeanDefinitionParser());
      registerBeanDefinitionParser("property-override", new PropertyOverrideBeanDefinitionParser());
      registerBeanDefinitionParser("annotation-config", new AnnotationConfigBeanDefinitionParser());
      registerBeanDefinitionParser("component-scan", new ComponentScanBeanDefinitionParser());
      // 这个就是我们要找的
      registerBeanDefinitionParser("load-time-weaver", new LoadTimeWeaverBeanDefinitionParser());
      registerBeanDefinitionParser("spring-configured", new SpringConfiguredBeanDefinitionParser());
      registerBeanDefinitionParser("mbean-export", new MBeanExportBeanDefinitionParser());
      registerBeanDefinitionParser("mbean-server", new MBeanServerBeanDefinitionParser());
   }

}
从上述init方法中,可以看出,解析load-time-weaver元素的类为:LoadTimeWeaverBeanDefinitionParser。
该类的类结构如下,可以看到,实现了BeanDefinitionParser,这个接口的方法,很简单,就是给你一个xml元素,你负责解析BeanDefinition。
import org.w3c.dom.Element;
import org.springframework.beans.factory.config.BeanDefinition;

public interface BeanDefinitionParser {

   BeanDefinition parse(Element element, ParserContext parserContext);

}

我们现在看下本解析类的实现:
@Override
protected void doParse(Element element, ParserContext parserContext, BeanDefinitionBuilder builder) {
   builder.setRole(BeanDefinition.ROLE_INFRASTRUCTURE);
   // 判断aspectJ织入是否启用,一般来说,只要classpath下存在META-INF/aop.xml,就算做启用
   if (isAspectJWeavingEnabled(element.getAttribute(ASPECTJ_WEAVING_ATTRIBUTE), parserContext)) {
      if (!parserContext.getRegistry().containsBeanDefinition(ASPECTJ_WEAVING_ENABLER_BEAN_NAME)) {
         // 注册一个bean,bean的class为ASPECTJ_WEAVING_ENABLER_CLASS_NAME常量,该常量为:org.springframework.context.weaving.AspectJWeavingEnabler
         RootBeanDefinition def = new RootBeanDefinition(ASPECTJ_WEAVING_ENABLER_CLASS_NAME);
         parserContext.registerBeanComponent(
               new BeanComponentDefinition(def, ASPECTJ_WEAVING_ENABLER_BEAN_NAME));
      }

      if (isBeanConfigurerAspectEnabled(parserContext.getReaderContext().getBeanClassLoader())) {
         new SpringConfiguredBeanDefinitionParser().parse(element, parserContext);
      }
   }
}

// 判断aspectJ织入是否启用,一般来说,只要classpath下存在META-INF/aop.xml,就算做启用
protected boolean isAspectJWeavingEnabled(String value, ParserContext parserContext) {
   if ("on".equals(value)) {
      return true;
   }
   else if ("off".equals(value)) {
      return false;
   }
   else {
      ClassLoader cl = parserContext.getReaderContext().getResourceLoader().getClassLoader();
      return (cl.getResource("META-INF/aop.xml") != null);
   }
}
我们从上面这段代码,可以看到,doParse时,注册了一个beanDefinition,该beanDefinition的class为:
org.springframework.context.weaving.AspectJWeavingEnabler。
其实,这段代码总共会注册2个bean definition:
-
doParse方法的参数BeanDefinitionBuilder builder,大家看到了吧,这个参数是父类传进来的,最终会被注册为一个bean definition,这个bean的class是啥呢,可以看到下面的代码,获取class是调用了子类的getBeanClassName。
// 本类为上述解析类LoadTimeWeaverBeanDefinitionParser的父类
org.springframework.beans.factory.xml.AbstractSingleBeanDefinitionParser

@Override
protected final AbstractBeanDefinition parseInternal(Element element, ParserContext parserContext) {
   BeanDefinitionBuilder builder = BeanDefinitionBuilder.genericBeanDefinition();
   String parentName = getParentName(element);
   if (parentName != null) {
      builder.getRawBeanDefinition().setParentName(parentName);
   }
	// 调用子类的方法,获取bean class
    String beanClassName = getBeanClassName(element);
    if (beanClassName != null) {
        builder.getRawBeanDefinition().setBeanClassName(beanClassName);
    }
   // 就是这里,会把builder传给子类进行处理;
   doParse(element, parserContext, builder);
   // 这里会通过builder,获取到BeanDefinition,返回给上层去注册
   return builder.getBeanDefinition();
}
// 被父类调用,获取bean class,这里返回的class为:首先看看xml元素是否设置了该属性,如果没设置,返回默认class:org.springframework.context.weaving.DefaultContextLoadTimeWeaver @Override protected String getBeanClassName(Element element) { if (element.hasAttribute(WEAVER_CLASS_ATTRIBUTE)) { return element.getAttribute(WEAVER_CLASS_ATTRIBUTE); } return DEFAULT_LOAD_TIME_WEAVER_CLASS_NAME; } -
大家在前面看到了,除了上面注册的这个bean definition,在LoadTimeWeaverBeanDefinitionParser的doParse里,还注册了一个bean definition,类型为org.springframework.context.weaving.AspectJWeavingEnabler。
本来可能还会注册一个,这个暂时不太了解,先跳过:
@Override
protected void doParse(Element element, ParserContext parserContext, BeanDefinitionBuilder builder) {
   builder.setRole(BeanDefinition.ROLE_INFRASTRUCTURE);

   if (isAspectJWeavingEnabled(element.getAttribute(ASPECTJ_WEAVING_ATTRIBUTE), parserContext)) {
      if (!parserContext.getRegistry().containsBeanDefinition(ASPECTJ_WEAVING_ENABLER_BEAN_NAME)) {
         RootBeanDefinition def = new RootBeanDefinition(ASPECTJ_WEAVING_ENABLER_CLASS_NAME);
         parserContext.registerBeanComponent(
               new BeanComponentDefinition(def, ASPECTJ_WEAVING_ENABLER_BEAN_NAME));
      }
	// 这里如果满足,还会自动注册<context:spring-configured/>
      if (isBeanConfigurerAspectEnabled(parserContext.getReaderContext().getBeanClassLoader())) 	{
         new SpringConfiguredBeanDefinitionParser().parse(element, parserContext);
      }
   }
}
汇总一下,注册了2个bean definition,其中一个为特殊类型的bean
| bean class | bean 类型 | 实现的接口 |
|---|---|---|
| DefaultContextLoadTimeWeaver | 普通bean | LoadTimeWeaver,BeanClassLoaderAware |
| AspectJWeavingEnabler | 实现了BeanFactoryPostProcessor,会在spring获取完成全部的bean definition后,会所有的bean definition进行后置处理 | BeanFactoryPostProcessor, BeanClassLoaderAware, LoadTimeWeaverAware, |
context:load-time-weaver如何生效
上面我们看到,注册的两个bean,其中一个比较特殊,是实现了BeanFactoryPostProcessor接口的。
按理说,正常的流程是:
- spring扫描xml或注解,获取注册的bean definition
- BeanFactoryPostProcessor对第一步获取到的bean definition进行处理,可能是修改,也有可能会注册更多的bean definition,这一步完成后,才是最终的bean definition集合
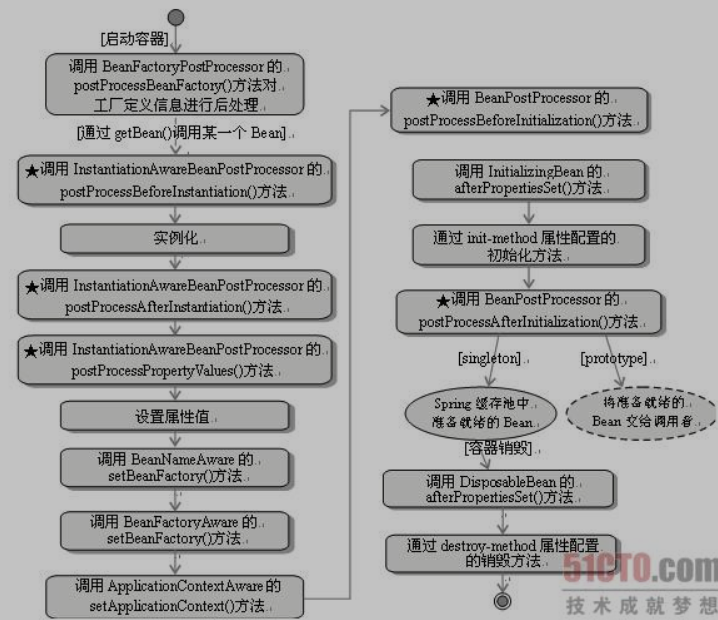
- 对全部的bean definition集合挨个遍历,如果是单例,且没有设置为lazy-init,则马上对其进行实例化。其中,这一步又有几个小步骤。我这里找了个网上的图,相对还比较准确。
但还有个问题,既然第二步中,BeanFactoryPostProcessor要去处理spring中所有的bean definition,那,BeanFactoryPostProcessor要怎么生成呢?
不用担心,BeanFactoryPostProcessor 它自己也是bean definition,生成的话,也是走和普通bean definition一样的流程。只是,BeanFactoryPostProcessor这些bean 的生成的时机比较超前。
下面这个代码,大家肯定比较熟悉了:
public void refresh() throws BeansException, IllegalStateException {
   synchronized (this.startupShutdownMonitor) {
      // Prepare this context for refreshing.
      prepareRefresh();

      // Tell the subclass to refresh the internal bean factory.
      ConfigurableListableBeanFactory beanFactory = obtainFreshBeanFactory();

      // Prepare the bean factory for use in this context.
      prepareBeanFactory(beanFactory);

      try {
         // Allows post-processing of the bean factory in context subclasses.
         postProcessBeanFactory(beanFactory);

         // BeanFactoryPostProcessor 这种类型的bean,在此时发挥作用,这时,就会通过getBean来先进行它自身的实例化
         invokeBeanFactoryPostProcessors(beanFactory);

         // Register bean processors that intercept bean creation.
         registerBeanPostProcessors(beanFactory);

         // Initialize message source for this context.
         initMessageSource();

         // Initialize event multicaster for this context.
         initApplicationEventMulticaster();

         // Initialize other special beans in specific context subclasses.
         onRefresh();

         // Check for listener beans and register them.
         registerListeners();

         // Instantiate all remaining (non-lazy-init) singletons.
         finishBeanFactoryInitialization(beanFactory);

         // Last step: publish corresponding event.
         finishRefresh();
      }
   }
}
在上述的 invokeBeanFactoryPostProcessors(beanFactory)中,中间会调用到下面的代码:
#org.springframework.context.support.PostProcessorRegistrationDelegate

public static void invokeBeanFactoryPostProcessors(
      ConfigurableListableBeanFactory beanFactory, List<BeanFactoryPostProcessor> beanFactoryPostProcessors) {
   // 获取各种BeanFactoryPostProcessor
   ...

   String[] postProcessorNames =
         beanFactory.getBeanNamesForType(BeanFactoryPostProcessor.class, true, false);
   ...

   // 这里,遍历所有的BeanFactoryPostProcessor,对每个BeanFactoryPostProcessor进行getBean来实例化
   List<BeanFactoryPostProcessor> orderedPostProcessors = new ArrayList<BeanFactoryPostProcessor>();
   for (String postProcessorName : orderedPostProcessorNames) {
      orderedPostProcessors.add(beanFactory.getBean(postProcessorName, BeanFactoryPostProcessor.class));
   }
   invokeBeanFactoryPostProcessors(orderedPostProcessors, beanFactory);

   ...
   beanFactory.clearMetadataCache();
}
这里,我们只关注我们前文通过context:load-time-weaver解析到的那个AspectJWeavingEnabler:
public class AspectJWeavingEnabler
      implements BeanFactoryPostProcessor, BeanClassLoaderAware, LoadTimeWeaverAware, Ordered
它实现了BeanClassLoaderAware,spring会把当前使用的类加载器传给这个bean;
它实现了LoadTimeWeaverAware,spring会给它传递一个LoadTimeWeaver:
public interface LoadTimeWeaverAware extends Aware {

   void setLoadTimeWeaver(LoadTimeWeaver loadTimeWeaver);
}
调用setLoadTimeWeaver传递LoadTimeWeaver,发生在什么时候呢?
其实,这个操作是由org.springframework.context.weaving.LoadTimeWeaverAwareProcessor来完成的,这个类,是一个BeanPostProcessor,既然是BeanPostProcessor,就是在bean已经生成了之后,实例化之前。
也就是说,在AspectJWeavingEnabler这个bean被创建后,但是还没有实例化之前,会调用BeanPostProcessor来对bean进行处理;其中一个BeanPostProcessor就是LoadTimeWeaverAwareProcessor。
我们接下来看LoadTimeWeaverAwareProcessor的实现:
org.springframework.context.weaving.LoadTimeWeaverAwareProcessor

@Override
public Object postProcessBeforeInitialization(Object bean, String beanName) throws BeansException {
   if (bean instanceof LoadTimeWeaverAware) {
      LoadTimeWeaver ltw = this.loadTimeWeaver;
      if (ltw == null) {
      	 // 通过spring 的beanFactory去获取LoadTimeWeaver bean
         ltw = this.beanFactory.getBean(
               ConfigurableApplicationContext.LOAD_TIME_WEAVER_BEAN_NAME, LoadTimeWeaver.class);
      }
      // 这里,会把LoadTimeWeaver bean,设置给AspectJWeavingEnabler 这个bean
      ((LoadTimeWeaverAware) bean).setLoadTimeWeaver(ltw);
   }
   return bean;
}
LoadTimeWeaver bean的获取
上面,我们看到了,在LoadTimeWeaverAwareProcessor 里,要去通过getBean(LoadTimeWeaver.class)来获取LoadTimeWeaver。
我们知道,这个bean definition已经在解析context:load-time-weaver时注册了,其类型为:
DefaultContextLoadTimeWeaver,这个bean class不特别,一个普通bean,实现了LoadTimeWeaver接口,还实现了一个生命周期接口:BeanClassLoaderAware
// 需要感知BeanClassLoader,因此实现了BeanClassLoaderAware
public class DefaultContextLoadTimeWeaver implements LoadTimeWeaver, BeanClassLoaderAware, DisposableBean

public interface BeanClassLoaderAware extends Aware {
	void setBeanClassLoader(ClassLoader classLoader);
}
我们先看看其实现的功能接口LoadTimeWeaver:
public interface LoadTimeWeaver {
   // 这个方法,我们可以传:类字节码转换器;也就是说,切面的那些逻辑,就是封装为ClassFileTransformer传递进去
   void addTransformer(ClassFileTransformer transformer);

   ClassLoader getInstrumentableClassLoader();
}
我们再看看它的setBeanClassLoader方法,有什么特别的没:
@Override
public void setBeanClassLoader(ClassLoader classLoader) {
   // 根据classloader来创建容器相关的 LoadTimeWeaver
   LoadTimeWeaver serverSpecificLoadTimeWeaver = createServerSpecificLoadTimeWeaver(classLoader);
   if (serverSpecificLoadTimeWeaver != null) {
      if (logger.isInfoEnabled()) {
         logger.info("Determined server-specific load-time weaver: " +
               serverSpecificLoadTimeWeaver.getClass().getName());
      }
      this.loadTimeWeaver = serverSpecificLoadTimeWeaver;
   }
   else if (InstrumentationLoadTimeWeaver.isInstrumentationAvailable()) {
      logger.info("Found Spring's JVM agent for instrumentation");
      this.loadTimeWeaver = new InstrumentationLoadTimeWeaver(classLoader);
   }
   else {
      try {
         this.loadTimeWeaver = new ReflectiveLoadTimeWeaver(classLoader);
         logger.info("Using a reflective load-time weaver for class loader: " +
               this.loadTimeWeaver.getInstrumentableClassLoader().getClass().getName());
      }
      catch (IllegalStateException ex) {
         throw new IllegalStateException(ex.getMessage() + " Specify a custom LoadTimeWeaver or start your " +
               "Java virtual machine with Spring's agent: -javaagent:org.springframework.instrument.jar");
      }
   }
}
这个方法,其实很关键,这里就会根据当前的classloader,来判断当前属于哪个容器环境。这个逻辑在createServerSpecificLoadTimeWeaver里,如果当前classloader的名字,以org.apache.catalina开头,说明当前是在tomcat里运行,就会创建tomcat的相应实现类的实例。
protected LoadTimeWeaver createServerSpecificLoadTimeWeaver(ClassLoader classLoader) {
   String name = classLoader.getClass().getName();
   try {
      if (name.startsWith("weblogic")) {
         return new WebLogicLoadTimeWeaver(classLoader);
      }
      else if (name.startsWith("org.glassfish")) {
         return new GlassFishLoadTimeWeaver(classLoader);
      }
      // 如果当前classloader的名字,以org.apache.catalina开头,说明当前是在tomcat里运行
      else if (name.startsWith("org.apache.catalina")) {
         return new TomcatLoadTimeWeaver(classLoader);
      }
      else if (name.startsWith("org.jboss")) {
         return new JBossLoadTimeWeaver(classLoader);
      }
      else if (name.startsWith("com.ibm")) {
         return new WebSphereLoadTimeWeaver(classLoader);
      }
   }
   catch (IllegalStateException ex) {
      logger.info("Could not obtain server-specific LoadTimeWeaver: " + ex.getMessage());
   }
   return null;
}
大家可以看看类图:

所以,大家看到,LoadTimeWeaver有多种实现,前面就会根据当前classloader的名称(比如在tomcat时,当前线程的classloader是org.apache.catalina.loader.WebappClassLoader,来创建LoadTimeWeaver在tomcat下的实现类TomcatLoadTimeWeaver的实例)
如果是独立的java应用,则会创建InstrumentationLoadTimeWeaver 这种实现类的实例,供后续使用。
AspectJWeavingEnabler这个BeanFactoryPostProcessor 如何工作
经过上面的讲解,我们获取到了LoadTimeWeaver bean,最终呢,这个bean也会设置到AspectJWeavingEnabler 里面。
为啥呢,因为AspectJWeavingEnabler实现了 LoadTimeWeaverAware的,还记得吧。
public class AspectJWeavingEnabler
		implements BeanFactoryPostProcessor, BeanClassLoaderAware, LoadTimeWeaverAware, Ordered
那么,一切就绪,我们看看这个BeanFactoryPostProcessor是怎么处理spring 的bean definition的。
public class AspectJWeavingEnabler
		implements BeanFactoryPostProcessor, BeanClassLoaderAware, LoadTimeWeaverAware, Ordered {

	private ClassLoader beanClassLoader;

	private LoadTimeWeaver loadTimeWeaver;

	public static final String ASPECTJ_AOP_XML_RESOURCE = "META-INF/aop.xml";


	public void setBeanClassLoader(ClassLoader classLoader) {
		this.beanClassLoader = classLoader;
	}

	public void setLoadTimeWeaver(LoadTimeWeaver loadTimeWeaver) {
		this.loadTimeWeaver = loadTimeWeaver;
	}

    // ok,就是这里
    @override
	public void postProcessBeanFactory(ConfigurableListableBeanFactory beanFactory) throws BeansException {
         //调用
		enableAspectJWeaving(this.loadTimeWeaver, this.beanClassLoader);
	}


	public static void enableAspectJWeaving(LoadTimeWeaver weaverToUse, ClassLoader beanClassLoader) {
         // 这里,因为weaverToUse已经是有值了,所以,会直接进入下面去
		if (weaverToUse == null) {
			if (InstrumentationLoadTimeWeaver.isInstrumentationAvailable()) {
				weaverToUse = new InstrumentationLoadTimeWeaver(beanClassLoader);
			}
			else {
				throw new IllegalStateException("No LoadTimeWeaver available");
			}
		}
        // 针对注入进来的LoadTimeWeaver,调用它的addTransformer,把aspectJ的ClassFileTransformer设置进去
		weaverToUse.addTransformer(new AspectJClassBypassingClassFileTransformer(
					new ClassPreProcessorAgentAdapter()));
	}
这里的weaverToUse,我们知道,就是前面说的DefaultContextLoadTimeWeaver。
我们看看DefaultContextLoadTimeWeaver的addTransformer方法,发现它代理给了具体的LoadTimeWeaver:
	public void addTransformer(ClassFileTransformer transformer) {
		this.loadTimeWeaver.addTransformer(transformer);
	}
tomcat下运行时的实现类
假设我们是在tomcat模式下运行,这里实际调用的,就是tomcat的实现类:
public class TomcatLoadTimeWeaver implements LoadTimeWeaver {

	private static final String INSTRUMENTABLE_LOADER_CLASS_NAME = "org.apache.tomcat.InstrumentableClassLoader";


	private final ClassLoader classLoader;

	private final Method addTransformerMethod;

	private final Method copyMethod;


	public TomcatLoadTimeWeaver() {
		this(ClassUtils.getDefaultClassLoader());
	}

	public TomcatLoadTimeWeaver(ClassLoader classLoader) {
		Assert.notNull(classLoader, "ClassLoader must not be null");
		this.classLoader = classLoader;

		Class<?> instrumentableLoaderClass;
		try {
			instrumentableLoaderClass = classLoader.loadClass(INSTRUMENTABLE_LOADER_CLASS_NAME);
			if (!instrumentableLoaderClass.isInstance(classLoader)) {
				// Could still be a custom variant of a convention-compatible ClassLoader
				instrumentableLoaderClass = classLoader.getClass();
			}
		}
		catch (ClassNotFoundException ex) {
			// We're on an earlier version of Tomcat, probably with Spring's TomcatInstrumentableClassLoader
			instrumentableLoaderClass = classLoader.getClass();
		}

		try {
			this.addTransformerMethod = instrumentableLoaderClass.getMethod("addTransformer", ClassFileTransformer.class);
			// Check for Tomcat's new copyWithoutTransformers on InstrumentableClassLoader first
			Method copyMethod = ClassUtils.getMethodIfAvailable(instrumentableLoaderClass, "copyWithoutTransformers");
			if (copyMethod == null) {
				// Fallback: expecting TomcatInstrumentableClassLoader's getThrowawayClassLoader
				copyMethod = instrumentableLoaderClass.getMethod("getThrowawayClassLoader");
			}
			this.copyMethod = copyMethod;
		}
		catch (Throwable ex) {
			throw new IllegalStateException(
					"Could not initialize TomcatLoadTimeWeaver because Tomcat API classes are not available", ex);
		}
	}


	@Override
	public void addTransformer(ClassFileTransformer transformer) {
        this.addTransformerMethod.invoke(this.classLoader, transformer);
	}

}
其实,这里的addTransformer实现,就是调用了addTransformerMethod 这个method,这个method呢,其实就是:
org.apache.tomcat.InstrumentableClassLoader.addTransformerMethod (ClassFileTransformer transformer)方法,有兴趣大家可以翻到第14篇看一下,里面很详细介绍了tomcat的实现细节。
java独立应用时的实现类
此时的实现类,就是InstrumentationLoadTimeWeaver。
public class InstrumentationLoadTimeWeaver implements LoadTimeWeaver {

	private static final boolean AGENT_CLASS_PRESENT = ClassUtils.isPresent(
			"org.springframework.instrument.InstrumentationSavingAgent",
			InstrumentationLoadTimeWeaver.class.getClassLoader());


	private final ClassLoader classLoader;

	private final Instrumentation instrumentation;

	private final List<ClassFileTransformer> transformers = new ArrayList<ClassFileTransformer>(4);


	/**
	 * Create a new InstrumentationLoadTimeWeaver for the default ClassLoader.
	 */
	public InstrumentationLoadTimeWeaver() {
		this(ClassUtils.getDefaultClassLoader());
	}

	/**
	 * Create a new InstrumentationLoadTimeWeaver for the given ClassLoader.
	 * @param classLoader the ClassLoader that registered transformers are supposed to apply to
	 */
	public InstrumentationLoadTimeWeaver(ClassLoader classLoader) {
		Assert.notNull(classLoader, "ClassLoader must not be null");
		this.classLoader = classLoader;
		this.instrumentation = getInstrumentation();
	}


	@Override
	public void addTransformer(ClassFileTransformer transformer) {
		FilteringClassFileTransformer actualTransformer =
				new FilteringClassFileTransformer(transformer, this.classLoader);
		synchronized (this.transformers) {
			if (this.instrumentation == null) {
				throw new IllegalStateException(
						"Must start with Java agent to use InstrumentationLoadTimeWeaver. See Spring documentation.");
			}
			this.instrumentation.addTransformer(actualTransformer);
			this.transformers.add(actualTransformer);
		}
	}


	/**
	 * Obtain the Instrumentation instance for the current VM, if available.
	 * @return the Instrumentation instance, or {@code null} if none found
	 * @see #isInstrumentationAvailable()
	 */
	private static Instrumentation getInstrumentation() {
		if (AGENT_CLASS_PRESENT) {
			return InstrumentationAccessor.getInstrumentation();
		}
		else {
			return null;
		}
	}


	/**
	 * Inner class to avoid InstrumentationSavingAgent dependency.
	 */
	private static class InstrumentationAccessor {

		public static Instrumentation getInstrumentation() {
			return InstrumentationSavingAgent.getInstrumentation();
		}
	}


	/**
	 * Decorator that only applies the given target transformer to a specific ClassLoader.
	 */
	private static class FilteringClassFileTransformer implements ClassFileTransformer {

		private final ClassFileTransformer targetTransformer;

		private final ClassLoader targetClassLoader;

		public FilteringClassFileTransformer(ClassFileTransformer targetTransformer, ClassLoader targetClassLoader) {
			this.targetTransformer = targetTransformer;
			this.targetClassLoader = targetClassLoader;
		}

		@Override
		public byte[] transform(ClassLoader loader, String className, Class<?> classBeingRedefined,
				ProtectionDomain protectionDomain, byte[] classfileBuffer) throws IllegalClassFormatException {

			if (!this.targetClassLoader.equals(loader)) {
				return null;
			}
			return this.targetTransformer.transform(
					loader, className, classBeingRedefined, protectionDomain, classfileBuffer);
		}
	}

}
核心就两点,如果启动时,加了下面的参数
-javaagent:E:\repo\org\springframework\spring-instrument\4.3.7.RELEASE\spring-instrument-4.3.7.RELEASE.jar
下面这个语句就是true,org.springframework.instrument.InstrumentationSavingAgent这个类里的static字段,就会将JVM暴露给我们的instrumentation保存下来。
private static final boolean AGENT_CLASS_PRESENT = ClassUtils.isPresent(
		"org.springframework.instrument.InstrumentationSavingAgent",
		InstrumentationLoadTimeWeaver.class.getClassLoader());
然后我们这里的addTransformer方法,就可以将ClassFileTransformer设置到instrumentation里面去:
@Override
public void addTransformer(ClassFileTransformer transformer) {
	FilteringClassFileTransformer actualTransformer =
			new FilteringClassFileTransformer(transformer, this.classLoader);
	synchronized (this.transformers) {
		if (this.instrumentation == null) {
			throw new IllegalStateException(
					"Must start with Java agent to use InstrumentationLoadTimeWeaver. See Spring documentation.");
		}
         // 这一句是核心! 将类字节码转换器,add到instrumentation字段。
		this.instrumentation.addTransformer(actualTransformer);
		this.transformers.add(actualTransformer);
	}
}
前面也说了,这个字段就是jvm暴露给我们的,所以我们对其进行操作,给它设置了ClassFileTransformer,以完成ltw的功能。
总结
这一篇有点长,我感觉写了好久,但如果大家能细细阅读并理解的话,我觉得目的也就达到了。但是,这个东西本身足够复杂,所以,写得肯定有不那么容易懂的地方,大家可以问我。

 浙公网安备 33010602011771号