foundationpose 部署到jetson(3)
在jetson部署FoundationPose
根据之前已经搭建好的jetson环境,在此基础上进行FoundationPose部署,若环境没有搭建好可以查看
foundationpose 部署到jetson(1)
foundationpose 部署到jetson(2)
先将前面的环境搭建好再进行FoundationPose 6D部署。
1. 所需要的环境
- Jetson Orin NX
- Jetpack 6.2 (Ubuntu2204)
- cuda 12.6
- MobaXterm
- Windows11
- vscode
- FoundationPose 源码
2. 下载源码
git clone https://github.com/NVlabs/FoundationPose.git
3. 环境搭建
3.1 先设置网络代理
设置网络代理是为了后续下载其他的文件和包做准备(这里确保jetson和本地PC连接同一个网络)。
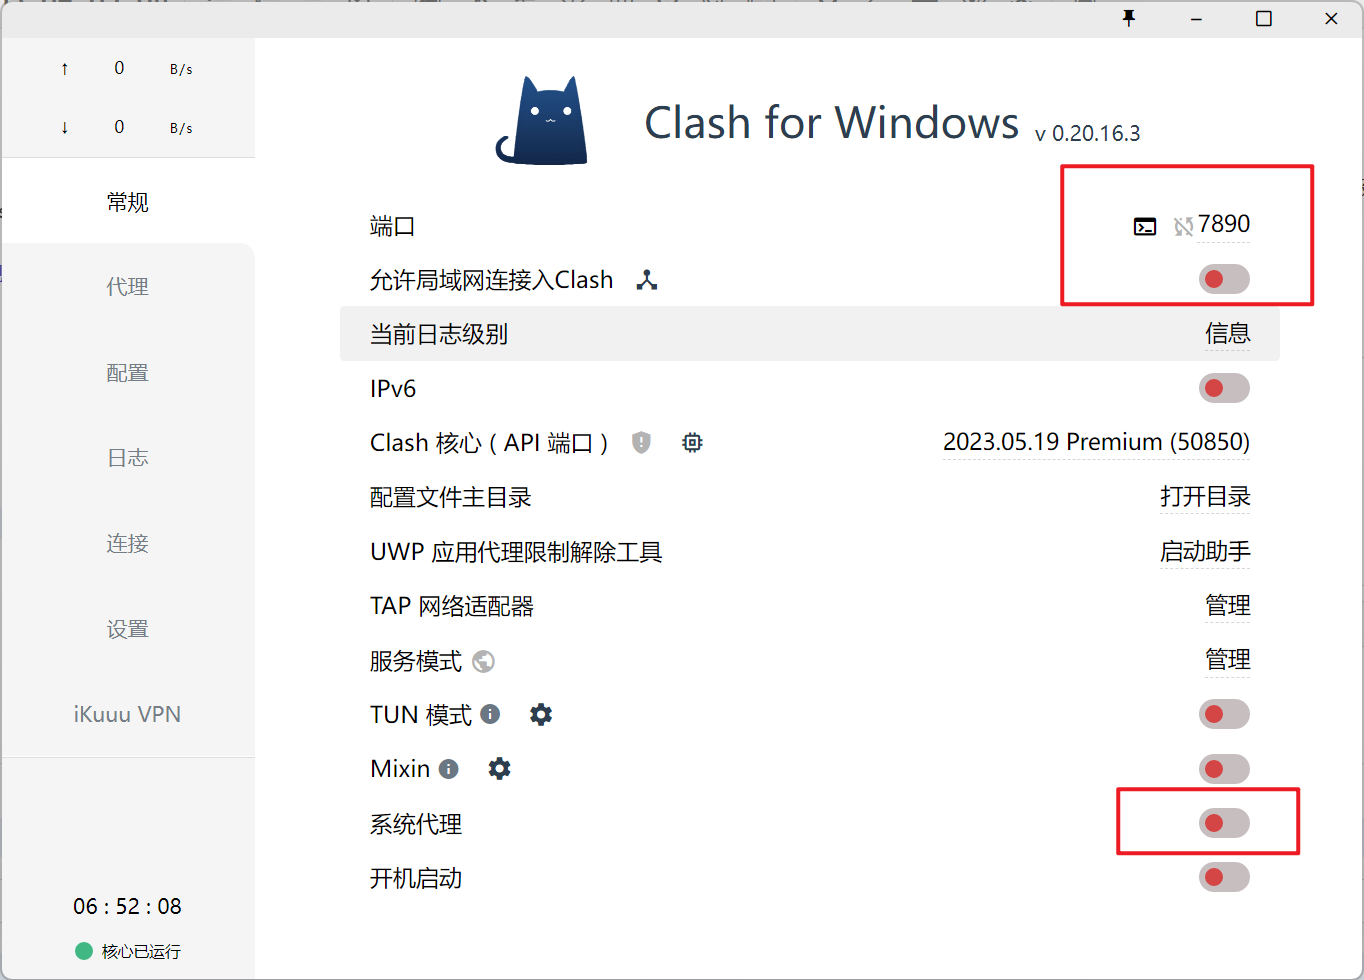
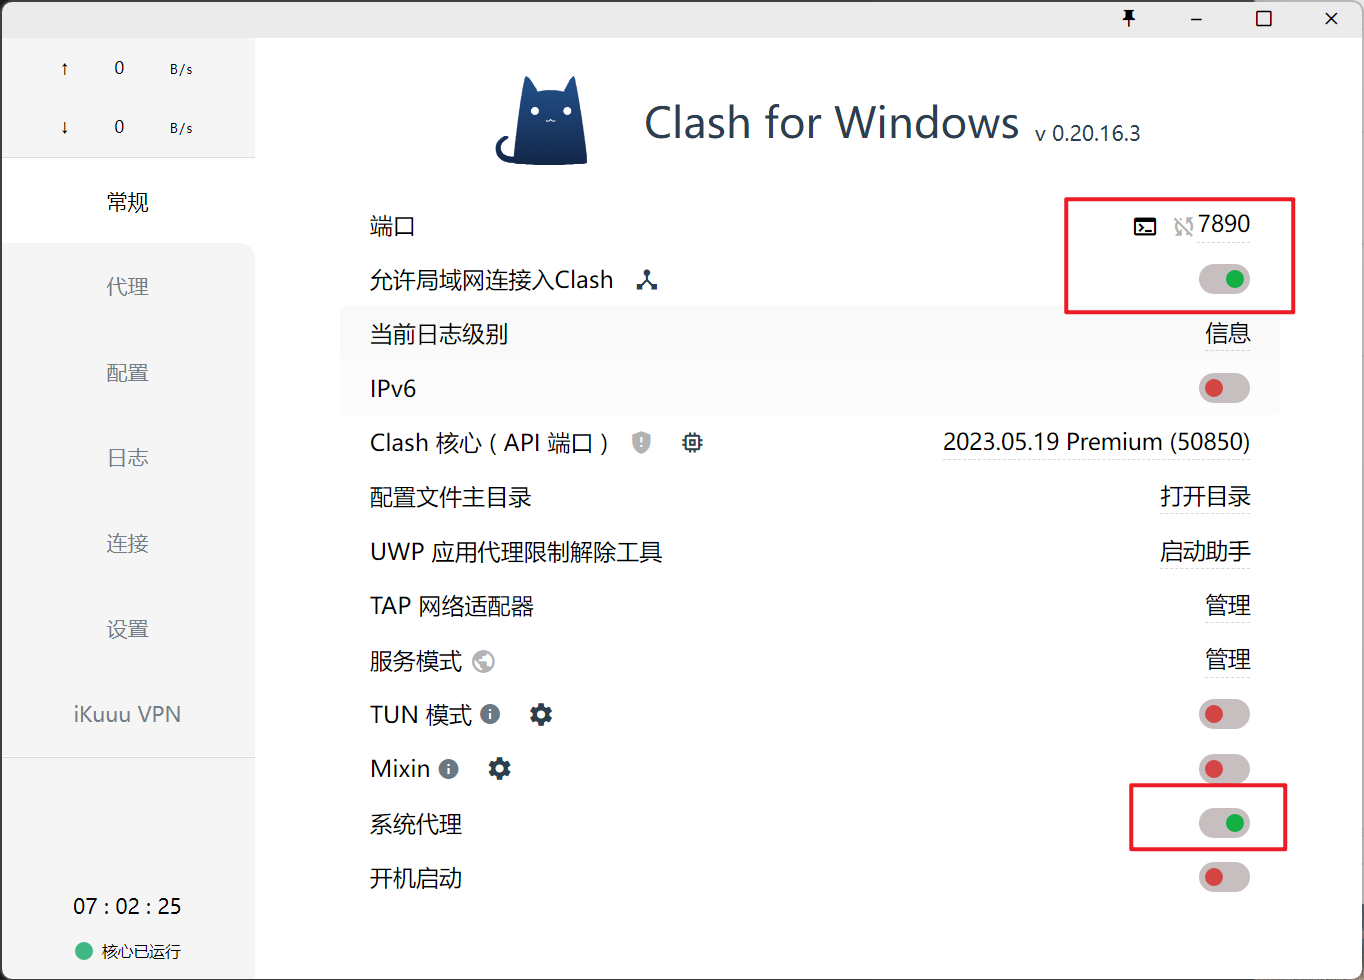
(1)在Windows上,打开本地的***(小猫咪)
打开图片上的两个地方并且记住端口(图片上端口是7890)。
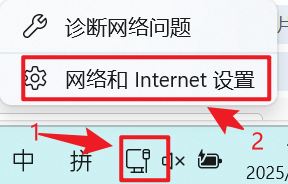
(2)打开Windows的网络配置设置本地ip
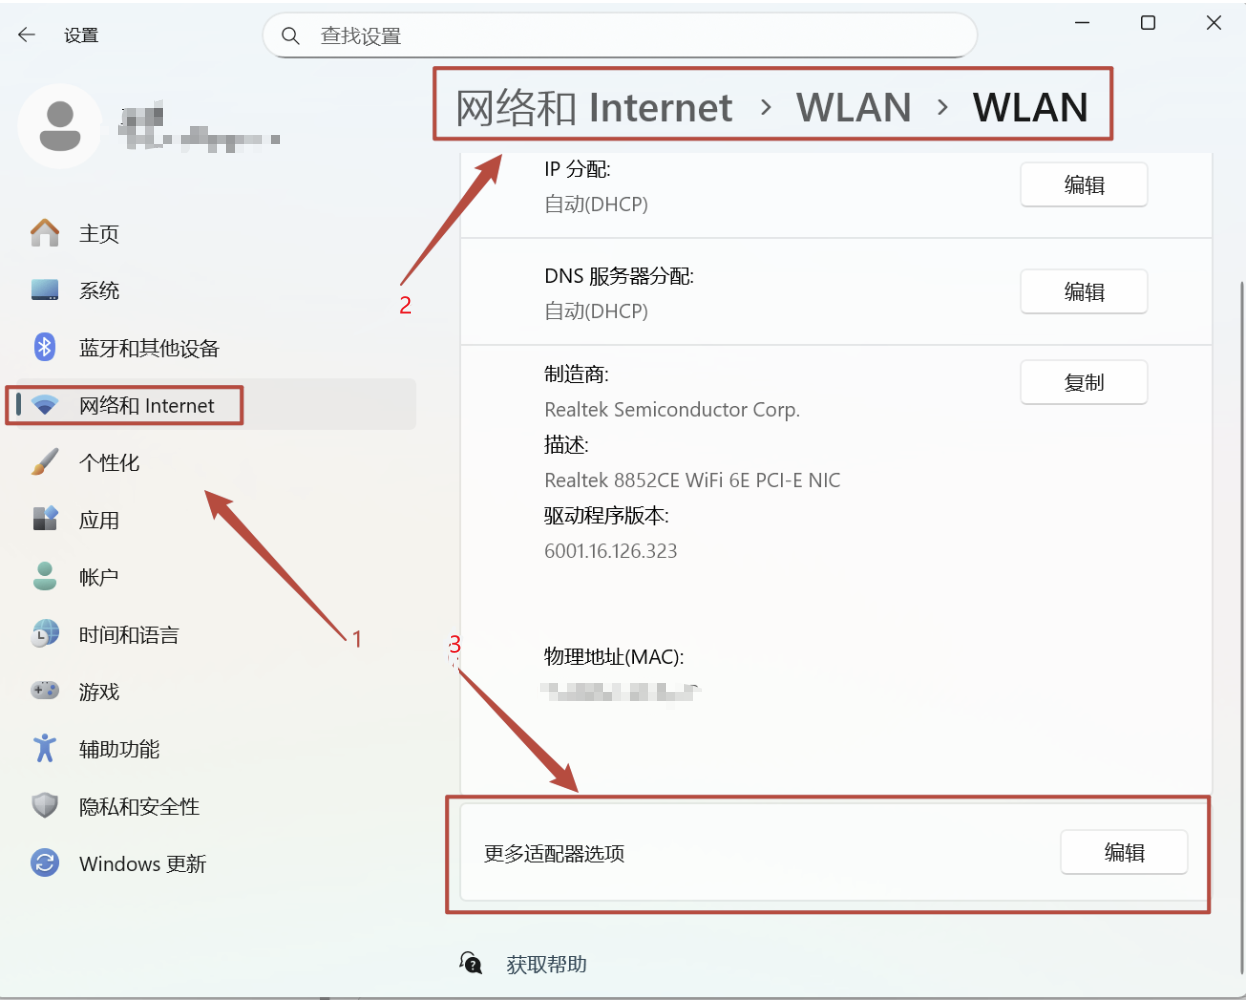
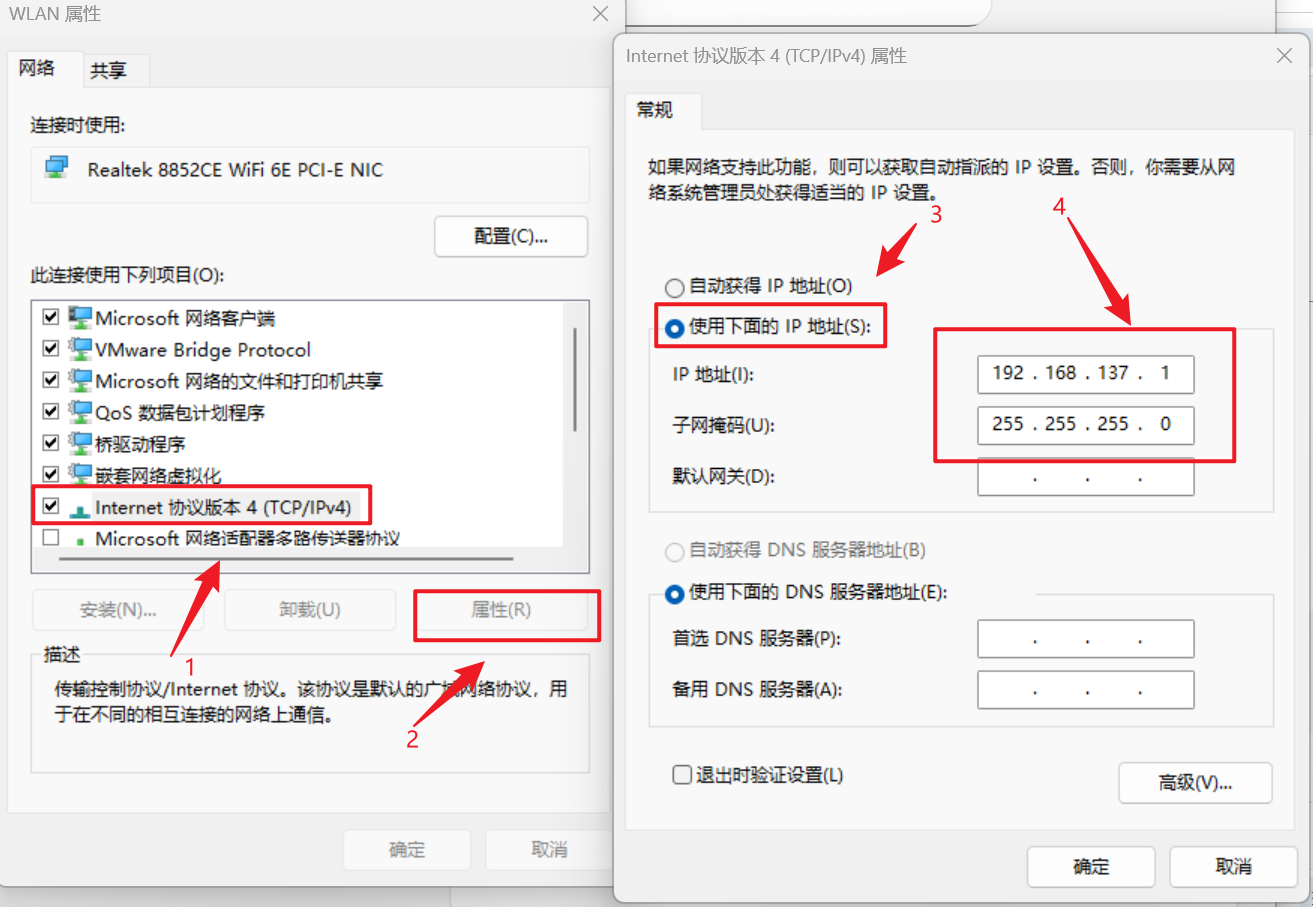
保存即可,
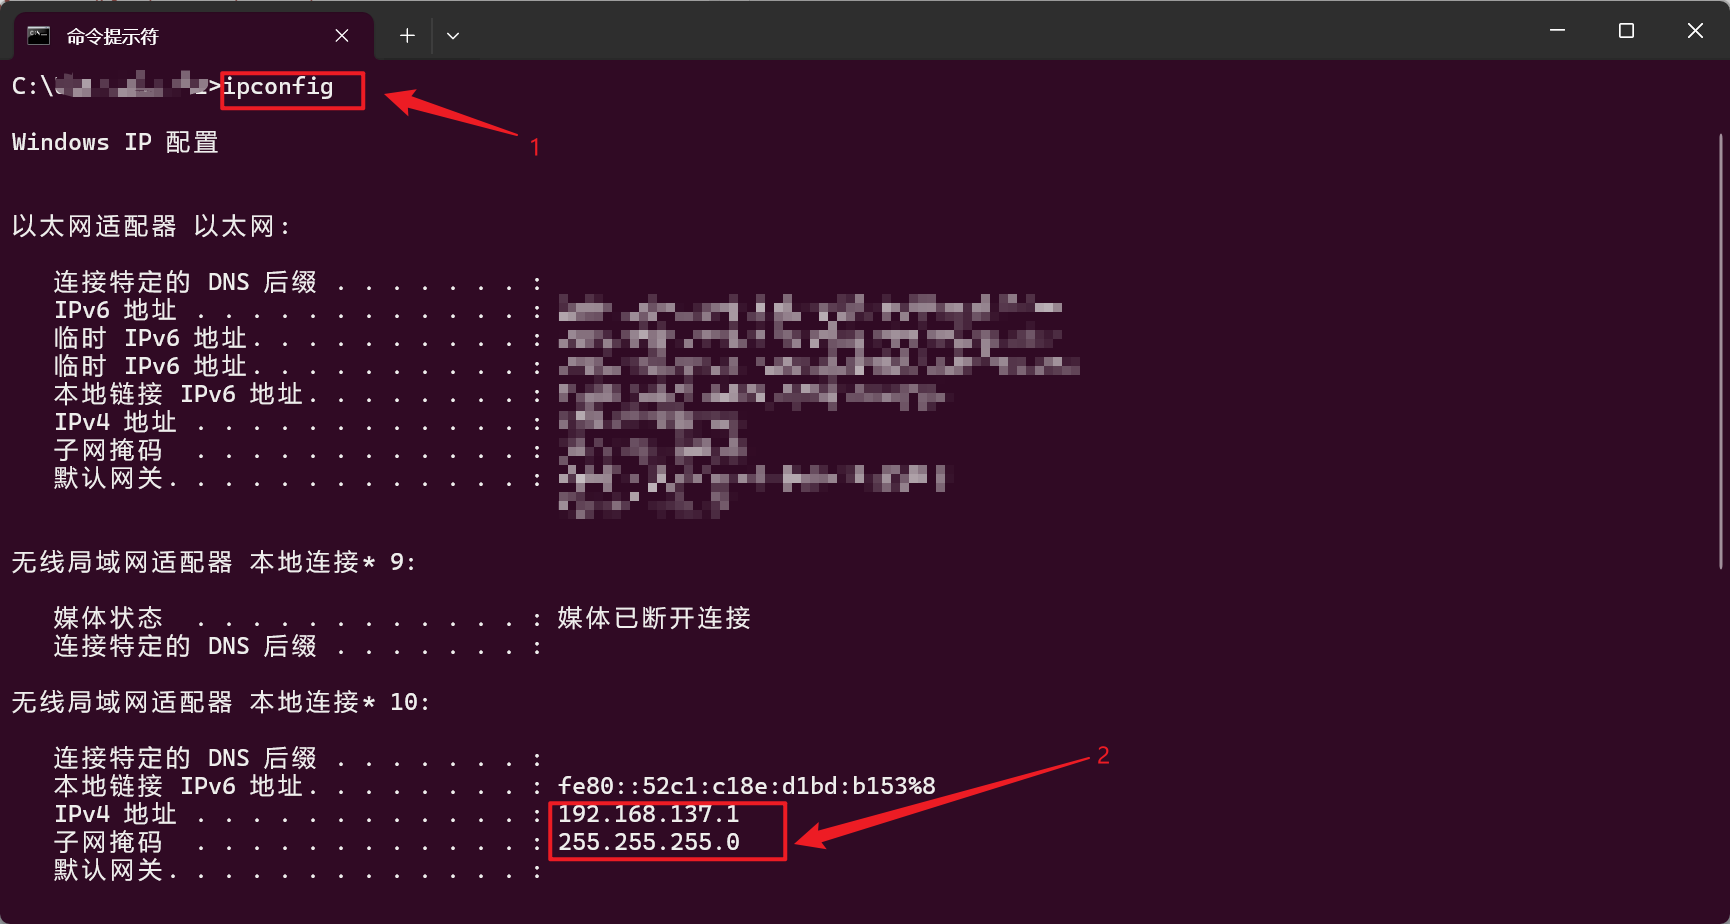
到windows的cmd中查看。
ipconfig
(3)在jetson终端输入下面的命令
export http_proxy=http://192.168.137.1:7890
export https_proxy=$http_proxy
# 验证
curl -v www.google.com
成功的话可以看到下面的结果:
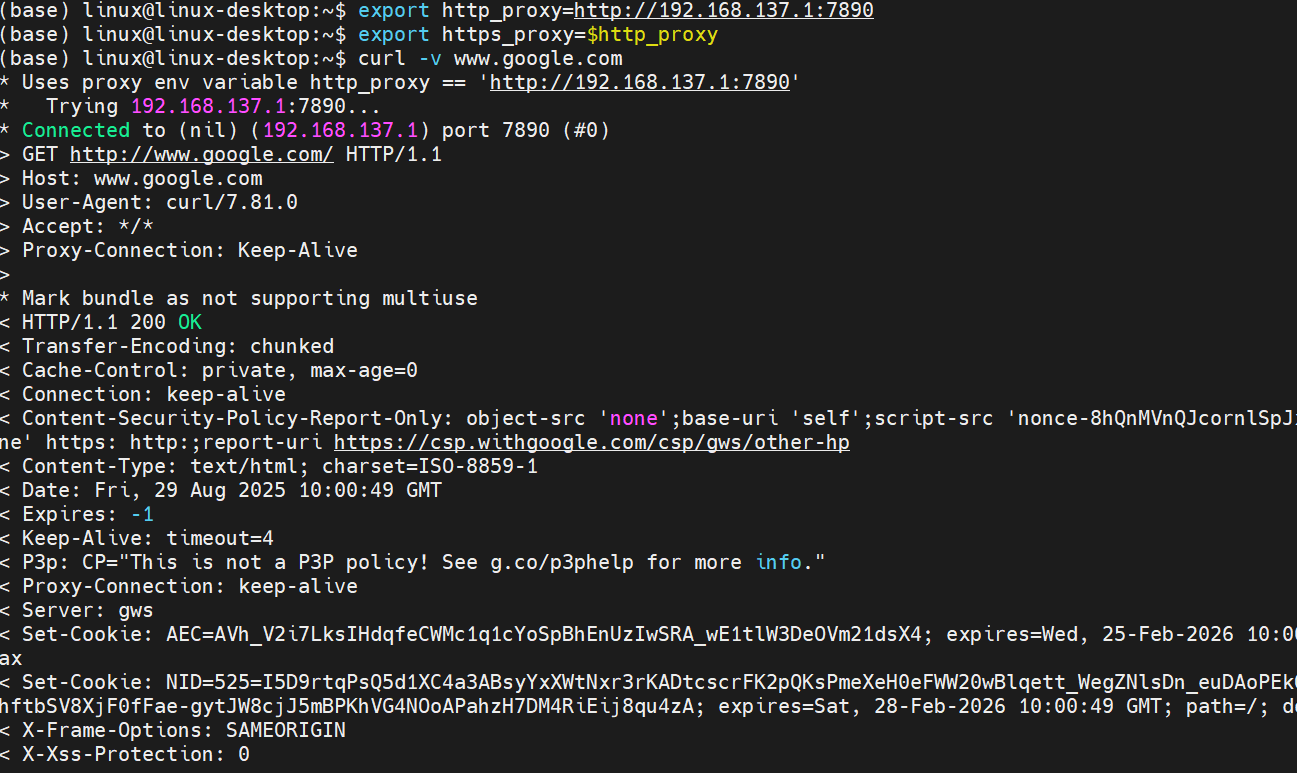
现在可以快速下载工程或者其他的文件了。。。
3.2 环境搭建
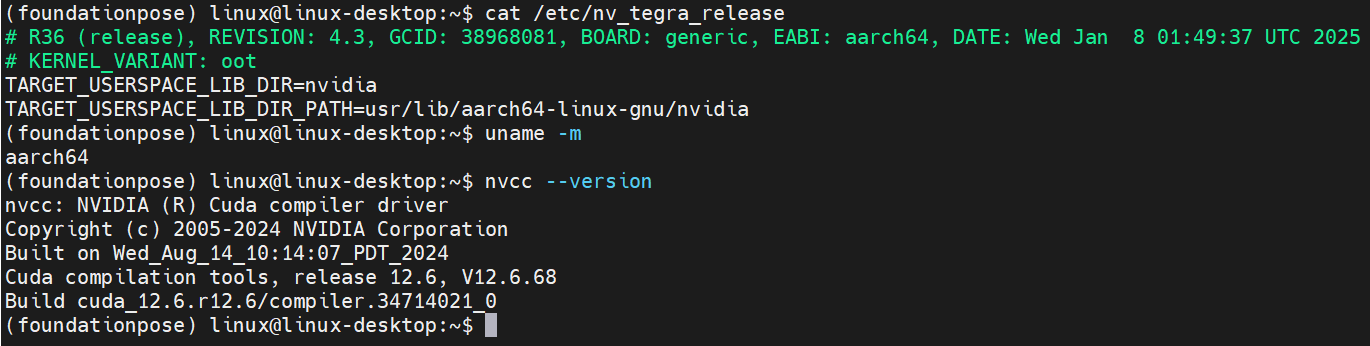
3.2.1 确认Jetson设备信息
在开始安装前,首先需要确认你的Jetson设备型号和系统信息:
# 查看JetPack版本
cat /etc/nv_tegra_release

# 查看系统架构
uname -m

# 查看CUDA版本
nvcc --version
运行后如下:
3.2.2更新系统包
sudo apt update
sudo apt upgrade -y
sudo apt autoremove -y
3.2.3 在jetson上面部署
由于jetson架构与PC不一样所以安装的时候不能完全按照Foundationpose上面的来,以下是自己一步步安装:
(1)先安装jetson所需要的库
# 由于已经有conda环境了所以不需要安装python3-pip
sudo apt install -y libopenblas-base libopenmpi-dev libjpeg-dev zlib1g-dev
(2)创建环境并激活环境
conda create -n foundationpose python=3.10
conda activate foundationpose
(3)设置本地的CUDA环境
# 在~/.bashrc的最后行,添加自己CUDA的安装路径
export PATH=/usr/local/cuda/bin:$PATH
export LD_LIBRARY_PATH=/usr/local/cuda/lib64:$LD_LIBRARY_PATH
export CUDA_HOME=/usr/local/cuda
export PATH=$CUDA_HOME/bin:$PATH
export LD_LIBRARY_PATH=$CUDA_HOME/lib64:$LD_LIBRARY_PATH
export CUB_HOME=/usr/local/cuda/include/cub
(4)安装11版本的gcc和g++
sudo apt-get update && sudo apt-get install -y gcc-11 g++-11
sudo update-alternatives --install /usr/bin/gcc gcc /usr/bin/gcc-11 100
sudo update-alternatives --install /usr/bin/g++ g++ /usr/bin/g++-11 100
(5)安装GLIBCXX_3.4.30
用来解决Intel D435摄像头的兼容问题
conda install -c conda-forge libstdcxx-ng
设置jetson架构的命令:
# 首先检查你的 GPU 架构
nvidia-smi --query-gpu=compute_cap --format=csv,noheader

# 下面的这两个命令可以写入~/.bashrc里面,最后source ~/.bashrc
export TORCH_CUDA_ARCH_LIST="8.7" # 我的是8.7
# 强制开启 OpenCV 对 OpenEXR 图像格式的读写支持
export OPENCV_IO_ENABLE_OPENEXR=1

# 注意安装pytorch3d库之类的时候指定最大的核心数不然会导致内存不够,安装完成后再改回去,所以指定4即可
export MAX_JOBS=4
(6)安装pytorch
这步很重要,必须按照这个方式安装,不能直接使用pytorch官网提供的pip方式安装,不然后面运行程序会出现错误
wget https://nvidia.box.com/shared/static/zvultzsmd4iuheykxy17s4l2n91ylpl8.whl -O ~/Downloads/torch-2.3.0-cp310-cp310-linux_aarch64.whl
wget https://nvidia.box.com/shared/static/xpr06qe6ql3l6rj22cu3c45tz1wzi36p.whl -O ~/Downloads/torchvision-0.18.0a0+6043bc2-cp310-cp310-linux_aarch64.whl
wget https://nvidia.box.com/shared/static/9si945yrzesspmg9up4ys380lqxjylc3.whl -O ~/Downloads/torchaudio-2.3.0+952ea74-cp310-cp310-linux_aarch64.whl
pip install ~/Downloads/torch-2.3.0-cp310-cp310-linux_aarch64.whl ~/Downloads/torchvision-0.18.0a0+6043bc2-cp310-cp310-linux_aarch64.whl ~/Downloads/torchaudio-2.3.0+952ea74-cp310-cp310-linux_aarch64.whl
(7)安装pytorch3d
这个可以使用下面的命令进行安装:
pip install "git+https://github.com/facebookresearch/pytorch3d.git@stable"
或者从官网下载源码进行安装:
git clone https://github.com/facebookresearch/pytorch3d.git
cd pytorch3d
pip install -e .
(8)安装运行Foundationpose的一些依赖库
python -m pip install scipy joblib scikit-learn ruamel.yaml trimesh pyyaml opencv-python imageio open3d transformations warp-lang einops kornia pyrender
(9)获取权重文件
-
可以具体查看在WSL2 Ubuntu22.04 下 FoundationPose 复现踩坑日记,获取权重文件,
-
也可以将之前的工程里的权重拷贝过来,
-
或者使用下面的命令获取:
pip install gdown

# 这里确保前面的小猫咪(***)能用
gdown --folder https://drive.google.com/drive/folders/1BEQLZH69UO5EOfah-K9bfI3JyP9Hf7wC -O FoundationPose/weights/2023-10-28-18-33-37
gdown --folder https://drive.google.com/drive/folders/12Te_3TELLes5cim1d7F7EBTwUSe7iRBj -O FoundationPose/weights/2024-01-11-20-02-45
(10)安装pybind11
安装这个是使C++与python相互调用:
cd FoundationPose && git clone https://github.com/pybind/pybind11 && \
    cd pybind11 && git checkout v2.10.0 && \
    mkdir build && cd build && cmake .. -DCMAKE_BUILD_TYPE=Release -DPYBIND11_INSTALL=ON -DPYBIND11_TEST=OFF && \
    make -j6
sudo make install
(11)安装Eigen库
cd $HOME && wget -q https://gitlab.com/libeigen/eigen/-/archive/3.4.0/eigen-3.4.0.tar.gz && \
tar -xzf eigen-3.4.0.tar.gz && \
cd eigen-3.4.0 && mkdir build && cd build
cmake .. -Wno-dev -DCMAKE_BUILD_TYPE=Release -DCMAKE_CXX_FLAGS=-std=c++14 ..
sudo make install
cd $HOME && rm -rf eigen-3.4.0 eigen-3.4.0.tar.gz
(12)安装nvdiffrast
这个也只能从源码安装,如果按照官方给的那个方式安装会出现很多问题(试过很多次),所以这个在jetson里安装:
cd ~/FoundationPose && git clone https://github.com/NVlabs/nvdiffrast && \
    cd nvdiffrast && pip install .
(13)安装mycpp
cd ~/FoundationPose/mycpp/ && \
rm -rf build && mkdir -p build && cd build && \
cmake .. && \
make -j$(nproc)
(14)修改官方提供的requirements.txt
拷贝一份,再将其内容修改:
cp -p ~/FoundationPose/requirements.txt ~/FoundationPose/rerequirements_copy.txt
将rerequirements_copy.txt里原来的所有东西清除,再将下面的内容复制到rerequirements_copy.txt的里:
aiohappyeyeballs==2.4.4
aiohttp==3.10.10
aiosignal==1.3.2
albucore==0.0.17
albumentations==1.4.18
annotated-types==0.7.0
antlr4-python3-runtime==4.9.3
anyio==4.7.0
async-timeout==4.0.3
attrs==24.3.0
beautifulsoup4==4.12.3
blinker==1.9.0
certifi==2025.1.31
charset-normalizer==3.4.1
click==8.1.8
configargparse==1.7
contourpy==1.3.1
cycler==0.12.1
cython==3.0.10
dash==2.18.2
dash-core-components==2.0.0
dash-html-components==2.0.0
dash-table==5.0.0
distro==1.9.0
einops==0.8.0
eval-type-backport==0.2.2
exceptiongroup==1.2.2
fastjsonschema==2.21.1
filelock==3.17.0
flask==3.0.3
fonttools==4.55.3
freetype-py==2.5.1
frozenlist==1.5.0
fsspec==2024.12.0
gdown==5.2.0
glfw==2.7.0
h11==0.14.0
h5py==3.12.1
hickle==5.0.3
httpcore==1.0.7
httpx==0.28.1
idna==3.10
ifaddr==0.2.0
imageio==2.35.1
importlib-metadata==8.6.1
iniconfig==2.0.0
itsdangerous==2.2.0
jinja2==3.1.5
jiter==0.8.2
joblib==1.4.2
jsonschema==4.23.0
jsonschema-specifications==2024.10.1
jupyter-core==5.7.2
kiwisolver==1.4.8
kornia==0.5.10
lazy-loader==0.4
lightning-utilities==0.11.9
loguru==0.7.2
markupsafe==3.0.2
matplotlib==3.9.2
mouseinfo==0.1.3
mpmath==1.3.0
multidict==6.1.0
nbformat==5.10.4
nest-asyncio==1.6.0
netifaces==0.11.0
networkx==3.4.2
ninja==1.11.1.3
numpy==1.26.4
nvdiffrast==0.3.3
omegaconf==2.3.0
open3d==0.18.0
openai==1.51.2
opencv-contrib-python==4.10.0.84
opencv-python==4.10.0.82
opencv-python-headless==4.10.0.84
packaging==24.2
pandas==2.2.3
pillow==11.1.0
platformdirs==4.3.6
plotly==5.24.1
pluggy==1.5.0
portalocker==3.1.1
progressbar33==2.4
propcache==0.2.1
psutil==6.1.1
py-cpuinfo==9.0.0
pyautogui==0.9.54
pydantic==2.10.4
pydantic-core==2.27.2
pygetwindow==0.0.9
pyglet==2.0.20
pymsgbox==1.0.9
pyopengl==3.1.0
pyparsing==3.2.1
pyperclip==1.9.0
pyrect==0.2.0
pyrender==0.1.45
pyscreeze==1.0.1
pyside6==6.8.0.1
pyside6-addons==6.8.0.1
pyside6-essentials==6.8.0.1
pysocks==1.7.1
pytest==8.2.2
python-dateutil==2.9.0.post0
python3-xlib==0.15
pytinyrenderer==0.0.14
pytorch-lightning==2.4.0
pytorch3d==0.7.8
pytweening==1.2.0
pytz==2024.2
pyyaml==6.0.2
referencing==0.35.1
requests==2.32.3
retrying==1.3.4
rpds-py==0.22.3
ruamel-base==1.0.0
ruamel-yaml==0.18.8
ruamel-yaml-clib==0.2.12
ruptures==1.1.9
scikit-image==0.25.0
scikit-learn==1.5.2
scipy==1.14.1
seaborn==0.13.2
setuptools==72.1.0
shiboken6==6.8.0.1
six==1.17.0
sniffio==1.3.1
soupsieve==2.6
sympy==1.13.3
tenacity==9.0.0
threadpoolctl==3.5.0
tifffile==2024.12.12
torch==2.3.0
torchaudio==2.3.0+952ea74
torchmetrics==1.6.1
torchvision==0.18.0a0+6043bc2
tqdm==4.66.5
traitlets==5.14.3
transformations==2025.1.1
trimesh==4.4.7
typing-extensions==4.12.2
tzdata==2024.2
ultralytics==8.3.31
ultralytics-thop==2.0.13
urllib3==2.3.0
warp==1.0.4
warp-lang==1.3.1
websocket-client==1.8.0
websockets==14.2
werkzeug==3.0.6
yacs==0.1.8
yarl==1.18.3
zeroconf==0.143.0
zipp==3.21.0
执行下面的命令:
python -m pip install -r requirements_copy.txt
以上安装完毕后,如果没有问题执行最后的命令:
# Build and install extensions in repo
CMAKE_PREFIX_PATH=$CONDA_PREFIX/lib/python3.9/site-packages/pybind11/share/cmake/pybind11 bash build_all_conda.sh
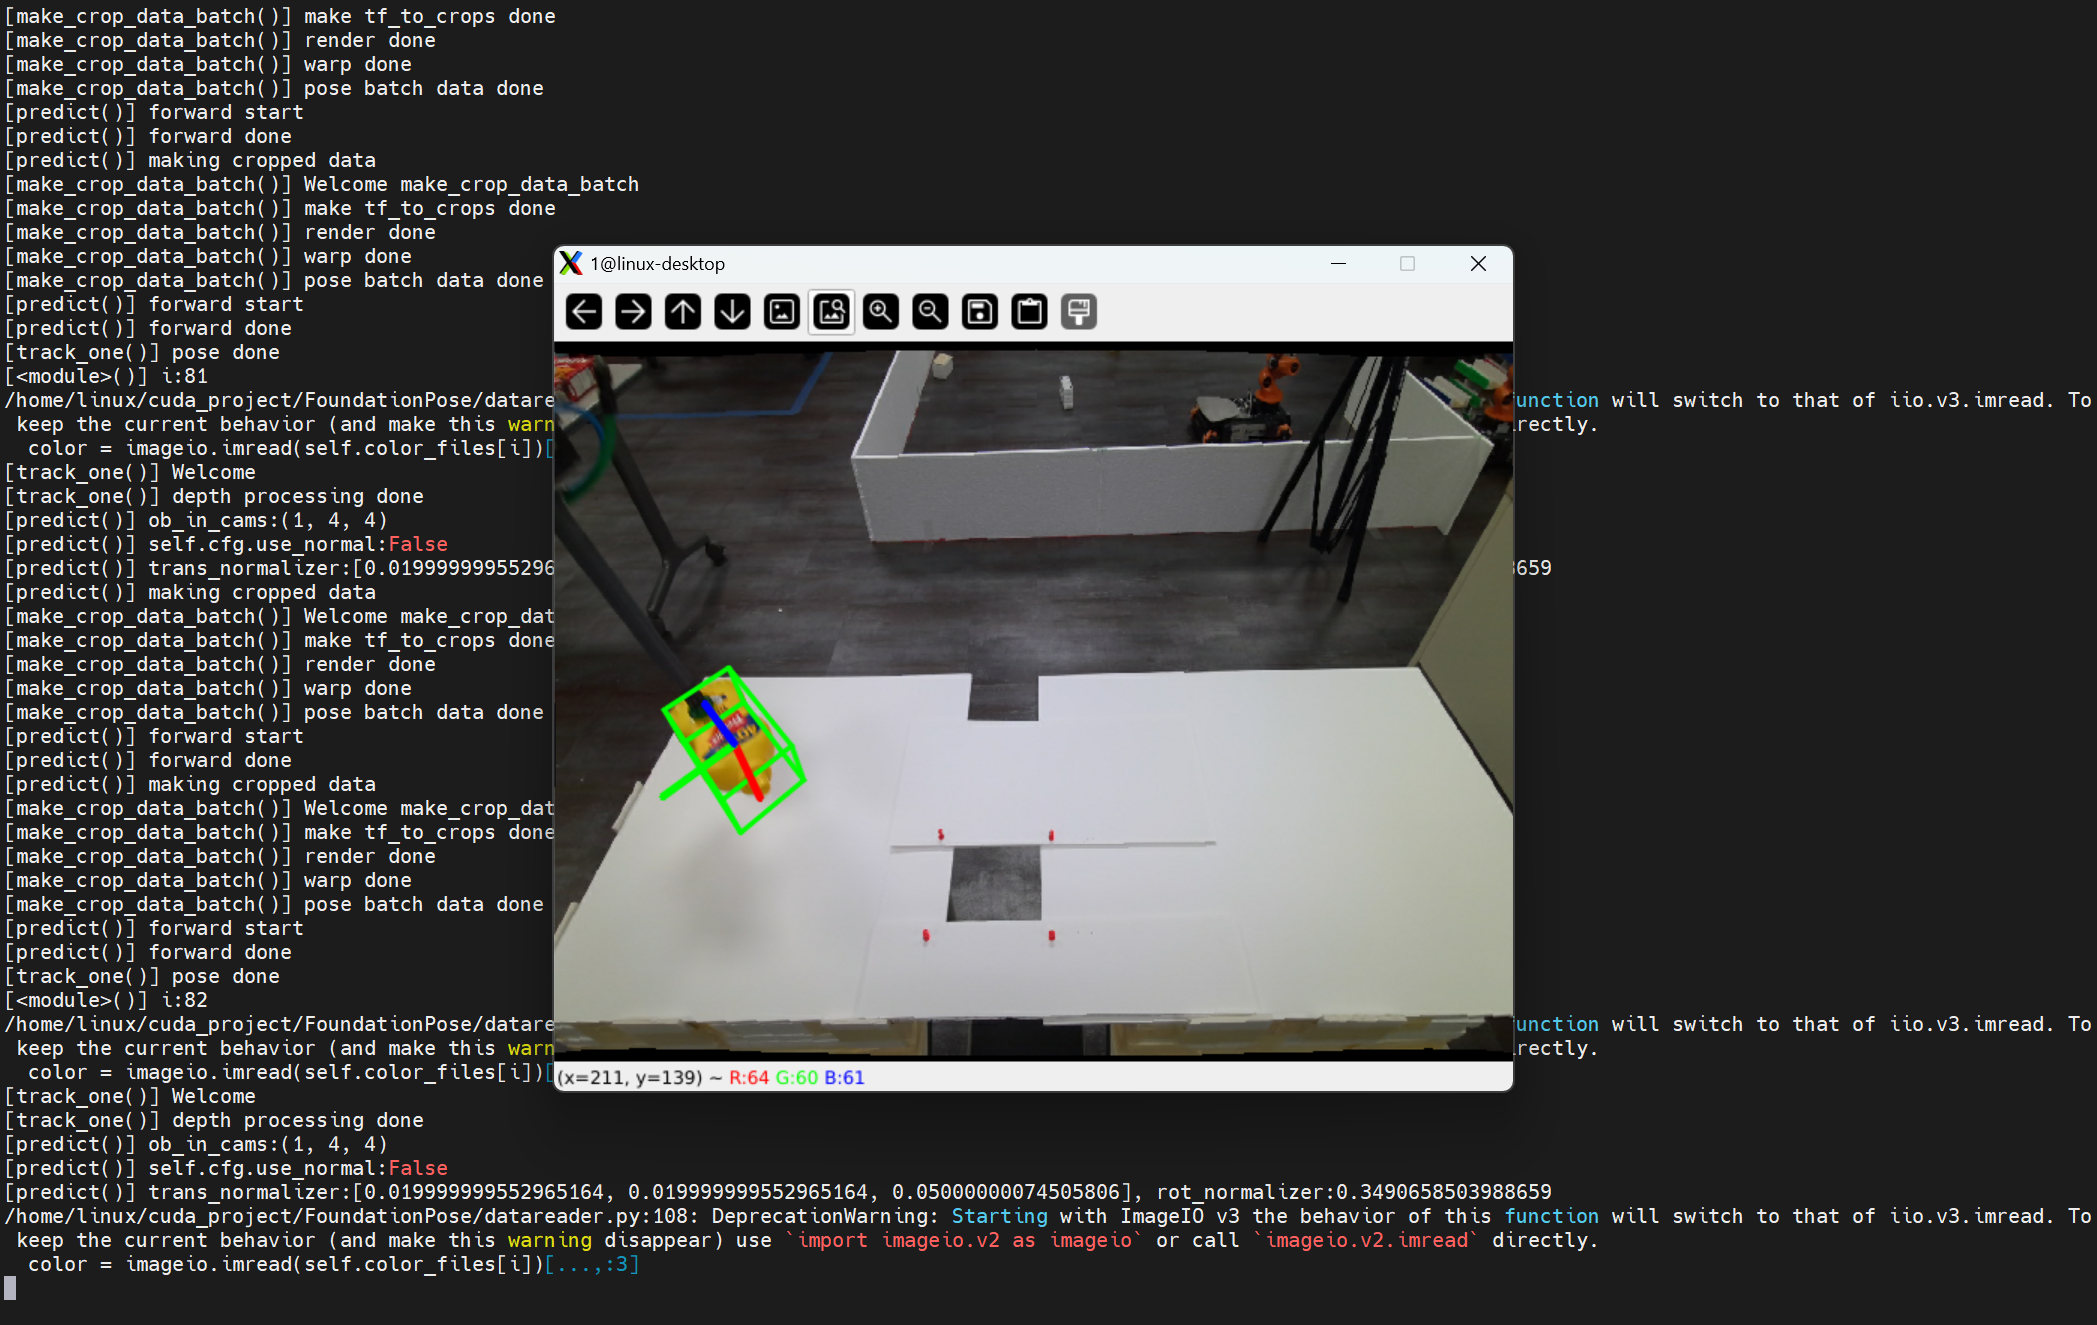
4. 运行run_demo.py
如果上面的都没有问题运行官方提供的demo。
python run_demo.py
你将会看到下面的结果:
5. 下一步计划
由于使用jetson后,帧数很低,可能是由于python执行效率低的原因,下一步整体将这个项目换成C++版本的。

 浙公网安备 33010602011771号