WebGPU学习(十):介绍“GPU实现粒子效果”
大家好,本文介绍了“GPU实现粒子效果”的基本思想,并推荐了相应的学习资料。
本文学习webgpu-samplers->computeBoids示例,它展示了如何用compute shader实现粒子效果,模拟鸟群的行为。
上一篇博文:
WebGPU学习(九):学习“fractalCube”示例
下一篇博文:
WebGPU学习(十一):学习两个优化:“reuse render command buffer”和“dynamic uniform buffer offset”
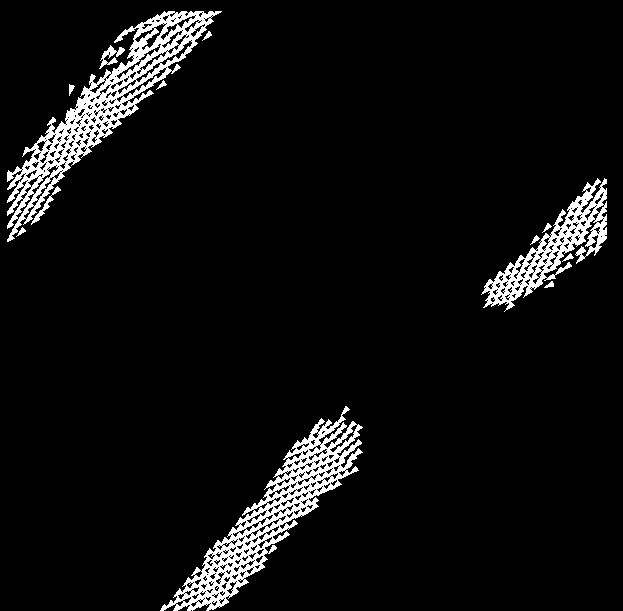
最终渲染结果:
为什么不在CPU端实现粒子效果?
虽然在CPU端实现会更灵活和可控,但如果粒子数量很大(如上百万),且与场景有交互,则最好在GPU端实现。
示例的实现思想
首先执行compute pass
代码如下:
  const numParticles = 1500;

  ...

  let t = 0;
  return function frame() {
    ...

    const commandEncoder = device.createCommandEncoder({});
    {
      const passEncoder = commandEncoder.beginComputePass();
      passEncoder.setPipeline(computePipeline);
      passEncoder.setBindGroup(0, particleBindGroups[t % 2]);
      passEncoder.dispatch(numParticles);
      passEncoder.endPass();
    }
    ...

    ++t;
  }
我们对这个pass进行分析:
particleBindGroups包含两个storage buffer:ParticlesA和ParticlesB
ParticlesA存储了上一帧所有粒子的数据。compute shader首先读取它,然后计算出下一帧所有粒子的数据,最好写到ParticlesB中。这样就打了一个ping-pong操作;
注:storage buffer在shader中可被读或写,而uniform buffer、vertex buffer等在shader中只能被读
dispatch到1500个instance,每个instance执行一次compute shader
compute shader计算每个粒子的数据时,需要遍历其它的所有粒子,计算相互的交互作用。
一共有1500个粒子,共需要计算15001500次。
如果在CPU端执行,只能串行计算,一共需要计算15001500次;
如果在GPU端执行,GPU有1500个instance,每个instance并行地计算1500次,因此一共只需要计算1500次,大大提高了效率。
然后执行render pass
代码如下:
  const numParticles = 1500;

  ...

  const renderPipeline = device.createRenderPipeline({
    ...
    vertexState: {
      vertexBuffers: [{
        // instanced particles buffer
        arrayStride: 4 * 4,
        stepMode: "instance",
        attributes: [{
          // instance position
          shaderLocation: 0,
          offset: 0,
          format: "float2"
        }, {
          // instance velocity
          shaderLocation: 1,
          offset: 2 * 4,
          format: "float2"
        }],
      }, {
        // vertex buffer
        arrayStride: 2 * 4,
        stepMode: "vertex",
        attributes: [{
          // vertex positions
          shaderLocation: 2,
          offset: 0,
          format: "float2"
        }],
      }],
    },
    ...
  });

  ...

  const vertexBufferData = new Float32Array([-0.01, -0.02, 0.01, -0.02, 0.00, 0.02]);
  const verticesBuffer = device.createBuffer({
    size: vertexBufferData.byteLength,
    usage: GPUBufferUsage.VERTEX | GPUBufferUsage.COPY_DST,
  });
  verticesBuffer.setSubData(0, vertexBufferData);

  ...

  return function frame() {
    ...

    const commandEncoder = device.createCommandEncoder({});
    ...
    {
      const passEncoder = commandEncoder.beginRenderPass(renderPassDescriptor);
      passEncoder.setPipeline(renderPipeline);
      //ParticlesB使用“instance”的stepMode,被设置到第一个vertex buffer中
      passEncoder.setVertexBuffer(0, particleBuffers[(t + 1) % 2]);
      //vertices buffer(包含3个顶点数据,每个顶点数据包含x坐标和y坐标)使用“vertex”的stepMode,被设置到第二个vertex buffer中
      passEncoder.setVertexBuffer(1, verticesBuffer);
      //draw一次,绘制1500个实例(使用ParticlesB的数据),其中每个实例有3个顶点(使用vertices buffer的数据)
      //注:每个粒子作为一个实例,由包含3个顶点的三角形组成
      passEncoder.draw(3, numParticles, 0, 0);
      passEncoder.endPass();
    }
    ...
  }
推荐学习资料
大家可以参考WebGPU-8,来学习示例的具体的代码。
虽然该文对应的示例代码的版本比较老(如它的示例中是1000个粒子,而不是1500个粒子),但与本文对应的最新版本基本上相同,而且它对示例代码分析得比较详细,所以推荐大家学习。
另外,大家可以通过Get started with GPU Compute on the Web,学习如何使用compute shader计算矩阵运算。
参考资料
感谢您的阅读~
扫码加入我的QQ群:

扫码加入免费知识星球-YYC的Web3D旅程:


 浙公网安备 33010602011771号