前端实现数字验证码
🧑💻 写在开头
点赞 + 收藏 === 学会🤣🤣🤣
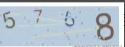
该代码的主要功能是生成一个图形验证码,并将其绘制在HTML的
<canvas>元素上。验证码由4个随机数字组成,背景和文字颜色随机生成,且文字有一定的旋转角度,增加了识别的难度。
核心逻辑:
useImageVerify:这是一个Vue 3的Composition API函数,用于管理验证码的生成和绘制。它返回一个包含domRef(指向<canvas>元素的引用)、imgCode(生成的验证码字符串)、setImgCode(设置验证码的函数)和getImgCode(重新生成验证码的函数)的对象。
randomNum:生成指定范围内的随机整数。
randomColor:生成指定范围内的随机RGB颜色。
draw:在<canvas>上绘制验证码。包括以下步骤:
- 填充背景色。
- 绘制4个随机数字,每个数字有不同的字体大小和旋转角度。
- 绘制5条随机干扰线。
- 绘制41个随机干扰点。
实现细节:
- 随机性:通过
randomNum和randomColor函数确保验证码的每个部分(数字、颜色、旋转角度等)都是随机的。- Canvas绘制:使用Canvas API进行绘制,包括
fillRect、fillText、stroke、arc等方法。- Vue生命周期:在
onMounted钩子中调用getImgCode,确保在组件挂载后立即生成验证码。
扩展性:
- 可以通过修改
NUMBER_STRING来支持更多字符(如字母)。- 可以通过调整
randomNum和randomColor的参数来改变验证码的样式和复杂度。
使用场景:
- 该验证码生成函数适用于需要简单图形验证码的场景,如登录、注册等表单验证。
import { ref, onMounted } from "vue";

/**
 * 绘制图形验证码
 * @param width - 图形宽度
 * @param height - 图形高度
 */
export const useImageVerify = (width = 120, height = 40) => {
  const domRef = ref<HTMLCanvasElement>();
  const imgCode = ref("");

  function setImgCode(code: string) {
    imgCode.value = code;
  }

  function getImgCode() {
    if (!domRef.value) return;
    imgCode.value = draw(domRef.value, width, height);
  }

  onMounted(() => {
    getImgCode();
  });

  return {
    domRef,
    imgCode,
    setImgCode,
    getImgCode
  };
};

function randomNum(min: number, max: number) {
  const num = Math.floor(Math.random() * (max - min) + min);
  return num;
}

function randomColor(min: number, max: number) {
  const r = randomNum(min, max);
  const g = randomNum(min, max);
  const b = randomNum(min, max);
  return `rgb(${r},${g},${b})`;
}

function draw(dom: HTMLCanvasElement, width: number, height: number) {
  let imgCode = "";

  const NUMBER_STRING = "0123456789";

  const ctx = dom.getContext("2d");
  if (!ctx) return imgCode;

  ctx.fillStyle = randomColor(180, 230);
  ctx.fillRect(0, 0, width, height);
  for (let i = 0; i < 4; i += 1) {
    const text = NUMBER_STRING[randomNum(0, NUMBER_STRING.length)];
    imgCode += text;
    const fontSize = randomNum(18, 41);
    const deg = randomNum(-30, 30);
    ctx.font = `${fontSize}px Simhei`;
    ctx.textBaseline = "top";
    ctx.fillStyle = randomColor(80, 150);
    ctx.save();
    ctx.translate(30 * i + 15, 15);
    ctx.rotate((deg * Math.PI) / 180);
    ctx.fillText(text, -15 + 5, -15);
    ctx.restore();
  }
  for (let i = 0; i < 5; i += 1) {
    ctx.beginPath();
    ctx.moveTo(randomNum(0, width), randomNum(0, height));
    ctx.lineTo(randomNum(0, width), randomNum(0, height));
    ctx.strokeStyle = randomColor(180, 230);
    ctx.closePath();
    ctx.stroke();
  }
  for (let i = 0; i < 41; i += 1) {
    ctx.beginPath();
    ctx.arc(randomNum(0, width), randomNum(0, height), 1, 0, 2 * Math.PI);
    ctx.closePath();
    ctx.fillStyle = randomColor(150, 200);
    ctx.fill();
  }
  return imgCode;
}
vue页面使用
<script setup lang="ts">
import { watch } from "vue";
import { useImageVerify } from "./hooks";

defineOptions({
  name: "ReImageVerify"
});

interface Props {
  code?: string;
}

interface Emits {
  (e: "update:code", code: string): void;
}

const props = withDefaults(defineProps<Props>(), {
  code: ""
});

const emit = defineEmits<Emits>();

const { domRef, imgCode, setImgCode, getImgCode } = useImageVerify();

watch(
  () => props.code,
  newValue => {
    setImgCode(newValue);
  }
);
watch(imgCode, newValue => {
  emit("update:code", newValue);
});

defineExpose({ getImgCode });
</script>

<template>
  <canvas
    ref="domRef"
    width="120"
    height="40"
    class="cursor-pointer"
    @click="getImgCode"
  />
</template>
如果对您有所帮助,欢迎您点个关注,我会定时更新技术文档,大家一起讨论学习,一起进步。


 浙公网安备 33010602011771号