【Cesium 颜狗初步】fabric 材质定义与自定义着色器实践
fabric 材质定义:着色器实践
1. 示例代码
贴到沙盒里就可以运行:
var viewer = new Cesium.Viewer("cesiumContainer");
viewer.scene.globe.depthTestAgainstTerrain = true;
viewer.camera.setView({
    destination : new Cesium.Cartesian3(-2644963.9889313546, 5763731.142118295, 2199400.7089496767), //世界坐标系下的一个坐标点
    orientation : {//旋转角度
        heading :6.075,
        pitch :-0.727,
        roll : 6.283
    }
});

const extrudedPolygon = new Cesium.PolygonGeometry({
  polygonHierarchy : new Cesium.PolygonHierarchy(
    Cesium.Cartesian3.fromDegreesArray([
      112.41726298378288, 23.290411251106182,
      113.67072522399741, 23.560312361463682,
      114.09370956893551, 22.590768298743153,
      112.83803246418894, 22.285610818885644
    ])
  ),
  extrudedHeight: 3000
});

const instance = new Cesium.GeometryInstance({
  geometry: extrudedPolygon,
  id: 'box with height'
});

const m = new Cesium.Material({
  fabric: {
    type: 'Color',
    uniforms: {
      color: new Cesium.Color(216 / 255.0, 170 / 255.0, 208 / 255.0).withAlpha(0.618),
    },
  }
});

const aper =  new Cesium.MaterialAppearance({
  material : m,
});

var p = viewer.scene.primitives.add(new Cesium.Primitive({
  geometryInstances: instance,
  appearance: aper,
  releaseGeometryInstances: false,
  compressVertices: false,
}));

// p.readyPromise.then(v => console.log(v));

const vs = aper.vertexShaderSource;
const fs = aper.fragmentShaderSource;
const fs2 = aper.getFragmentShaderSource();

console.log(`// 顶点着色器:
${vs}`);
console.log(`// 片元着色器:
${fs}`);
console.log(`// 片元着色器2:
${fs2}`);
2. 修改 fabric 对象
const m = new Cesium.Material({
  fabric: {
    source: `float a = 12.0;`,
  }
});
随便定义一个浮点数,发现报错:
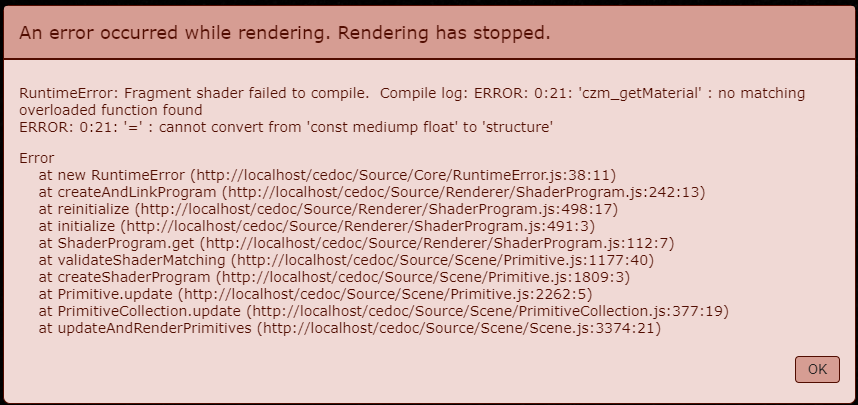
加上 uniform 限定字,报错稍微改了一点:
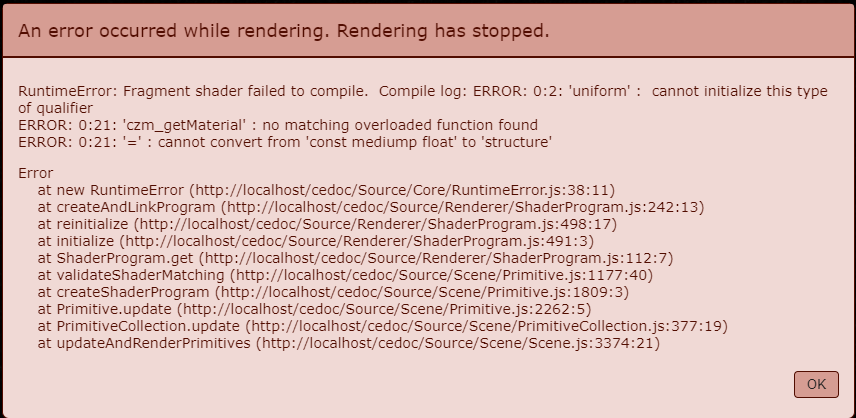
所以,这个 source 是有规则的。
2.1. 必须拥有函数 czm_getMaterial(czm_materialInput materialInput)
我改成这样:
source:
`czm_material czm_getMaterial(czm_materialInput materialInput)
{

}`,
报错变化了:
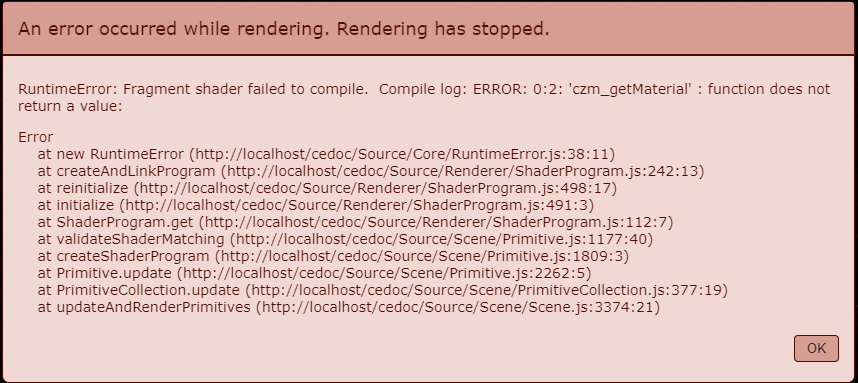
大意是指,czm_getMaterial 这个函数没有返回值。这很正常,强类型的 GLSL 规定了这个函数的返回值类型是结构体 czm_material,那么再次修改它。
2.2. 必须有返回值:不妨返回个默认值
source:
`czm_material czm_getMaterial(czm_materialInput materialInput)
{
	czm_material material = czm_getDefaultMaterial(materialInput);
 	return material;
}`,
这时,形状有颜色了:
material 这个变量是一个结构体,通过修改其材质因子即可实现材质修改。
修改其漫反射因子:
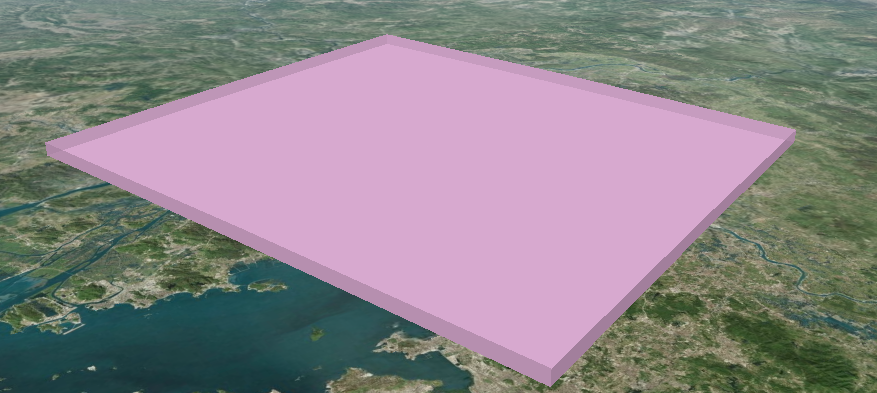
注意,glsl 中创建结构体 vec3 的默认值是 (0, 0, 0),现在我想要个粉色,rgb色值是:(216 / 255.0, 170 / 255.0, 208 / 255.0),即 (0.8470588235294118, 0.66666666, 0.8156862745098039)
source:
`czm_material czm_getMaterial(czm_materialInput materialInput)
{
	czm_material material = czm_getDefaultMaterial(materialInput);
	material.diffuse = vec3(0.8470588235294118, 0.66666666, 0.8156862745098039);
 	return material;
}`,
没毛病,颜色出来了:
2.3. 顶点着色器与片元着色器
你可以在很多个地方获取材质、外观的着色器源代码:
- Material.prototype.shaderSource:可读可写:当前 material 对象的 source 属性,支持实时修改
- Appearance.prototype.vertexShaderSource:只读:当前外观对象的顶点着色器,仅支持构造时传入
- Appearance.prototype.fragmentShaderSource:只读:当前外观对象的片元着色器,仅支持构造时传入
- Appearance.prototype.getFragmentShaderSource():返回最终完全版片元着色器源代码。
上面在 fabric 对象中的 source 属性指定的 glsl 源代码,与 console.log(m.shaderSource) 出来的是完全一样的,所以此处忽略。
当通过 2.2 节中对漫反射属性的设置后,外观对象的 vertexShaderSource 和 fragmentShaderSource 输出结果如下:
// 顶点着色器:
attribute vec3 position3DHigh;
attribute vec3 position3DLow;
attribute vec3 normal;
attribute vec2 st;
attribute float batchId;

varying vec3 v_positionEC;
varying vec3 v_normalEC;
varying vec2 v_st;

void main()
{
    vec4 p = czm_computePosition();

    v_positionEC = (czm_modelViewRelativeToEye * p).xyz;      // position in eye coordinates
    v_normalEC = czm_normal * normal;                         // normal in eye coordinates
    v_st = st;

    gl_Position = czm_modelViewProjectionRelativeToEye * p;
}
// 片元着色器:
varying vec3 v_positionEC;
varying vec3 v_normalEC;
varying vec2 v_st;

void main()
{
    vec3 positionToEyeEC = -v_positionEC;

    vec3 normalEC = normalize(v_normalEC);
#ifdef FACE_FORWARD
    normalEC = faceforward(normalEC, vec3(0.0, 0.0, 1.0), -normalEC);
#endif

    czm_materialInput materialInput;
    materialInput.normalEC = normalEC;
    materialInput.positionToEyeEC = positionToEyeEC;
    materialInput.st = v_st;
    czm_material material = czm_getMaterial(materialInput);

#ifdef FLAT
    gl_FragColor = vec4(material.diffuse + material.emission, material.alpha);
#else
    gl_FragColor = czm_phong(normalize(positionToEyeEC), material, czm_lightDirectionEC);
#endif
}
捕获重点:片元着色器
观察片元着色器代码中的主函数,其中有一句调用 czm_material material = czm_getMaterial(materialInput);
这一句便是对我们在 fabric 对象中写入的 glsl 代码的调用。
最终,进入 #ifdef FLAT 分支(才疏学浅,不知道这个 FLAT 宏是什么),对像素着色,使用 material 结构的漫反射因子 + 自发光因子 + 透明度因子进行叠加,生成最终的颜色值。所以,这个时候不妨回到 Material 的 source 中,继续动手脚。
是存在直接修改 Appearance 对象 fragmentShader、vertexShader 的大佬的,后面有机会展开说说。
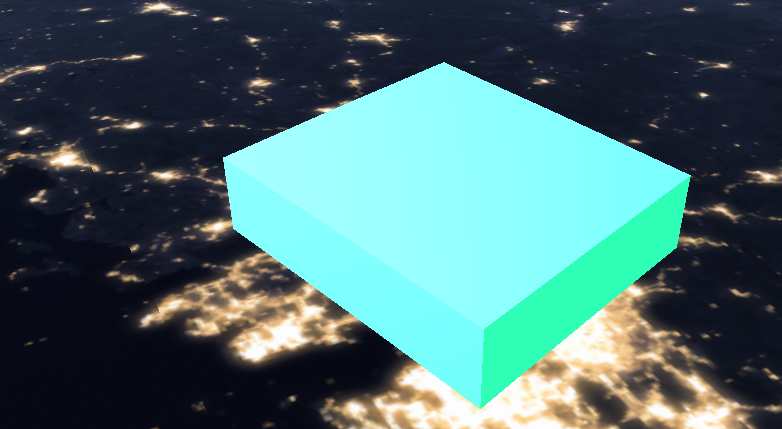
2.4. 牛刀小试:发个光吧
source:
`czm_material czm_getMaterial(czm_materialInput materialInput)
{
	czm_material material = czm_getDefaultMaterial(materialInput);
  material.diffuse = vec3(0.8470588235294118, 0.66666666, 0.8156862745098039);
  material.specular = 1.0;
  material.shininess = 0.8;
 	return material;
}`,

(我偷偷把高度设为了 30000,不然不太明显)
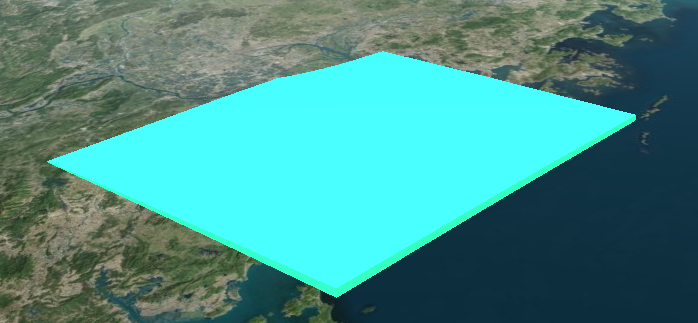
换个地图和参数:
稍微有那么一点感觉了。
const m = new Cesium.Material({
  translucent: false,
  fabric: {
    source:
    `czm_material czm_getMaterial(czm_materialInput materialInput)
     {
       czm_material material = czm_getDefaultMaterial(materialInput);
       material.diffuse = vec3(0.24313725490196078, 0.7372549019607844, 0.9333333333333333);
       material.specular = 0.5;
       material.shininess = 0.8;
       material.emission = vec3(0.0, 0.66666666, 0.0);
       return material;
     }`,
  }
});
3. *高级运用:直接修改 Appearance 的片元着色器
用的是 1. 中的代码,修改 aper 对象的构造参数,直接将 2.3 中的片元着色器代码贴入看看:
const aper =  new Cesium.MaterialAppearance({
  fragmentShaderSource:
  ` varying vec3 v_positionEC;
    varying vec3 v_normalEC;
    varying vec2 v_st;

    void main()
    {
        vec3 positionToEyeEC = -v_positionEC;

        vec3 normalEC = normalize(v_normalEC);
    #ifdef FACE_FORWARD
        normalEC = faceforward(normalEC, vec3(0.0, 0.0, 1.0), -normalEC);
    #endif

        czm_materialInput materialInput;
        materialInput.normalEC = normalEC;
        materialInput.positionToEyeEC = positionToEyeEC;
        materialInput.st = v_st;
        czm_material material = czm_getMaterial(materialInput);

    #ifdef FLAT
        gl_FragColor = vec4(material.diffuse + material.emission, material.alpha);
    #else
        gl_FragColor = czm_phong(normalize(positionToEyeEC), material, czm_lightDirectionEC);
    #endif
    }
   `
});
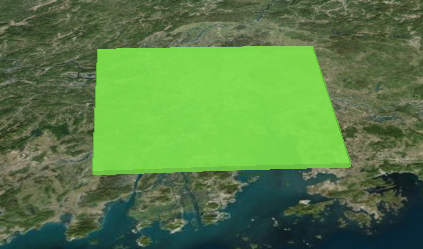
没有问题:

所以,基于此模板,只要胆大心细(划掉)只要对 Cesium 内置的着色器足够了解,完全可以自己改顶点和片元着色器。
试一试:把 2.2 和 2.4 中的尝试加入
const aper =  new Cesium.MaterialAppearance({
  fragmentShaderSource:
  ` varying vec3 v_positionEC;
    varying vec3 v_normalEC;
    varying vec2 v_st;

    void main()
    {
        vec3 positionToEyeEC = -v_positionEC;

        vec3 normalEC = normalize(v_normalEC);
    #ifdef FACE_FORWARD
        normalEC = faceforward(normalEC, vec3(0.0, 0.0, 1.0), -normalEC);
    #endif

        czm_materialInput materialInput;
        materialInput.normalEC = normalEC;
        materialInput.positionToEyeEC = positionToEyeEC;
        materialInput.st = v_st;
        czm_material material = czm_getMaterial(materialInput);
				material.diffuse = vec3(0.24313725490196078, 0.7372549019607844, 0.9333333333333333);
			  material.emission = vec3(0.0, 0.66666666, 0.0);
        material.specular = 0.5;
        material.shininess = 0.8;

    #ifdef FLAT
        gl_FragColor = vec4(material.diffuse + material.emission, material.alpha);
    #else
        gl_FragColor = czm_phong(normalize(positionToEyeEC), material, czm_lightDirectionEC);
    #endif
    }
   `
});
4. **实验性记录:修改 Appearance 的顶点着色器
const apr = new Cesium.MaterialAppearance({
  vertexShaderSource:
  `
  attribute vec3 position3DHigh;
  attribute vec3 position3DLow;
  attribute vec3 normal;
  attribute vec2 st;
  attribute float batchId;

  varying vec3 v_positionEC;
  varying vec3 v_normalEC;
  varying vec2 v_st;

  void main()
  {
      float zh = position3DHigh.z * 0.97;
      float zl = position3DLow.z * 0.97;

      vec3 th = vec3(position3DHigh.xy, zh);
      vec3 tl = vec3(position3DLow.xy, zl);

      vec4 p = czm_translateRelativeToEye(th, tl);

      v_positionEC = (czm_modelViewRelativeToEye * p).xyz;      // position in eye coordinates
      v_normalEC = czm_normal * normal;                         // normal in eye coordinates
      v_st = st;

      gl_Position = czm_modelViewProjectionRelativeToEye * p;
  }
	`,
})
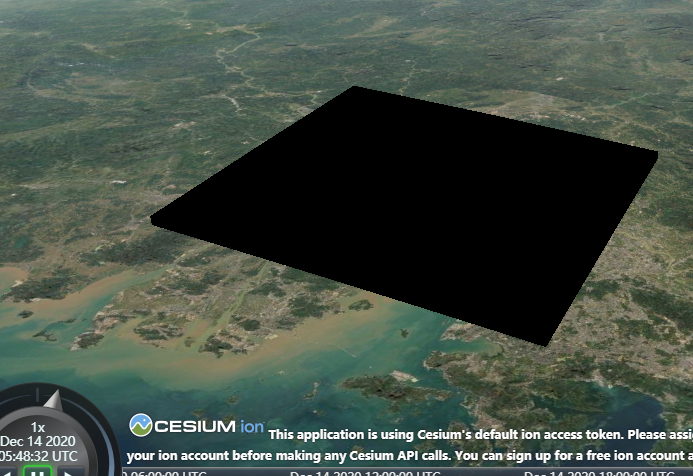
依旧是上方 1. 的例子,只不过在顶点着色器稍微动动手脚,可达到变形的效果:
很可惜这个 position3DHigh 和 position3DLow 并不是这个 Primitive 的局部相对坐标,所以直接修改 z = 0 是压不平的,但是从图中可略见端倪,猜测这个 z 值是世界坐标,后续使用半透明地形看看。
5. 给材质的着色器代码传入动态值:uniforms 的运用
uniform 在 WebGL 中就是恒定值的意思。一般 WebGL 用 attribute 关键字指定顶点属性或外来值,用 uniform 关键字指定常量,用 varying 关键字指定顶点着色器、片元着色器共享的变量。
在 Cesium fabric 规则中,fabric.uniforms 的所有变量,在 fabric.source 中可以直接使用。
例如,我需要传入一个透明度:
const m = new Cesium.Material({
  fabric: {
    uniforms: {
      my_var: 0.5,
    },
    source:
    `
    czm_material czm_getMaterial(czm_materialInput materialInput)
    {
        czm_material material = czm_getDefaultMaterial(materialInput);
        material.diffuse = vec3(0.5, 0.9, 0.3);
        material.alpha = my_var;
        return material;
    }
    `
  }
});
是可以的:

打印 这个 m变量,可以轻松看到 glsl 代码:

并且支持直接对 js 的变量进行修改以重新着色:
m.uniforms.my_var = 0.9;
注:了解 uniforms
uniforms 是 fabric 对象的一个属性,按理说,你可以给这个对象传递任何与 glsl 内置结构、数据类型有对应关系的数据,例如上例的 my_var,是数字类型,在着色器内部自动解析为 uniform float my_var_0;
参考官方给出的二十多种预置 Material,如果你有兴趣,可以直接把它们的 source 打印出来观察。
例如,在镜面反射材质中,它的 uniforms 就有这两个:
uniforms : {
  image : 'specular.png',
  channel : 'a'
}
一个是图片路径,一个是图片用于镜面反射强度的通道(此处是 alpha 通道)。
如果你传递的是对象,例如最常见的纹理材质中:
uniforms: {
  image: 'diffuse.png',
  my_struct: {
    x: 10,
    y: 2
  }
}
这个 my_struct,最终会传入一个结构体 uniform vec2 my_struct_0;
当然有的时候不要作死,比如这个情况是转译不了的:
uniforms: {
  my_var: 0.5,
  my_struct: {
    x: 12,
    y: 5,
    name: {
      value: 'aaa'
    },
    obj: false,
    time: 5
  }
}
会报错,因为 my_struct 已经超出了 glsl 能理解的类型。
事实上,你在 uniforms 对象中写的任何数据,在 fabric.components 中一样能用,并且 Cesium 的内置结构体常量、函数都是可以直接使用的。
从着色器的角度看,一种材质无非就是 czm_getMaterial() 函数的返回值罢了。
这里仅仅改的是材质,属于片元着色器阶段发生的事情,在第四节中已经看到了 Material 中写的着色器代码是如何被 Appearance 对象的片元着色器代码调用的。如果你想修改 Primitive 的形状,那就要去修改 Appearance 的顶点着色器。
Primitive 是 Scene 对象下的,在渲染循环中它是最终被宰杀的羔羊(划掉),只要是 Primitive,只要你有能力去修改它的着色器代码,就可以自定义很多东西出来。
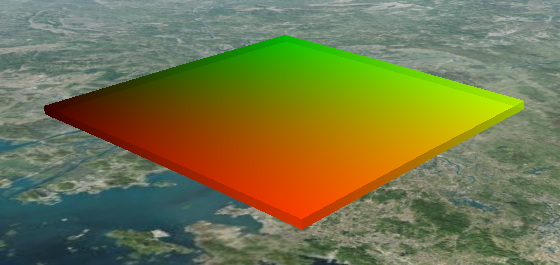
玩一玩:可视化纹理坐标
将纹理坐标作为漫反射颜色写入,就能看到纹理坐标的样子了:
const m = new Cesium.Material({
  fabric: {
    uniforms: {
      my_var: 0.5,
    },
    source:
    `
    czm_material czm_getMaterial(czm_materialInput materialInput)
    {
        czm_material material = czm_getDefaultMaterial(materialInput);
        material.diffuse = vec3(materialInput.st, 0.0);
        material.alpha = my_var;
        return material;
    }
    `
  }
});
6. 后续想做的
- 研究自带材质的着色器以及最终生成的顶点着色器、片元着色器
- 继续结合源代码,研究各路 Primitive
- 研究自带 glsl 结构体、函数、常量,灵活运用
- 理解顶点着色器的坐标含义

 浙公网安备 33010602011771号