SoftGLRender源码:配置面板(ConfigPanel)
Config类
特性
文件:Config.h
Config类管理着SoftGLRender的配置资源,主要包括资源路径、渲染设置、场景参数等.
Config对象由ViewManager管理,但由ConfigPanel使用. 因此,介绍ConfigPanel时,需要先了解Config.
常量定义
资源路径
// 资源路径
const std::string ASSERTS_DIR    = "./assets"; // 模型、贴图等路径
const std::string SHADER_GLSL_DR = "./shader/GLSL"; // 着色器路径
抗锯齿类型
抗锯齿技术可减少图形中锯齿状边缘. 2种常见抗锯齿技术:
-
MSAA 多重采样抗锯齿,对多边形的边缘进行多重采样(如4x、8x),通过混合相邻像素的颜色平滑锯齿. 仅对几何边缘处理,不处理纹理内部的锯齿.
质量较好,但速度慢. -
FXAA 快速近似抗锯齿,后处理的全屏模糊技术,通过快速模糊整个画面中的高对比度区域(包括边缘和纹理)来消除锯齿.
质量一般,但速度快.
// 抗锯齿类型
enum AAType {
	AAType_NONE, // 无抗锯齿
	AAType_MSAA, // 多重采样抗锯齿
	AAType_FXAA, // 快速近似抗锯齿
};
Config类定义
class Config {
public:
    // resource paths
    // 管理当前加载的3D模型和skybox资源
	std::string modelName;
	std::string modelPath;
	std::string skyboxName;
	std::string skyboxPath;

    // 模型的三角形总数
	size_t triangleCount_ = 0;

    // 显示控制
	bool wireFrame  = false; // 是否启用线框模式
	bool worldAxis  = true;  // 是否显示世界坐标系
	bool showSkybox = false; // 是否显示天空盒
	bool showFloor  = false; // 是否显示地面

	bool shadowMap  = true;  // 是否启用阴影贴图
	bool pbrIbl     = false; // 是否启用基于图像的PBR光照
	bool mipmaps    = false; // 是否生成纹理Mipmap

	bool cullFace   = true;  // 是否启用背面剔除
	bool depthTest  = true;  // 是否启用深度测试
	bool reverseZ   = false; // 反转Z缓冲

	glm::vec4 clearColor   = { 0.f, 0.f, 0.f, 0.f }; // 清屏颜色(RGBA)
	glm::vec3 ambientColor = { 0.5f, 0.5f, 0.5f }; // 环境光颜色(RGB)

	bool showLight = true;
	glm::vec3 pointLightPosition = { 0.f, 0.f, 0.f }; // 点光源位置
	glm::vec3 pointLightColor = { 0.5f, 0.5f, 0.5f }; // 点光源颜色

    // render mode
	int aaType     = AAType_NONE; // 抗锯齿类型(默认关闭)
	int renderType = Renderer_SOFT; // 渲染器类型(默认为软光栅化)
};
reverseZ 反转深度缓冲范围,可减少远距离物体的Z-fighting问题.
pbrIbl 基于物理的渲染(PBR),基于图像的光照(IBR).
ConfigPanel类
特性
文件:ConfigPanel.h, ConfigPanel.cpp
ConfigPanel是一个UI强相关的类,主要负责利用配置(Config)信息构建配置面板界面,同时为用户提供交换接口.
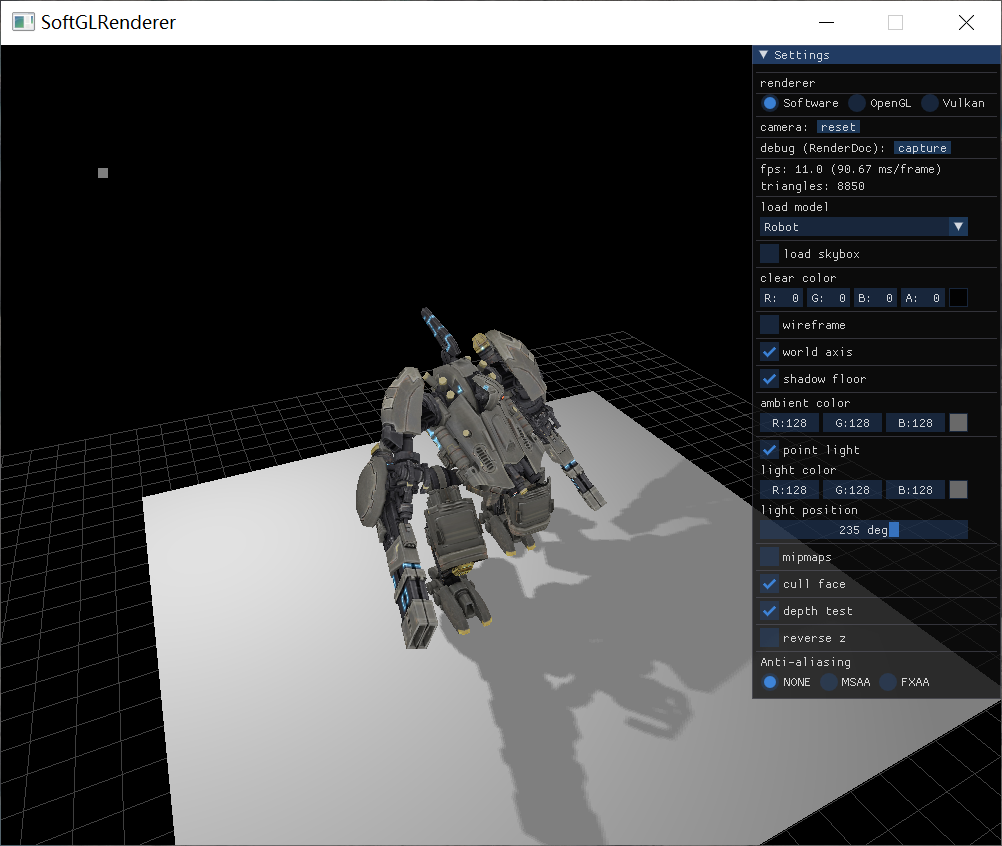
下图是SoftGLRender初始界面:
ConfigPanel数据成员
private:
	Config &config_; // not the owner

    // frame size
	int frameWidth_ = 0;
	int frameHeight_ = 0;

	float lightPositionAngle_ = glm::radians(235.f); // 角度 -> 弧度

	std::unordered_map<std::string, std::string> modelPaths_;
	std::unordered_map<std::string, std::string> skyboxPaths_;

	std::vector<const char*> modelNames_;
	std::vector<const char*> skyboxNames_;

	// callbacks
	std::function<bool(const std::string& path)> reloadModelFunc_;
	std::function<bool(const std::string& path)> reloadSkyboxFunc_;
	std::function<void(glm::vec3& position, glm::vec3& color)> updateLightFunc_;
	std::function<void(void)> resetCameraFunc_;
	std::function<void(void)> resetMipmapFunc_;
	std::function<void(void)> resetReverseZFunc_;
	std::function<void(void)> frameDumpFunc_;
重用数据成员:
- config_,ConfigPanel类利用Config对象来配置界面,但本身并不持有Config对象,Config对象由ViewManager管理,同时,ConfigPanel对象也是被ViewManager管理,因此生存周期一致,只需要一个引用即可.
- lightPositionAngle_ 控制点光源位置的时候,是通过一个滑块控制角度lightPositionAngle_来实现的.
- modelPaths_, skyboxPaths_ 模型、天空盒资源路径. 路径和名称以json格式存放在json文件中.
- modelNames_, skyboxNames_ 模型、天空盒资源名称.
ConfigPanel函数成员
核心函数:
onDraw()主循环调用,绘制面板update()主循环调用,更新光源位置wantCaptureKeyboard()检测ImGUI是否希望捕获键盘输入wantCaptureMouse()检测ImGUI是否希望捕获鼠标输入loadConfig()根据Config模块信息,读取资源路径reloadModel()重载模型reloadSkybox()重载skyboxdrawSettings()负责实现绘制Settings面板内容
注意:ConfigPanel只负责读取资源路径,并转存给Config对象,并不直接读取模型文件. 也就是说,ConfigPanel不负责3D模型绘制.
构造与析构
ConfigPanel的构造函数很简单,从ViewManager接受Config对象,并绑定本地引用.
explicit ConfigPanel(Config &config) : config_(config) {}
ConfigPanel类的真正初始化,不是在ctor中,而是在init()中.
这部分主要工作:
1)初始化ImGui环境(见下文ImGui使用流程);
2)从Config模块加载资源路径;
注意:init不负责绘制界面
bool ConfigPanel::init(void* window, int width, int height) {
	frameWidth_ = width;
	frameHeight_ = height;

	// 1. 创建上下文
	// Setup Dear ImGui context
	IMGUI_CHECKVERSION(); // 版本兼容性检查宏
	ImGui::CreateContext();
	ImGuiIO& io = ImGui::GetIO();
	io.IniFilename = nullptr;

	// 2. 设置样式
	// Setup Dear ImGui style
	ImGui::StyleColorsDark(); // Optional: Dark / Classic / Light
	ImGuiStyle* style = &ImGui::GetStyle();
	style->Alpha = 0.8f;

	// 3. 初始化平台和渲染器绑定(示例: GLFW + OpenGL)
	ImGui_ImplGlfw_InitForOpenGL((GLFWwindow *)window, true);
	ImGui_ImplOpenGL3_Init("#version 330 core");

	// load config
	return loadConfig();
}
ConfigPanel::init()由ConfigPanel对象的拥有者ViewManager调用,这也是一种延迟初始化方式,可将类构造与初始化分离.
析构:主要回收在Init中申请的ImGui与OpenGL、glfw关联的资源
~ConfigPanel() { destroy(); };

void ConfigPanel::destroy() {
    // 关闭后端
    ImGui_ImplOpenGL3_Shutdown(); // 释放ImGui与OpenGL关联的资源, 与ImGui_ImplOpenGL3_Init配对
    ImGui_ImplGlfw_Shutdown(); // 是否ImGui与glfw关联的资源,与ImGui_ImplGlfw_InitForOpenGL配对

    // 销毁ImGui上下文
    ImGui::DestroyContext();
}
加载资源路径
loadConfig 由init调用,主要负责从Config模块提供的信息加载资源路径.
bool ConfigPanel::loadConfig() {
	auto configPath = ASSERTS_DIR + "assets.json"; // "./assets/assets.json"
	auto configStr  = FileUtils::readText(configPath); // 一次性读取所有文本
	if (configStr.empty()) {
		LOGE("load models failed: error read config file");
		return false;
	}

    // 用json11库解析json文件
	std::string err;
	const auto json = json11::Json::parse(configStr, err);
    // 找到 model 下所有路径
	for (auto& kv : json["model"].object_items()) {
		modelPaths_[kv.first] = ASSERTS_DIR + kv.second["path"].string_value();
	}

    // 找到 skybox 下所有路径
	for (auto& kv : json["skybox"].object_items()) {
		skyboxPaths_[kv.first] = ASSERTS_DIR + kv.second["path"].string_value();
	}

	if (modelPaths_.empty()) {
		LOGE("load models failed: %s", err.c_str());
		return false;
	}

    // 找到所有model路径下资源对应名称
	for (const auto& kv : modelPaths_) {
		modelNames_.emplace_back(kv.first.c_str());
	}
    // 找到所有skybox路径下资源对应名称
	for (const auto& kv : skyboxPaths_) {
		skyboxNames_.emplace_back(kv.first.c_str());
	}

	// load default model & skybox
	return reloadModel(modelPaths_.begin()->first) && reloadSkybox(skyboxPaths_.begin()->first);
}
init中默认加载的model和skybox,是第一个从json文件读取到的资源.
"assets.json"文件,是以json格式存储了项目的模型(model)、天空盒(skybox)资源路径.
"assets.json"文件内容:
{
	"model": {
		"AfricanHead": {
			"path": "AfricanHead/african_head.obj"
		},
		"Brickwall": {
			"path": "Brickwall/brickwall.obj"
		},
		"Cube": {
			"path": "Cube/Cube.gltf"
		},
		"DamagedHelmet": {
			"path": "DamagedHelmet/DamagedHelmet.gltf"
		},
		"BoomBox": {
			"path": "BoomBox/BoomBox.gltf"
		},
		"GlassTable": {
			"path": "GlassTable/scene.gltf"
		},
		"Robot": {
			"path": "Robot/scene.gltf"
		}
	},
	"skybox": {
		"Lake": {
			"path": "Skybox/Lake/"
		},
		"Room": {
			"path": "Skybox/Room.jpeg"
		},
		"Hotel": {
			"path": "Skybox/Hotel.jpg"
		}
	}
}
加载model
加载model主要完成2个工作:
1)更新config配置中存放的mode name,model path信息;
2)回调用户定义的加载model函数;
// 加载指定名称的model
bool ConfigPanel::reloadModel(const std::string& name) {
	if (name != config_.modelName) {
        // 当前正在加载的model
		config_.modelName = name;
		config_.modelPath = modelPaths_[config_.modelName];

		if (reloadModelFunc_) {
			return reloadModelFunc_(config_.modelPath);
		}
	}
	return true;
}
加载skybox
与加载model方式类似,不过加载资源的来源不同.
bool ConfigPanel::reloadSkybox(const std::string& name) {
	if (name != config_.skyboxName) {
		config_.skyboxName = name;
		config_.skyboxPath = skyboxPaths_[config_.skyboxName];

		if (reloadSkyboxFunc_) {
			reloadModelFunc_(config_.skyboxPath);
		}
	}
	return true;
}
绘制面板
main函数通过调用viewer->drawPanel();,进而调用configPanel_->onDraw();绘制配置面板.
也就是说,实际绘制工作由onDraw完成. 这部分ImGui的工作,可参考下文ImGui使用流程中的主循环渲染.
// 绘制面板,主循环调用
inline void drawPanel() {
    if (showConfigPanel_) { // 如果启用了控制面板,则转发给onDraw()负责绘制工作
        configPanel_->onDraw();
    }
}

// 绘制面板
void ConfigPanel::onDraw() {
	// 1. 启动新帧
	// Start the Dear ImGui frame
	ImGui_ImplOpenGL3_NewFrame(); // 渲染器绑定的 new frame
	ImGui_ImplGlfw_NewFrame();    // 平台绑定的 new frame
	ImGui::NewFrame();            // ImGui 本身的 new frame

	// 2. 构建UI(核心逻辑)
	// 开始一个窗口
	ImGui::Begin(
		"Settings",
		nullptr,
		ImGuiWindowFlags_NoSavedSettings | ImGuiWindowFlags_NoMove | ImGuiWindowFlags_NoResize);
	drawSettings(); // 绘制设置菜单
	ImGui::SetWindowPos(ImVec2(frameWidth_ - ImGui::GetWindowWidth(), 0));
	ImGui::End(); // 结束窗口

	// 3. 渲染UI
	ImGui::Render();
	ImGui_ImplOpenGL3_RenderDrawData(ImGui::GetDrawData());
}
其中,隐藏了一个重要的自定义函数drawSettings,用于专门绘制设置菜单内容.
绘制设置菜单
drawSettings 负责绘制菜单. 与onDraw主要区别:
onDraw绘制面板,同时为菜单绘制提供环境;drawSettings绘制面板中的菜单内容.
我们看下这个菜单包含哪些内容.
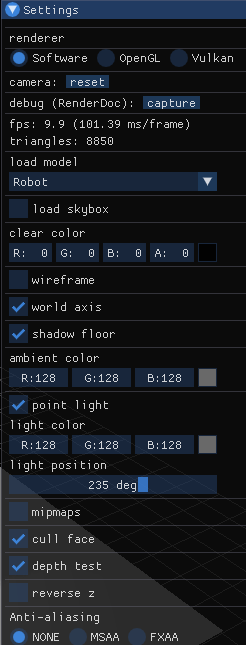
最上面窗口标题"Settings",是onDraw中设置的;从"renderer"文本开始,一直到最下面的"Aniti-aliasing"的3个选项,都由drawSettings负责.
renderer,包含3个单选选项{"Software","OpenGL","Vulkan"},用于选择渲染类型camera,包含1个reset按钮,用于重置相机debug,包含一个capture按钮,用于捕获画面(截图)fps,显示当前帧数triangles,显示当前模型的三角形总数load model,1个下拉框,选择要加载的当前模型(名称)load skybox,1个复选框,决定是否加载天空盒clear color,4个文本输入框,双击可以输入RGBA值,决定清除色(背景色);右键可以选择颜色模型、颜色范围wireframe,1个复选框,决定模型是否以网格形式显示world axis,1个复选框,决定是否显示世界坐标(地板上的网格)shadow floor,1个复选框,决定是否显示阴影地板ambient color,3个文本输入框、1个颜色选择按钮,双击可输入RGBA值,决定环境光颜色;单击颜色选择按钮,可从颜色图中选择颜色;右键可以选择颜色模型、颜色范围(类似于clear color部分)point light,1个复选框,决定是否使用场景中的点光源light color,点光源颜色. 设置方法类同ambient colorlight position,1个滑动条,设置光源角度,进而决定光源位置mipmaps,1个复选框,决定是否使用Mipmaps技术cull face,1个复选框,决定是否开启背面剔除depth test,1个复选框,决定是否开启深度测试reverse z,1个复选框,决定是否z缓冲反向Aniti-aliasing,3个单选框,决定使用哪种抗锯齿技术
// 绘制设置菜单
void ConfigPanel::drawSettings() {
	// renderer
	const char* rendererItems[] = {
		"Software",
		"OpenGL",
		"Vulkan",
	};

	ImGui::Separator(); // UI中插入一条水平分隔线
	ImGui::Text("renderer"); // UI中显示一段静态文本
	for (int i = 0; i < 3; i++) {
		if (ImGui::RadioButton(rendererItems[i], config_.renderType == i)) {
			config_.renderType = i;
		}
		ImGui::SameLine(); // 将下一个控件放在同一行
	}
	ImGui::Separator();

	// reset camera
	ImGui::Separator();
	ImGui::Text("camera");
	ImGui::SameLine();
	if (ImGui::SmallButton("reset")) {
		if (resetCameraFunc_) {
			resetCameraFunc_();
		}
	}

	// frame dump
	ImGui::Separator();
	ImGui::Text("debug (RenderDoc):");
	ImGui::SameLine();
	if (ImGui::SmallButton("capture")) {
		if (frameDumpFunc_) {
			frameDumpFunc_();
		}
	}

	// fps
	ImGui::Separator();
	ImGui::Text("fps: %.1f (%.2f ms/frame)", ImGui::GetIO().Framerate, 1000.f / ImGui::GetIO().Framerate);

	// model
	ImGui::Separator();
	ImGui::Text("load model");

	// find out current model
	int modelIdx = 0;
	for (; modelIdx < modelNames_.size(); modelIdx++) {
		if (config_.modelName == modelNames_[modelIdx]) {
			break;
		}
	}

	// ImGui::Combo: 创建下拉选择框(类似于HTML  <select>). 用户可以从预定义的选项列表中选择一个值
	if (ImGui::Combo("##load model", &modelIdx, modelNames_.data(), (int)modelNames_.size())) {
		reloadModel(modelNames_[modelIdx]);
	}

	// skybox
	ImGui::Separator();
	ImGui::Checkbox("load skybox", &config_.showSkybox);

	if (config_.showSkybox) {
		// pbr ibl
		// PBR: Physically Based Rendering,基于物理的渲染
		// IBL: Image-Based Lighting,基于图像的照明
		int skyboxIdx = 0;
		for (; skyboxIdx < skyboxNames_.size(); skyboxIdx++) {
			reloadSkybox(skyboxNames_[skyboxIdx]);
		}
	}

	// clear color
	ImGui::Separator();
	ImGui::Text("clear color");
	// ImGui::ColorEdit4: 提供一个 颜色选择器,允许用户通过UI交互修改一个RGBA颜色值(4个float,范围 [0.0, 1.0])
	// ImGuiColorEditFlags_NoLabel: 隐藏颜色选择器左侧的文本标签,仅保留颜色按钮和编辑区域
	ImGui::ColorEdit4("clear color", (float*)&config_.clearColor, ImGuiColorEditFlags_NoLabel);

	// wireframe
	ImGui::Separator();
	ImGui::Checkbox("wireframe", &config_.wireFrame);

	// world axis
	ImGui::Separator();
	ImGui::Checkbox("world axis", &config_.worldAxis);

	// shadow floor
	ImGui::Separator();
	ImGui::Checkbox("shadow floor", &config_.showFloor);
	config_.shadowMap = config_.showFloor;

	if (!config_.wireFrame) {
		// light
		ImGui::Separator();
		ImGui::Text("ambient color");
		// ImGui::ColorEdit3: 提供一个颜色选择器,用于编辑RGB颜色值(区别ImGui::ColorEdit4的RGBA值)
		ImGui::ColorEdit3("ambient color", (float*)&config_.ambientColor, ImGuiColorEditFlags_NoLabel);

		ImGui::Separator();
		ImGui::Checkbox("point light", &config_.showLight);
		if (config_.showLight) {
			ImGui::Text("light color");
			ImGui::ColorEdit3("light color", (float*)&config_.pointLightColor, ImGuiColorEditFlags_NoLabel);

			ImGui::Text("light position");
			// 通过滑块交互式地调整角度值(以弧度或度数为单位)
			// 直观地显示角度范围(如 -180° 到 180°),适合旋转、方向控制等场景
			ImGui::SliderAngle("##light position", &lightPositionAngle_, 0, 360.f);
		}

		// mipmaps
		ImGui::Separator();
		if (ImGui::Checkbox("mipmaps", &config_.mipmaps)) {
			if (resetMipmapFunc_) {
				resetMipmapFunc_();
			}
		}
	}

	// face cull
	ImGui::Separator();
	ImGui::Checkbox("cull face", &config_.cullFace);

	// depth test
	ImGui::Separator();
	ImGui::Checkbox("depth test", &config_.depthTest);

	// reverse Z
	ImGui::Separator();
	if (ImGui::Checkbox("reverse z", &config_.reverseZ)) {
		if (resetReverseZFunc_) {
			resetReverseZFunc_();
		}
	}

	// Anti aliasing
	const char* aaItems[] = {
		"NONE",
		"MSAA",
		"FXAA",
	};
	ImGui::Separator();
	ImGui::Text("Anti-aliasing");
	for (int i = 0; i < 3; i++) {
		if (ImGui::RadioButton(aaItems[i], config_.aaType == i)) {
			config_.aaType = i;
		}
		ImGui::SameLine();
	}
}
更新光源
update()负责更新光源位置,并回调用户更新光源的函数.
void ConfigPanel::update() {
	// update light position
	config_.pointLightPosition = 2.f * glm::vec3(
		glm::sin(lightPositionAngle_),
		1.2f,
		glm::cos(lightPositionAngle_));
	if (updateLightFunc_) {
		updateLightFunc_(config_.pointLightPosition, config_.pointLightColor);
	}
}
ConfigPanel从面板UI读取光源位置角度(滑块)、光源颜色(3个文本输入框),在update中转换为光源位置后,交给用户,根据用户自己的光照模型,对shading point进行着色.
设从滑块读取的光源位置角度\(α\in [0,360)deg\),则
可以看出,光源位置运行轨道是y=2.4的圆.
下面看看update的客户端是什么样的,即回调的是什么函数,客户如何更新光源的.
// ViewManager.h

void ViewManager::setupConfigPanelActions() {
    ...
    // 更新光源时,同步更新场景点光源的属性
    configPanel_->setUpdateLightFunc([&](glm::vec3& position, glm::vec3& color)->void {
        auto& scene = modelLoader_->getScene();
        scene.pointLight.vertexes[0].a_position = position; // 位置
        scene.pointLight.UpdateVertexes(); // 同步GPU数据
        scene.pointLight.material->baseColor = glm::vec4(color, 1.f); // 材质基础颜色
        });
}
传入updateLightFunc_的是一个lambda表达式.
首先,利用ModelLoader对象获取场景Scene对象,然后用Scene设置点光源信息,接着将光源信息同步到GPU,最后将材质的基础颜色修改为光照颜色(update回调传入).
是否需要捕获IO事件
ImGui并不是随时随地都需要捕获鼠标、键盘等IO事件,有可能是其他程序需要捕获的事件. ImGui提供一组状态,用于判断鼠标、键盘等IO输入是否应由ImGui处理.
而ConfigPanel对这些状态用函数进行了包装:
wantCaptureKeyboard检查当前是否需要捕获键盘输入wantCaptureMouse检查当前是否需要捕获鼠标输入
// 检测ImGui 是否正在捕获键盘输入
// @return io.WantCaptureKeyboard,供外部逻辑判断是否屏蔽键盘输入
// - true:表示 ImGui 当前正在使用键盘输入(例如输入框聚焦、快捷键触发等),此时应禁止游戏/应用的键盘响应
// - false: 表示 ImGui 未占用键盘,游戏/应用可以处理键盘事件
bool ConfigPanel::wantCaptureKeyboard() {
	ImGuiIO& io = ImGui::GetIO();
	return io.WantCaptureKeyboard;
}

// 检测 ImGui 是否正在捕获鼠标输入
bool ConfigPanel::wantCaptureMouse() {
	ImGuiIO& io = ImGui::GetIO();
	return io.WantCaptureMouse;
}
可以看看ConfigPanel::wantCaptureMouse()的客户端,返回true时,直接忽略该事件;返回false,才处理.
// Main.cpp
// glfw: whenever the mouse moves, this callback is called
void mouseCallback(GLFWwindow* window, double xPos, double yPos) {
    if (!viewer || viewer->wantCaptureMouse()) {
        return;
    }
    ...
}
ImGui
使用流程
ImGui使用流程:
- 初始化流程(GLFW+OpenGL3)
// 初始化GLFW和OpenGL上下文
glfwInit();
GLFWwindow* window = glfwCreateWindow(...);

// 初始化ImGui
IMGUI_CHECKVERSION();
ImGui::CreateContext();
ImGuiIO& io = ImGui::GetIO();

// 绑定后端
ImGui_ImplGlfw_InitForOpenGL(window, true);
ImGui_ImplOpenGL3_Init("#version 330"); // 匹配你的GLSL版本

// 设置样式
ImGui::StyleColorsDark();
- 主渲染循环
while (!glfwWindowShouldClose(window)) {
    // draw frame use OpenGL
    ...

    // 开始新帧
    ImGui_ImplOpenGL3_NewFrame();
    ImGui_ImplGlfw_NewFrame();
    ImGui::NewFrame();

    // 构建UI(示例:显示一个窗口)
    ImGui::Begin("Demo Window");
    ImGui::Text("Hello, OpenGL!");
    if (ImGui::Button("Click Me")) { ... }
    ImGui::End();

    // 渲染
    ImGui::Render();
    glClear(GL_COLOR_BUFFER_BIT);

    // 实际绘制ImGui数据
    ImGui_ImplOpenGL3_RenderDrawData(ImGui::GetDrawData());

    glfwSwapBuffers(window);
}

 浙公网安备 33010602011771号