手把手教你用Pytorch-Transformers——实战(二)
本文是《手把手教你用Pytorch-Transformers》的第二篇,主要讲实战
手把手教你用Pytorch-Transformers——部分源码解读及相关说明(一)
使用 PyTorch 的可以结合使用 Apex ,加速训练和减小显存的占用
PyTorch必备神器 | 唯快不破:基于Apex的混合精度加速
github托管地址:https://github.com/NVIDIA/apex
情感分类任务
这里使用 BertForSequenceClassification 进行情感分类任务,还是用 苏剑林 整理的情感二分类数据集
可以结合之前发的那篇一起看,由于官方的 examples 还没细看,这里的例子使用 PyTorch 比较传统的方式进行训练
数据集:
原始Github链接:https://github.com/bojone/bert4keras/tree/master/examples/datasets
个人网盘:链接: https://pan.baidu.com/s/1OAhNbRYpU1HW25_vChdRng 提取码: uxax
用Dataset表示数据集
先放上一些参数设置
# 超参数
hidden_dropout_prob = 0.3
num_labels = 2
learning_rate = 1e-5
weight_decay = 1e-2
epochs = 2
batch_size = 16
继承 PyTorch 的 Dataset ,编写一个类表示数据集,这里我们用字典返回一个样本和它的标签
from torch.utils.data import Dataset
import pandas as pd

class SentimentDataset(Dataset):
    def __init__(self, path_to_file):
        self.dataset = pd.read_csv(path_to_file, sep="\t", names=["text", "label"])
    def __len__(self):
        return len(self.dataset)
    def __getitem__(self, idx):
        text = self.dataset.loc[idx, "text"]
        label = self.dataset.loc[idx, "label"]
        sample = {"text": text, "label": label}
        return sample
编写模型
Transformers 已经实现好了用来分类的模型,我们这里就不自己编写了,直接使用 BertForSequenceClassification 调用预训练模型
一些自定义的配置可以通过 BertConfig 传递给 BertForSequenceClassification
from transformers import BertConfig, BertForSequenceClassification
# 使用GPU
# 通过model.to(device)的方式使用
device = torch.device("cuda:0" if torch.cuda.is_available() else "cpu")
config = BertConfig.from_pretrained("bert-base-uncased", num_labels=num_labels, hidden_dropout_prob=hidden_dropout_prob)
model = BertForSequenceClassification.from_pretrained("bert-base-uncased", config=config)
model.to(device)
想自定义编写模型的话可以参考BertForSequenceClassification。另外,这个BertConfig还可以添加自定义的属性,比如添加一个作者啥的
config = BertConfig.from_pretrained("bert-base-uncased", author="DogeCheng")
读取数据集
用 DataLoader 得到一个迭代器,每次得到一个 batch_size 的数据
from torch.utils.data import DataLoader
data_path = "/data/sentiment/"
# 加载数据集
sentiment_train_set = SentimentDataset(data_path + "sentiment.train.data")
sentiment_train_loader = DataLoader(sentiment_train_set, batch_size=batch_size, shuffle=True, num_workers=2)

sentiment_valid_set = SentimentDataset(data_path + "sentiment.train.data")
sentiment_valid_loader = DataLoader(sentiment_valid_set, batch_size=batch_size, shuffle=False, num_workers=2)
数据处理
主要实现对文本进行 tokenization 和 padding 的函数
vocab_file = "PyTorch_Pretrained_Model/chinese_wwm_pytorch/vocab.txt"
tokenizer = BertTokenizer(vocab_file)

def convert_text_to_ids(tokenizer, text, max_len=100):
    if isinstance(text, str):
        tokenized_text = tokenizer.encode_plus(text, max_length=max_len, add_special_tokens=True)
        input_ids = tokenized_text["input_ids"]
        token_type_ids = tokenized_text["token_type_ids"]
    elif isinstance(text, list):
        input_ids = []
        token_type_ids = []
        for t in text:
            tokenized_text = tokenizer.encode_plus(t, max_length=max_len, add_special_tokens=True)
            input_ids.append(tokenized_text["input_ids"])
            token_type_ids.append(tokenized_text["token_type_ids"])
    else:
        print("Unexpected input")
    return input_ids, token_type_ids

def seq_padding(tokenizer, X):
    pad_id = tokenizer.convert_tokens_to_ids("[PAD]")
    if len(X) <= 1:
        return torch.tensor(X)
    L = [len(x) for x in X]
    ML = max(L)
    X = torch.Tensor([x + [pad_id] * (ML - len(x)) if len(x) < ML else x for x in X])
    return X
定义优化器和损失函数
其实从源码看,我们知道 BertForSequenceClassification 已经有了损失函数,可以不用实现,这里展示一个更通用的例子,自己实现损失函数
import torch
import torch.nn as nn
from transformers import AdamW
# 定义优化器和损失函数
# Prepare optimizer and schedule (linear warmup and decay)
no_decay = ['bias', 'LayerNorm.weight']
optimizer_grouped_parameters = [
        {'params': [p for n, p in model.named_parameters() if not any(nd in n for nd in no_decay)], 'weight_decay': weight_decay},
        {'params': [p for n, p in model.named_parameters() if any(nd in n for nd in no_decay)], 'weight_decay': 0.0}
]
#optimizer = AdamW(model.parameters(), lr=learning_rate)
optimizer = AdamW(optimizer_grouped_parameters, lr=learning_rate)
criterion = nn.CrossEntropyLoss()
从上面我们可以看到 bias 和 LayerNorm.weight 都没用权重衰减,可以参考下面的博文,主要是由于 bias 的更新跟权重衰减无关
权重衰减(weight decay)与学习率衰减(learning rate decay):
https://blog.csdn.net/program_developer/article/details/80867468
定义训练和验证函数
PyTorch 不像 Keras 那样调用 fit 就可以了,大多都需要自己实现,为了复用性,这里用函数实现了简单的训练和测试函数
因为 BertForSequenceClassification 里面已经有了一个 CrossEntropyLoss() ,实际可以不用我们刚刚的实例化的损失函数,见 train() 函数 中的注释
函数返回2个内容:一个 epoch 内的损失和准确率,如果要计算其他评估指标需自己实现(或通过 sklearn.metrics 帮助)
def train(model, iterator, optimizer, criterion, device):
    model.train()
    epoch_loss = 0
    epoch_acc = 0
    for i, batch in enumerate(iterator):
        label = batch["label"]
        text = batch["text"]
        input_ids, token_type_ids = convert_text_to_ids(tokenizer, text)
        input_ids = seq_padding(tokenizer, input_ids)
        token_type_ids = seq_padding(tokenizer, token_type_ids)
        # 标签形状为 (batch_size, 1)
        label = label.unsqueeze(1)
        # 需要 LongTensor
        input_ids, token_type_ids, label = input_ids.long(), token_type_ids.long(), label.long()
        # 梯度清零
        optimizer.zero_grad()
        # 迁移到GPU
        input_ids, token_type_ids, label = input_ids.to(device), token_type_ids.to(device), label.to(device)
        output = model(input_ids=input_ids, token_type_ids=token_type_ids, labels=label)
        y_pred_prob = output[1]
        y_pred_label = y_pred_prob.argmax(dim=1)
        # 计算loss
        # 这个 loss 和 output[0] 是一样的
        loss = criterion(y_pred_prob.view(-1, 2), label.view(-1))
        #loss = output[0]
        # 计算acc
        acc = ((y_pred_label == label.view(-1)).sum()).item()
        # 反向传播
        loss.backward()
        optimizer.step()
        # epoch 中的 loss 和 acc 累加
        epoch_loss += loss.item()
        epoch_acc += acc
        if i % 200 == 0:
            print("current loss:", epoch_loss / (i+1), "\t", "current acc:", epoch_acc / ((i+1)*len(label)))
    # return epoch_loss / len(iterator), epoch_acc / (len(iterator) * iterator.batch_size)
    # 经评论区提醒修改
    return epoch_loss / len(iterator), epoch_acc / len(iterator.dataset.dataset)

def evaluate(model, iterator, criterion, device):
    model.eval()
    epoch_loss = 0
    epoch_acc = 0
    with torch.no_grad():
        for _, batch in enumerate(iterator):
            label = batch["label"]
            text = batch["text"]
            input_ids, token_type_ids = convert_text_to_ids(tokenizer, text)
            input_ids = seq_padding(tokenizer, input_ids)
            token_type_ids = seq_padding(tokenizer, token_type_ids)
            label = label.unsqueeze(1)
            input_ids, token_type_ids, label = input_ids.long(), token_type_ids.long(), label.long()
            input_ids, token_type_ids, label = input_ids.to(device), token_type_ids.to(device), label.to(device)
            output = model(input_ids=input_ids, token_type_ids=token_type_ids, labels=label)
            y_pred_label = output[1].argmax(dim=1)
            loss = output[0]
            acc = ((y_pred_label == label.view(-1)).sum()).item()
            epoch_loss += loss.item()
            epoch_acc += acc
    # return epoch_loss / len(iterator), epoch_acc / (len(iterator) * iterator.batch_size)
    # 经评论区提醒修改
    return epoch_loss / len(iterator), epoch_acc / len(iterator.dataset.dataset)
开始训练
这里只跑了 2 个 epoch,在验证集上的效果达到了 92 的准确率
# 再测试
for i in range(epochs):
    train_loss, train_acc = train(model, sentiment_train_loader, optimizer, criterion, device)
    print("train loss: ", train_loss, "\t", "train acc:", train_acc)
    valid_loss, valid_acc = evaluate(model, sentiment_valid_loader, criterion, device)
    print("valid loss: ", valid_loss, "\t", "valid acc:", valid_acc)
第一个 epoch

第二个 epoch

SQuAD任务
官方例子的使用
这里直接使用 Transformers 提供 run_squad.py 进行说明
这里使用的是 SQuAD v1.1 数据集,下载地址为
下载好数据后,放入 $SQUAD_DIR 中,输入以下命令运行
export SQUAD_DIR=/path/to/SQUAD

python run_squad.py \
  --model_type bert \
  --model_name_or_path bert-base-cased \
  --do_train \
  --do_eval \
  --do_lower_case \
  --train_file $SQUAD_DIR/train-v1.1.json \
  --predict_file $SQUAD_DIR/dev-v1.1.json \
  --per_gpu_train_batch_size 12 \
  --learning_rate 3e-5 \
  --num_train_epochs 2.0 \
  --max_seq_length 384 \
  --doc_stride 128 \
  --output_dir /tmp/debug_squad/
utils_squad.py
SQuAD数据集是用JSON格式存储的,而且层级很多,下面的链接有SQuAD数据集的结构化展示
我们主要使用到的是 paragraphs 字段的内容,包括context 和 qas
- qas 包括 answers,question 以及 id
- 而 answers 包括 answer_start 和 text
read_squad_examples()
read_squad_examples() 就是负责把原来的JSON数据抽取出来,让数据变得更清晰。每条数据变成一个 SquadExample 对象,存放下面的内容
- qas_id:id
- question_text:question
- doc_tokens:经过 tokenization 后的 text
- orig_answer_text:text
- start_position:开始位置
- end_position:结束位置
- is_impossible:样本是否没有答案
其中 is_impossible 是SQuAD v2才有的字段,read_squad_examples() 会判断数据集的版本,我们在运行 run_squad.py时,可以通过 --version_2_with_negative 参数设置
if version_2_with_negative:
    is_impossible = qa["is_impossible"]
数据集只提供了 answer_start,所以 end_position 需要自己计算,即 start_position 加上答案的长度-1
if not is_impossible:
    answer = qa["answers"][0]
    orig_answer_text = answer["text"]
    answer_offset = answer["answer_start"]
    answer_length = len(orig_answer_text)
    start_position = char_to_word_offset[answer_offset]
    end_position = char_to_word_offset[answer_offset + answer_length - 1]
convert_examples_to_features()
read_squad_examples() 负责从 JSON 中读取数据,并进行一些处理,但是这样不能输入 Bert 模型中
所以还需要使用 convert_examples_to_features() 函数处理成能够输入到 Bert 中的格式,主要是截断、padding 和 token转换为id等
如简单粗暴的截断操作
if len(query_tokens) > max_query_length:
    query_tokens = query_tokens[0:max_query_length]
token 转换成 id 和 mask 等操作
input_ids = tokenizer.convert_tokens_to_ids(tokens)

# The mask has 1 for real tokens and 0 for padding tokens. Only real
# tokens are attended to.
input_mask = [1 if mask_padding_with_zero else 0] * len(input_ids)
padding 操作
# Zero-pad up to the sequence length.
while len(input_ids) < max_seq_length:
    input_ids.append(pad_token)
    input_mask.append(0 if mask_padding_with_zero else 1)
    segment_ids.append(pad_token_segment_id)
    p_mask.append(1)
最后每个样本用 InputFeatures 对象存放这些处理后的数据
run_squad.py
run_squad.py 用一个字典存放不同模型用到的Config、Model 和 Tokenizer,通过 --model_type 参数使用
MODEL_CLASSES = {
    'bert': (BertConfig, BertForQuestionAnswering, BertTokenizer),
    'xlnet': (XLNetConfig, XLNetForQuestionAnswering, XLNetTokenizer),
    'xlm': (XLMConfig, XLMForQuestionAnswering, XLMTokenizer),
    'distilbert': (DistilBertConfig, DistilBertForQuestionAnswering, DistilBertTokenizer),
    'albert': (AlbertConfig, AlbertForQuestionAnswering, AlbertTokenizer)
}
我们通过 --model_type 参数使用需要的模型,并在 main() 函数中实例化 config、model 和 tokenizer 对象
config_class, model_class, tokenizer_class = MODEL_CLASSES[args.model_type]
准备数据集
使用 read_squad_examples 处理再用 convert_examples_to_features 将每一个样本用 InputFeatures 对象表示
再通过 load_and_cache_examples() 将数据全部变成张量,大致代码如下
...
examples = read_squad_examples(input_file=input_file,
                                        is_training=not evaluate,
                                        version_2_with_negative=args.version_2_with_negative)
features = convert_examples_to_features(examples=examples,
                                        tokenizer=tokenizer,
                                        max_seq_length=args.max_seq_length,
                                        doc_stride=args.doc_stride,
                                        max_query_length=args.max_query_length,
                                        is_training=not evaluate,
                                        cls_token_segment_id=2 if args.model_type in ['xlnet'] else 0,
                                        pad_token_segment_id=3 if args.model_type in ['xlnet'] else 0,
                                        cls_token_at_end=True if args.model_type in ['xlnet'] else False,
                                        sequence_a_is_doc=True if args.model_type in ['xlnet'] else False)

...

# Convert to Tensors and build dataset
all_input_ids = torch.tensor([f.input_ids for f in features], dtype=torch.long)
all_input_mask = torch.tensor([f.input_mask for f in features], dtype=torch.long)
all_segment_ids = torch.tensor([f.segment_ids for f in features], dtype=torch.long)
all_cls_index = torch.tensor([f.cls_index for f in features], dtype=torch.long)
all_p_mask = torch.tensor([f.p_mask for f in features], dtype=torch.float)
if evaluate:
    all_example_index = torch.arange(all_input_ids.size(0), dtype=torch.long)
    dataset = TensorDataset(all_input_ids, all_input_mask, all_segment_ids,
                            all_example_index, all_cls_index, all_p_mask)
else:
    all_start_positions = torch.tensor([f.start_position for f in features], dtype=torch.long)
    all_end_positions = torch.tensor([f.end_position for f in features], dtype=torch.long)
    dataset = TensorDataset(all_input_ids, all_input_mask, all_segment_ids,
                            all_start_positions, all_end_positions,
                            all_cls_index, all_p_mask)

if output_examples:
    return dataset, examples, features
return dataset
在 main() 函数中将这些数据变成张量后,再送到 train() 函数中
train_dataset = load_and_cache_examples(args, tokenizer, evaluate=False, output_examples=False)
global_step, tr_loss = train(args, train_dataset, model, tokenizer)
train()
这里也使用 DataLoader 将数据集变成生成器,用来取出一个 batch 的数据训练
train_sampler = RandomSampler(train_dataset) if args.local_rank == -1 else DistributedSampler(train_dataset)
train_dataloader = DataLoader(train_dataset, sampler=train_sampler, batch_size=args.train_batch_size)
定义优化器
no_decay = ['bias', 'LayerNorm.weight']
optimizer_grouped_parameters = [
    {'params': [p for n, p in model.named_parameters() if not any(nd in n for nd in no_decay)], 'weight_decay': args.weight_decay},
    {'params': [p for n, p in model.named_parameters() if any(nd in n for nd in no_decay)], 'weight_decay': 0.0}
    ]
optimizer = AdamW(optimizer_grouped_parameters, lr=args.learning_rate, eps=args.adam_epsilon)
还使用了学习率预热,训练时先从小的学习率开始训练
scheduler = get_linear_schedule_with_warmup(optimizer, num_warmup_steps=args.warmup_steps, num_training_steps=t_total)
如果机器上有 apex ,可以通过 --fp16 参数设置,进行加速训练
if args.fp16:
    try:
        from apex import amp
    except ImportError:
        raise ImportError("Please install apex from https://www.github.com/nvidia/apex to use fp16 training.")
    model, optimizer = amp.initialize(model, optimizer, opt_level=args.fp16_opt_level)
训练过程设置了 checkpoint,默认每 50 个 step 保存一次模型,可以通过 --save_steps 修改
if args.local_rank in [-1, 0] and args.save_steps > 0 and global_step % args.save_steps == 0:
    # Save model checkpoint
    output_dir = os.path.join(args.output_dir, 'checkpoint-{}'.format(global_step))
    if not os.path.exists(output_dir):
        os.makedirs(output_dir)
    model_to_save = model.module if hasattr(model, 'module') else model  # Take care of distributed/parallel training
    model_to_save.save_pretrained(output_dir)
    torch.save(args, os.path.join(output_dir, 'training_args.bin'))
    logger.info("Saving model checkpoint to %s", output_dir)
在 BertForQuestionAnswering 中,它会把 sequence_output 送到一个全连接层中,转换 hidden_size 维度为2,然后split输出,得到 start_logits 和 end_logits
下面是 BertForQuestionAnswering 中的代码片段,描述了上面说的过程
logits = self.qa_outputs(sequence_output)
start_logits, end_logits = logits.split(1, dim=-1)
start_logits 和 end_logits 就是每个 Bert 预测答案开始和结束位置的置信度,这个过程大致如下图所示

BertForQuestionAnswering 计算损失的方式就是 start_logits 和 end_logits 分别计算 loss 再相加取平均
loss_fct = CrossEntropyLoss(ignore_index=ignored_index)
start_loss = loss_fct(start_logits, start_positions)
end_loss = loss_fct(end_logits, end_positions)
total_loss = (start_loss + end_loss) / 2
evaluate()
如果设置了 --do_eval 参数,模型训练完后会进行测试
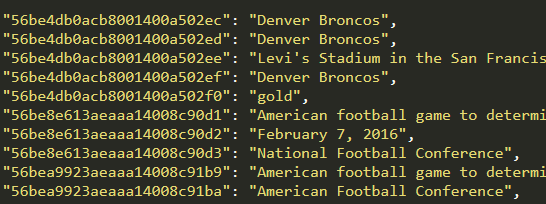
预测完成后生成的文件有 predictions_.json 和 nbest_predictions_.json 等
其中 predictions_.json 记录的是每个问题 id 对应的最佳答案,如下图所示
nbest_predictions_.json 记录的是每个问题 id 对应的 n 个最佳答案

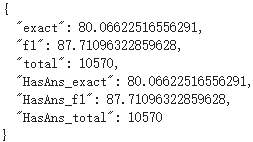
这是我跑的结果

 浙公网安备 33010602011771号