Haproxy全透明代理
1. 系统环境搭建
- 操作系统Centos7 内核版本3.10
- Centos7已自带TPROXY模块,不需要安装TPROXY
2. Haproxy下载,编译,安装,配置
-
下载地址 http://www.haproxy.org/download/ (所有ha版本)
1.4.24 下载地址 http://www.haproxy.org/download/1.4/src/haproxy-1.4.24.tar.gz -
编译安装
tar -xvf haproxy-1.4.24.tar.gz
cd haproxy-1.4.24
yum install gcc gcc-c++ autoconf automake -y #安装gcc编译器
make TARGET=linux2628 arch=x86_64 USE_LINUX_TPROXY=1 #重点USE_LINUX_TPROXY=1用于编译支持TPTOXY
make install
mkdir /etc/haproxy
cp examples/haproxy.cfg /etc/haproxy
cp examples/haproxy.init /etc/init.d/haproxy
chmod +x /etc/init.d/haproxy
cp haproxy /usr/sbin/ -
配置
this config needs haproxy-1.1.28 or haproxy-1.2.1
global
log 127.0.0.1 local0
log 127.0.0.1 local1 notice
#log loghost local0 info
maxconn 4096
# chroot /usr/share/haproxy
# uid 99
# gid 99
daemon
#debug
#quietdefaults
log global
mode http
option httplog
option dontlognull
retries 3
maxconn 2000
contimeout 5000
clitimeout 50000
srvtimeout 50000listen test
bind 0.0.0.0:12345
balance roundrobin
mode tcp
option tcplog
source 0.0.0.0 usesrc clientip #重点,TPROXY需要加上这行。
server test 10.17.12.246:12346 weight 1 check inter 2000 rise 2 fall 5
3. 网络拓扑
客户端:10.17.12.212---------haproxy节点:10.17.12.192-------------后端服务器节点:10.17.12.246
客户端与后端服务器均为window7 ,haproxy为centos7
4. Haproxy代理服务器配置
-
iptables配置
iptables -F
iptables -t mangle -N DIVERT
iptables -t mangle -A PREROUTING -p tcp -m socket -j DIVERT
iptables -t mangle -A DIVERT -j MARK --set-mark 222
iptables -t mangle -A DIVERT -j ACCEPT
ip rule add fwmark 222 lookup 100
ip route add local 0.0.0.0/0 dev lo table 100
haproxy 网卡enp0s8的ip地址为 10.17.12.192
实验中 iptables -F 指令非常重要,不执行此条指令,后面iptables的规则都没有起作用
-
添加转发和重定向
允许ip转发
echo 1 > /proc/sys/net/ipv4/conf/all/forwarding
设置松散逆向路径过滤
echo 2 > /proc/sys/net/ipv4/conf/default/rp_filter
echo 2 > /proc/sys/net/ipv4/conf/all/rp_filter
echo 0 > /proc/sys/net/ipv4/conf/enp0s8/rp_filter允许ICMP重定向
echo 1 > /proc/sys/net/ipv4/conf/all/send_redirects
echo 1 > /proc/sys/net/ipv4/conf/enp0s8/send_redirects
5. 服务器配置
-
配置路由
route delete 10.17.12.0
route add 10.17.12.0 mask 255.255.255.0 10.17.12.192 -
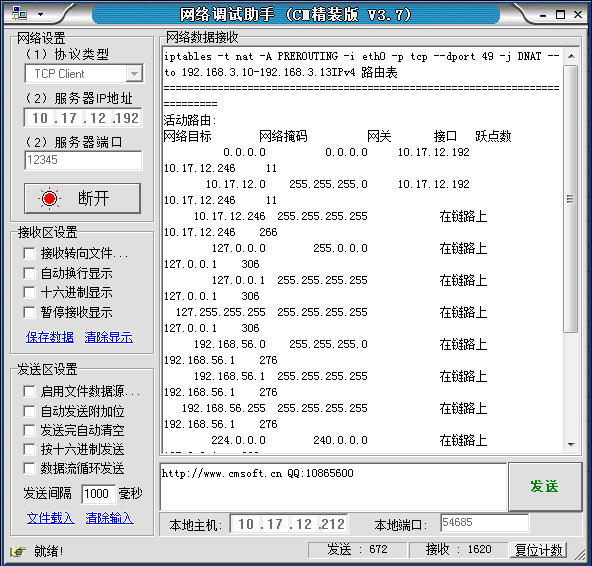
最终路由结果
===========================================================================
活动路由:
网络目标 网络掩码 网关 接口 跃点数
0.0.0.0 0.0.0.0 10.17.12.192 10.17.12.246 11
10.17.12.0 255.255.255.0 10.17.12.192 10.17.12.246 11
10.17.12.246 255.255.255.255 在链路上 10.17.12.246 266
127.0.0.0 255.0.0.0 在链路上 127.0.0.1 306
127.0.0.1 255.255.255.255 在链路上 127.0.0.1 306
127.255.255.255 255.255.255.255 在链路上 127.0.0.1 306
192.168.56.0 255.255.255.0 在链路上 192.168.56.1 276
192.168.56.1 255.255.255.255 在链路上 192.168.56.1 276
192.168.56.255 255.255.255.255 在链路上 192.168.56.1 276
224.0.0.0 240.0.0.0 在链路上 127.0.0.1 306
224.0.0.0 240.0.0.0 在链路上 10.17.12.246 266
224.0.0.0 240.0.0.0 在链路上 192.168.56.1 276
255.255.255.255 255.255.255.255 在链路上 127.0.0.1 306
255.255.255.255 255.255.255.255 在链路上 10.17.12.246 266
255.255.255.255 255.255.255.255 在链路上 192.168.56.1 276
6. 测试结果
客户端测试软件截图:
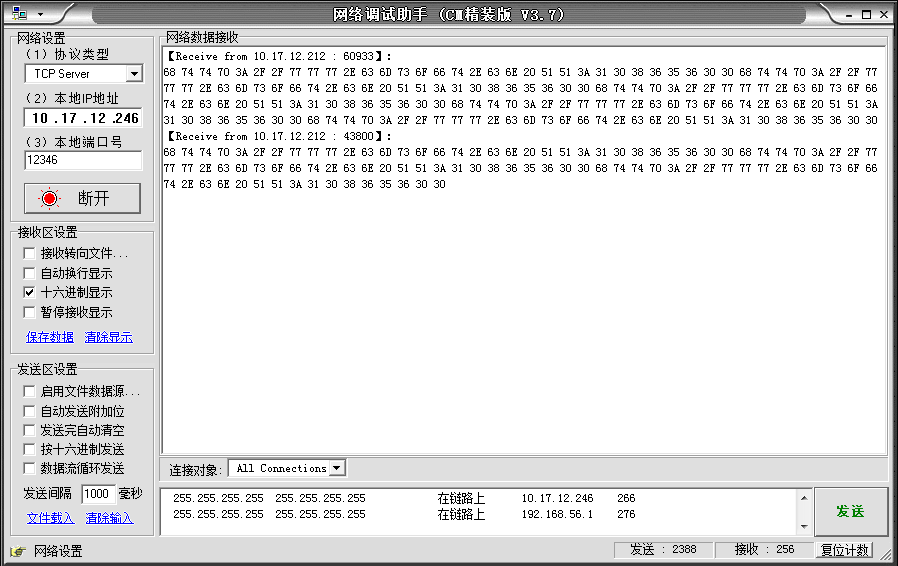
服务端测试软件截图
7. 参考文档
- iptables 参考文档 http://blog.csdn.net/reyleon/article/details/12976341
- haproxy 全透明代理参考文档 https://my.oschina.net/eddylinux/blog/535043
- http://www.haproxy.com/blog/howto-transparent-proxying-and-binding-with-haproxy-and-aloha-load-balancer/
- http://techblogsearch.com/a/haproxy-transparent-mode-on-centos-7.html
- http://www.360doc.com/content/13/0821/17/13047933_308812287.shtml
- https://wenku.baidu.com/view/335db66a376baf1ffc4fade1.html
- http://forlinux.blog.51cto.com/8001278/1415350/(第二参考资料)
- http://cbonte.github.io/haproxy-dconv/1.4/configuration.html
- http://blog.sina.com.cn/s/blog_704836f401011e17.html(第一参考资料)
|
作者:Bonker 出处:http://www.cnblogs.com/Bonker WeiXin:iBonker |

 浙公网安备 33010602011771号