
gazebo+rviz 仿真
gazebo小车模型创建及键盘操控详见之前的博客
参考链接
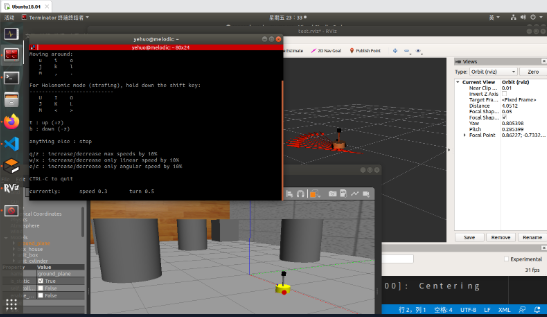
Part 1 : 里程计查看
效果图
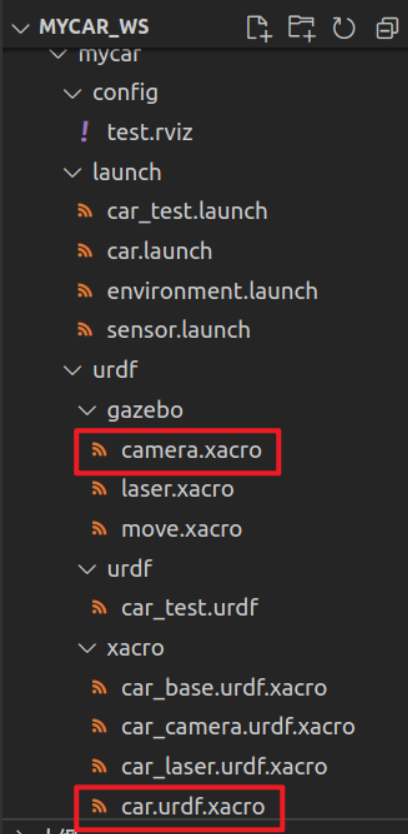
step1: 添加需要的文件
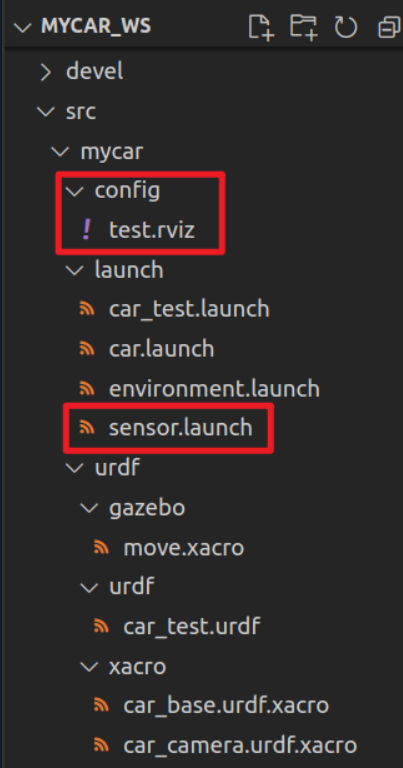
src/mycar/config/test.rviz
Panels:
  - Class: rviz/Displays
    Help Height: 78
    Name: Displays
    Property Tree Widget:
      Expanded:
        - /Global Options1
        - /Status1
        - /RobotModel1
        - /TF1
        - /Odometry1
        - /Odometry1/Shape1
      Splitter Ratio: 0.5
    Tree Height: 670
  - Class: rviz/Selection
    Name: Selection
  - Class: rviz/Tool Properties
    Expanded:
      - /2D Pose Estimate1
      - /2D Nav Goal1
      - /Publish Point1
    Name: Tool Properties
    Splitter Ratio: 0.5886790156364441
  - Class: rviz/Views
    Expanded:
      - /Current View1
    Name: Views
    Splitter Ratio: 0.5
  - Class: rviz/Time
    Experimental: false
    Name: Time
    SyncMode: 0
    SyncSource: ""
Preferences:
  PromptSaveOnExit: true
Toolbars:
  toolButtonStyle: 2
Visualization Manager:
  Class: ""
  Displays:
    - Alpha: 0.5
      Cell Size: 1
      Class: rviz/Grid
      Color: 160; 160; 164
      Enabled: true
      Line Style:
        Line Width: 0.029999999329447746
        Value: Lines
      Name: Grid
      Normal Cell Count: 0
      Offset:
        X: 0
        Y: 0
        Z: 0
      Plane: XY
      Plane Cell Count: 10
      Reference Frame: <Fixed Frame>
      Value: true
    - Alpha: 1
      Class: rviz/RobotModel
      Collision Enabled: false
      Enabled: true
      Links:
        All Links Enabled: true
        Expand Joint Details: false
        Expand Link Details: false
        Expand Tree: false
        Link Tree Style: Links in Alphabetic Order
        back_wheel:
          Alpha: 1
          Show Axes: false
          Show Trail: false
          Value: true
        base_footprint:
          Alpha: 1
          Show Axes: false
          Show Trail: false
          Value: true
        base_link:
          Alpha: 1
          Show Axes: false
          Show Trail: false
          Value: true
        camera:
          Alpha: 1
          Show Axes: false
          Show Trail: false
          Value: true
        front_wheel:
          Alpha: 1
          Show Axes: false
          Show Trail: false
          Value: true
        laser:
          Alpha: 1
          Show Axes: false
          Show Trail: false
          Value: true
        left_wheel:
          Alpha: 1
          Show Axes: false
          Show Trail: false
          Value: true
        right_wheel:
          Alpha: 1
          Show Axes: false
          Show Trail: false
          Value: true
        support:
          Alpha: 1
          Show Axes: false
          Show Trail: false
          Value: true
      Name: RobotModel
      Robot Description: robot_description
      TF Prefix: ""
      Update Interval: 0
      Value: true
      Visual Enabled: true
    - Class: rviz/TF
      Enabled: false
      Frame Timeout: 15
      Frames:
        All Enabled: true
      Marker Scale: 1
      Name: TF
      Show Arrows: true
      Show Axes: true
      Show Names: true
      Tree:
        {}
      Update Interval: 0
      Value: false
    - Angle Tolerance: 0.10000000149011612
      Class: rviz/Odometry
      Covariance:
        Orientation:
          Alpha: 0.5
          Color: 255; 255; 127
          Color Style: Unique
          Frame: Local
          Offset: 1
          Scale: 1
          Value: true
        Position:
          Alpha: 0.30000001192092896
          Color: 204; 51; 204
          Scale: 1
          Value: true
        Value: true
      Enabled: true
      Keep: 10
      Name: Odometry
      Position Tolerance: 0.10000000149011612
      Shape:
        Alpha: 1
        Axes Length: 1
        Axes Radius: 0.10000000149011612
        Color: 255; 25; 0
        Head Length: 0.30000001192092896
        Head Radius: 0.05000000074505806
        Shaft Length: 1
        Shaft Radius: 0.009999999776482582
        Value: Arrow
      Topic: /odom
      Unreliable: false
      Value: true
  Enabled: true
  Global Options:
    Background Color: 48; 48; 48
    Default Light: true
    Fixed Frame: odom
    Frame Rate: 30
  Name: root
  Tools:
    - Class: rviz/Interact
      Hide Inactive Objects: true
    - Class: rviz/MoveCamera
    - Class: rviz/Select
    - Class: rviz/FocusCamera
    - Class: rviz/Measure
    - Class: rviz/SetInitialPose
      Theta std deviation: 0.2617993950843811
      Topic: /initialpose
      X std deviation: 0.5
      Y std deviation: 0.5
    - Class: rviz/SetGoal
      Topic: /move_base_simple/goal
    - Class: rviz/PublishPoint
      Single click: true
      Topic: /clicked_point
  Value: true
  Views:
    Current:
      Class: rviz/Orbit
      Distance: 6.243990898132324
      Enable Stereo Rendering:
        Stereo Eye Separation: 0.05999999865889549
        Stereo Focal Distance: 1
        Swap Stereo Eyes: false
        Value: false
      Focal Point:
        X: -0.6781591773033142
        Y: 0.7335925102233887
        Z: -0.1656564623117447
      Focal Shape Fixed Size: true
      Focal Shape Size: 0.05000000074505806
      Invert Z Axis: false
      Name: Current View
      Near Clip Distance: 0.009999999776482582
      Pitch: 0.3703985810279846
      Target Frame: <Fixed Frame>
      Value: Orbit (rviz)
      Yaw: 0.8403980731964111
    Saved: ~
Window Geometry:
  Displays:
    collapsed: false
  Height: 967
  Hide Left Dock: false
  Hide Right Dock: false
  QMainWindow State: 000000ff00000000fd00000004000000000000015600000329fc0200000008fb0000001200530065006c0065006300740069006f006e00000001e10000009b0000005c00fffffffb0000001e0054006f006f006c002000500072006f007000650072007400690065007302000001ed000001df00000185000000a3fb000000120056006900650077007300200054006f006f02000001df000002110000018500000122fb000000200054006f006f006c002000500072006f0070006500720074006900650073003203000002880000011d000002210000017afb000000100044006900730070006c006100790073010000003d00000329000000c900fffffffb0000002000730065006c0065006300740069006f006e00200062007500660066006500720200000138000000aa0000023a00000294fb00000014005700690064006500530074006500720065006f02000000e6000000d2000003ee0000030bfb0000000c004b0069006e0065006300740200000186000001060000030c00000261000000010000010f00000329fc0200000003fb0000001e0054006f006f006c002000500072006f00700065007200740069006500730100000041000000780000000000000000fb0000000a00560069006500770073010000003d00000329000000a400fffffffb0000001200530065006c0065006300740069006f006e010000025a000000b200000000000000000000000200000490000000a9fc0100000001fb0000000a00560069006500770073030000004e00000080000002e100000197000000030000062d0000003efc0100000002fb0000000800540069006d006501000000000000062d000002eb00fffffffb0000000800540069006d00650100000000000004500000000000000000000003bc0000032900000004000000040000000800000008fc0000000100000002000000010000000a0054006f006f006c00730100000000ffffffff0000000000000000
  Selection:
    collapsed: false
  Time:
    collapsed: false
  Tool Properties:
    collapsed: false
  Views:
    collapsed: false
  Width: 1581
  X: 67
  Y: 27
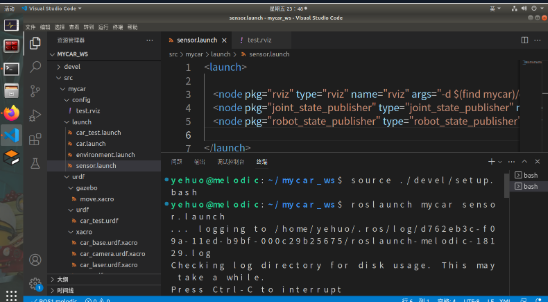
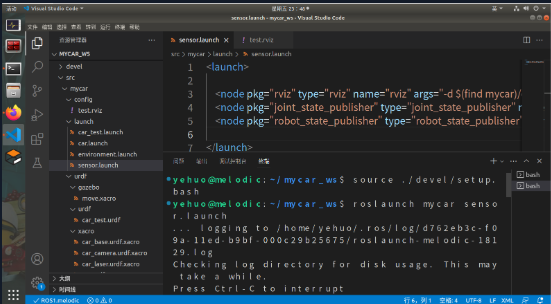
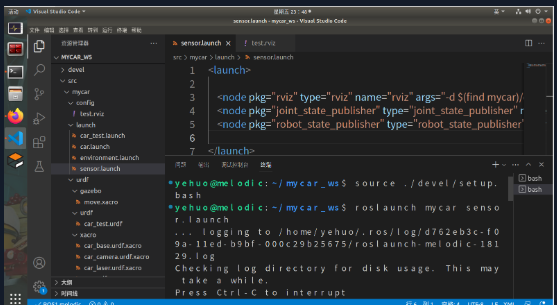
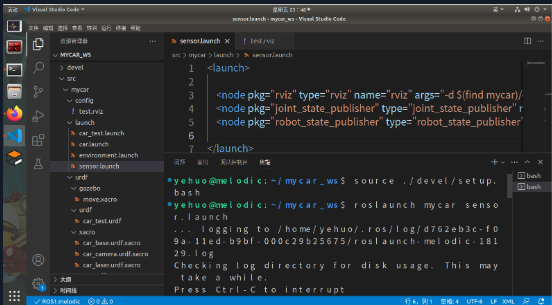
src/mycar/launch/sensor.launch
<launch>

    <node pkg="rviz" type="rviz" name="rviz" args="-d $(find mycar)/config/test.rviz" />
    <node pkg="joint_state_publisher" type="joint_state_publisher" name="joint_state_publisher" output="screen" />
    <node pkg="robot_state_publisher" type="robot_state_publisher" name="robot_state_publisher" output="screen" />

</launch>
step2: 运行
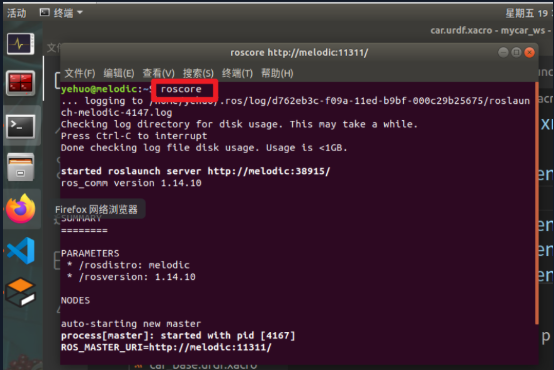
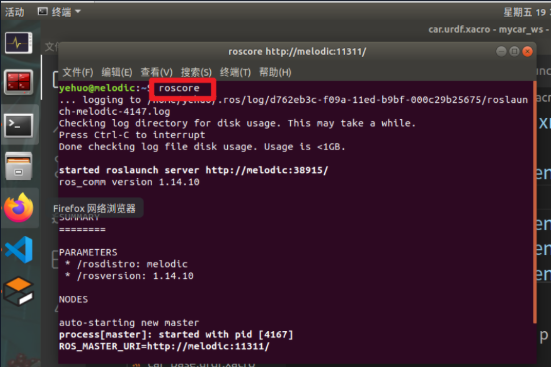
在终端启动roscore
roscore
启动gazebo
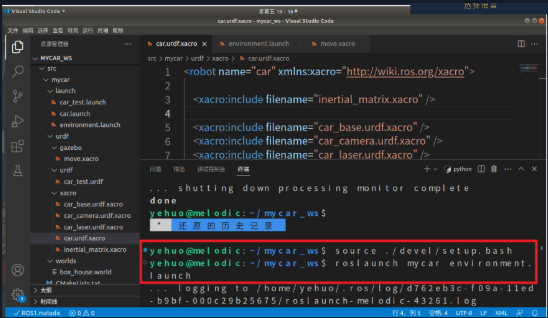
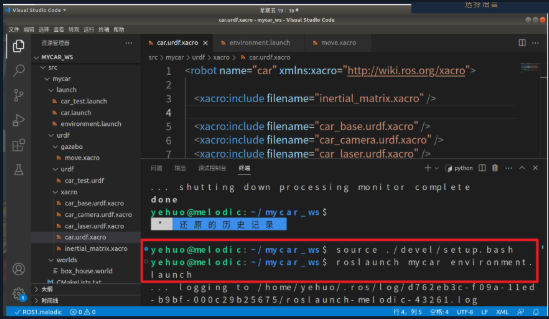
source ./devel/setup.bash

roslaunch mycar environment.launch
启动rviz
source ./devel/setup.bash

roslaunch mycar sensor.launch

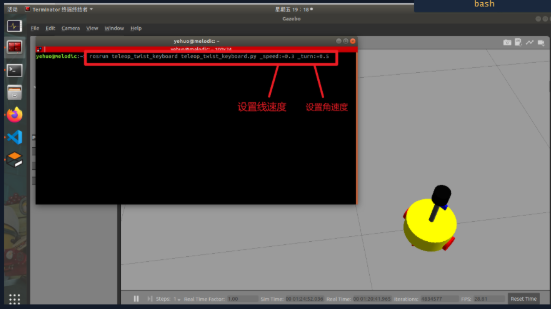
启动键盘控制
rosrun teleop_twist_keyboard teleop_twist_keyboard.py _speed:=0.3 _turn:=0.5

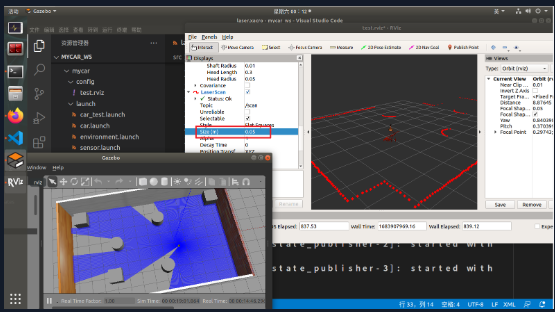
Part 2 : 雷达仿真
效果图

step1: 添加需要的文件
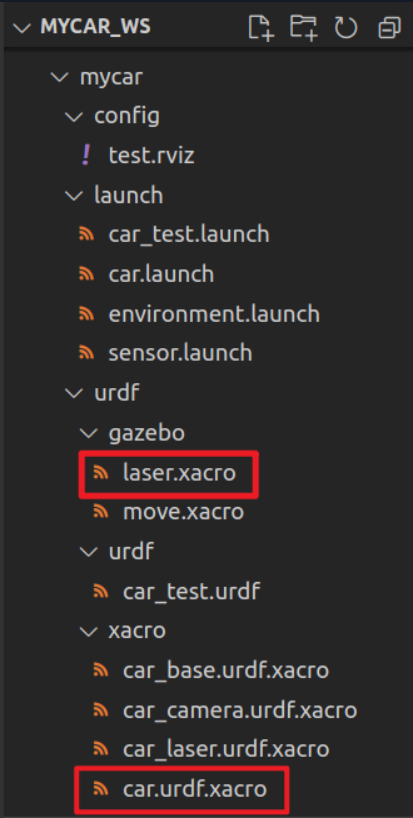
src/mycar/urdf/gazebo/laser.xacro
<robot name="my_sensors" xmlns:xacro="http://wiki.ros.org/xacro">

  <!-- laser -->
  <gazebo reference="laser">
    <sensor type="ray" name="rplidar">
      <pose>0 0 0 0 0 0</pose>
      <visualize>true</visualize>
      <update_rate>5.5</update_rate>
      <ray>
        <scan>
          <horizontal>
            <samples>360</samples>
            <resolution>1</resolution>
            <min_angle>-3</min_angle>
            <max_angle>3</max_angle>
          </horizontal>
        </scan>
        <range>
          <min>0.10</min>
          <max>30.0</max>
          <resolution>0.01</resolution>
        </range>
        <noise>
          <type>gaussian</type>
          <mean>0.0</mean>
          <stddev>0.01</stddev>
        </noise>
      </ray>
      <plugin name="gazebo_rplidar" filename="libgazebo_ros_laser.so">
        <topicName>/scan</topicName>
        <frameName>laser</frameName>
      </plugin>
    </sensor>
  </gazebo>

</robot>
src/mycar/urdf/xacro/car.urdf.xacro
<robot name="car" xmlns:xacro="http://wiki.ros.org/xacro">

    <xacro:include filename="inertial_matrix.xacro" />

    <xacro:include filename="car_base.urdf.xacro" />
    <xacro:include filename="car_camera.urdf.xacro" />
    <xacro:include filename="car_laser.urdf.xacro" />

    <!-- move control  -->
     <xacro:include filename="../gazebo/move.xacro" />

    <!-- laser control  -->
     <xacro:include filename="../gazebo/laser.xacro" />

</robot>
step2: 运行
在终端启动roscore
roscore

启动gazebo
source ./devel/setup.bash

roslaunch mycar environment.launch

启动rviz
source ./devel/setup.bash

roslaunch mycar sensor.launch
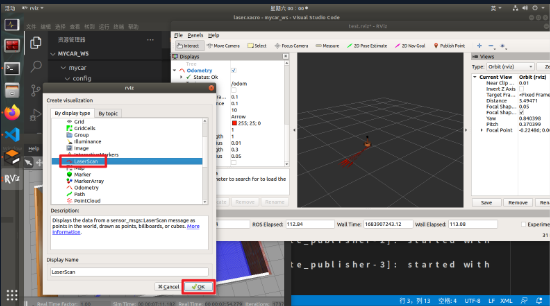
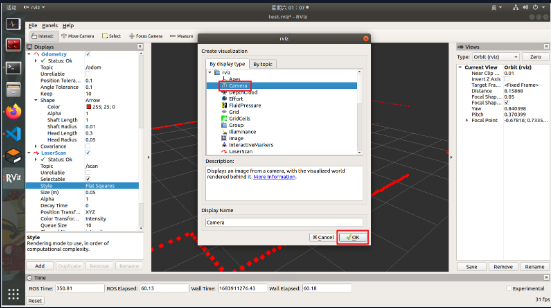
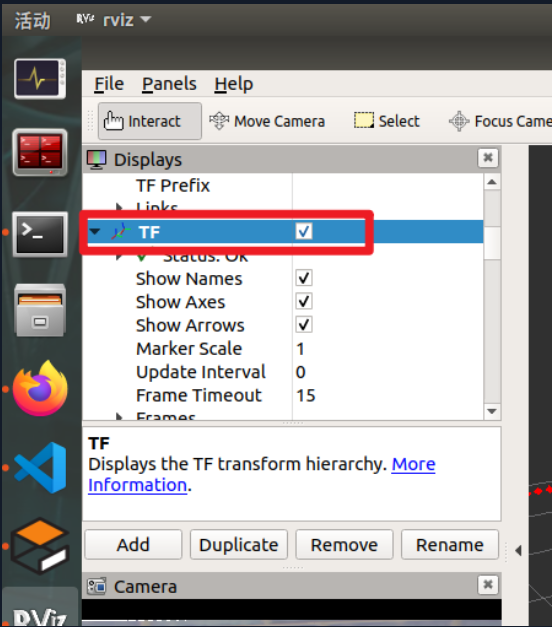
step3: 配置 rviz

Part 3 : 摄像头仿真
效果图
step1: 添加需要的文件
src/mycar/urdf/gazebo/camera.xacro
<robot name="my_sensors" xmlns:xacro="http://wiki.ros.org/xacro">

  <gazebo reference="camera">

    <sensor type="camera" name="camera_node">
      <update_rate>30.0</update_rate>

      <camera name="head">
        <horizontal_fov>1.3962634</horizontal_fov>
        <image>
          <width>1280</width>
          <height>720</height>
          <format>R8G8B8</format>
        </image>
        <clip>
          <near>0.02</near>
          <far>300</far>
        </clip>
        <noise>
          <type>gaussian</type>
          <mean>0.0</mean>
          <stddev>0.007</stddev>
        </noise>
      </camera>

      <plugin name="gazebo_camera" filename="libgazebo_ros_camera.so">
        <alwaysOn>true</alwaysOn>
        <updateRate>0.0</updateRate>
        <cameraName>/camera</cameraName>
        <imageTopicName>image_raw</imageTopicName>
        <cameraInfoTopicName>camera_info</cameraInfoTopicName>
        <frameName>camera</frameName>
        <hackBaseline>0.07</hackBaseline>
        <distortionK1>0.0</distortionK1>
        <distortionK2>0.0</distortionK2>
        <distortionK3>0.0</distortionK3>
        <distortionT1>0.0</distortionT1>
        <distortionT2>0.0</distortionT2>
      </plugin>
    </sensor>
  </gazebo>
</robot>
src/mycar/urdf/xacro/car.urdf.xacro
<robot name="car" xmlns:xacro="http://wiki.ros.org/xacro">

    <xacro:include filename="inertial_matrix.xacro" />

    <xacro:include filename="car_base.urdf.xacro" />
    <xacro:include filename="car_camera.urdf.xacro" />
    <xacro:include filename="car_laser.urdf.xacro" />

    <!-- move control  -->
     <xacro:include filename="../gazebo/move.xacro" />

    <!-- laser control  -->
     <xacro:include filename="../gazebo/laser.xacro" />

     <!-- camera control  -->
     <xacro:include filename="../gazebo/camera.xacro" />

</robot>
step2: 运行
在终端启动roscore
roscore
启动gazebo
source ./devel/setup.bash

roslaunch mycar environment.launch
启动rviz
source ./devel/setup.bash

roslaunch mycar sensor.launch
启动键盘控制
rosrun teleop_twist_keyboard teleop_twist_keyboard.py _speed:=0.3 _turn:=0.5
step3: 配置 rviz

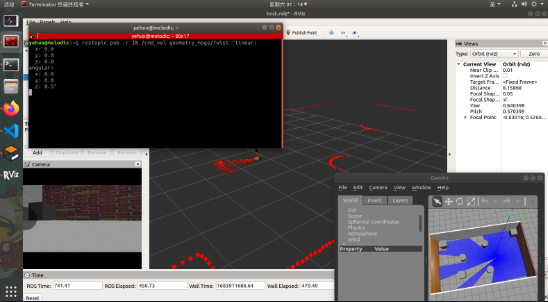
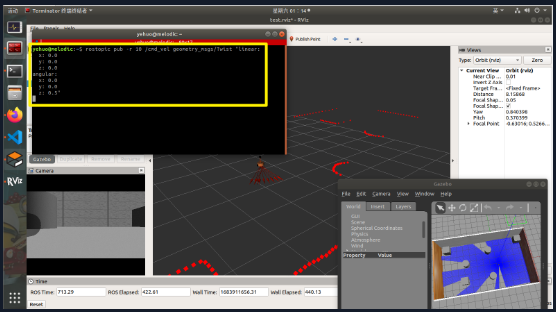
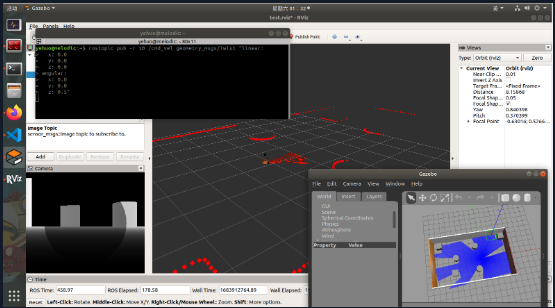
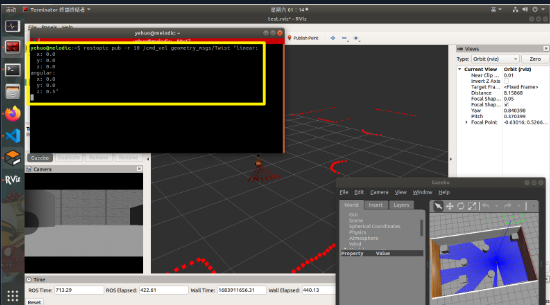
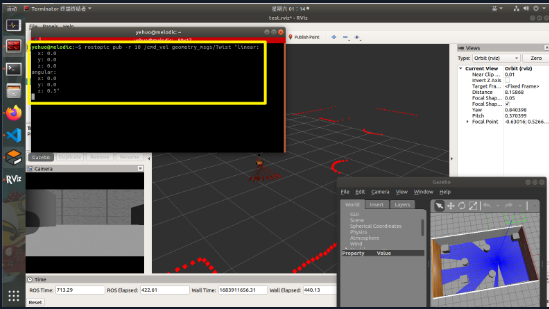
step4: 打开终端,使小车在rviz中旋转
输入以下指令
rostopic pub -r 10 /cmd_vel geometry_msgs/Twist "linear:
  x: 0.0
  y: 0.0
  z: 0.0
angular:
  x: 0.0
  y: 0.0
  z: 0.5"
Part 4 : 深度相机仿真
效果图
step1: 添加需要的文件
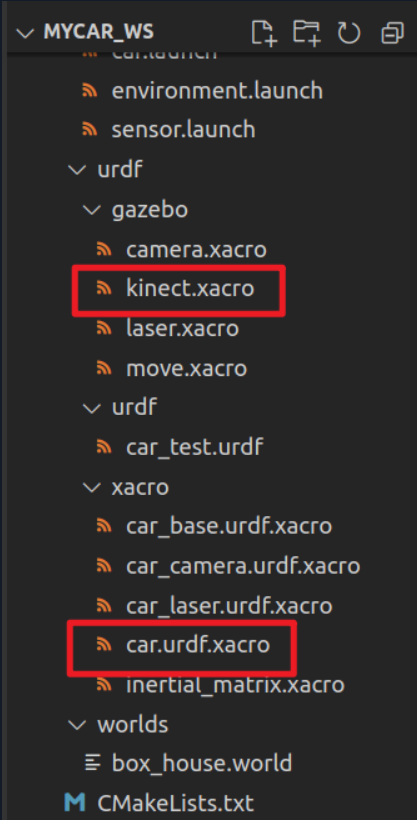
src/mycar/urdf/gazebo/kinect.xacro
<robot name="my_sensors" xmlns:xacro="http://wiki.ros.org/xacro">
    <gazebo reference="support">
      <sensor type="depth" name="camera">
        <always_on>true</always_on>
        <update_rate>20.0</update_rate>
        <camera>
          <horizontal_fov>${60.0*PI/180.0}</horizontal_fov>
          <image>
            <format>R8G8B8</format>
            <width>640</width>
            <height>480</height>
          </image>
          <clip>
            <near>0.05</near>
            <far>8.0</far>
          </clip>
        </camera>
        <plugin name="kinect_camera_controller" filename="libgazebo_ros_openni_kinect.so">
          <cameraName>camera</cameraName>
          <alwaysOn>true</alwaysOn>
          <updateRate>10</updateRate>
          <imageTopicName>rgb/image_raw</imageTopicName>
          <depthImageTopicName>depth/image_raw</depthImageTopicName>
          <pointCloudTopicName>depth/points</pointCloudTopicName>
          <cameraInfoTopicName>rgb/camera_info</cameraInfoTopicName>
          <depthImageCameraInfoTopicName>depth/camera_info</depthImageCameraInfoTopicName>
          <frameName>support</frameName>
          <baseline>0.1</baseline>
          <distortion_k1>0.0</distortion_k1>
          <distortion_k2>0.0</distortion_k2>
          <distortion_k3>0.0</distortion_k3>
          <distortion_t1>0.0</distortion_t1>
          <distortion_t2>0.0</distortion_t2>
          <pointCloudCutoff>0.4</pointCloudCutoff>
        </plugin>
      </sensor>
    </gazebo>

</robot>
src/mycar/urdf/xacro/car.urdf.xacro
<robot name="car" xmlns:xacro="http://wiki.ros.org/xacro">

    <xacro:include filename="inertial_matrix.xacro" />

    <xacro:include filename="car_base.urdf.xacro" />
    <xacro:include filename="car_camera.urdf.xacro" />
    <xacro:include filename="car_laser.urdf.xacro" />

    <!-- move control  -->
     <xacro:include filename="../gazebo/move.xacro" />

    <!-- laser control  -->
     <xacro:include filename="../gazebo/laser.xacro" />

     <!-- camera control  -->
     <xacro:include filename="../gazebo/camera.xacro" />

     <!-- kinect control  -->
     <xacro:include filename="../gazebo/kinect.xacro" />

</robot>
step2: 运行
在终端启动roscore
roscore

启动gazebo
source ./devel/setup.bash

roslaunch mycar environment.launch

启动rviz
source ./devel/setup.bash

roslaunch mycar sensor.launch
启动键盘控制
rosrun teleop_twist_keyboard teleop_twist_keyboard.py _speed:=0.3 _turn:=0.5

step3: 配置 rviz
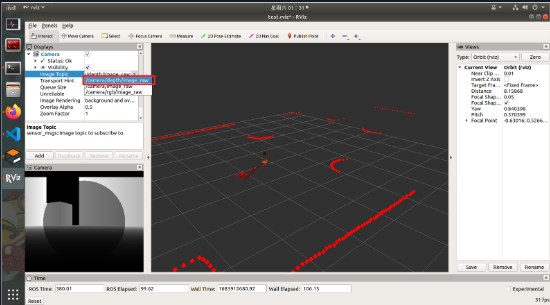
step4: 打开终端,使小车在rviz中旋转
输入以下指令
rostopic pub -r 10 /cmd_vel geometry_msgs/Twist "linear:
  x: 0.0
  y: 0.0
  z: 0.0
angular:
  x: 0.0
  y: 0.0
  z: 0.5"
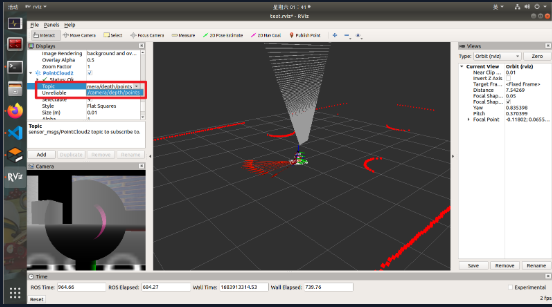
Part 5 : 深度相机仿真(点云)
效果图

step1: 添加需要的文件

src/mycar/urdf/gazebo/kinect.xacro
<robot name="my_sensors" xmlns:xacro="http://wiki.ros.org/xacro">
    <gazebo reference="support">
      <sensor type="depth" name="camera">
        <always_on>true</always_on>
        <update_rate>20.0</update_rate>
        <camera>
          <horizontal_fov>${60.0*PI/180.0}</horizontal_fov>
          <image>
            <format>R8G8B8</format>
            <width>640</width>
            <height>480</height>
          </image>
          <clip>
            <near>0.05</near>
            <far>8.0</far>
          </clip>
        </camera>
        <plugin name="kinect_camera_controller" filename="libgazebo_ros_openni_kinect.so">
          <cameraName>camera</cameraName>
          <alwaysOn>true</alwaysOn>
          <updateRate>10</updateRate>
          <imageTopicName>rgb/image_raw</imageTopicName>
          <depthImageTopicName>depth/image_raw</depthImageTopicName>
          <pointCloudTopicName>depth/points</pointCloudTopicName>
          <cameraInfoTopicName>rgb/camera_info</cameraInfoTopicName>
          <depthImageCameraInfoTopicName>depth/camera_info</depthImageCameraInfoTopicName>
          <frameName>support_depth</frameName>
          <baseline>0.1</baseline>
          <distortion_k1>0.0</distortion_k1>
          <distortion_k2>0.0</distortion_k2>
          <distortion_k3>0.0</distortion_k3>
          <distortion_t1>0.0</distortion_t1>
          <distortion_t2>0.0</distortion_t2>
          <pointCloudCutoff>0.4</pointCloudCutoff>
        </plugin>
      </sensor>
    </gazebo>

</robot>
src/mycar/launch/sensor.launch
<launch>
    <!-- 添加点云坐标系到kinect连杆坐标系的变换 -->
    <node pkg="tf2_ros" name="static_transform_publisher" type="static_transform_publisher"  args="0 0 0 -1.57 0 -1.57 /support /support_depth" />

    <node pkg="rviz" type="rviz" name="rviz" args="-d $(find mycar)/config/test.rviz" />
    <node pkg="joint_state_publisher" type="joint_state_publisher" name="joint_state_publisher" output="screen" />
    <node pkg="robot_state_publisher" type="robot_state_publisher" name="robot_state_publisher" output="screen" />

</launch>
step2: 运行
在终端启动roscore
roscore

启动gazebo
source ./devel/setup.bash

roslaunch mycar environment.launch
启动rviz
source ./devel/setup.bash

roslaunch mycar sensor.launch
step3: 配置 rviz

step4: 打开终端,使小车在rviz中旋转
输入以下指令
rostopic pub -r 10 /cmd_vel geometry_msgs/Twist "linear:
  x: 0.0
  y: 0.0
  z: 0.0
angular:
  x: 0.0
  y: 0.0
  z: 0.3"

 浙公网安备 33010602011771号