Spring Boot -- Spring Boot之热部署、性能优化、打包
一、热部署
所谓的热部署:比如项目的热部署,就是在应用程序在不停止的情况下,实现新的部署。
1.1、热部署原理
原理: 使用类加载器(classloader重新读取字节码文件到jvm内存)
如何纯手写一个热部署功能:
- 监听 class文件是否发生改变 版本号、修改时间 作对比;
- 如果发生改变就用classloader进行重新读取;
热部署可以用于在生产环境?
- 理论上可以(不推荐),热部署要是用在生产环境,性能很差了,不安全;
- 本地开发(eclipse、idea)、用来提高效率,不需要重启服务器;
1.2、devtools依赖
要想实现热部署,我们可以利用Spring Boot为我们提供了一个非常方便的工具spring-boot-devtools。
添加依赖:
<!--   热部署     -->
<dependency>
     <groupId>org.springframework.boot</groupId>
      <artifactId>spring-boot-devtools</artifactId>
       <optional>true</optional><!-- optional=true,依赖不会传递 -->
</dependency>
1.3、IDEA设置
如果使用idea,必须需要确保开启运行时编译才行,IDEA Settings->Build,Execution,Deployment->Compiler 开启Build project automatically:

快捷键 ctrl+shift+a,输入Registry,找到下面这行,开启:

以上即可实现热部署,前后台代码修改都可不用再次部署运行。
1.4、devtools原理
springboot-devtools模块能够实现热部署,添加类.添加方法,修改配置文件,修改页面等,都能实现热部署。
原理就是重启项目,但比手动重启快多了,其深层原理是使用了两个ClassLoder:
- 一个ClassLoader加载哪些不会改变的类(第三方jar包);
- 另一个ClassLoader加载会更改的类,称之为restart ClassLoader;
- 这样在有代码更改的时候,原来的restart Classloader被丢弃,重新创建一个restart ClassLoader,由于需要加载的类相比较少,所以实现了较快的重启时间(5秒以内);
二、性能优化
2.1、组件自动扫描带来的问题
默认情况下,我们会使用 @SpringBootApplication 注解来自动获取应用的配置信息,我们首先来看一下这个注解源代码:


/*
 * Copyright 2012-2019 the original author or authors.
 *
 * Licensed under the Apache License, Version 2.0 (the "License");
 * you may not use this file except in compliance with the License.
 * You may obtain a copy of the License at
 *
 *      https://www.apache.org/licenses/LICENSE-2.0
 *
 * Unless required by applicable law or agreed to in writing, software
 * distributed under the License is distributed on an "AS IS" BASIS,
 * WITHOUT WARRANTIES OR CONDITIONS OF ANY KIND, either express or implied.
 * See the License for the specific language governing permissions and
 * limitations under the License.
 */

package org.springframework.boot.autoconfigure;

import java.lang.annotation.Documented;
import java.lang.annotation.ElementType;
import java.lang.annotation.Inherited;
import java.lang.annotation.Retention;
import java.lang.annotation.RetentionPolicy;
import java.lang.annotation.Target;

import org.springframework.boot.SpringBootConfiguration;
import org.springframework.boot.context.TypeExcludeFilter;
import org.springframework.context.annotation.Bean;
import org.springframework.context.annotation.ComponentScan;
import org.springframework.context.annotation.ComponentScan.Filter;
import org.springframework.context.annotation.Configuration;
import org.springframework.context.annotation.FilterType;
import org.springframework.core.annotation.AliasFor;
import org.springframework.data.repository.Repository;

/**
 * Indicates a {@link Configuration configuration} class that declares one or more
 * {@link Bean @Bean} methods and also triggers {@link EnableAutoConfiguration
 * auto-configuration} and {@link ComponentScan component scanning}. This is a convenience
 * annotation that is equivalent to declaring {@code @Configuration},
 * {@code @EnableAutoConfiguration} and {@code @ComponentScan}.
 *
 * @author Phillip Webb
 * @author Stephane Nicoll
 * @author Andy Wilkinson
 * @since 1.2.0
 */
@Target(ElementType.TYPE)
@Retention(RetentionPolicy.RUNTIME)
@Documented
@Inherited
@SpringBootConfiguration
@EnableAutoConfiguration
@ComponentScan(excludeFilters = { @Filter(type = FilterType.CUSTOM, classes = TypeExcludeFilter.class),
        @Filter(type = FilterType.CUSTOM, classes = AutoConfigurationExcludeFilter.class) })
public @interface SpringBootApplication {

    /**
     * Exclude specific auto-configuration classes such that they will never be applied.
     * @return the classes to exclude
     */
    @AliasFor(annotation = EnableAutoConfiguration.class)
    Class<?>[] exclude() default {};

    /**
     * Exclude specific auto-configuration class names such that they will never be
     * applied.
     * @return the class names to exclude
     * @since 1.3.0
     */
    @AliasFor(annotation = EnableAutoConfiguration.class)
    String[] excludeName() default {};

    /**
     * Base packages to scan for annotated components. Use {@link #scanBasePackageClasses}
     * for a type-safe alternative to String-based package names.
     * <p>
     * <strong>Note:</strong> this setting is an alias for
     * {@link ComponentScan @ComponentScan} only. It has no effect on {@code @Entity}
     * scanning or Spring Data {@link Repository} scanning. For those you should add
     * {@link org.springframework.boot.autoconfigure.domain.EntityScan @EntityScan} and
     * {@code @Enable...Repositories} annotations.
     * @return base packages to scan
     * @since 1.3.0
     */
    @AliasFor(annotation = ComponentScan.class, attribute = "basePackages")
    String[] scanBasePackages() default {};

    /**
     * Type-safe alternative to {@link #scanBasePackages} for specifying the packages to
     * scan for annotated components. The package of each class specified will be scanned.
     * <p>
     * Consider creating a special no-op marker class or interface in each package that
     * serves no purpose other than being referenced by this attribute.
     * <p>
     * <strong>Note:</strong> this setting is an alias for
     * {@link ComponentScan @ComponentScan} only. It has no effect on {@code @Entity}
     * scanning or Spring Data {@link Repository} scanning. For those you should add
     * {@link org.springframework.boot.autoconfigure.domain.EntityScan @EntityScan} and
     * {@code @Enable...Repositories} annotations.
     * @return base packages to scan
     * @since 1.3.0
     */
    @AliasFor(annotation = ComponentScan.class, attribute = "basePackageClasses")
    Class<?>[] scanBasePackageClasses() default {};

    /**
     * Specify whether {@link Bean @Bean} methods should get proxied in order to enforce
     * bean lifecycle behavior, e.g. to return shared singleton bean instances even in
     * case of direct {@code @Bean} method calls in user code. This feature requires
     * method interception, implemented through a runtime-generated CGLIB subclass which
     * comes with limitations such as the configuration class and its methods not being
     * allowed to declare {@code final}.
     * <p>
     * The default is {@code true}, allowing for 'inter-bean references' within the
     * configuration class as well as for external calls to this configuration's
     * {@code @Bean} methods, e.g. from another configuration class. If this is not needed
     * since each of this particular configuration's {@code @Bean} methods is
     * self-contained and designed as a plain factory method for container use, switch
     * this flag to {@code false} in order to avoid CGLIB subclass processing.
     * <p>
     * Turning off bean method interception effectively processes {@code @Bean} methods
     * individually like when declared on non-{@code @Configuration} classes, a.k.a.
     * "@Bean Lite Mode" (see {@link Bean @Bean's javadoc}). It is therefore behaviorally
     * equivalent to removing the {@code @Configuration} stereotype.
     * @since 2.2
     * @return whether to proxy {@code @Bean} methods
     */
    @AliasFor(annotation = Configuration.class)
    boolean proxyBeanMethods() default true;

}
使用这个注解后,会触发自动配置( auto-configuration )和 组件扫描 ( component scanning ),这跟使用 @Configuration、@EnableAutoConfiguration 和 @ComponentScan 三个注解的作用是一样的。但是由于@SpringBootApplication会扫描当前、以及子包下的所有文件,导致做给开发带来方便的同时,也会有三方面的影响:
- 会导致项目启动时间变长,当启动一个大的应用程序,或将做大量的集成测试启动应用程序时,影响会特别明显;
- 会加载一些不需要的多余的实例(beans);
- 会增加 CPU 消耗;
针对以上三个情况,我们可以移除 @SpringBootApplication,然后使用 @Configuration、@EnableAutoConfiguration 和 @ComponentScan注解来扫描特定的包。
2.2、Spring Boot JVM参数调优
关于Jvm调优Oracle官网有一份指导说明: Oracle官网对Jvm调优的说明, 有兴趣大家可以去看看。
调优策略:初始化堆内存与最大堆相同,减少垃圾回收次数。
两种方法:内部启动和外部启动
(1)、内部启动
实例参数-XX:+PrintGCDetails -Xmx32M -Xms1M
打印GC日志,设置最大堆内存32M,初始堆内存32M
-Xms :设置Java堆栈的初始化大小
-Xmx :设置最大的java堆大小
测试:
第一步,在项目运行,编辑结构中配置参数:

运行项目,查看回收次数:

这样配置后,GC回收次数非常多。
更改堆大小后,-XX:+PrintGCDetails -Xmx256M -Xms256M ,GC回收次数减少:

我们可以使用jconsole.exe工具查看堆内存使用情况:

(2)、外部启动
第一步,通过maven 项目打jar包,配置pom.xml:
    <build>
        <plugins>
            <!-- 指定maven编译的jdk版本,如果不指定,maven3默认用jdk 1.5 maven2默认用jdk1.3 -->
            <plugin>
                <groupId>org.apache.maven.plugins</groupId>
                <artifactId>maven-compiler-plugin</artifactId>
                <configuration>
                    <source>1.8</source>
                    <target>1.8</target>
                </configuration>
            </plugin>

            <!--  使用maven-jar-plugin将指定包目录打成单独的jar包  -->
            <plugin>
                <groupId>org.apache.maven.plugins</groupId>
                <artifactId>maven-jar-plugin</artifactId>
            </plugin>

            <!--   SpringBoot 项目借由 spring-boot-maven-plugin 插件,通过 Maven 将项目打包成可执行的 JAR(Fat Jar) 或者 WAR,由此插件生成的 Jar 包  -->
            <plugin>
                <groupId>org.springframework.boot</groupId>
                <artifactId>spring-boot-maven-plugin</artifactId>
            </plugin>
        </plugins>
    </build>
使用maven打包,如图:

最终生成spring-boot-helloworld-1.0-SNAPSHOT.jar,执行如下命令:
java -server -Xms32m -Xmx232m -jar spring-boot-helloworld-1.0-SNAPSHOT.jar

2.3、Spring Boot使用undertow代替tomcat
        <dependency>
            <groupId>org.springframework.boot</groupId>
            <artifactId>spring-boot-starter-web</artifactId>
            <!--  为什么不需要版本号,在parent里面已经封装好了版本号 -->
            <exclusions>
                <!--     移除内嵌tomcat    -->
                <exclusion>
                    <groupId>org.springframework.boot</groupId>
                    <artifactId>spring-boot-starter-tomcat</artifactId>
                </exclusion>
            </exclusions>
        </dependency>
然后,添加undertow依赖:
        <!--   引入undertow     -->
        <dependency>
            <groupId>org.springframework.boot</groupId>
            <artifactId>spring-boot-starter-undertow</artifactId>
        </dependency>
下面我们使用jMetter工具来测试udertow和tomcat的吞吐量,jMeter的使用可以参考博客:JMeter性能测试,完整入门篇;
|
服务器名称 |
第一次运行 |
第二次运行 |
第三次运行 |
平均值 |
|
tomcat |
8203 |
8190 |
7955 |
8116 |
|
undertow |
7097 |
7434 |
7462 |
7331 |
三、发布打包
目前,前后端分离的架构已成主流,因此使用springboot构建应用是非常快速的,项目发布到服务器上的时候,只需要打成一个jar包,然后通过命令 : java -server jar包名称即可启动服务了;
在2.3节中我们已经介绍了Jar类型打包方式,这里就不重复介绍了,这里主要介绍一下war类型打包方式。
3.1、修改pom文件
修改默认打包类型:
    <groupId>com.zy.example</groupId>
    <artifactId>springboot-atomikos</artifactId>
    <version>1.0-SNAPSHOT</version>
    <modelVersion>4.0.0</modelVersion>
    <packaging>war</packaging>
添加servlet-api依赖:
        <!--  添加servlet-api的依赖,用来打war包  -->
        <dependency>
            <groupId>javax.servlet</groupId>
            <artifactId>javax.servlet-api</artifactId>
            <scope>provided</scope>
        </dependency>
3.2、排除Spring Boot内置tomcat
        <dependency>
            <groupId>org.springframework.boot</groupId>
            <artifactId>spring-boot-starter-web</artifactId>
            <!--  为什么不需要版本号,在parent里面已经封装好了版本号 -->
            <!--   排除内置tomcat   -->
            <exclusions>
                <exclusion>
                    <groupId>org.springframework.boot</groupId>
                    <artifactId>spring-boot-starter-tomcat</artifactId>
                </exclusion>
            </exclusions>
        </dependency>
3.3、改造启动类
修改App.java:
package com.zy.example;

import com.zy.example.config.DBConfig1;
import com.zy.example.config.DBConfig2;
import org.springframework.boot.SpringApplication;
import org.springframework.boot.autoconfigure.SpringBootApplication;
import org.springframework.boot.builder.SpringApplicationBuilder;
import org.springframework.boot.context.properties.EnableConfigurationProperties;
import org.springframework.boot.web.servlet.support.SpringBootServletInitializer;

/**
 * 启动代码  打包成war、使用外置tomcat启动
 *
 * @author zy
 * @since  2020-2-2
 */

@SpringBootApplication
//开启读取配置文件
@EnableConfigurationProperties(value = { DBConfig1.class, DBConfig2.class })
public class App extends SpringBootServletInitializer {

    public static void main(String[] args) {
        SpringApplication.run(App.class,args);
    }

    @Override
    protected SpringApplicationBuilder configure(SpringApplicationBuilder builder) {
        return builder.sources(App.class);
    }
}
3.4、pom指定maven打包插件(不指定则使用默认的)
<build>
        <plugins>
            <!-- 指定maven编译的jdk版本,如果不指定,maven3默认用jdk 1.5 maven2默认用jdk1.3 -->
            <plugin>
                <groupId>org.apache.maven.plugins</groupId>
                <artifactId>maven-compiler-plugin</artifactId>
                <configuration>
                    <source>1.8</source>
                    <target>1.8</target>
                </configuration>
            </plugin>

            <!--  使用maven-war-plugin将指定包目录打成单独的war包  -->
            <plugin>
                <groupId>org.apache.maven.plugins</groupId>
                <artifactId>maven-war-plugin</artifactId>
            </plugin>

            <!--   SpringBoot 项目借由 spring-boot-maven-plugin 插件,通过 Maven 将项目打包成可执行的 JAR(Fat Jar) 或者 WAR  -->
            <plugin>
                <groupId>org.springframework.boot</groupId>
                <artifactId>spring-boot-maven-plugin</artifactId>
            </plugin>
        </plugins>
    </build>
3.5、打包
在idea环境下,依次执行clean、install:

执行完毕后,可以看到war包已经生成了,默认是在target目录下:

3.6、IDEA使用tomcat进行部署启动
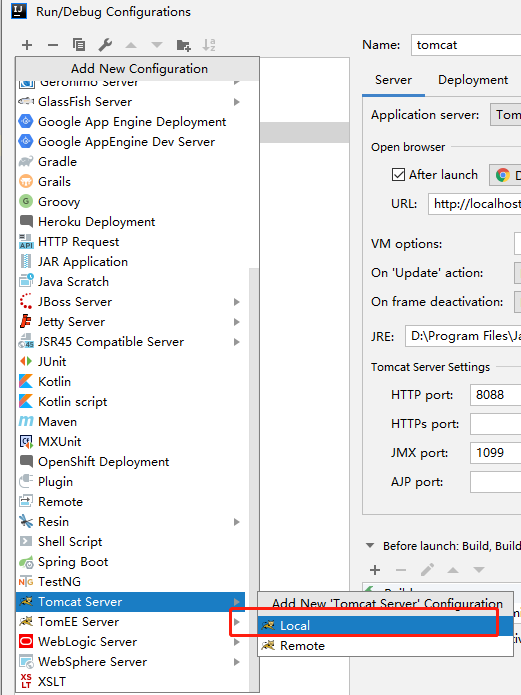
IDEA编译器点击右上角Edit Configurations、新增tomcat server:
配置如下信息,指定启动端口和访问的路径:

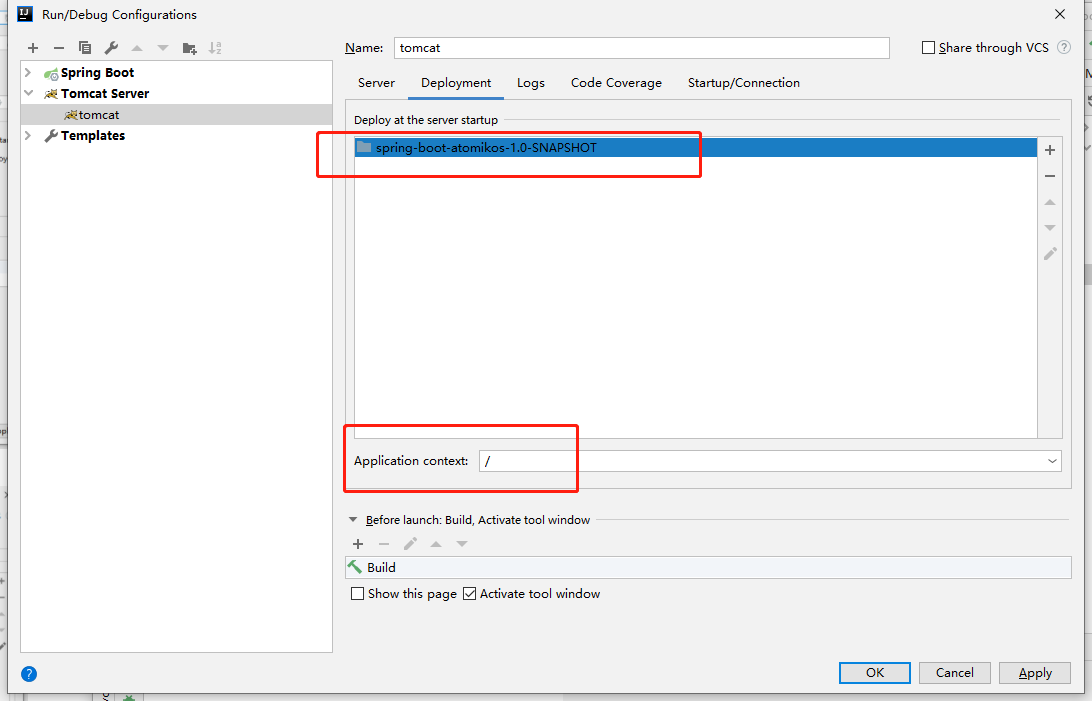
点击Deployment,添加war包:
然后启动tomcat:
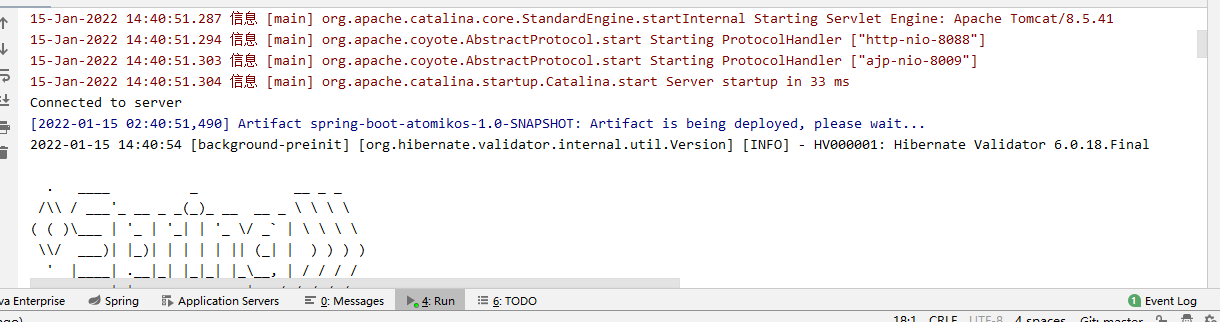
项目启动的时候出现了乱码,解决办法如下,添加配置,-Dfile.encoding=UTF-8即可:
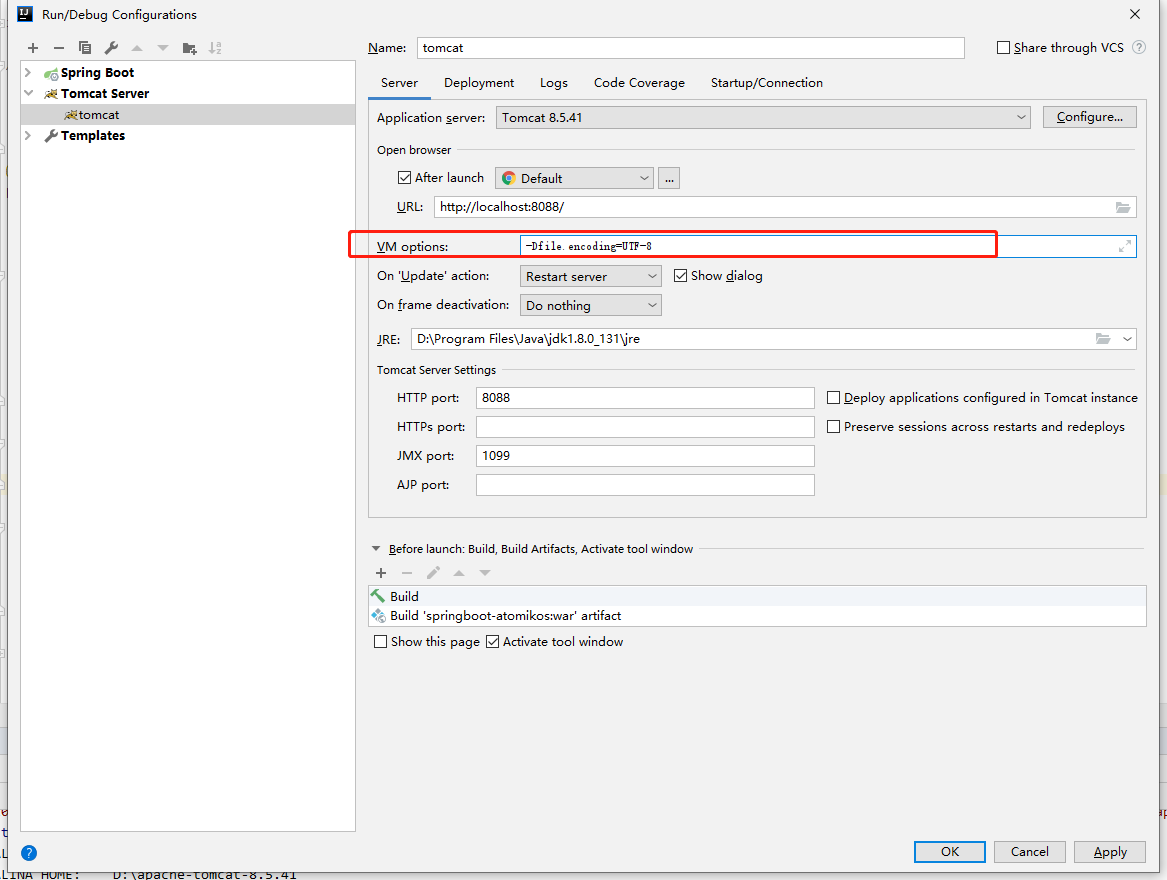
重新启动tomcat、访问http://localhost:8088/getStudent01?id=1即可。
3.7、直接使用tomcat部署
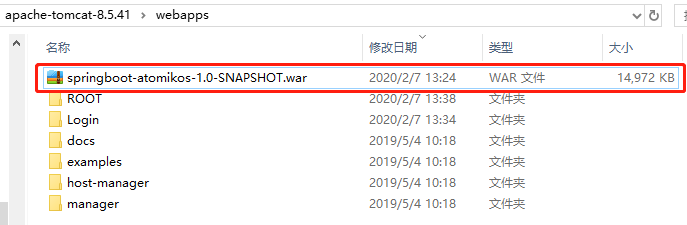
如果我们不想使用IDEA工具进行部署,我们可以将war直接拷贝到tomcat安装路径下的webapps下:
修改conf/server.xml文件,通过port修改端口号:
    <!-- A "Connector" represents an endpoint by which requests are received
         and responses are returned. Documentation at :
         Java HTTP Connector: /docs/config/http.html
         Java AJP  Connector: /docs/config/ajp.html
         APR (HTTP/AJP) Connector: /docs/apr.html
         Define a non-SSL/TLS HTTP/1.1 Connector on port 8080
    -->
    <Connector connectionTimeout="20000" port="8888" protocol="HTTP/1.1" redirectPort="8443"/>
然后我们需要定义上下文,通过在conf/server.xml文件中添加Context元素,每个Context元素代表了运行在虚拟主机上的单个Web应用,一个Host可以包含多个Context元素,每个Web应用有唯一的一个相对应的Context代表Web应用自身。
我们在Host元素下创建一个Context元素,并给上下文路径定义path属性,如下:
<Host appBase="webapps" autoDeploy="true" name="localhost" unpackWARs="true">
<!-- SingleSignOn valve, share authentication between web applications
Documentation at: /docs/config/valve.html -->
<!--
<Valve className="org.apache.catalina.authenticator.SingleSignOn" />
-->
<!-- Access log processes all example.
Documentation at: /docs/config/valve.html
Note: The pattern used is equivalent to using pattern="common" -->
<Valve className="org.apache.catalina.valves.AccessLogValve" directory="logs" pattern="%h %l %u %t "%r" %s %b" prefix="localhost_access_log" suffix=".txt"/>
<Context docBase="D:\apache-tomcat-8.5.41\webapps\springboot-atomikos-1.0-SNAPSHOT.war" path="" reloadable="true"/>
</Host>
- appBase : 指 定虚拟主机的目录,可以指定绝对目录,也可以指定相对于<CATALINA_HOME>的相对目录.如果没有此项,默认 为<CATALINA_HOME>/webapps.,它将匹配请求URL和自己的Context的路径,并把请求转交给对应的Context来处理;
- path:指定访问该Web应用的URL入口;
- docBase:指定Web应用的文件路径,可以给定绝对路径,也可以给定相对于<Host>的appBase属性的相对路径,如果Web应用采用开放目录结构,则指定Web应用的根目录,如果Web应用是个war文件,则指定war文件的路径;
- reloadable:如果这个属性设为true,tomcat服务器在运行状态下会监视在WEB-INF/classes和WEB-INF/lib目录下class文件的改动,如果监测到有class文件被更新的,服务器会自动重新加载Web应用;
进入tomcat安装目录下bin文件,双击运行startup.bat文件(windows)或startup.sh文件(UNIX/Linux/Mac OS)来启动Tomcat:

然后访问http://localhost:8888/getStudent01?id=1即可:

四、源码下载
源码放置在gitee:
参考文章:
[1] IDEA新建springboot选择DevTools
[4] 简述GC回收机制

 浙公网安备 33010602011771号