

本教程主要通过搭建一个横版摇杆八方向移动的实例,让大家如何用Cocos2dx-Js来做一款
游戏,从基础了解Cocos2dx-Js的基本实现原理,从创建工程,到各个知识点的梳理。
教程分为上下两讲:
上讲有2个小节:
1,工程的创建;
2,Cocos2dx-Js目录及Cocos2dx运行原理;
下讲有2个小节:
1,Cocos2dx-Js的事件处理机制;
2,摇杆的、八方向、精灵移动的实现;
Js环境搭载传送门:
轻松搭建完后,开始用JS写一个横版摇杆动作游戏的Demo,听起来貌似很高大上~~。
首先要做好几个准备:
1,角色精灵,我准备了一个骨骼动画精灵1个,cocosstiduo2.0.6制作的;
2,地图,也是用cocosstiduo2.0.6制作,生成出MainScene.csb 文件;
3,摇杆的PNG素材;


下面开始创建一个新的工程GoFighting,创建主场景MainLayer.js文件;
MainLayer继承BaseLayer.js,BaseLayer中处理这个层基本的页面处理,包括弹出的新层的遮罩处理;
BaseLayer.js:


 1 var BaseLayer=cc.Layer.extend({
 2     _bgFrame:null,
 3     _notShowAnimation:null,
 4     _directorSteps:null,
 5     _showAnied:false,
 6     init:function(notShowAnimation){
 7         var bret=false;
 8         if(this._super()){
 9             //不可删除
10             var bgFrame = cc.LayerColor(cc.color(0,0,0,200));
11             this.addChild(bgFrame);
12             this._bgFrame=bgFrame;
13             this._notShowAnimation=notShowAnimation;
14             this.setAnchorPoint(cc.p(0.5,0.5));
15             this.ignoreAnchorPointForPosition(false);
16             if(!this._notShowAnimation){
17                 this.setScale(0.8);
18             }
19             this.setContentSize(winSize);
20             this.setPosition(cc.p(winSize.width/2,winSize.height/2));
21
22             cc.eventManager.addListener({
23                 event: cc.EventListener.TOUCH_ONE_BY_ONE,
24                 swallowTouches: true,
25                 //onTouchMoved: this.onTouchMoved,
26                 onTouchBegan: function(){return true;}
27             }, this);
28
29             bret=true;
30         }
31         return bret;
32     },
33     setBgColor:function(color){
34         this._bgFrame.setColor(color);
35     },
36
37     onEnter:function(){
38         this._super();
39         if(!this._notShowAnimation&&!this._showAnied){
40             var sl=cc.EaseIn.create(cc.ScaleTo.create(0.15,1.1),2);
41             var sl2=cc.ScaleTo.create(0.15,1);
42             var seq=cc.Sequence.create(sl,sl2);
43             this.runAction(seq);
44             this._showAnied=true;
45         }
46     },
47
48     onExit:function(){
49         this._super();
50         MemoryManager.getInstance().releaseMeoryFromOther();
51     }
52 });
53
54 BaseLayer.OpenActionFs=function(obj){
55     obj.setScale(0.8);
56     if(obj!=null){
57         var sl=cc.EaseIn.create(cc.ScaleTo.create(0.15,1.1),2);
58         var sl2=cc.ScaleTo.create(0.15,1);
59         var seq=cc.Sequence.create(sl,sl2);
60         obj.runAction(seq);
61     }
62 };
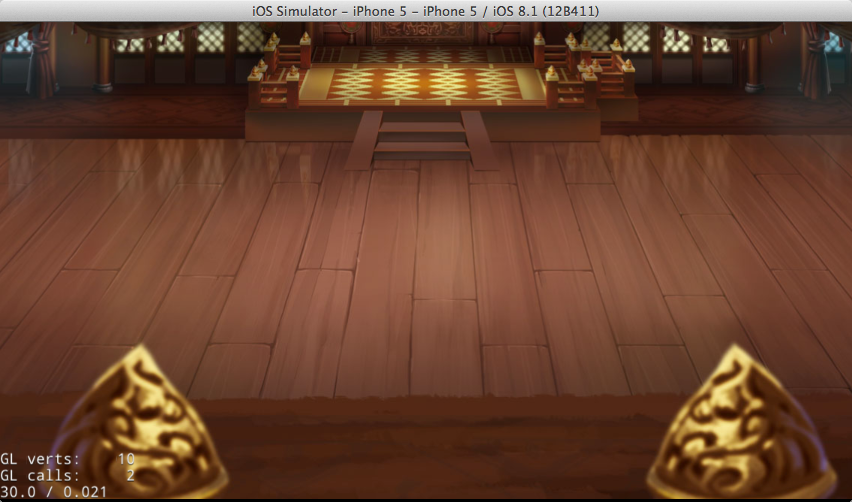
首先我们加载主场景必须得背景图片,而主场景背景图片由cocosstiduo2.0.6制作,如何绑定呢?
在3.2引擎终目前还不支持直接使用widgetFromBinaryFile方法加载CSB,那么换成另外一种加载创建Node的方式:
ccs.csLoader.createNode(res.MainScene_CSB);
使用该方法需要自己去添加全路径
 /*
        cocostidio制作的CSB文件加载,注:
        在3.2引擎终目前还不支持直接使用widgetFromBinaryFile方法加载CSB
         */
        var baseroot = ccs.csLoader.createNode(res.MainScene_CSB);
        baseroot.setAnchorPoint(cc.p(0.5,0.5));
        baseroot.setPosition(this.getContentSize().width/2,this.getContentSize().height/2);
        this.baseroot=baseroot;
        this.addChild(baseroot,1,9001);
        BaseLayer.OpenActionFs(baseroot);
然后Run看一下效果:
然后继续加载角色的骨骼动画
        //角色骨骼动画加载
        var charname = "Char_014_1";
        var nowcharurl = resRole+charname+".ExportJson";
        if(jsb.fileUtils.isFileExist(nowcharurl)==true) {
            cc.log("nowcharurl =" + nowcharurl);
            ccs.ArmatureDataManager.getInstance().addArmatureFileInfo(nowcharurl);
            var hero = ccs.Armature.create(charname);
            this._hero_donghua = hero;
            hero.setPosition(cc.p(330, 260));
            hero.getAnimation().play("stand");
            hero.getAnimation().setMovementEventCallFunc(this.overStand, this);
           baseroot.addChild(hero, 3,99999);
        }
角色hero有回调,如跑动后停下来的回调:
    //移动完后回调
    overStand:function() {
        if(this._hero_donghua.getAnimation().getCurrentMovementID()=="")
        {
            this._hero_donghua.getAnimation().play("stand");
        }
    },
单单一个角色植入场景是否显得逻辑太单调,我们可以拖动这个精灵岂不更好,加一个简单的事件,让精灵活一点吧!!
//主角监听
var listener_Role = cc.EventListener.create({
    event: cc.EventListener.TOUCH_ONE_BY_ONE,
    swallowTouches: true,
    onTouchBegan: function (touch, event) {
        var target = event.getCurrentTarget();

        var locationInNode = target.convertToNodeSpace(touch.getLocation());
        var s = target.getContentSize();
        var rect = cc.rect(0, 0, s.width, s.height);

        if (cc.rectContainsPoint(rect, locationInNode)) {
            cc.log("sprite began... x = " + locationInNode.x + ", y = " + locationInNode.y);
            target.setOpacity(180);
            target.getAnimation().play("move");
            return true;
        }
        return false;
    },
    onTouchMoved: function (touch, event) {
        var target = event.getCurrentTarget();
        var delta = touch.getDelta();
        target.x += delta.x;
        target.y += delta.y;

    },
    onTouchEnded: function (touch, event) {
        var target = event.getCurrentTarget();
        cc.log("sprite onTouchesEnded.. ");
        target.setOpacity(255);
        target.getAnimation().play("stand");

    }
});
在ctor构造中添加角色事件的注册方法:
//人物
cc.eventManager.addListener(listener_Role, this._hero_donghua);
OK,我们再Run起来看看效果:
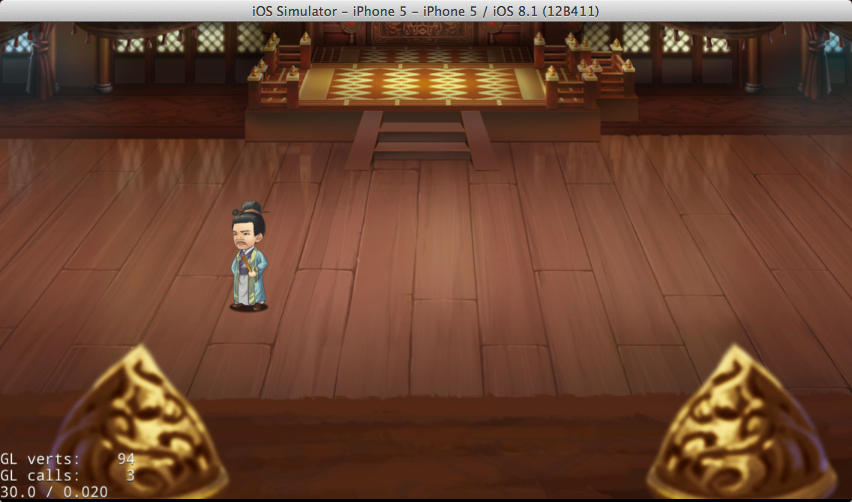
还可以拖动的呢!
然后,我们继续实现摇杆模式:
摇杆与事件有关,JS中摇杆须继承cc.EventListener去创建事件,事件类型cc.EventListener.TOUCH_ONE_BY_ONE(单点触摸方式);
看代码:
//摇杆监听
var listener_YaoGan = cc.EventListener.create({
    event: cc.EventListener.TOUCH_ONE_BY_ONE,
    swallowTouches: true,
    onTouchBegan: function (touch, event) {
        var target = event.getCurrentTarget();
        var locationInNode = target.convertToNodeSpace(touch.getLocation());
        //创建摇杆
        this.sprite_yaogan = new cc.Sprite(res.YaoGan_png);
        this.sprite_yaogan.attr({
            x: locationInNode.x,
            y: locationInNode.y
        });
        target.addChild(this.sprite_yaogan, 4,90099);

        //创建摇杆点
        this.sprite_yaogan_dian = new cc.Sprite(res.YaoGan_Dian_png);
        this.sprite_yaogan_dian.attr({
            x: locationInNode.x,
            y: locationInNode.y
        });
        target.addChild(this.sprite_yaogan_dian, 4,90999);

        return true;
    },

    onTouchMoved: function (touch, event) {
        //摇杆点
        var target = event.getCurrentTarget();
        var sp_dian = target.getChildByTag(90999);
        var sp_yaoganbd = target.getChildByTag(90099);
        var sp_hero = target.getChildByTag(99999);

        //摇起来
        if(sp_dian!=null&&sp_yaoganbd!=null)
        {
            var p_dian =  sp_yaoganbd.getPosition();
            var bd_width =sp_yaoganbd.getContentSize().width*0.5;
            cc.log("bd_width>>=="+bd_width);
            var point = touch.getLocation();
            var p_rad = this.getRad(p_dian,point);
            cc.log("p_rad>>=="+p_rad);
            //计算两个圆心之间距离
            var juli =Math.sqrt(Math.pow((p_dian.x - point.x),2) + Math.pow((p_dian.y - point.y),2));
            //距离不超过半径
            if(juli>=bd_width)
            {
                cc.log("go111>>>");
                sp_dian.setPosition(cc.pAdd(this.getAngelePosition(bd_width,p_rad),cc.p(p_dian.x,p_dian.y)));
            }
            else
            {
                cc.log("go2222>>>");
                var delta = touch.getDelta();
                sp_dian.x += delta.x;
                sp_dian.y += delta.y;
            }

//            //判断方向---四方向
//            if(p_rad>=-PI/4&&p_rad<PI/4)
//            {
//                R_Direction="right";
//            }
//            else if(p_rad>=PI/4&&p_rad<3*PI/4)
//            {
//                R_Direction="up";
//            }
//            else if((p_rad>=3*PI/4&&p_rad<=PI)||(p_rad>=-PI&&p_rad<-3*PI/4))
//            {
//                R_Direction="left";
//            }
//            else if(p_rad>=-3*PI/4&&p_rad<-PI/4)
//            {
//                R_Direction="down";
//            }


            //判断方向---八方向
            var move_x =  parseInt(p_dian.x -point.x);
            var move_y =  parseInt(p_dian.y -point.y);

            if(move_x>=10&&move_y<=-10)
            {
                //左上
                R_Direction = "left_up";
            }
            else if(move_x>=10&&move_y>=10)
            {
                //左下
                R_Direction = "left_down";
            }
            else if(move_x<=-10&&move_y<=-10)
            {
                //右上
                R_Direction = "rigth_up";
            }
            else if(move_x<=-10&&move_y>=10)
            {
                //右下
                R_Direction = "rigth_down";
            }
            else if(move_x>-10&&move_x<10&&move_y>0)
            {
                //下
                R_Direction = "down";
            }
            else if(move_x>-10&&move_x<10&&move_y<0)
            {
                //上
                R_Direction = "up";
            }
            else if(move_x>0&&move_y>-10&&move_y<10)
            {
                //左
                R_Direction = "left";
            }
            else if(move_x<0&&move_y>-10&&move_y<10)
            {
                //右
                R_Direction = "right";
            }

            R_Action="move";
            cc.log("R_Direction>>>"+R_Direction);
        }
    },

    //获取半径坐标
    getAngelePosition:function(r,angle){
        return cc.p(r*Math.cos(angle),r*Math.sin(angle));
    },

    //判断两点之间夹角
    getRad:function(pos1,pos2)
    {
        var px1 = pos1.x;
        var py1 = pos1.y;
        var px2 = pos2.x;
        var py2 = pos2.y;

        //得到两点x的距离
        var x = px2 - px1;
        //得到两点y的距离
        var y = py1 - py2;
        //算出斜边长度
        var xie = Math.sqrt(Math.pow(x,2) + Math.pow(y,2));
        //得到这个角度的余弦值(通过三角函数中的店里:角度余弦值=斜边/斜边)
        var cosAngle = x / xie;
        //通过反余弦定理获取到期角度的弧度
        var rad = Math.acos(cosAngle);
        //注意:当触屏的位置Y坐标<摇杆的Y坐标,我们要去反值-0~-180
        if (py2 < py1)
        {
            rad = -rad;
        }
        return rad;
    },

    onTouchEnded: function (touch, event) {
        var target = event.getCurrentTarget();
        if(target.getChildByTag(90099)!=null)
        {
            target.removeChildByTag(90099);
        }
        if(target.getChildByTag(90999)!=null)
        {
            target.removeChildByTag(90999);
        }

        R_Action="stand";

        var sp_hero = target.getChildByTag(99999);
        sp_hero.getAnimation().play("stand");
    }

});
在上面这个Js类中,包含了几个方法如,两点之间夹角的计算公式和最大半径坐标的计算公式;
因为我们需要在摇杆和摇杆点上面去做坐标处理,计算出夹角来对角色进行坐标位移操作,达到我们所需要的效果
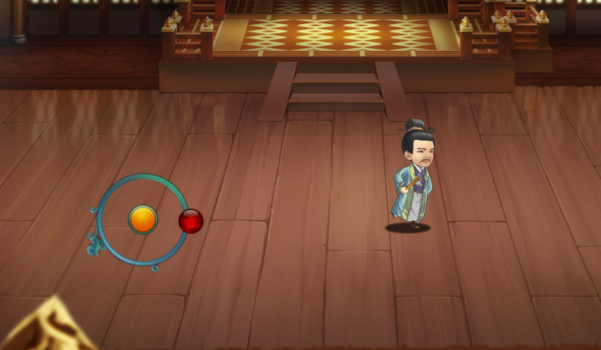
跑起来的摇杆效果如下:
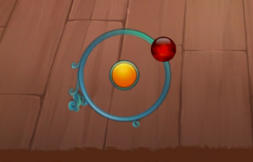
摇杆可以活动了,并且不能超过底下的背景半径,达到了我们需要的效果,下面就继续实现摇杆操控精灵移动的功能
可以继续在onTouchMoved: function (touch, event)事件终写方法获取一些判定参数:
//方向
var R_Direction = "";
//动作
var R_Action = "stand";
//移动速度
var R_speed = 4;
继续看listener_YaoGan类中的方向判断,我写了2种角色移动方法:
1,根据PI=3.1415 来计算 ,做了4方向的标识判断
2,根据坐标差值来计算,做了8方向的标识判断
OK,两种方法都可以行,可以自己拓展。
有了标识我们需要启动一个定时器来执行人物的操作
下面是定时器部分的代码:
//更新状态
    runGame:function(){

        if(R_Action=="move")
        {
            if(this._hero_donghua!=null)
            {
                if(this._hero_donghua.getAnimation().getCurrentMovementID()!="move")
                {
                    this._hero_donghua.getAnimation().play("move");
                }

                var p_hero_old = this._hero_donghua.getPosition();
                if(R_Direction=="right")
                {
                    this._hero_donghua.setScaleX(-1);
                    this._hero_donghua.setPosition(cc.p(p_hero_old.x+R_speed,p_hero_old.y));

                }
                else if(R_Direction=="up")
                {
                    this._hero_donghua.setPosition(cc.p(p_hero_old.x,p_hero_old.y+R_speed));

                }
                else if(R_Direction=="left")
                {
                    this._hero_donghua.setScaleX(1);
                    this._hero_donghua.setPosition(cc.p(p_hero_old.x-R_speed,p_hero_old.y));

                }
                else if(R_Direction=="down")
                {
                    this._hero_donghua.setPosition(cc.p(p_hero_old.x,p_hero_old.y-R_speed));

                }
                else if(R_Direction=="left_up")
                {
                    this._hero_donghua.setScaleX(1);
                    this._hero_donghua.setPosition(cc.p(p_hero_old.x-R_speed,p_hero_old.y+R_speed));

                }
                else if(R_Direction=="left_down")
                {
                    this._hero_donghua.setScaleX(1);
                    this._hero_donghua.setPosition(cc.p(p_hero_old.x-R_speed,p_hero_old.y-R_speed));

                }
                else if(R_Direction=="rigth_up")
                {
                    this._hero_donghua.setScaleX(-1);
                    this._hero_donghua.setPosition(cc.p(p_hero_old.x+R_speed,p_hero_old.y+R_speed));
                }
                else if(R_Direction=="rigth_down")
                {
                    this._hero_donghua.setScaleX(-1);
                    this._hero_donghua.setPosition(cc.p(p_hero_old.x+R_speed,p_hero_old.y-R_speed));

                }
            }
        }
    }
OK,人物可以根据摇杆八方向的跑动起来了,我们Run起来看看效果,应该很赞!
嗯,该Demo就开发完毕了,下面是整个DEMO的下载地址,希望能大家对大家起到帮助;
cocos2d-x 3.2 - JS -横版摇杆八方向移动DEMO下载地址
自己创建一个新的工程,将ZIP解压文件拷贝到工程根目录就可以Run起来,替换main.js和project.json;

 浙公网安备 33010602011771号