AntDesign vue学习笔记(二)axios使用
之前在vue页面中引入axios使用,本篇在mainjs中引入,这样就不用单独在每个页面引入
1、mainjs中引入axios,设置基础url
import axios from 'axios'
axios.defaults.baseURL = 'https://localhost:8080/'
Vue.prototype.axios = axios
2、在vue页面中,注意axios前需要加this.
methods: {
    login () {
      let that = this
      console.log(this.userName)
      console.log(this.password)
      this.axios
        .get('/api/login', {
          params: {
            userName: that.userName,
            password: that.password
          }
        })
        .then(function (response) {
          console.log(response)
          if (response.data.data.result === 'success') {
            that.$router.push('second')
          } else {
            alert(response.data.data.message)
          }
        })
        .catch(function (error) {
          console.log(error)
        })
    }
  }
3、function (response)中必须使用that才能获取到$router对象,有没有办法直接获取到呢,代码如下
 methods: {
    login () {
      let that = this
      console.log(this.userName)
      console.log(this.password)
      this.axios
        .get('/api/login', {
          params: {
            userName: that.userName,
            password: that.password
          }
        })
        .then((response) => {
          console.log(response)
          if (response.data.data.result === 'success') {
            this.$router.push('second')
          } else {
            alert(response.data.data.message)
          }
        })
        .catch(function (error) {
          console.log(error)
        })
    }
  }
ES6中的 箭头函数 "=>" 内部的this是词法作用域,由上下文确定(也就是由外层调用者vue来确定)。
4、关于api/login,api login是模拟的一个json数据
4.1在项目根目录下添加data.json,内容如下
{
    "loginresult": {
      "result": "success",
      "message": ""
    }
}
4.2修改webpack.dev.conf.js文件,添加红色部分代码,关闭服务器重新npm run dev.
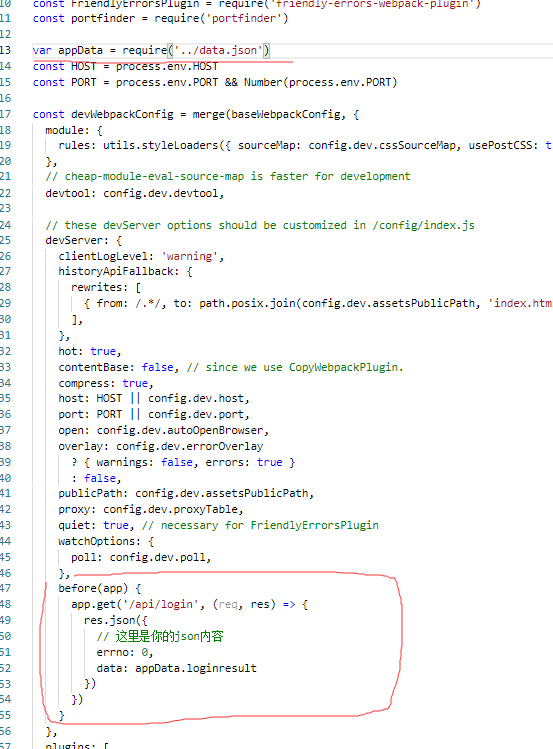
4.3、点击登录按钮就可以工作了。
5、如果传递比较复杂的请求,比如header添加数据,方法如下
this.axios(
        {
          method:"post",
          url:'/api/Login',
          data:{
            username: that.userName,
            password: that.password
          },
          headers: {
            'Content-Type':'application/json;charset=UTF-8'
          }
        })
        .then((response) => {
          console.log(response)
        })
        .catch(function (error) {
          console.log(error)
        })
    }
6、配置跨域的方法
找到config/index.js添加如下代码
proxyTable: {
        '/api': {
            target: 'http://xx.xx.xx.xx:8080/',
            changeOrigin: true,
            pathRewrite: {'^/api': '' }
        }

  }
这样所有访问api接口都会走这个重定向。
7、跨域下接口两次请求处理屏蔽方法
1、可以在后端设置Access-Control-Max-Age
2、或者请求限制只允许Post,Get.
本博客是个人工作中记录,更深层次的问题可以提供有偿技术支持。
另外建了几个QQ技术群:
2、全栈技术群:616945527
2、硬件嵌入式开发: 75764412
3、Go语言交流群:9924600
闲置域名WWW.EXAI.CN (超级人工智能)出售。
另外建了几个QQ技术群:
2、全栈技术群:616945527
2、硬件嵌入式开发: 75764412
3、Go语言交流群:9924600
闲置域名WWW.EXAI.CN (超级人工智能)出售。

 浙公网安备 33010602011771号