vue tabBar导航栏设计实现3-进一步抽取tab-item
系列导航
二、vue tabBar导航栏设计实现2-抽取tab-bar
三、vue tabBar导航栏设计实现3-进一步抽取tab-item
四、vue tabBar导航栏设计实现4-再次抽取MainTabBar
tabBar导航栏设计3-进一步抽取tab-item
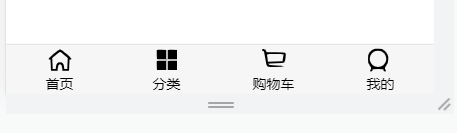
一、本节目标效果
抽取一个tab-bar-item组件负责导航栏的布局
二、代码结构
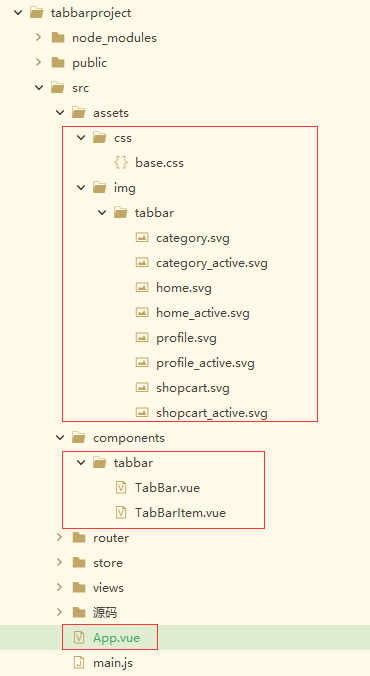
注:主要是标红的几个文件
三、代码
重新编写这几个文件中的代码
App.vue
<template>
	<div id="app">
		<tab-bar>
			<tab-bar-item>
				<template v-slot:item-icon>
					<img :src="require('./assets/img/tabbar/home.svg')">
				</template>
				<template v-slot:item-text>
					 <div slot="item-text">首页</div>
				</template>
			</tab-bar-item>
			<tab-bar-item>
				<template v-slot:item-icon>
					 <img :src="require('./assets/img/tabbar/category.svg')">
				</template>
				<template v-slot:item-text>
					 <div slot="item-text">分类</div>
				</template>
			</tab-bar-item>
			<tab-bar-item>
				<template v-slot:item-icon>
					<img :src="require('./assets/img/tabbar/shopcart.svg')">
				</template>
				<template v-slot:item-text>
					<div slot="item-text">购物车</div>
				</template>
			</tab-bar-item>
			<tab-bar-item>
				<template v-slot:item-icon>
					 <img :src="require('./assets/img/tabbar/profile.svg')">
				</template>
				<template v-slot:item-text>
					 <div slot="item-text">我的</div>
				</template>
			</tab-bar-item>
		</tab-bar>
	</div>
</template>


<script>
	import {
		defineComponent
	} from 'vue'
	import TabBar from './components/tabbar/TabBar'
	import TabBarItem from './components/tabbar/TabBarItem'
	export default defineComponent({
		//组件名称
		name: 'App',
		//接收父组件的数据
		props: {},
		components: {
			TabBar,
			TabBarItem
		},
		setup(props, ctx) {
			return {}
		}
	})
</script>

<style lang="scss">
	@import "./assets/css/base.css";
</style>
TabBar.vue
<template>
  <div id="tab-bar">
	  <slot></slot>
  </div>
</template>

<script>

import {defineComponent} from 'vue'

export default defineComponent({
    //组件名称
    name:'TabBar',
    //接收父组件的数据
    props:{
    },
	components: {

	},
    setup(props,ctx){
        return{
        }
    }
})


</script>

<style lang="scss">
  #tab-bar {
    display: flex;
    background-color: #f6f6f6;

    position: fixed;
    left: 0;
    right: 0;
    bottom: 0;

    box-shadow: 0 -1px 1px rgba(100,100,100,.2);
  }


</style>
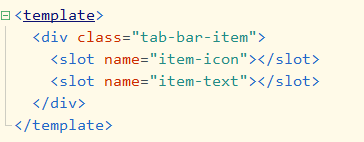
TabBarItem.vue
<template>
<div class="tab-bar-item">
<slot name="item-icon"></slot>
<slot name="item-text"></slot>
</div>
</template>
<script>
import {defineComponent} from 'vue'
export default defineComponent({
//组件名称
name:'TabBarItem',
//接收父组件的数据
props:{
},
components: {
},
setup(props,ctx){
return{
}
}
})
</script>
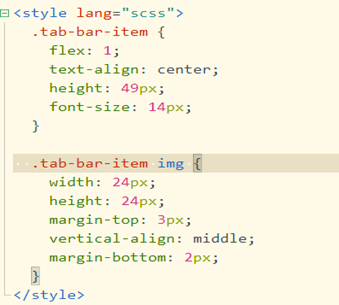
<style lang="scss">
.tab-bar-item {
flex: 1;
text-align: center;
height: 49px;
font-size: 14px;
}
.tab-bar-item img {
width: 24px;
height: 24px;
margin-top: 3px;
vertical-align: middle;
margin-bottom: 2px;
}
</style>
base.css
body {
  padding: 0;
  margin: 0;
}
一些图片
四、代码按照步骤解释
1、抽取TabBarItem组件,利用插槽使该组件独立
2、数据放到App.vue 注:具体看源码 引入TabBar和TabBarItem两个组件


 浙公网安备 33010602011771号