

用 【C# + Winform + Dlib68点】 实现静图眼镜虚拟佩戴
 基于DlibDotNet,识别人脸68点关键点,通过眼镜标定功能,使虚拟眼镜能更自然地贴合人脸。采用.NET Framework 4.6.2开发,通过计算眼镜标定点与人眼位置的相对关系,实现眼镜对齐和缩放。关键步骤:人脸检测模型加载、关键点识别与绘制、眼镜位置标定、以及基于几何变换的眼镜匹配算法。

本文实现了一种简单的人脸面部关键点识别,和进行静图眼镜图片的虚拟佩戴功能。
开发环境为:VS 2022、WinForm、 .NET Framework 4.6.2 、 DlibDotNet 19.21.0.0
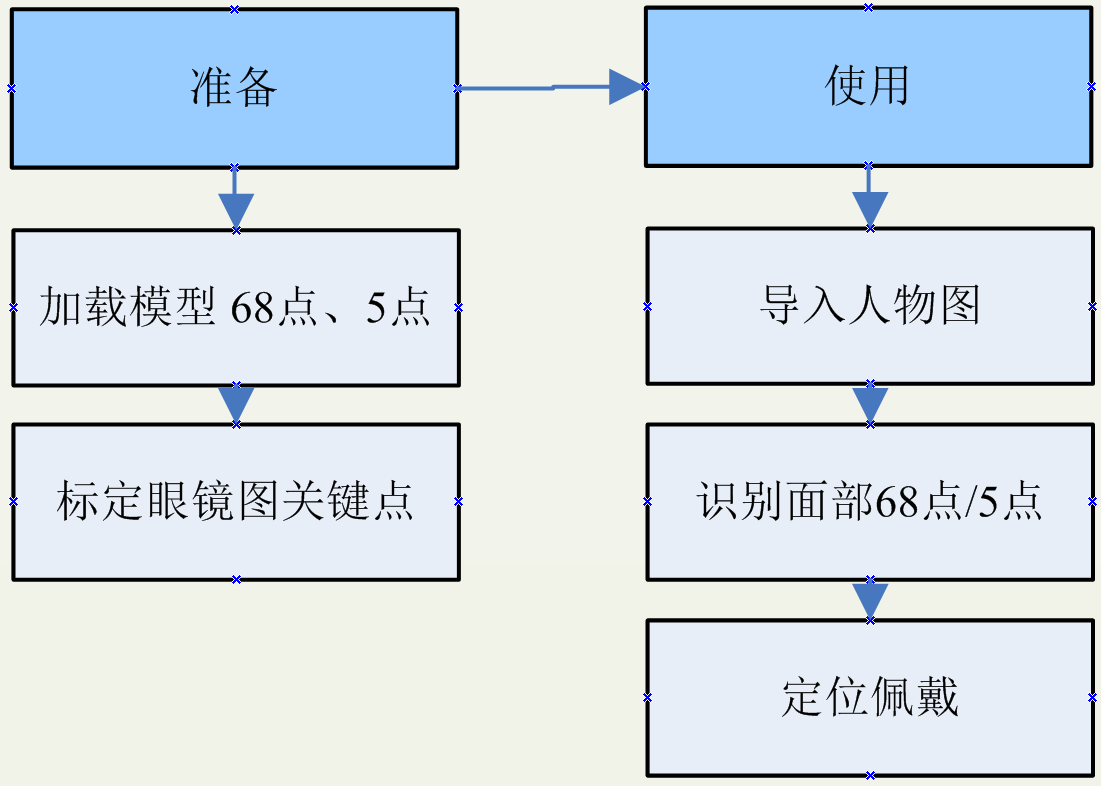
整体的处理流程如下图:
加载数据模型
首先加载 数据模型。人脸关键点的数据模型分为68点和5点(人脸的3d 模型点为468点,本文暂不讨论 ),这两个模型文件大小分别为95M、8.72M,两个文件从识别速度上来说差异非常小,主要 区别就是文件的大小和结果点的精度 。
加载数据模型的时候,有一点非常容易出错,就是模型的加载路径一定不能包含中文或特殊字符,否则会加载失败,所以我们把模型文件从软件的根目录下拷贝到所在盘符后再使用 ,
模型的加载处理如下:
private void InitializeDlib()
{
    try
    {
        faceDetector = Dlib.GetFrontalFaceDetector();

        var modelPath68 = AppDomain.CurrentDomain.BaseDirectory + "data\\shape_predictor_68_face_landmarks.dat";
        var modelPath5 = AppDomain.CurrentDomain.BaseDirectory + "data\\shape_predictor_5_face_landmarks.dat";
        // 加载68点模型
        if (File.Exists(modelPath68))
        {
            //防止中文路径
            var modelPath68_tmp = modelPath68[0] + ":\\" + modelPath68.Split('\\').Last();
            if (!File.Exists(modelPath68_tmp))
                File.Copy(modelPath68, modelPath68_tmp);
            shapePredictor68 = ShapePredictor.Deserialize(modelPath68_tmp);
            radioButton68.Enabled = true;
            radioButton68.Checked = true;
        }
        else
        {
            radioButton68.Enabled = false;
        }

        // 加载5点模型
        if (File.Exists(modelPath5))
        {
            //防止中文路径
            var modelPath5_tmp = modelPath5[0] + ":\\" + modelPath5.Split('\\').Last();
            if (!File.Exists(modelPath5_tmp))
                File.Copy(modelPath5, modelPath5_tmp);
            shapePredictor5 = ShapePredictor.Deserialize(modelPath5_tmp);
            radioButton5.Enabled = true;
        }
        else
        {
            radioButton5.Enabled = false;
        }

        if (!radioButton68.Enabled && !radioButton5.Enabled)
        {
            MessageBox.Show("未找到任何人脸检测模型!", "错误", MessageBoxButtons.OK, MessageBoxIcon.Error);
        }
    }
    catch (Exception ex)
    {
        MessageBox.Show($"初始化Dlib失败:{ex.Message}", "错误", MessageBoxButtons.OK, MessageBoxIcon.Error);
    }
}
识别人脸68点
模型加载完成之后,我们就可以使用它来识别指定的人像图片了,通过简单的一句代码就可以识别到我们需要的关键点 :redictor.Detect(img, face),获取到关键点后,把它绘制到页面上。具体处理如下 :
private void DrawFaceLandmarks()
{
    if (originalImage == null) return;

    ShapePredictor currentPredictor = radioButton68.Checked ? shapePredictor68 : shapePredictor5;
    if (currentPredictor == null)
    {
        pictureBoxFace.Image = originalImage;
        return;
    }

    try
    {
        faceLandmarksImage?.Dispose();
        faceLandmarksImage = new Bitmap(originalImage);

        using (var img = Dlib.LoadImage<RgbPixel>(currentImagePath))
        {
            var faces = faceDetector.Operator(img);

            if (faces.Length > 0)
            {
                using (Graphics g = Graphics.FromImage(faceLandmarksImage))
                {
                    g.SmoothingMode = SmoothingMode.HighQuality;

                    // 绘制人脸框
                    Pen facePen = new Pen(Color.Lime, 3);

                    // 使用更亮的颜色和更大的点
                    Brush faceOutlineBrush = new SolidBrush(Color.Cyan);         // 脸部轮廓 0-16
                    Brush eyebrowBrush = new SolidBrush(Color.Yellow);           // 眉毛 17-26
                    Brush noseBrush = new SolidBrush(Color.Magenta);             // 鼻子 27-35
                    Brush eyeBrush = new SolidBrush(Color.Lime);                 // 眼睛 36-47 - 使用亮绿色
                    Brush mouthBrush = new SolidBrush(Color.HotPink);            // 嘴巴 48-67

                    Font font = new Font("Arial", 8, FontStyle.Bold);
                    Brush textBrush = new SolidBrush(Color.White);
                    Brush textBackBrush = new SolidBrush(Color.FromArgb(128, 0, 0, 0));

                    foreach (var face in faces)
                    {
                        // 绘制人脸矩形框
                        g.DrawRectangle(facePen, (int)face.Left, (int)face.Top, (int)face.Width, (int)face.Height);

                        var shape = currentPredictor.Detect(img, face);

                        // 绘制所有关键点
                        for (uint i = 0; i < shape.Parts; i++)
                        {
                            var point = shape.GetPart(i);
                            int x = (int)point.X;
                            int y = (int)point.Y;

                            // 根据点的索引选择颜色
                            Brush pointBrush;
                            if (i <= 16) pointBrush = faceOutlineBrush;      // 脸部轮廓
                            else if (i <= 26) pointBrush = eyebrowBrush;     // 眉毛
                            else if (i <= 35) pointBrush = noseBrush;        // 鼻子
                            else if (i <= 47) pointBrush = eyeBrush;         // 眼睛
                            else pointBrush = mouthBrush;                    // 嘴巴

                            // 绘制更大的点,并添加边框
                            g.FillEllipse(pointBrush, x - 4, y - 4, 8, 8);
                            // 添加白色边框使点更明显
                            using (Pen borderPen = new Pen(Color.White, 1))
                            {
                                g.DrawEllipse(borderPen, x - 4, y - 4, 8, 8);
                            }

                            // 显示点号(仅68点模型)
                            if (shape.Parts >= 68)
                            {
                                // 先绘制半透明背景
                                SizeF textSize = g.MeasureString(i.ToString(), font);
                                g.FillRectangle(textBackBrush, x + 6, y - 8, textSize.Width + 2, textSize.Height);
                                // 绘制白色文字
                                g.DrawString(i.ToString(), font, textBrush, x + 6, y - 8);
                            }
                        }

                        // 连接关键点形成轮廓(可选)
                        if (shape.Parts >= 68)
                        {
                            Pen linePen = new Pen(Color.FromArgb(100, Color.Lime), 2);

                            // 连接脸部轮廓
                            for (uint i = 0; i < 16; i++)
                            {
                                var p1 = shape.GetPart(i);
                                var p2 = shape.GetPart(i + 1);
                                g.DrawLine(linePen, (int)p1.X, (int)p1.Y, (int)p2.X, (int)p2.Y);
                            }

                            // 连接左眉毛
                            for (uint i = 17; i < 21; i++)
                            {
                                var p1 = shape.GetPart(i);
                                var p2 = shape.GetPart(i + 1);
                                g.DrawLine(linePen, (int)p1.X, (int)p1.Y, (int)p2.X, (int)p2.Y);
                            }

                            // 连接右眉毛
                            for (uint i = 22; i < 26; i++)
                            {
                                var p1 = shape.GetPart(i);
                                var p2 = shape.GetPart(i + 1);
                                g.DrawLine(linePen, (int)p1.X, (int)p1.Y, (int)p2.X, (int)p2.Y);
                            }

                            linePen.Dispose();
                        }
                    }

                    facePen.Dispose();
                    faceOutlineBrush.Dispose();
                    eyebrowBrush.Dispose();
                    noseBrush.Dispose();
                    eyeBrush.Dispose();
                    mouthBrush.Dispose();
                    font.Dispose();
                    textBrush.Dispose();
                    textBackBrush.Dispose();
                }
            }

            pictureBoxFace.Image = faceLandmarksImage;
        }
    }
    catch (Exception ex)
    {
        lblStatus.Text = $"绘制关键点失败:{ex.Message}";
        pictureBoxFace.Image = originalImage;
    }
}
眼镜标定
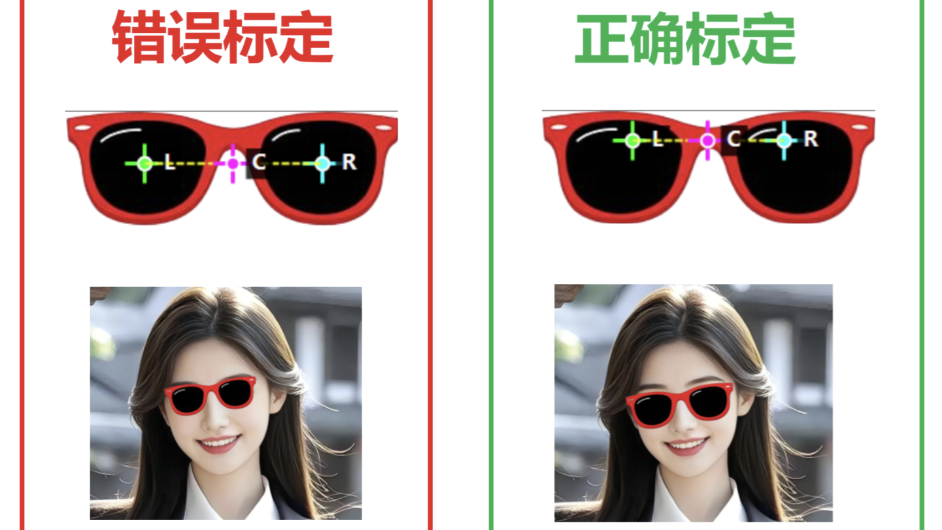
面部关键点有了,那么如何把眼镜图片正确的放到目标位置呢?这里也有需要注意的点 默认情况下 我们可能 会把眼睛图片以眼睛的中心为基准来 让眼睛图片的中心点与它对齐 但是这样的效果可能是非常傻的 因为实际我们在佩戴眼镜的时候 眼睛一般处于镜片的偏上和偏内的位置 ,例如下图的效果比对 ,
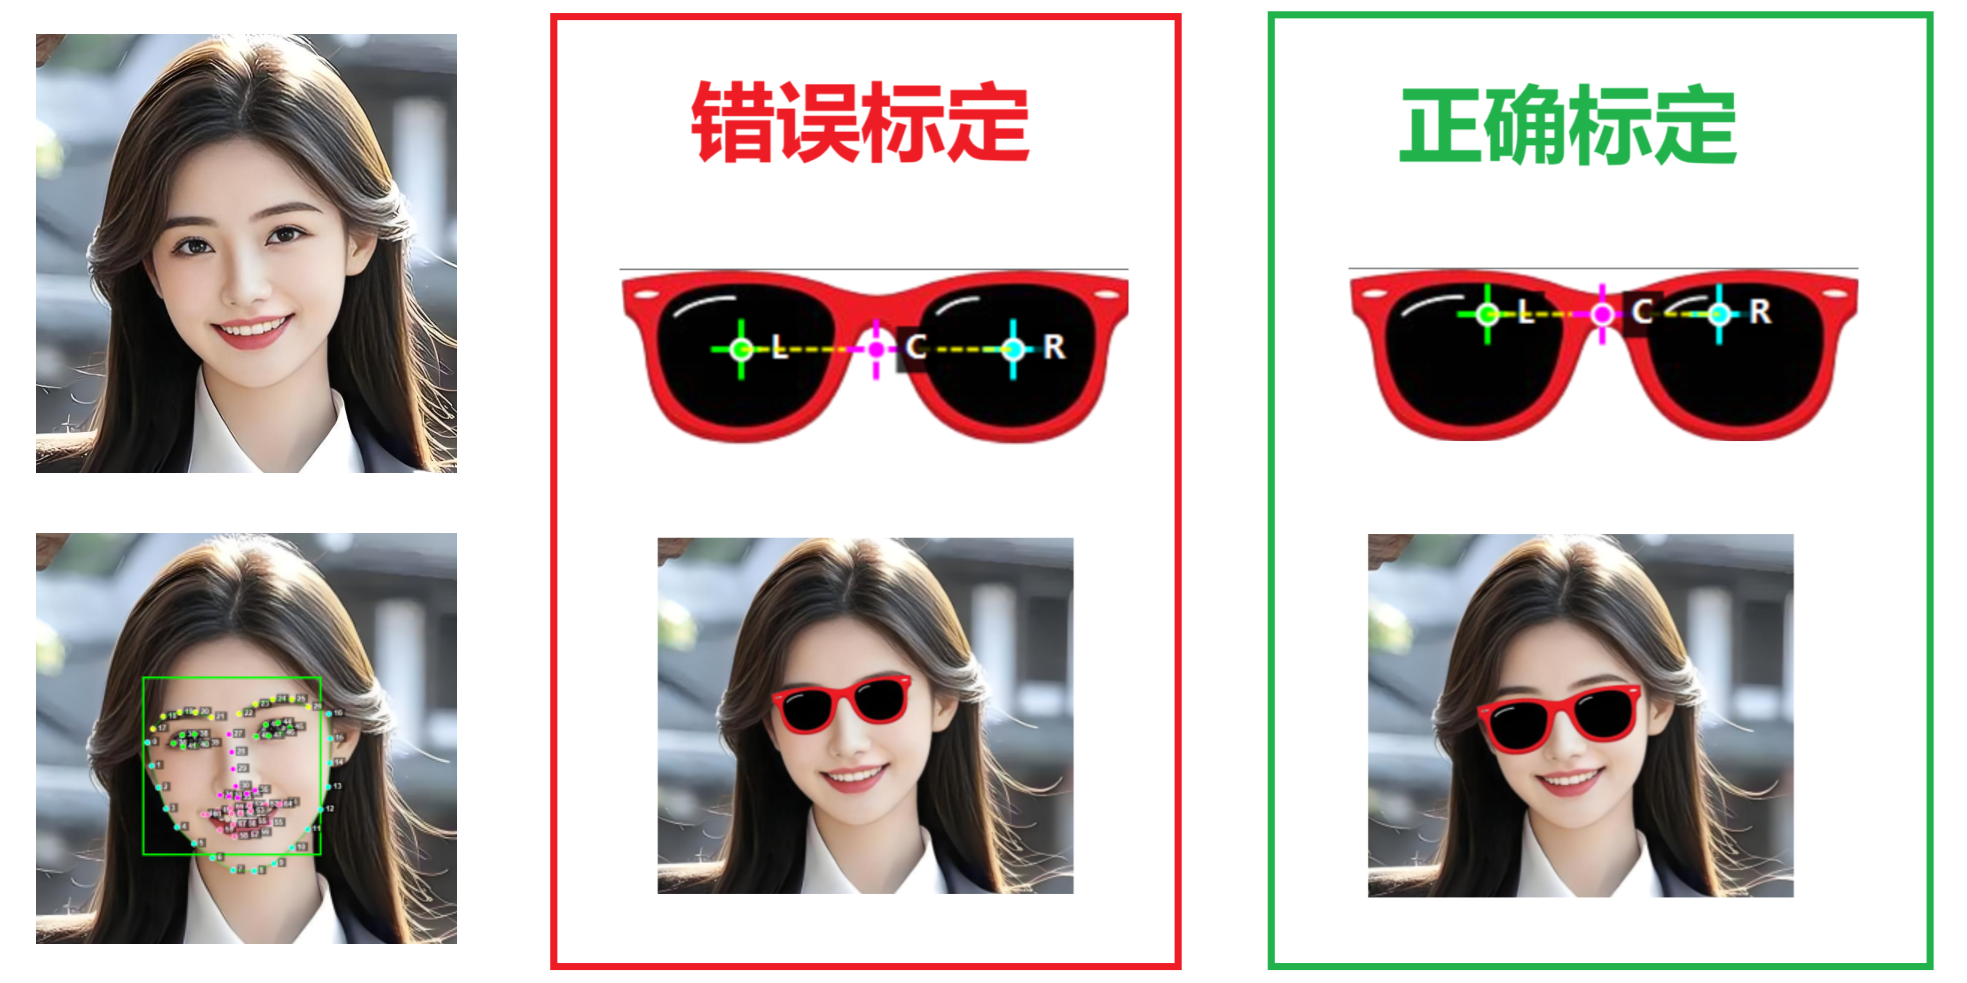
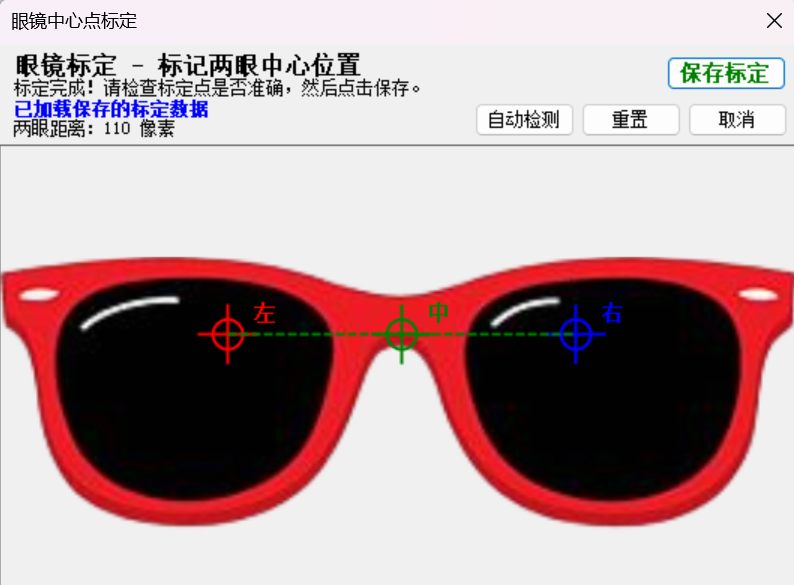
因此我们需要告诉软件,我们希望眼镜位于眼中心的位置在哪里,因此我们在这里做一个眼镜标定的功能:进行标定的时候,为了方便,当选中左侧的某个点之后,右眼的第2个点在标定时默认为了与左眼相同的y坐标,只需要进行x的位置选取即可 :
佩戴匹配
有了正确的位置标定,我们就可以把它与眼睛位置进行正确的匹配了,匹配的处理代码如下:
private void OverlayGlasses(Graphics g, FullObjectDetection shape)
{
    System.Drawing.Point leftEye, rightEye;

    // 获取人脸上的眼睛中心点
    if (shape.Parts >= 68)
    {
        leftEye = GetEyeCenter(shape, 36, 41);
        rightEye = GetEyeCenter(shape, 42, 47);
    }
    else
    {
        leftEye = new System.Drawing.Point((int)shape.GetPart(0).X, (int)shape.GetPart(0).Y);
        rightEye = new System.Drawing.Point((int)shape.GetPart(2).X, (int)shape.GetPart(2).Y);
    }

    // 检查是否有标定数据
    if (glassesCalibrations.ContainsKey(selectedAccessoryPath) &&
        glassesCalibrations[selectedAccessoryPath].IsCalibrated)
    {
        // 使用标定数据进行精确对齐
        var calibration = glassesCalibrations[selectedAccessoryPath];
        OverlayGlassesWithCalibration(g, leftEye, rightEye, calibration);
    }
    else
    {
        // 使用默认算法
        int eyeDistance = (int)Math.Sqrt(Math.Pow(rightEye.X - leftEye.X, 2) + Math.Pow(rightEye.Y - leftEye.Y, 2));
        float glassesWidth = eyeDistance * 2.2f;
        float glassesHeight = glassesWidth * currentAccessoryImage.Height / currentAccessoryImage.Width;

        double angle = Math.Atan2(rightEye.Y - leftEye.Y, rightEye.X - leftEye.X) * 180 / Math.PI;

        int centerX = (leftEye.X + rightEye.X) / 2;
        int centerY = (leftEye.Y + rightEye.Y) / 2;

        DrawRotatedImage(g, currentAccessoryImage, centerX, centerY, glassesWidth, glassesHeight, (float)angle);
    }
}

private void OverlayGlassesWithCalibration(Graphics g, System.Drawing.Point faceLeftEye, System.Drawing.Point faceRightEye, GlassesCalibrationData calibration)
{
    // 计算眼镜标定点之间的距离和角度
    double glassesEyeDistance = Math.Sqrt(
        Math.Pow(calibration.RightEyeCenter.X - calibration.LeftEyeCenter.X, 2) +
        Math.Pow(calibration.RightEyeCenter.Y - calibration.LeftEyeCenter.Y, 2));

    double glassesAngle = Math.Atan2(
        calibration.RightEyeCenter.Y - calibration.LeftEyeCenter.Y,
        calibration.RightEyeCenter.X - calibration.LeftEyeCenter.X);

    // 计算人脸眼睛之间的距离和角度
    double faceEyeDistance = Math.Sqrt(
        Math.Pow(faceRightEye.X - faceLeftEye.X, 2) +
        Math.Pow(faceRightEye.Y - faceLeftEye.Y, 2));

    double faceAngle = Math.Atan2(
        faceRightEye.Y - faceLeftEye.Y,
        faceRightEye.X - faceLeftEye.X);

    // 计算缩放比例
    float scale = (float)(faceEyeDistance / glassesEyeDistance);

    // 计算旋转角度(度)
    float rotationAngle = (float)((faceAngle - glassesAngle) * 180 / Math.PI);

    // 计算眼镜的新尺寸
    float newWidth = currentAccessoryImage.Width * scale;
    float newHeight = currentAccessoryImage.Height * scale;

    // 计算眼镜中心点(在原图中的位置)
    System.Drawing.Point glassesCenter = new System.Drawing.Point(
        (calibration.LeftEyeCenter.X + calibration.RightEyeCenter.X) / 2,
        (calibration.LeftEyeCenter.Y + calibration.RightEyeCenter.Y) / 2
    );

    // 计算人脸眼睛中心点
    System.Drawing.Point faceEyesCenter = new System.Drawing.Point(
        (faceLeftEye.X + faceRightEye.X) / 2,
        (faceLeftEye.Y + faceRightEye.Y) / 2
    );

    // 应用变换
    var state = g.Save();

    // 移动到人脸眼睛中心
    g.TranslateTransform(faceEyesCenter.X, faceEyesCenter.Y);

    // 旋转
    g.RotateTransform(rotationAngle);

    // 计算偏移(考虑标定点在眼镜图片中的相对位置)
    float offsetX = -glassesCenter.X * scale;
    float offsetY = -glassesCenter.Y * scale;

    // 绘制眼镜
    g.DrawImage(currentAccessoryImage, offsetX, offsetY, newWidth, newHeight);

    g.Restore(state);
}

 浙公网安备 33010602011771号