

C# 程序中,实现 图像滤镜 的 2 种方式
 本文尝试了在 C# 桌面程序中实现好看滤镜效果的 2 种方法。第一种是借助AI生成基础滤镜算法,如故障艺术、热成像等效果。第二种是通过创建颜色查找表(LUT)来复制美颜软件中的滤镜效果,包括生成全色彩点图像、使用美颜软件处理、应用查找表进行颜色映射等步骤。研究发现,查找表方法虽然占用空间较大,但通过隔点采样和线性插值可以显著减小文件体积(30KB-1MB)而不影响效果。另外还尝试了公式拟合和压缩存储等优化方案,最终实现了 公式滤镜+查找表滤镜 的基本可实用的 滤镜效果。
前言
在我们的智能手机上,随手拍照都会有多种多样的好看的滤镜效果、美颜效果、甚至美妆效果、甚至ar增强效果,这成了一种看似必然的存在,不禁让人以为,在任何应用中拥有这些效果都是一件非常简单的事情,因为它太让人习以为常了,太普遍了,这是移动端拍照应用给人最大的感受。
然而,当我用C#开发桌面程序时,找到一个免费的、效果好看的滤镜,竟然是一件有点困难的事情,要么是各种繁琐的步骤,尝试之后失败,要么是看到的效果比app上的难看好多,于是,为了在我的c# 程序中应用一个不依赖于第三方的滤镜效果,我尝试了 2 种可行的方法。
方式一:AI 手写滤镜
滤镜,实际上是在不同的颜色空间内对颜色进行指定系数的转换处理,可能是对RGB通道直接处理,可能是HSL空间的明度或饱和度进行处理,使用不同的参数转换,得到了不同的滤镜效果,那么我们如何知道哪些滤镜效果需要什么样的参数呢?最简单的一种方式是,我们直接先让ai来写一些基础的滤镜算法:

AI真的强大,我们轻松得到了一些看起来不错的滤镜效果。
部分算法代码:
#region 高级效果

/// <summary>
/// 故障艺术效果
/// </summary>
public static byte[] ApplyGlitchEffect(byte[] sourceBytes, int width, int height)
{
    var result = new byte[sourceBytes.Length];
    Random rand = new Random();
    int offset = rand.Next(5, 15);

    for (int i = 0; i < sourceBytes.Length; i += 4)
    {
        int x = (i / 4) % width;
        int y = (i / 4) / width;

        // RGB通道偏移
        int redIdx = i;
        int greenIdx = i;
        int blueIdx = i;

        // 红色通道向右偏移
        if (x + offset < width)
        {
            redIdx = (y * width + x + offset) * 4;
        }

        // 蓝色通道向左偏移
        if (x - offset >= 0)
        {
            blueIdx = (y * width + x - offset) * 4;
        }

        // 添加扫描线效果
        float scanline = (y % 4 == 0) ? 0.9f : 1.0f;

        result[i] = (byte)(sourceBytes[blueIdx] * scanline);
        result[i + 1] = (byte)(sourceBytes[greenIdx + 1] * scanline);
        result[i + 2] = (byte)(sourceBytes[redIdx + 2] * scanline);
        result[i + 3] = sourceBytes[i + 3];
    }

    return result;
}

/// <summary>
/// 热成像效果
/// </summary>
public static byte[] ApplyThermalEffect(byte[] sourceBytes, int width, int height)
{
    var result = new byte[sourceBytes.Length];

    for (int i = 0; i < sourceBytes.Length; i += 4)
    {
        // 计算灰度
        float gray = sourceBytes[i] * 0.114f + sourceBytes[i + 1] * 0.587f + sourceBytes[i + 2] * 0.299f;
        gray /= 255f;

        float r, g, b;

        // 热成像色彩映射
        if (gray < 0.25f)
        {
            // 深蓝到蓝
            r = 0;
            g = 0;
            b = gray * 4f;
        }
        else if (gray < 0.5f)
        {
            // 蓝到青
            r = 0;
            g = (gray - 0.25f) * 4f;
            b = 1f;
        }
        else if (gray < 0.75f)
        {
            // 青到黄
            r = (gray - 0.5f) * 4f;
            g = 1f;
            b = 1f - (gray - 0.5f) * 4f;
        }
        else
        {
            // 黄到红
            r = 1f;
            g = 1f - (gray - 0.75f) * 4f;
            b = 0;
        }

        result[i] = (byte)(b * 255);
        result[i + 1] = (byte)(g * 255);
        result[i + 2] = (byte)(r * 255);
        result[i + 3] = sourceBytes[i + 3];
    }

    return result;
}

/// <summary>
/// 像素化效果
/// </summary>
public static byte[] ApplyPixelateEffect(byte[] sourceBytes, int width, int height, int pixelSize = 10)
{
    var result = new byte[sourceBytes.Length];

    for (int y = 0; y < height; y += pixelSize)
    {
        for (int x = 0; x < width; x += pixelSize)
        {
            // 计算块的平均颜色
            int sumR = 0, sumG = 0, sumB = 0;
            int count = 0;

            for (int py = y; py < Math.Min(y + pixelSize, height); py++)
            {
                for (int px = x; px < Math.Min(x + pixelSize, width); px++)
                {
                    int idx = (py * width + px) * 4;
                    sumB += sourceBytes[idx];
                    sumG += sourceBytes[idx + 1];
                    sumR += sourceBytes[idx + 2];
                    count++;
                }
            }

            byte avgB = (byte)(sumB / count);
            byte avgG = (byte)(sumG / count);
            byte avgR = (byte)(sumR / count);

            // 填充整个块
            for (int py = y; py < Math.Min(y + pixelSize, height); py++)
            {
                for (int px = x; px < Math.Min(x + pixelSize, width); px++)
                {
                    int idx = (py * width + px) * 4;
                    result[idx] = avgB;
                    result[idx + 1] = avgG;
                    result[idx + 2] = avgR;
                    result[idx + 3] = sourceBytes[idx + 3];
                }
            }
        }
    }

    return result;
}

#endregion

#region 艺术效果

/// <summary>
/// 水彩画效果
/// </summary>
public static byte[] ApplyWatercolorEffect(byte[] sourceBytes, int width, int height)
{
    // 先应用油画效果
    var oilPaint = ApplyOilPaintEffect(sourceBytes, width, height);

    // 再降低饱和度并增加亮度
    var result = new byte[oilPaint.Length];

    for (int i = 0; i < oilPaint.Length; i += 4)
    {
        float b = oilPaint[i] / 255f;
        float g = oilPaint[i + 1] / 255f;
        float r = oilPaint[i + 2] / 255f;

        // 降低饱和度
        float gray = 0.299f * r + 0.587f * g + 0.114f * b;
        r = gray + 0.5f * (r - gray);
        g = gray + 0.5f * (g - gray);
        b = gray + 0.5f * (b - gray);

        // 增加亮度
        r = Math.Min(1f, r * 1.2f);
        g = Math.Min(1f, g * 1.2f);
        b = Math.Min(1f, b * 1.2f);

        result[i] = (byte)(b * 255);
        result[i + 1] = (byte)(g * 255);
        result[i + 2] = (byte)(r * 255);
        result[i + 3] = oilPaint[i + 3];
    }

    return result;
}

/// <summary>
/// 油画效果
/// </summary>
public static byte[] ApplyOilPaintEffect(byte[] sourceBytes, int width, int height)
{
    var result = new byte[sourceBytes.Length];
    int radius = 3;
    int levels = 8;

    for (int y = 0; y < height; y++)
    {
        for (int x = 0; x < width; x++)
        {
            int[] intensityCount = new int[levels];
            int[] sumR = new int[levels];
            int[] sumG = new int[levels];
            int[] sumB = new int[levels];

            // 统计周围像素
            for (int dy = -radius; dy <= radius; dy++)
            {
                for (int dx = -radius; dx <= radius; dx++)
                {
                    int nx = Math.Min(Math.Max(x + dx, 0), width - 1);
                    int ny = Math.Min(Math.Max(y + dy, 0), height - 1);
                    int idx = (ny * width + nx) * 4;

                    int r = sourceBytes[idx + 2];
                    int g = sourceBytes[idx + 1];
                    int b = sourceBytes[idx];

                    int intensity = (r + g + b) / 3;
                    int level = intensity * levels / 256;
                    level = Math.Min(level, levels - 1);

                    intensityCount[level]++;
                    sumR[level] += r;
                    sumG[level] += g;
                    sumB[level] += b;
                }
            }

            // 找出最多的强度级别
            int maxLevel = 0;
            int maxCount = intensityCount[0];
            for (int i = 1; i < levels; i++)
            {
                if (intensityCount[i] > maxCount)
                {
                    maxCount = intensityCount[i];
                    maxLevel = i;
                }
            }

            int destIdx = (y * width + x) * 4;
            result[destIdx] = (byte)(sumB[maxLevel] / intensityCount[maxLevel]);
            result[destIdx + 1] = (byte)(sumG[maxLevel] / intensityCount[maxLevel]);
            result[destIdx + 2] = (byte)(sumR[maxLevel] / intensityCount[maxLevel]);
            result[destIdx + 3] = sourceBytes[destIdx + 3];
        }
    }

    return result;
}

/// <summary>
/// 素描效果
/// </summary>
public static byte[] ApplySketchEffect(byte[] sourceBytes, int width, int height)
{
    var result = new byte[sourceBytes.Length];

    // 转为灰度
    var grayscale = ApplyBlackWhiteEffect(sourceBytes, width, height);

    // 反相
    var inverted = new byte[grayscale.Length];
    for (int i = 0; i < grayscale.Length; i += 4)
    {
        inverted[i] = (byte)(255 - grayscale[i]);
        inverted[i + 1] = (byte)(255 - grayscale[i + 1]);
        inverted[i + 2] = (byte)(255 - grayscale[i + 2]);
        inverted[i + 3] = grayscale[i + 3];
    }

    // 高斯模糊
    var blurred = ApplyGaussianBlur(inverted, width, height, 5);

    // 颜色减淡混合
    for (int i = 0; i < result.Length; i += 4)
    {
        for (int c = 0; c < 3; c++)
        {
            int a = grayscale[i + c];
            int b = blurred[i + c];
            int value = (b == 255) ? 255 : Math.Min(255, (a * 256) / (256 - b));
            result[i + c] = (byte)value;
        }
        result[i + 3] = sourceBytes[i + 3];
    }

    return result;
}

#endregion
方式二:把喜欢的滤镜“搬”过来
质感自然的多样滤镜
可是我不满足于AI手写的滤镜效果,因为在其他的美颜软件中看到了更多清新亮丽的滤镜,那些具有画面感的图像色彩,还有那只听名字就觉得好看的滤镜:电影感女生日记、电影感且听风吟、时尚风信子,实在让人想把他们“搬”过来… 比如下面这些:

这些配色真的非常协调、自然、有一种质感美。
那么怎么把这些好看的效果,搬到我的程序中呢?如何才能知道这些好看的滤镜效果,它使用了什么样的转换公式呢?如果我能够得知颜色的转换公式,那么我就可以使用这个效果;如果我想知道转换公式,我是不是得 拥有所有的像素点的滤镜效果?然后把这些数据发给ai去进行算法拟合,有没有可能得到我需要的公式呢?
使用查找表进行色彩映射
所有的像素点,从纯黑色255,0,0,0到纯白色 255,255,255,255, 一共是256×256×256=1677,7216个点,1600万多,也就是4096×4096 大小的图像,每个点按顺序存放,放满之后就是所有的点,然后把这张图像交给美颜软件进行滤镜处理,于是我们得到了一张结果图,这张结果图一般被叫做 查找表 LUT(Look-Up Table,查找表),
生成所有色彩点图像:
var cr_from = System.Drawing.Color.FromArgb(255, 0, 0, 0).ToArgb();
var cr_to = System.Drawing.Color.FromArgb(255, 255, 255, 255).ToArgb();
var ps_count_all = (cr_to - cr_from) + 1;
var wd = (int)Math.Pow(ps_count_all, 0.5);
var img = new Bitmap(wd, wd);
var lb = new LockBitmap(img);
lb.LockBits();

for (int r = 0; r < lb.Height; r++)
{
    for (int c = 0; c < lb.Width; c++)
    {
        lb.SetPixel(c, r, System.Drawing.Color.FromArgb(cr_from));
    }
}
lb.UnlockBits();

SaveFileDialog saveFileDialog = new SaveFileDialog();
saveFileDialog.FileName = "原图." + skip + ".png";
if (saveFileDialog.ShowDialog() == DialogResult.OK)
    img.Save(saveFileDialog.FileName);

img.Dispose();
然后把生成的图像,在美颜软件中进行滤镜处理,得到的结果图作为颜色查找表,使用这张查找表来对任意的一个图像进行颜色的映射,看起来与在美颜软件中几乎一致,看不到差异,太完美了:
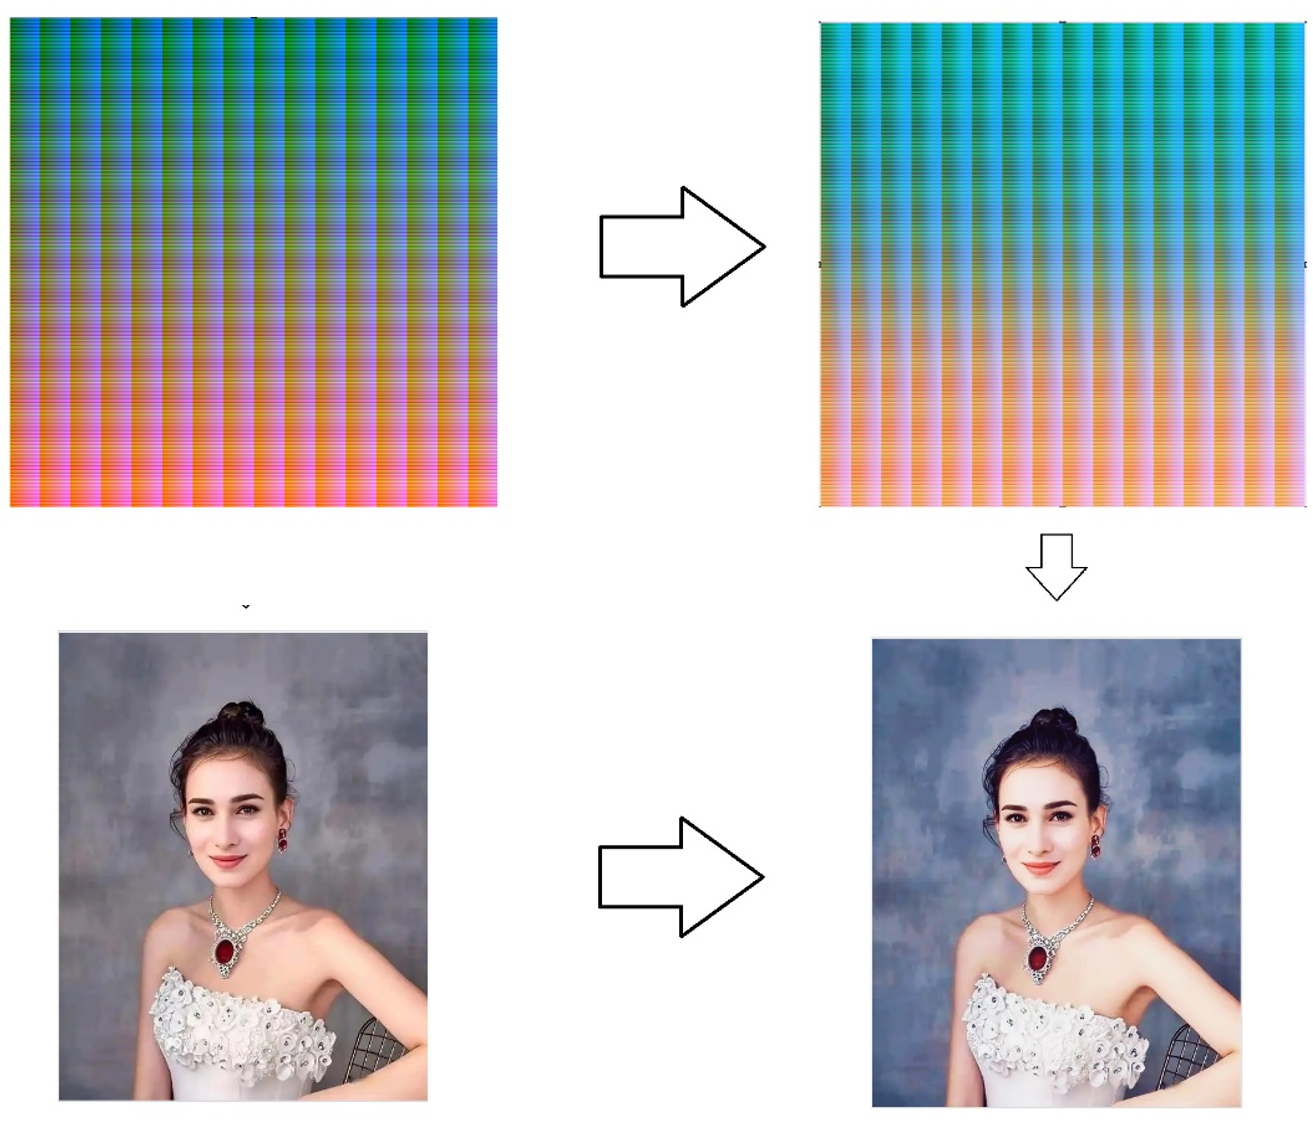
左上:原图;右上:原图使用了滤镜效果后的图;左下:任务图像;右下:使用滤镜效果后的图作为查找表进行颜色映射得到的结果图;
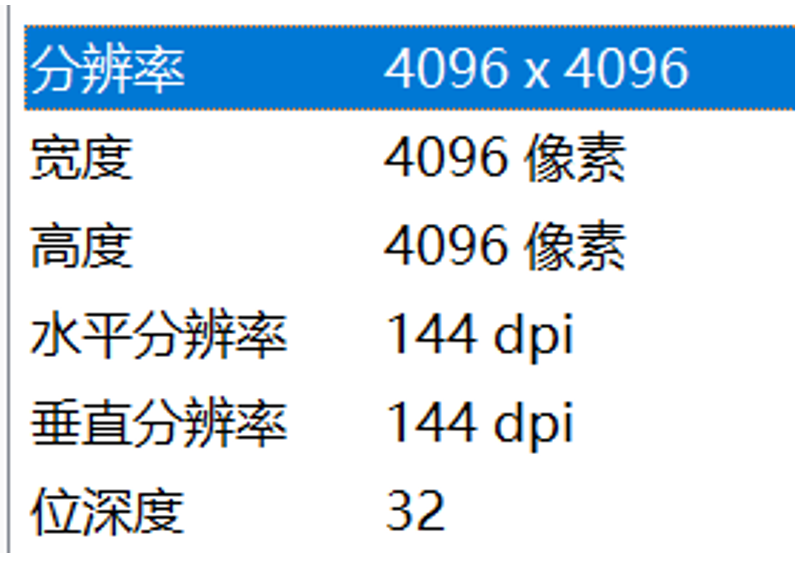
但是现在问题来了,单这一个滤镜查找表,图像文件的大小就达到了8.29MB(原图40.9MB,经过美颜软件处理后得到原滤镜图8.29MB) ,
如何把它压缩呢?是否可以压缩为公式呢? 先尝试一下让ai来进行公式拟合。
压缩查找表 - 尝试公式拟合
从查找表来看,可以发现一个简单的规律,就是每隔256个点是一个曲线周期,如图所示:
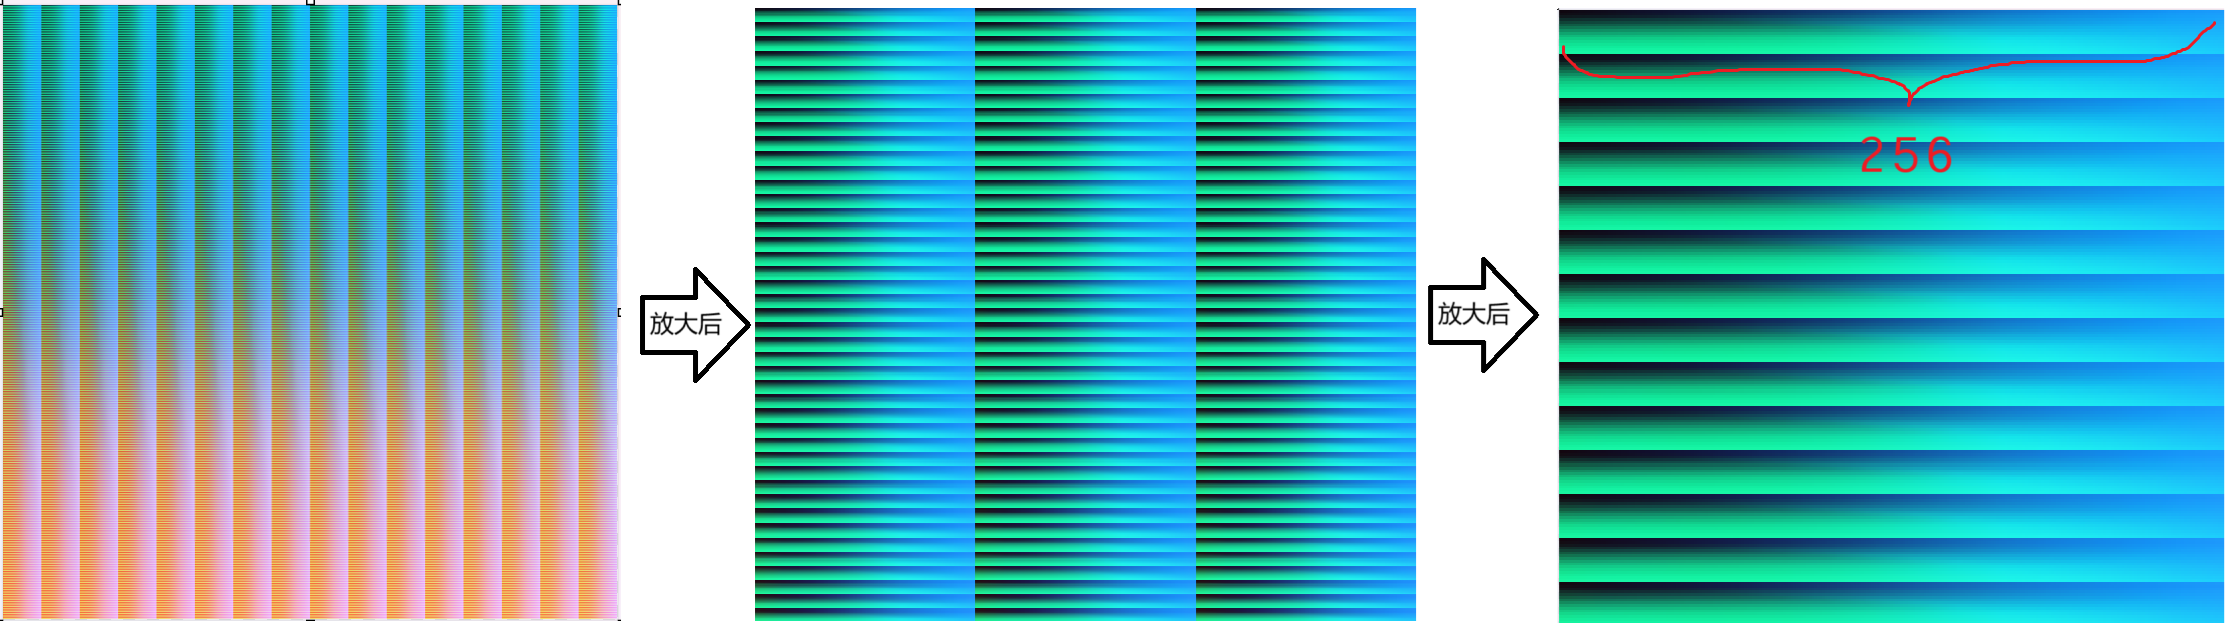
对1600多万个点位于头部的(下图第一行,位于255,0,0,0)、和中间的(下图第二行,大概位于255,128,0,0)、和末尾的(下图第三行,大概位于255,255, 255, 255)RGB进行曲线图绘制:
绘制代码:
public static string DrawRGB(string imgfile, int x, int y, int colcount, int rowcount)
{
    try
    {
        var img = System.Drawing.Image.FromFile(imgfile) as System.Drawing.Bitmap;
        var lb = new LockBitmap(img);
        lb.LockBits();


        var rst_map = new System.Drawing.Bitmap(colcount, 256);
        var lb2 = new LockBitmap(rst_map);
        lb2.LockBits();

        // 初始化为白色背景
        for (int i = 0; i < colcount; i++)
        {
            for (int j = 0; j < 256; j++)
            {
                lb2.SetPixel(i, j, System.Drawing.Color.White);
            }
        }

        // 处理rowcount行数据
        for (int c = 0; c < colcount; c++)
        {
            double sumR = 0, sumG = 0, sumB = 0;

            // 计算所有行的RGB平均值
            for (int r = 0; r < rowcount; r++)
            {
                if (y + r < img.Height && x + c < img.Width)
                {
                    var cr = lb.GetPixel(x + c, y + r);
                    sumR += cr.R;
                    sumG += cr.G;
                    sumB += cr.B;
                }
            }

            int avgR = (int)(sumR / rowcount);
            int avgG = (int)(sumG / rowcount);
            int avgB = (int)(sumB / rowcount);

            // 绘制RGB三个通道的曲线
            lb2.SetPixel(c, 255 - avgR, System.Drawing.Color.Red);
            lb2.SetPixel(c, 255 - avgG, System.Drawing.Color.Green);
            lb2.SetPixel(c, 255 - avgB, System.Drawing.Color.Blue);

            // 增加线条可见性
            if (255 - avgR > 0) lb2.SetPixel(c, 255 - avgR - 1, System.Drawing.Color.FromArgb(128, 255, 0, 0));
            if (255 - avgR < 255) lb2.SetPixel(c, 255 - avgR + 1, System.Drawing.Color.FromArgb(128, 255, 0, 0));

            if (255 - avgG > 0) lb2.SetPixel(c, 255 - avgG - 1, System.Drawing.Color.FromArgb(128, 0, 255, 0));
            if (255 - avgG < 255) lb2.SetPixel(c, 255 - avgG + 1, System.Drawing.Color.FromArgb(128, 0, 255, 0));

            if (255 - avgB > 0) lb2.SetPixel(c, 255 - avgB - 1, System.Drawing.Color.FromArgb(128, 0, 0, 255));
            if (255 - avgB < 255) lb2.SetPixel(c, 255 - avgB + 1, System.Drawing.Color.FromArgb(128, 0, 0, 255));
        }

        lb2.UnlockBits();
        var ftmp = System.IO.Path.Combine(AppDomain.CurrentDomain.BaseDirectory, "rst" + Guid.NewGuid().ToString() + ".png");
        rst_map.Save(ftmp);
        rst_map.Dispose();

        lb.UnlockBits();
        img.Dispose();

        return ftmp;
    }
    catch (Exception ex)
    {
        return string.Empty;
    }
}
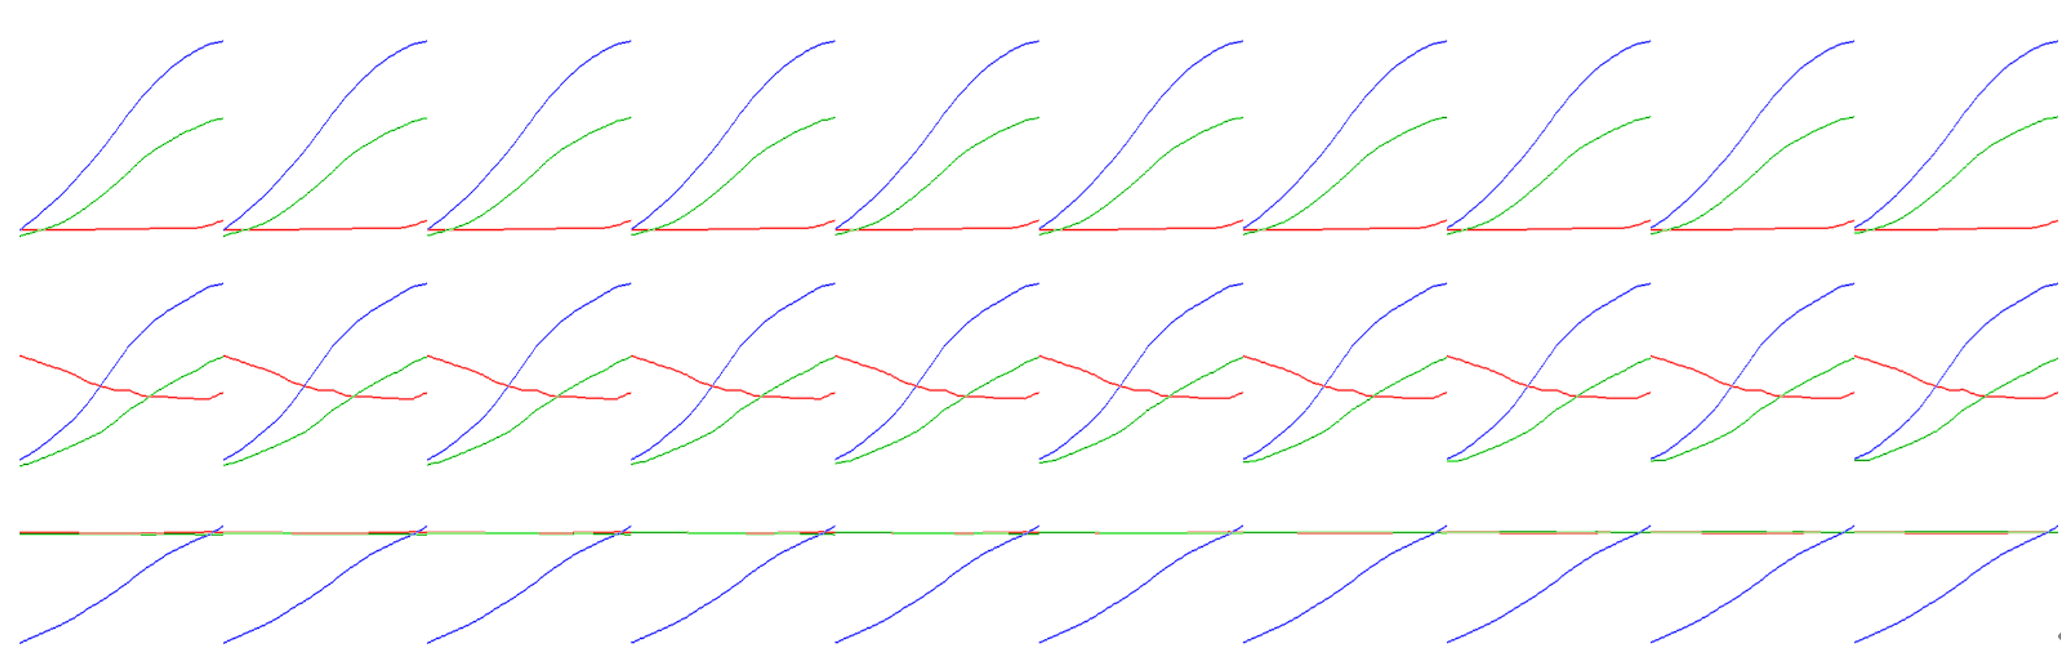
可以发现,邻近的曲线图 极其接近 但是 位置距离很远的 会有很大的差异,所以,不仅在小周期内有变化曲线,在大周期内受到不同颜色通道的影响,曲线形状也会随之变化,Ai进行拟合后, R通道拟合几乎完全一致, 但是对另外两个通道的拟合,基本上不对,但是整体来看起来是非常的有规律性的 :

在HSL空间的拟合,在饱和度、亮度 两个维度的拟合基本一致:

部分拟合处理代码:
private static FilterFormula FitFormula(byte[] curve, string channel)
{
    var formulas = new List<FilterFormula>();

    // 1. 尝试线性拟合
    formulas.Add(FitLinear(curve));

    // 2. 尝试伽马曲线拟合
    formulas.Add(FitGamma(curve));

    // 3. 尝试S曲线拟合
    formulas.Add(FitSCurve(curve));

    // 4. 尝试多项式拟合
    formulas.Add(FitPolynomial(curve, 3));
    formulas.Add(FitPolynomial(curve, 5));

    // 5. 尝试三角函数拟合(对于周期性滤镜)
    if (HasPeriodicity(curve))
    {
        formulas.Add(FitTrigonometric(curve));
    }
    // 选择误差最小的公式
    return formulas.OrderBy(f => f.Error).First();
}

private static FilterFormula FitLinear(byte[] curve)
{
    // 最小二乘法线性拟合
    double sumX = 0, sumY = 0, sumXY = 0, sumX2 = 0;
    int n = 256;

    for (int i = 0; i < n; i++)
    {
        sumX += i;
        sumY += curve[i];
        sumXY += i * curve[i];
        sumX2 += i * i;
    }

    double a = (n * sumXY - sumX * sumY) / (n * sumX2 - sumX * sumX);
    double b = (sumY - a * sumX) / n;

    var formula = new FilterFormula
    {
        Type = FilterFormula.FormulaType.Linear,
        Parameters = new[] { a, b },
        Expression = $"y = {a:F3}x + {b:F3}"
    };

    formula.Error = CalculateError(curve, formula);
    return formula;
}

private static FilterFormula FitGamma(byte[] curve)
{
    // 通过对数变换拟合伽马曲线
    double bestGamma = 1.0;
    double minError = double.MaxValue;

    // 搜索最佳伽马值
    for (double gamma = 0.1; gamma <= 3.0; gamma += 0.05)
    {
        double error = 0;
        for (int i = 1; i < 256; i++) // 跳过0避免对数问题
        {
            double predicted = 255 * Math.Pow(i / 255.0, gamma);
            double diff = curve[i] - predicted;
            error += diff * diff;
        }

        if (error < minError)
        {
            minError = error;
            bestGamma = gamma;
        }
    }

    var formula = new FilterFormula
    {
        Type = FilterFormula.FormulaType.Gamma,
        Parameters = new[] { bestGamma },
        Expression = $"y = 255 * (x/255)^{bestGamma:F3}"
    };

    formula.Error = Math.Sqrt(minError / 255);
    return formula;
}

private static FilterFormula FitSCurve(byte[] curve)
{
    // S曲线拟合
    double bestStrength = 1.0;
    double bestMidpoint = 0.5;
    double minError = double.MaxValue;

    // 网格搜索最佳参数
    for (double strength = 0.1; strength <= 2.0; strength += 0.1)
    {
        for (double midpoint = 0.3; midpoint <= 0.7; midpoint += 0.05)
        {
            var tempFormula = new FilterFormula
            {
                Type = FilterFormula.FormulaType.SCurve,
                Parameters = new[] { strength, midpoint }
            };

            double error = CalculateError(curve, tempFormula);
            if (error < minError)
            {
                minError = error;
                bestStrength = strength;
                bestMidpoint = midpoint;
            }
        }
    }

    var formula = new FilterFormula
    {
        Type = FilterFormula.FormulaType.SCurve,
        Parameters = new[] { bestStrength, bestMidpoint },
        Expression = $"S-Curve(strength={bestStrength:F2}, midpoint={bestMidpoint:F2})"
    };

    formula.Error = minError;
    return formula;
}

private static FilterFormula FitPolynomial(byte[] curve, int degree)
{
    // 使用最小二乘法进行多项式拟合
    int n = 256;
    var matrix = new double[degree + 1, degree + 1];
    var vector = new double[degree + 1];

    // 构建正规方程组
    for (int i = 0; i <= degree; i++)
    {
        for (int j = 0; j <= degree; j++)
        {
            double sum = 0;
            for (int x = 0; x < n; x++)
            {
                sum += Math.Pow(x, i + j);
            }
            matrix[i, j] = sum;
        }

        double sumY = 0;
        for (int x = 0; x < n; x++)
        {
            sumY += curve[x] * Math.Pow(x, i);
        }
        vector[i] = sumY;
    }

    // 高斯消元求解
    var coefficients = SolveLinearSystem(matrix, vector);

    var formula = new FilterFormula
    {
        Type = FilterFormula.FormulaType.Polynomial,
        Parameters = coefficients,
        Expression = FormatPolynomialExpression(coefficients)
    };

    formula.Error = CalculateError(curve, formula);
    return formula;
}
但是上面两种方式,经过反复尝试后,没有成功拟合到与原效果图一致的公式,视觉效果总是有很大差异,因此我暂时放弃了这种方式。但是我觉得这可能是最正确的一种方式,如果继续深入研究的话,极可能是非常可行的,这里还有更多的尝试空间。
压缩查找表 - 尝试有损压缩
为了偷懒,我希望使用一种更通用的,适用于任意滤镜的一种方法,所以我还是倾向于使用上面提到的查找表,所以思路又回到了对查找表的存储压缩这个问题上。当前的无损图,存储的是png图像,假如把它压缩为 有损失的高质量的JPG图像(把查找表 压缩为95%质量的JPG图像,文件大小从 8.29M压缩到3.52M),滤镜的表现效果是否会有很大差异呢?从下图可以看到,人物图像整体看起来几乎不受影响,肉眼无法区分差异;但是在第二组简单背景的图像中,浅亮色的过渡区域,出现了很大的瑕疵,像是沾染了红墨水的坏图、劣质感凸显,因此对于查找表,这里的原则是:务必进行完全无损存储。
瑕疵图演示:

压缩查找表 - 尝试无损压缩
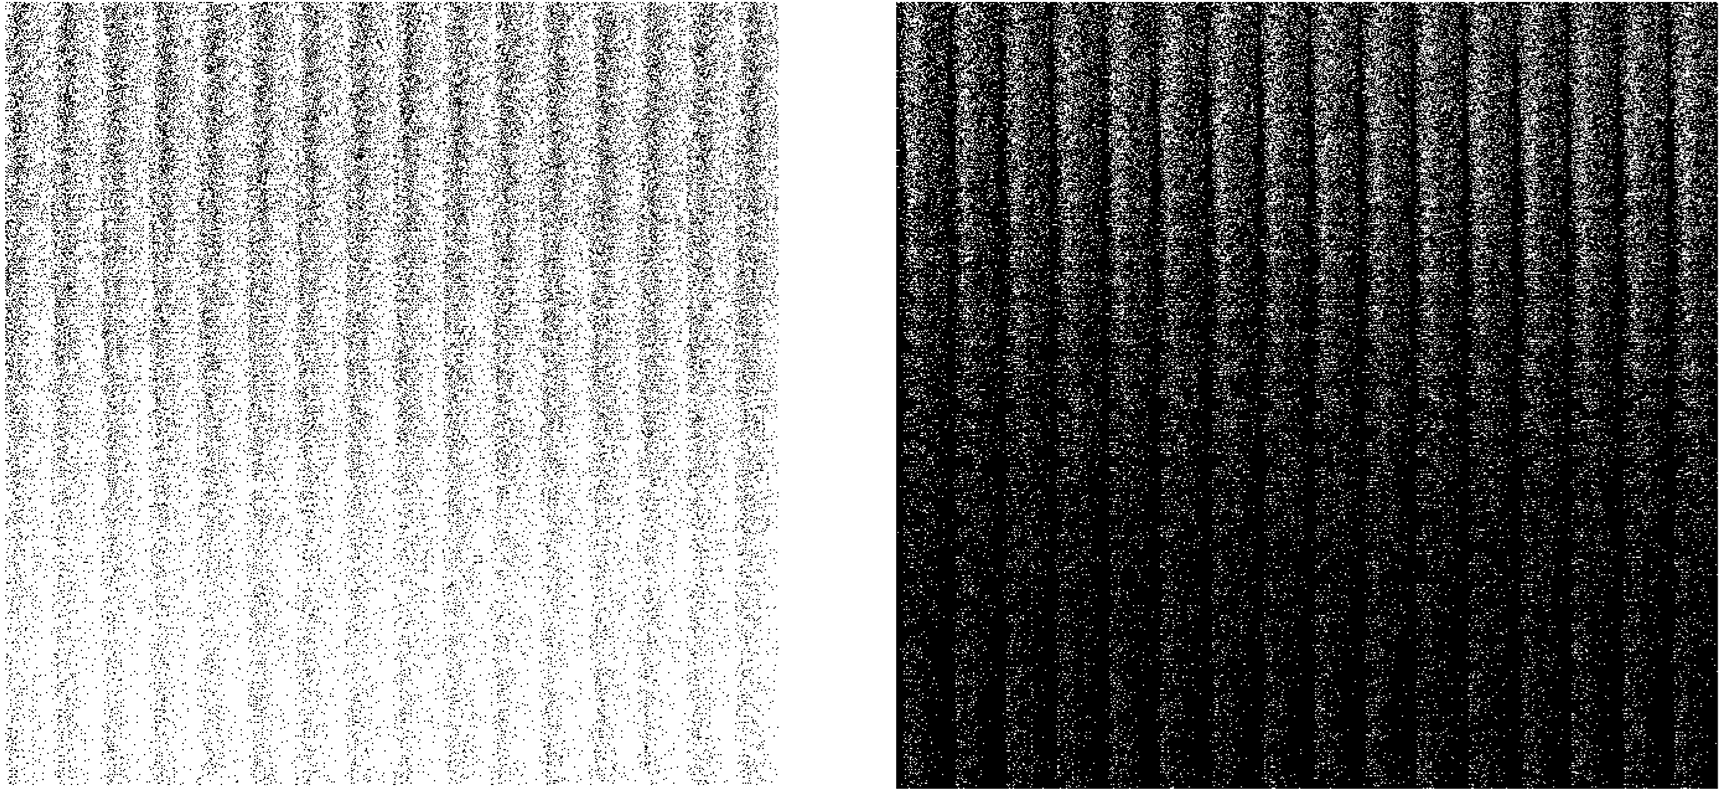
如何进行无损存储呢?那只能从数据压缩本身来看了,最好是利用它的周期规律来进行存储,从查找表的曲线图上可以看出来,邻近的256周期范围内,曲线图的差异是极其小的,所以这里可以考虑进行周期性比对,只存储有差异的点, 这样点的差异绝大部分会在0、1和-1之间,以及极其少量的其他数值差异,然后把占据绝大多数的通道差异存储为多个一位图像,或者四位图像,分散多个文件存储,总存储大小从10MB可以降低到 3~5MB左右, 仍然是太大了,基本不可行。 (下图为256个像素点为一周期,与前一周期的差异点记录,单个通道存储文件1M左右)
分层存储处理代码:
var img_init = System.Drawing.Image.FromFile(file_init) as System.Drawing.Bitmap;
var img_effect = System.Drawing.Image.FromFile(file_effect) as System.Drawing.Bitmap;
var lb_init = new LockBitmap(img_init);
var lb_effect = new LockBitmap(img_effect);
lb_init.LockBits();
lb_effect.LockBits();

var idx = -1;
for (int r = 0; r < 4096; r++)
{
    for (int c = 0; c < 4096; c++)
    {
        var cr2 = lb_effect.GetPixel(c, r);

        idx++;
        bs_dif_r[idx] = cr2.R;
        bs_dif_g[idx] = cr2.G;
        bs_dif_b[idx] = cr2.B;
    }
}
for (int i = 256; i < bs_dif_r.Length; i++)
{
    var dr = bs_dif_r[i] - bs_dif_r[i - 256];
    var dg = bs_dif_r[i] - bs_dif_r[i - 256];
    var db = bs_dif_r[i] - bs_dif_r[i - 256];

    bs_dif_bytelst_r_dif_to_pre[i] = (int)dr;
    bs_dif_bytelst_g_dif_to_pre[i] = (int)dg;
    bs_dif_bytelst_b_dif_to_pre[i] = (int)db;
}

// 使用分层优化的调色板存储
var baseFileName = file_effect.Replace(".png", "");

Console.WriteLine("\n******** 开始处理滤镜:" + file_effect.Split('\\').Last() + " ********");

// 对每个通道进行分层存储
var resultR = HierarchicalPaletteStorage.SaveHierarchical(
    bs_dif_bytelst_r_dif_to_pre,
    baseFileName,
    "R");

var resultG = HierarchicalPaletteStorage.SaveHierarchical(
    bs_dif_bytelst_g_dif_to_pre,
    baseFileName,
    "G");

var resultB = HierarchicalPaletteStorage.SaveHierarchical(
    bs_dif_bytelst_b_dif_to_pre,
    baseFileName,
    "B");
压缩查找表 - 降低采样率+线性插值
既然相邻近的点,差异值如此小,并且256周期范围内曲线图并没有很大的上下波动 那么是否可以进行点的采样呢?采样点之间再进行线性插值?于是接下来尝试:每隔4点采样、每隔16点采样,分别得到了2048×2048 和1024×1024 尺寸的图像,分别对这两个原图进行 “橘彩星光” 滤镜效果的处理,得到了一个 比 “每隔1点采样”小的多的图片,以下是对1点、4点、16点采样的原图:

隔点采样代码:
var skip = 16;//4

var cr_from = System.Drawing.Color.FromArgb(255, 0, 0, 0).ToArgb();
var cr_to = System.Drawing.Color.FromArgb(255, 255, 255, 255).ToArgb();
var ps_count_all = (cr_to - cr_from) + 1;
ps_count_all /= skip;
var wd = (int)Math.Pow(ps_count_all, 0.5);
var img = new Bitmap(wd, wd);
var lb = new LockBitmap(img);
lb.LockBits();

for (int r = 0; r < lb.Height; r++)
{
    for (int c = 0; c < lb.Width; c++)
    {
        lb.SetPixel(c, r, System.Drawing.Color.FromArgb(cr_from));
        cr_from += skip;
    }
}
lb.UnlockBits();
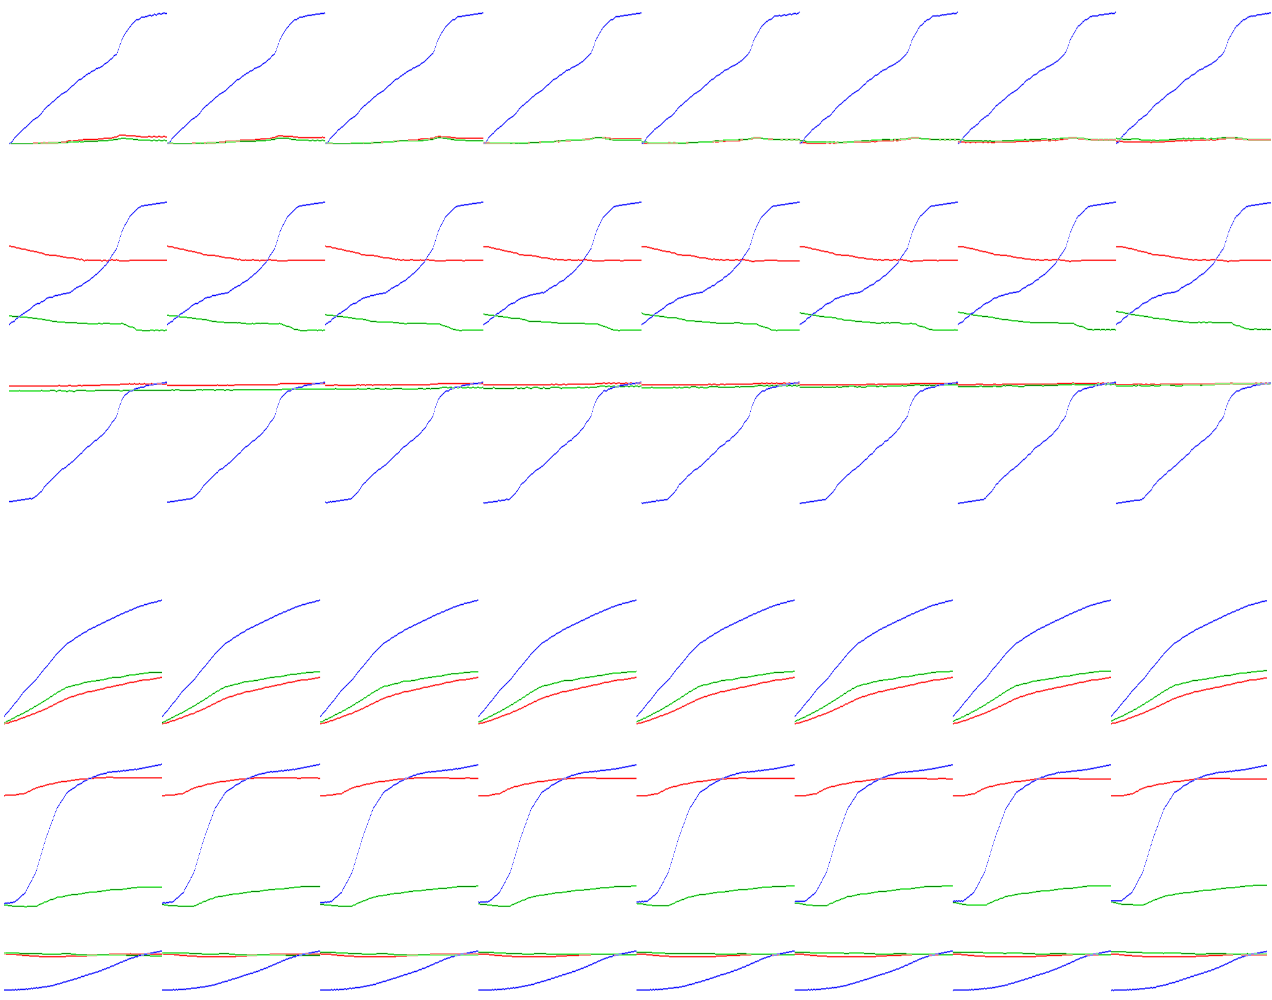
使用这3种作为查找表,得到的滤镜效果几乎是无差别的,这个方式看起来非常好,那么是否可以进一步让采样点更稀疏呢?比如在256周期收尾各采 1 点?如果仅采样两点,就是绝对直线 , 我觉得它对特定的滤镜效果可能是可行的,但是根据滤镜查找表的曲线图规律,它并不完全呈现线性,比如下面的各种曲线类型:
所以过于稀疏的采样很可能会极大的破坏原滤镜效果的质感,产生一种视觉不易察觉但是潜意识里能够感觉到的某种缺失的美感 (不过这里我觉得还是可以进一步去研究,因为有可能会它他朝着极简方式发展,从而来得到更接近的原公式)。
现在通过使用 16点采样 得到的查找表,在不同的滤镜效果,它的文件大小大概是在 30KB到1MB左右不等, 对于占用空间较小的这些滤镜, 可用性非常强, 而且基本上确保了与原滤镜效果的一致性, 具有一定可行性。
线性插值核心代码:
[System.Runtime.CompilerServices.MethodImpl(System.Runtime.CompilerServices.MethodImplOptions.AggressiveInlining)]
private static unsafe void ProcessPixelRange(byte[] source, byte[] result, uint[] paleteArgb, int startIndex, int endIndex, int bytesPerPixel)
{
    int paleteLength = paleteArgb.Length;

    fixed (byte* srcBase = source)
    fixed (byte* dstBase = result)
    fixed (uint* paletePtr = paleteArgb)
    {
        for (int i = startIndex; i < endIndex; i++)
        {
            int offset = i * bytesPerPixel;
            byte* src = srcBase + offset;
            byte* dst = dstBase + offset;

            // 组合 BGR 为单个 uint 值
            uint rgb = (uint)(src[0] | (src[1] << 8) | (src[2] << 16) | (0xFF << 24));
            int loc_task = (int)(rgb - (uint)crBase);

            // 使用位运算替代除法和取模
            int loc_1 = loc_task >> 4;
            int loc_2 = loc_task & stepMask;

            if (loc_1 >= 0 && loc_1 < paleteLength)
            {
                uint resultArgb;

                if (loc_2 == 0)
                {
                    // 直接查找,无需插值
                    resultArgb = paletePtr[loc_1];
                }
                else
                {
                    // 线性插值
                    uint currArgb = paletePtr[loc_1];
                    uint otherArgb;
                    bool isBackward = ((loc_1 + 1) & 0xF) == 0;

                    if (isBackward && loc_1 > 0)
                    {
                        otherArgb = paletePtr[loc_1 - 1];
                    }
                    else if (!isBackward && loc_1 + 1 < paleteLength)
                    {
                        otherArgb = paletePtr[loc_1 + 1];
                    }
                    else
                    {
                        otherArgb = currArgb;
                    }

                    // 提取颜色分量
                    int currR = (int)((currArgb >> 16) & 0xFF);
                    int currG = (int)((currArgb >> 8) & 0xFF);
                    int currB = (int)(currArgb & 0xFF);

                    int otherR = (int)((otherArgb >> 16) & 0xFF);
                    int otherG = (int)((otherArgb >> 8) & 0xFF);
                    int otherB = (int)(otherArgb & 0xFF);

                    int baseR, baseG, baseB;

                    if (isBackward)
                    {
                        // 向后插值
                        int diffR = currR - otherR;
                        int diffG = currG - otherG;
                        int diffB = currB - otherB;

                        // 使用定点数运算避免浮点运算
                        baseR = otherR + ((diffR * loc_2 + 8) >> 4);
                        baseG = otherG + ((diffG * loc_2 + 8) >> 4);
                        baseB = otherB + ((diffB * loc_2 + 8) >> 4);
                    }
                    else
                    {
                        // 向前插值
                        int diffR = otherR - currR;
                        int diffG = otherG - currG;
                        int diffB = otherB - currB;

                        baseR = currR + ((diffR * loc_2 + 8) >> 4);
                        baseG = currG + ((diffG * loc_2 + 8) >> 4);
                        baseB = currB + ((diffB * loc_2 + 8) >> 4);
                    }

                    // 钳位到 0-255 范围
                    baseR = baseR > 255 ? 255 : (baseR < 0 ? 0 : baseR);
                    baseG = baseG > 255 ? 255 : (baseG < 0 ? 0 : baseG);
                    baseB = baseB > 255 ? 255 : (baseB < 0 ? 0 : baseB);

                    resultArgb = (uint)((0xFF << 24) | (baseR << 16) | (baseG << 8) | baseB);
                }

                // 写入结果
                dst[0] = (byte)(resultArgb & 0xFF);
                dst[1] = (byte)((resultArgb >> 8) & 0xFF);
                dst[2] = (byte)((resultArgb >> 16) & 0xFF);

                if (bytesPerPixel == 4)
                    dst[3] = src[3];
            }
            else
            {
                // 超出范围,复制原始值
                dst[0] = src[0];
                dst[1] = src[1];
                dst[2] = src[2];

                if (bytesPerPixel == 4)
                    dst[3] = src[3];
            }
        }
    }
}
使用线性插值的目的,仅仅是为了节省存储空间,如果完全忽略存储空间和加载速度的话,使用完全不压缩的查找表进行哈希匹配,无任何计算,效率是非常高的,实时预览的性能也不错。因此当前的方式其实是在性能与空间之间采取了一种折中方案。但是这里讨论的仍然是CPU处理的滤镜,后续仍然需要研究使用GPU加速的滤镜处理。
以下是多种查找表的缩略图:

查找表的局限性
查找表虽然方便、快速,但是它是有局限性的,仅适用于比较简单的滤镜效果,对于关联特征的、关联空间位置的、或偏向于艺术风格的是不适用的,比如 蜡笔、素描:

这个太好看了,后续再继续研究。
查找表滤镜效果演示
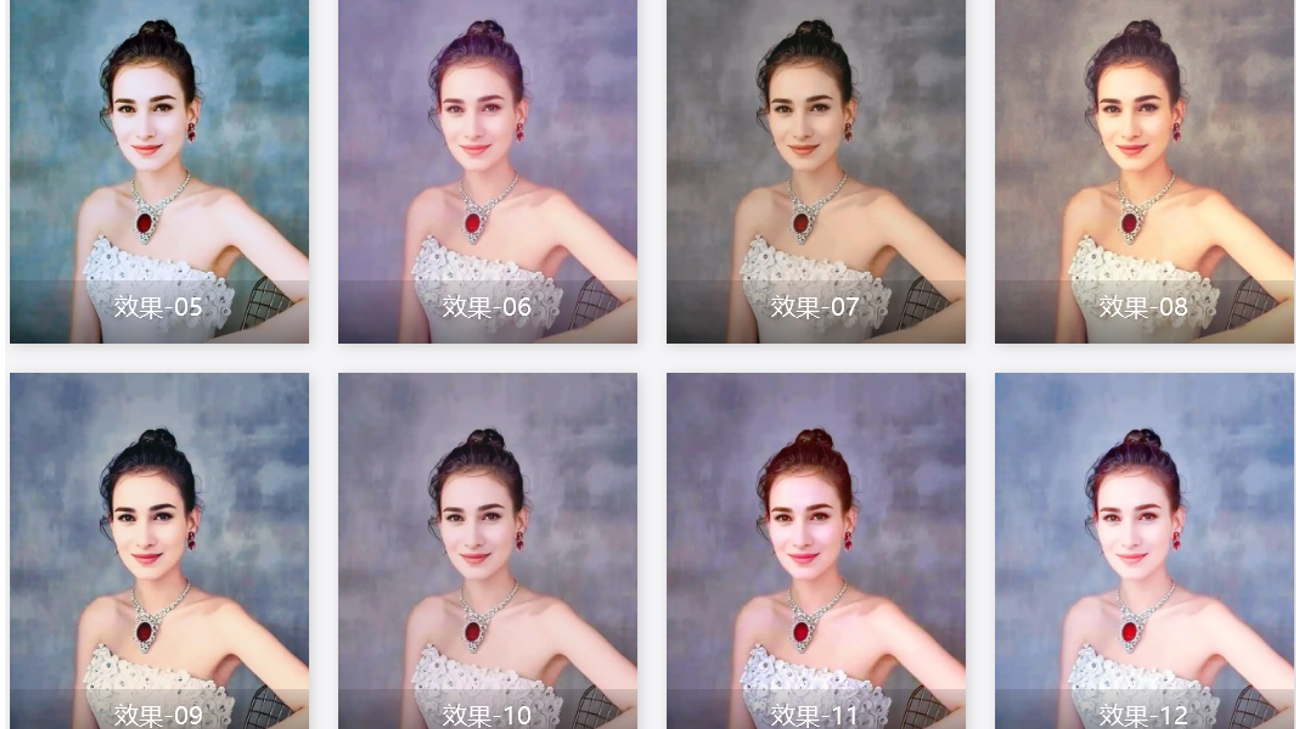
以下是简化的查找表处理的滤镜效果展示:
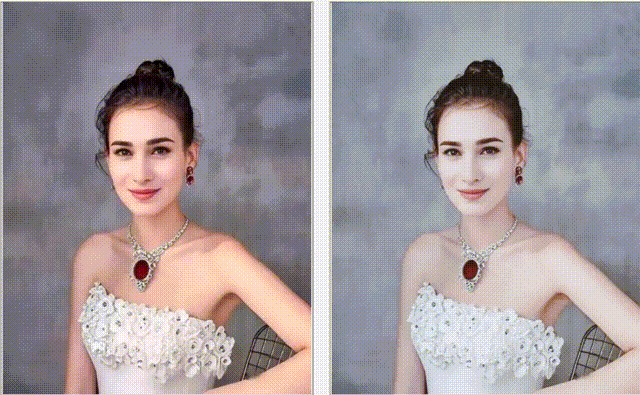
加工后的最终效果(隔16点采样、1024*1024简化查找表、线性差值、颜色映射):


 浙公网安备 33010602011771号