Git详解及Gitlab介绍、部署
git的配置与使用
git是一个分布式版本控制软件,最初由林纳斯·托瓦兹(Linus Torvalds)创作,于2005年以GPL发布。最初目的是为更好地管理Linux内核开发而设计。
分布式版本控制
所有版本信息仓库全部同步到本地的每个用户,这样就可以在本地查看所有版本历史,可以离线在本地提交,只需在连网时push 到相应的服务器或其他用户那里。由于每个用户那里保存的都是所有的版本数据,只要有一个用户的设备没有问题就可以恢复所有的数据,但这增加了本地存储空间的占用。
Git 官方中文手册 https://git-scm.com/book/zh/v2
一、yum安装git
[root@localhost ~]# rpm -qa git
git-1.8.3.1-11.el7.x86_64
二、编译安装git
Git下载地址: https://github.com/git/git/releases
# 安装依赖关系
yum install curl-devel expat-devel gettext-devel  openssl-devel zlib-devel
# 编译安装
tar -zxf git-2.0.0.tar.gz
cd git-2.0.0
make configure
./configure --prefix=/usr
make
make install
三、初始化仓库(获取git仓库)
 1 [root@redhat2 ~]# mkdir test        #创建一个目录存储代码
 2 [root@redhat2 ~]# cd test/
 3 [root@redhat2 test]# git init            #将test目录初始化为代码仓库
 4 [root@redhat2 test]# git status       #查看工作区状态
 5 [root@redhat2 test]# git config --global user.name "wsy"          #创建仓库用户
 6 [root@redhat2 test]# git config --global user.email "wushaoyu95@163.com"         #创建git使用邮箱
 7 [root@redhat2 test]# git config --list                      #查看全局配置
 8 user.name=wsy
 9 user.email=wushaoyu95@163.com
10 core.repositoryformatversion=0
11 core.filemode=true
12 core.bare=false
13 core.logallrefupdates=true
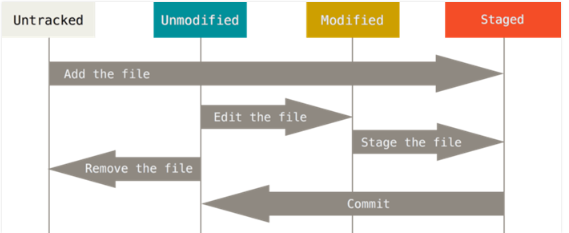
四、GIT的四个区和五种状态的顺序
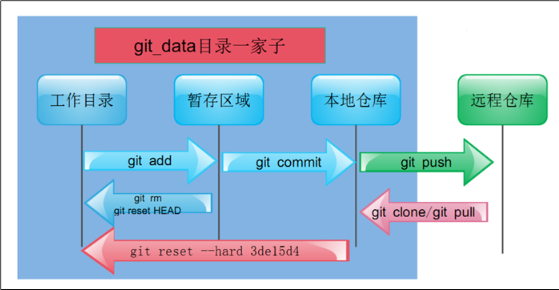
文件状态变化周期
四个区
工作区(Working Area)
暂存区(Stage)
本地仓库(Local Repository)
远程仓库(Remote Repository)
五种状态
未修改(Origin)
已修改(Modified)&未追踪(Untracked)
已暂存(Staged)
已提交(Committed)
已推送(Pushed)
常用命令:
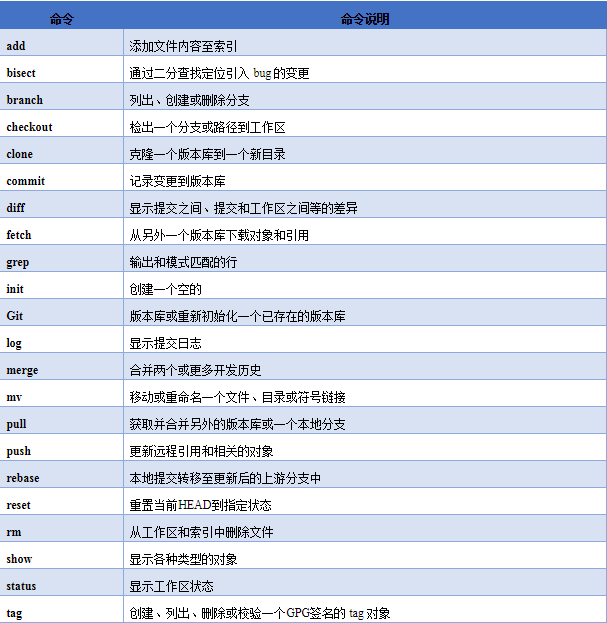
- 先用git status查看下当前状态。
- git checkout用于撤销删除和修改,git clean -df用于撤销新增。
- git diff可以查看工作区、暂存区、仓库之间的修改和差异,参数不同。
- git reset可以作用于本地仓库,用于回退/前进到任意版本,也可以作用于暂存区,用于撤销暂存区修改。有hard和soft2个参数。soft参数可以省略,soft参数表示撤销的修改仍放在工作区中。
一、常用git命令提交及版本回退
git reset --hard HEAD^ 回退到上一个版本
git reset --hard 提交id(可回退到之前或未来的指定版本,使用git log查看提交id)
git log 查看提交版本记录,包含提交id
注:回退到了某个版本,关掉了电脑,第二天早上就后悔了,想恢复到新版本怎么办?找不到新版本的commit id怎么办?
Git提供了一个命令git reflog用来记录你的每一次命令:
git reflog
总结一下:

HEAD指向的版本就是当前版本,因此,Git允许我们在版本的历史之间穿梭,使用命令git reset --hard commit_id。

穿梭前,用git log可以查看提交历史,以便确定要回退到哪个版本。

要重返未来,用git reflog查看命令历史,以便确定要回到未来的哪个版本。
git实用总结:https://blog.csdn.net/u012556150/article/details/50736896
https://www.liaoxuefeng.com/wiki/896043488029600
git本地创建分支推送到远程gitlab仓库:
参考链接:https://www.cnblogs.com/xieshuang/p/8316769.html
git checkout -b 1.0.x //创建分支并切换
git checkout master //切换分支
git chekcout tag name //切换标签
git push origin 1.0.x (也可直接push)
git把本地创建的tag推送到远程仓库:
参考链接:https://yq.aliyun.com/articles/364285
https://www.cnblogs.com/kabi/p/8553850.html
git回退版本:(在本地回退远程仓库到制定版本)
例:在封板发布时,封板版本为1.0.3.RELEASE,发布开发版本为1.0.4.BUILD-SNAPSHOT,并且将发布的版本号都推向1.0.x分支,已经将1.0.3.RELEASE修改完毕,推向主分支,然后在1.0.x分支合并master分支的代码,后,在开发版本发布1.0.4.BUILD-SNAPSHOT时,没有切换到主分支,导致1.0.4.BUILD-SNAPSHOT版本也推向了1.0.x版本,此时应该回退,将1.0.4.BUILD-SNAPSHOT发布到master分支
解决:在1.0.x分支找到提交1.0.3.RELEASE,版本时的comit id 然后回退到制定版本(git reset --hard commit id),然后git push -f 或git push origin HEAD --force(推荐此种)强制将本地标签推送到远程仓库标签即可
可参考:https://www.cnblogs.com/Super-scarlett/p/8183348.html
修改 git 历史提交 commit 信息(重写历史)
git reset HEAD~2 查看修改前几个提交,后按提示修改。 参考链接:https://www.jianshu.com/p/0f1fbd50b4be
git tag 1.0.1.RELEASE //在制定分支打标签,或在打标签时添加备注 git tag -a '1.0.1.RELEASE' -m '1.0.1.RELEASE'' -m 添加备注
git push origin --tags //推送所有标签到远程仓库
git push origin tagname //推送指定标签名到远程仓库
五、创建文件
1 [root@redhat2 test]# touch wsy
2 [root@redhat2 test]# git add wsy
3 [root@redhat2 test]# git commit -m "first commit"
4 [master (root-commit) fcf38a6] first commit
5 1 file changed, 0 insertions(+), 0 deletions(-)
6 create mode 100644 wsy
六、五种状态下的撤销
添加a.txt、b.txt文本文件为例
 1 [root@redhat2 test]# touch a.txt
 2 [root@redhat2 test]# touch b.txt
 3 [root@redhat2 test]# echo a >a.txt
 4 [root@redhat2 test]# echo b >b.txt
 5 [root@redhat2 test]# git add a.txt b.txt
 6 [root@redhat2 test]# git commit -m "second commit"
 7 [master 4712ad3] second commit
 8 3 files changed, 3 insertions(+)
 9 create mode 100644 a.txt
10 create mode 100644 b.txt
1、已修改,未缓存
[root@redhat2 test]#git diff # 列出所有的修改
[root@redhat2 test]#git diff xx/xx.py xx/xx2.py # 列出某(几)个文件的修改
[root@redhat2 test]#git checkout # 撤销项目下所有的修改
[root@redhat2 test]#git checkout . # 撤销当前文件夹下所有的修改
[root@redhat2 test]#git checkout xx/xx.py xx/xx2.py # 撤销某几个文件的修改
[root@redhat2 test]#git clean -f # untracked状态,撤销新增的文件
[root@redhat2 test]#git clean -df # untracked状态,撤销新增的文件和文件夹
对a.txt添加内容
1 [root@redhat2 test]# echo aaa >> a.txt
2 [root@redhat2 test]# ls
3 a.txt b.txt wsy
4 [root@redhat2 test]# cat a.txt
5 a
6 aaa
7 [root@redhat2 test]# git checkout .  #撤销当前文件夹下所有修改
8 [root@redhat2 test]# cat a.txt
9 a
添加c.txt文件并且创建目录c
1 [root@redhat2 test]# touch c.txt
2 [root@redhat2 test]# mkdir c
3 [root@redhat2 test]# ls
4 a.txt  b.txt  c  c.txt  wsy
5 [root@redhat2 test]# git clean -df
6 Removing c.txt
7 Removing c/
8 [root@redhat2 test]# ls
9 a.txt  b.txt  wsy
2.已暂存,未提交
此时已经执行了git add,但未执行git commit,但是用git diff已经看不到任何修改了。因为git diff检查的是工作区和暂存区之间的差异。
[root@redhat2 test]#git diff --cached # 这个命令显示暂存区和本地仓库的差异
[root@redhat2 test]#git reset  # 暂存区的修改恢复到工作区
[root@redhat2 test]#git reset --soft # 与git reset等价,回到已修改状态,修改的内容仍然在工作区中
[root@redhat2 test]#git reset --hard # 回到未修改状态,清空暂存区和工作区
[root@redhat2 test]#git reset --hard 操作等价于 git reset 和 git checkout 2步操作
对a.txt添加内容,并添加到缓存区
 1 [root@redhat2 test]# cat a.txt
 2 a
 3 [root@redhat2 test]# echo aaa >> a.txt
 4 [root@redhat2 test]# git add a.txt
 5 [root@redhat2 test]# cat a.txt
 6 a
 7 aaa
 8 [root@redhat2 test]# git reset --hard
 9 HEAD is now at 4712ad3 second commit
10 [root@redhat2 test]# cat a.txt
11 a
3.已提交,为推送
执行完commit之后,会在仓库中生成一个版本号(hash值),标志这次提交。之后任何时候,都可以借助这个hash值回退到这次提交。
[root@redhat2 test]#git diff <branch-name1> <branch-name2> # 比较2个分支之间的差异
[root@redhat2 test]#git diff master origin/master # 查看本地仓库与本地远程仓库的差异
[root@redhat2 test]#git reset --hard origin/master # 回退与本地远程仓库一致
[root@redhat2 test]#git reset --hard HEAD^ # 回退到本地仓库上一个版本
[root@redhat2 test]#git reset --hard <hash code> # 回退到任意版本(如失误导致回退,想重新回到未来指定的版本时,可以使用git log查看提交id,然后进行回退)
[root@redhat2 test]#git reset --soft/git reset # 回退且回到已修改状态,修改仍保留在工作区中。
4.已经推送到远程
[root@redhat2 test]#git push -f orgin master # 强制覆盖远程分支
[root@redhat2 test]#git push -f # 如果之前已经用 -u 关联过,则可省略分支名
七、提交代码,简易使用流程
因为Git是分布式版本控制系统,所以需要填写用户名和邮箱作为一个标识。
注意:git config --global 参数,有了这个参数,表示你这台机器上所有的Git仓库都会使用这个配置,当然你也可以对某个仓库指定的不同的用户名和邮箱
mkdir git #创建一个空目录,存放数据仓库
cd git #进入目录
git init #初始化仓库
git add ‘readme.txt“ #添加一个文件,此时文件已被放置暂存区
git add . #添加所有文件
git status #可查看数据状态
git config --list #查看全局配置,可查看远程源等信息
git commit -m ’first commit‘ #提交文件,此时文件已被放入本地仓库,-m后接提交理由,提示信息,方便后续识别
git remote add origin https://github.com/shaoyuwu/wsy.git #git远程添加源(第一次时执行即可)
git push -u origin master 由于第一次推送时,git仓库为空,所以需要添加-u参数,后面可以简化参数即可,如下
或git push #远程提交代码
git pull #拉取代码
git branch -d '分支' #删除分支
git commit -a -m 'fsfk' #包括了git add的作用
注:git remote rm origin #若添加远程源错误,或是之前就有,可执行此命令删除,重新添加
获取远程代码:git clone https://github.com/shaoyuwu/wsy.git
当代码源更新后,可以执行git pull 来获取更新
git详细学习可参考链接:https://www.cnblogs.com/tugenhua0707/p/4050072.html
八、Git分支结构
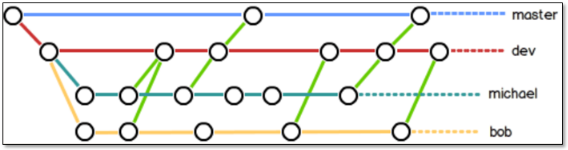
在实际的项目开发中,尽量保证master分支稳定,仅用于发布新版本,平时不要随便直接修改里面的数据文件。
那在哪干活呢?干活都在dev分支上。每个人从dev分支创建自己个人分支,开发完合并到dev分支,最后dev分支合并到master分支。所以团队的合作分支看起来会像下图那样。
#分支切换
[root@gitlab git_data]# git branch linux   #创建分支
[root@gitlab git_data]# git branch    #查看分支结构
linux
* master
[root@gitlab git_data]# git checkout linux   #切换分支
切换到分支 'linux'
[root@gitlab git_data]# git branch
* linux
master
#在linux分支进行修改
    [root@gitlab git_data]# touch README
    [root@gitlab git_data]# echo "woshiwushaoyu" >> shaoyu.txt
    [root@gitlab git_data]# git add .
    [root@gitlab git_data]# git commit -m "2018年11月30日09点10分"
    [linux 5a6c037] 2017年11月30日09点10分
     1 file changed, 1 insertion(+)
    [root@gitlab git_data]# git status
    # 位于分支 linux
    无文件要提交,干净的工作区
#回到master分支
    [root@gitlab git_data]# git checkout master
    切换到分支 'master'
    [root@gitlab git_data]# cat shaoyu.txt
    [root@gitlab git_data]# git log  -1
    commit 7015bc7b316cc95e2dfe6c53e06e3900b2edf427
    Author: wsy <admin@znix.top>
    Date:   Wed Nov 29 19:30:57 2017 +0800

        123
#合并代码
[root@gitlab git_data]# git merge linux #合并分支代码
更新 7015bc7..5a6c037
Fast-forward
README | 1 +
1 file changed, 1 insertion(+)
[root@gitlab git_data]# git status
# 位于分支 master
无文件要提交,干净的工作区
[root@gitlab git_data]# cat shaoyu      #合并分支代码后,可在主分支看到在其他分支添加的文件
woshiwushaoyu
[root@gitlab git_data]# git branch -d linux #删除分支
注:合并失败,删除分支,及更多资料可参考:https://www.cnblogs.com/clsn/p/7929958.html#auto_id_24
模拟冲突,在文件同一行做不同修改
#在linux分支进行修改
$ git status
On branch linux      #在linux分支

$ echo "wushaoyu is linux" >>shaoyu.txt        #新添加内容

$ cat shaoyu.txt
woshishaoyuwu
wushaoyu is linux

$ git commit -a -m 'sy'    #提交
warning: LF will be replaced by CRLF in shaoyu.txt.
The file will have its original line endings in your working directory
[linux 4d43e3c] sy
1 file changed, 1 insertion(+)
#在master分支进行修改
$ git checkout master       #切回到主分支
Switched to branch 'master

$ echo "wushaoyu is master" >> shaoyu.txt      #同样在主分支对此文件进行添加内容

$ cat shaoyu.txt
woshishaoyuwu
wushaoyu is master

$ git commit -a -m 'shaoyu'    #提交
warning: LF will be replaced by CRLF in shaoyu.txt.
The file will have its original line endings in your working directory
[master 57fa3a0] shaoyu
1 file changed, 1 insertion(+)
#在master分支进行合并,出现冲突
$ git merge linux
Auto-merging shaoyu.txt
CONFLICT (content): Merge conflict in shaoyu.txt
Automatic merge failed; fix conflicts and then commit the result.

#解决冲突

$ vim shaoyu.txt

woshishaoyuwu
wushaoyu is master
wushaoyu is linux

$ git commit -a -m 'wu'
[master 9a2fc0d] wu
配置使用gitlab
一、下载gitlab软件包
官方网站 https://about.gitlab.com/
官方安装文档 https://about.gitlab.com/installation/
国内软件镜像站 https://mirrors.tuna.tsinghua.edu.cn/gitlab-ce/yum/
GitLab 服务构成
GitLab 由主要由以下服务构成,他们共同承担了Gitlab 的运作需要
Nginx:静态web 服务器。
gitlab-shell:用于处理Git 命令和修改authorized keys 列表。
gitlab-workhorse: 轻量级的反向代理服务器。
logrotate:日志文件管理工具。
postgresql:数据库。
redis:缓存数据库。
sidekiq:用于在后台执行队列任务(异步执行)。
unicorn:An HTTP server for Rack applications,GitLab Rails 应用是托管在这个服务器上面的。
GitLab 工作流程
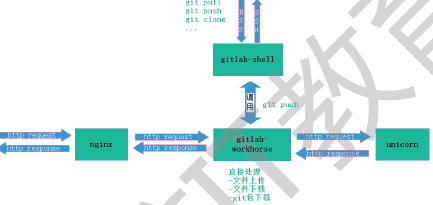
GitLab Shell
GitLab Shell 有两个作用:为GitLab 处理Git 命令、修改authorized keys 列表。当通过SSH 访问GitLab Server 时,GitLab Shell 会:
限制执行预定义好的Git 命令(git push, git pull, git annex)
调用GitLab Rails API 检查权限
执行pre-receive 钩子(在GitLab 企业版中叫做Git 钩子)
执行你请求的动作处理GitLab 的post-receive 动作
处理自定义的post-receive 动作
当通过http(s)访问GitLab Server 时,工作流程取决于你是从Git 仓库拉取(pull)代码还是向git 仓库推送(push)代码。
如果你是从Git 仓库拉取(pull)代码,GitLab Rails 应用会全权负责处理用户鉴权和执行Git 命令的工作;
如果你是向Git 仓库推送(push)代码,GitLab Rails 应用既不会进行用户鉴权也不会执行Git 命令,它会把以下工作交由GitLab Shell 进行处理:
调用GitLab Rails API 检查权限
执行pre-receive 钩子(在GitLab 企业版中叫做Git 钩子)
执行你请求的动作
处理GitLab 的post-receive 动作
处理自定义的post-receive 动作
GitLab 主要目录
/var/opt/gitlab/git-data/repositories/:库默认存储目录
/opt/gitlab: 应用代码和相应的依赖程序
/var/opt/gitlab:gitlab-ctl reconfigure 命令编译后的应用数据和配置文件,不需要人为修改配置
/etc/gitlab: 配置文件目录
/var/log/gitlab:此目录下存放了gitlab 各个组件产生的日志
/var/opt/gitlab/backups/:备份文件生成的目录
1、安装
[root@redhat1 ~]# rpm -ivh gitlab-ce-9.1.4-ce.0.el7.x86_64.rpm
Preparing...                          ################################# [100%]
Updating / installing...
   1:gitlab-ce-9.1.4-ce.0.el7         ################################# [100%]


       *.                  *.
      ***                 ***
     *****               *****
    .******             *******
    ********            ********
   ,,,,,,,,,***********,,,,,,,,,
  ,,,,,,,,,,,*********,,,,,,,,,,,
  .,,,,,,,,,,,*******,,,,,,,,,,,,
      ,,,,,,,,,*****,,,,,,,,,.
         ,,,,,,,****,,,,,,
            .,,,***,,,,
                ,*,.

     _______ __  __          __
    / ____(_) /_/ /   ____ _/ /_
   / / __/ / __/ /   / __ `/ __ \
  / /_/ / / /_/ /___/ /_/ / /_/ /
  \____/_/\__/_____/\__,_/_.___/


gitlab: Thank you for installing GitLab!
gitlab: To configure and start GitLab, RUN THE FOLLOWING COMMAND:

sudo gitlab-ctl reconfigure

gitlab: GitLab should be reachable at http://redhat1
gitlab: Otherwise configure GitLab for your system by editing /etc/gitlab/gitlab.rb file
gitlab: And running reconfigure again.
gitlab:
gitlab: For a comprehensive list of configuration options please see the Omnibus GitLab readme
gitlab: https://gitlab.com/gitlab-org/omnibus-gitlab/blob/master/README.md
gitlab:
It looks like GitLab has not been configured yet; skipping the upgrade script.
注:gitlab主配置文件/etc/gitlab/gitlab.rb,若修改配置文件,需重新配置gitalb,命令:gitlab-ctl reconfigure
2、初始化
[root@ecs-46f1 ~]# gitlab-ctl status
run: gitaly: (pid 4413) 28s; run: log: (pid 4166) 83s
run: gitlab-monitor: (pid 4428) 27s; run: log: (pid 4248) 71s
run: gitlab-workhorse: (pid 4401) 28s; run: log: (pid 4120) 98s
run: logrotate: (pid 4148) 89s; run: log: (pid 4147) 89s
run: nginx: (pid 4132) 96s; run: log: (pid 4131) 96s
run: node-exporter: (pid 4212) 77s; run: log: (pid 4211) 77s
run: postgres-exporter: (pid 4446) 26s; run: log: (pid 4334) 53s
run: postgresql: (pid 3907) 146s; run: log: (pid 3906) 146s
run: prometheus: (pid 4436) 27s; run: log: (pid 4317) 59s
run: redis: (pid 3847) 152s; run: log: (pid 3846) 152s
run: redis-exporter: (pid 4298) 65s; run: log: (pid 4297) 65s
run: sidekiq: (pid 4391) 36s; run: log: (pid 4106) 104s
run: unicorn: (pid 4504) 4s; run: log: (pid 4071) 110s
3、查看状态
[root@redhat1 ~]# gitlab-ctl status #查看状态
[root@redhat1 ~]# gitlab-ctl restart #重启
4、查看端口
[root@redhat1 ~]# netstat -tnulp |grep 80
tcp        0      0 127.0.0.1:8080          0.0.0.0:*               LISTEN      2331/unicorn master #此端口可能冲突,导致无法访问,可修改
tcp        0      0 0.0.0.0:80              0.0.0.0:*               LISTEN      2381/nginx: master
tcp        0      0 0.0.0.0:8060            0.0.0.0:*               LISTEN      2381/nginx: master
5、使用浏览器访问,进行web界面操作
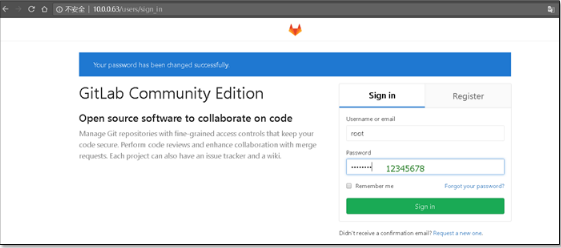
##第一次访问创建密码
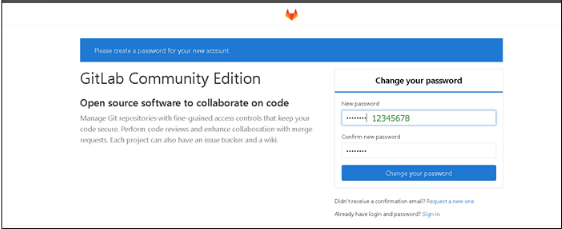
##进行登陆,用户名为root,密码为12345678
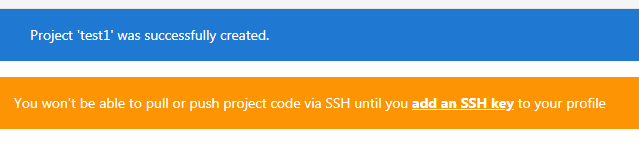
##创建一个新的项目
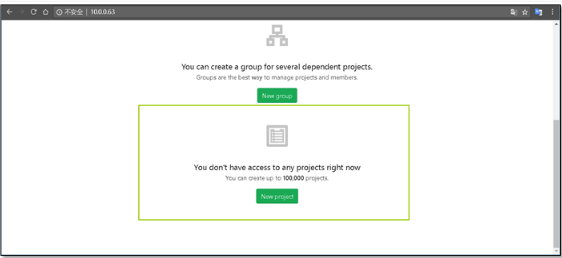
##定义项目的名称

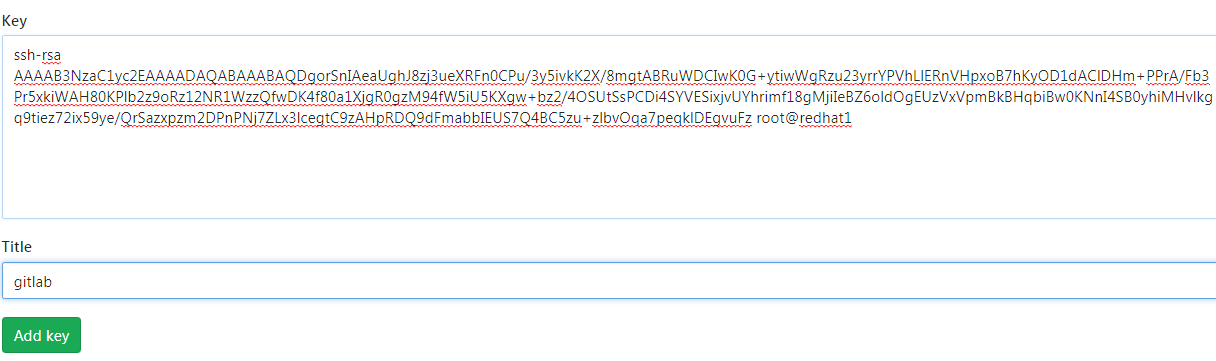
##创建完成后会提示没有添加ssh密钥
##在服务器上创建ssh密钥 使用ssh-keygen 命令
[root@redhat1 ~]# ssh-keygen
Generating public/private rsa key pair.
Enter file in which to save the key (/root/.ssh/id_rsa):
Enter passphrase (empty for no passphrase):
Enter same passphrase again:
Your identification has been saved in /root/.ssh/id_rsa.
Your public key has been saved in /root/.ssh/id_rsa.pub.
The key fingerprint is:
SHA256:LHH5RTv4buubxtykNWpbSvtotzVahu9d0HUhPGSyg7o root@redhat1
The key's randomart image is:
+---[RSA 2048]----+
|           .++ . |
|         ..o++. .|
|      . o..o+ . o|
|       +.. o.. .o|
|      ..S . . . .|
|       ..  .  =. |
|       E   o+B.=o|
|           oOBB.+|
|           =X*++.|
+----[SHA256]-----+
[root@redhat1 ~]# cd /root/.ssh/
[root@redhat1 .ssh]# ll
total 12
-rw------- 1 root root 1679 Mar 25 13:43 id_rsa
-rw-r--r-- 1 root root  394 Mar 25 13:43 id_rsa.pub
-rw-r--r-- 1 root root  971 Mar 22 17:31 known_hosts
[root@redhat1 .ssh]# cat id_rsa.pub
ssh-rsa AAAAB3NzaC1yc2EAAAADAQABAAABAQDgorSnIAeaUghJ8zj
3ueXRFn0CPu/3y5ivkK2X/8mgtABRuWDCIwK0G+ytiwWgRzu23yrrYP
VhLlERnVHpxoB7hKyOD1dAClDHm+PPrA/Fb3Pr5xkiWAH80KPlb2z9o
Rz12NR1WzzQfwDK4f80a1XjgR0gzM94fW5iU5KXgw+bz2/4OSUtSsPC
Di4SYVESixjvUYhrimf18gMjiIeBZ6oldOgEUzVxVpmBkBHqbiBw0KN
nI4SB0yhiMHvlkgq9tiez72ix59ye/QrSazxpzm2DPnPNj7ZLx3lceg
tC9zAHpRDQ9dFmabbIEUS7Q4BC5zu+zlbvOqa7peqklDEgvuFz root@redhat1
##将密钥添加到web界面的用户中
##Gitlab相关命令集
Command line instructions
Git global setup
git config --global user.name "Administrator"
git config --global user.email "admin@example.com"
Create a new repository
git clone git@gitlab.example.com:root/clsn.git    #ssh的方式
cd clsn
touch README.md
git add README.md
git commit -m "add README"
git push -u origin master
Existing folder
cd existing_folder
git init
git remote add origin git@gitlab.example.com:root/clsn.git
git add .
git commit -m "Initial commit"
git push -u origin master
Existing Git repository
cd existing_repo
git remote rename origin old-origin
git remote add origin git@gitlab.example.com:root/clsn.git
git push -u origin --all
git push -u origin --tags
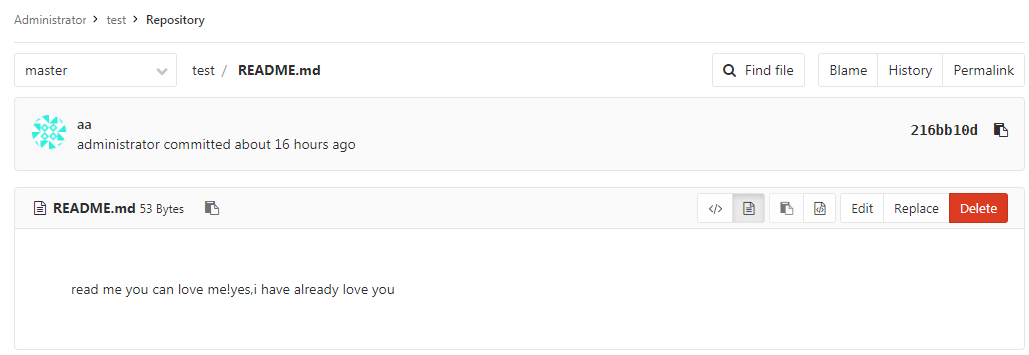
6、在gitlab中创建一个README.md,并写入内容
7、本地部署git,配置远程仓库源,建立git仓库
[root@redhat6]#mkdir /git
[root@redhat6]#cd /git
[root@redhat6 git]# git config --global user.name "administrator"
[root@redhat6 git]# git config --global user.email "wushaoyu@ccxe.com.cn"
[root@redhat6 git]# git clone git@redhat6.9:root/test.git
Initialized empty Git repository in /git/test/.git/
The authenticity of host 'redhat6.9 (192.168.214.103)' can't be established.
RSA key fingerprint is 9c:7b:80:e8:ce:45:74:46:f3:a6:cb:c5:74:00:ff:68.
Are you sure you want to continue connecting (yes/no)? yes
Warning: Permanently added 'redhat6.9,192.168.214.103' (RSA) to the list of known hosts.
remote: Counting objects: 3, done.
remote: Total 3 (delta 0), reused 0 (delta 0)
Receiving objects: 100% (3/3), done.
##向拉取代码中的README.md中追加内容,然后上传到gitlab仓库中
[root@redhat6 test]# echo "yes,i have already love you" >> README.md
[root@redhat6 test]# git add README.md
[root@redhat6 test]# git commit -m 'aa'
1 files changed, 1 insertions(+), 1 deletions(-)
[root@redhat6 test]# git push -u origin master
在web中查看README.md,发现已更新。
补充:若访问gitlab网址出现以下报错

报错原因,一般情况有其二:
1)jenkens默认占用8080端口,而gitlab中也用到了8080端口,产生了冲突,需修改gitlab配置文件(/etc/gitlab/gitlab.rb)的端口或jenkens端口
2)gitlab的timeout设置过小,默认为60
3)gitlab的安装环境内存最少为2G
###查看状态,各服务都正常
 1 [root@redhat1 ~]# gitlab-ctl status
 2 run: gitaly: (pid 3380) 400s; run: log: (pid 2610) 693s
 3 run: gitlab-monitor: (pid 3384) 399s; run: log: (pid 2765) 666s
 4 run: gitlab-workhorse: (pid 3387) 399s; run: log: (pid 2622) 687s
 5 run: logrotate: (pid 3399) 398s; run: log: (pid 2642) 684s
 6 run: nginx: (pid 3405) 398s; run: log: (pid 2629) 686s
 7 run: node-exporter: (pid 3410) 397s; run: log: (pid 2691) 676s
 8 run: postgres-exporter: (pid 3414) 397s; run: log: (pid 2724) 668s
 9 run: postgresql: (pid 3421) 396s; run: log: (pid 2457) 733s
10 run: prometheus: (pid 3429) 396s; run: log: (pid 2676) 678s
11 run: redis: (pid 3437) 395s; run: log: (pid 2400) 739s
12 run: redis-exporter: (pid 3442) 395s; run: log: (pid 2702) 674s
13 run: sidekiq: (pid 3449) 394s; run: log: (pid 2600) 695s
14 run: unicorn: (pid 4326) 3s; run: log: (pid 2569) 697s
###修改gitlab配置文件
1 [root@redhat1 ~]# vim /etc/gitlab/gitlab.rb
2 unicorn['port'] = 8888
3 gitlab_workhorse['auth_backend'] = "http://localhost:8888"
4 注意:unicorn['port']与gitlab_workhorse['auth_backend']的端口必须相同
5 gitlab_rails['webhook_timeout'] = 90           #修改超时时间
6 gitlab_rails['git_timeout']=90                 #修改超时时间

 浙公网安备 33010602011771号