Android Map API与Android Location API 开发应用- [Android开发]
Google对于Android提供的Map扩展库是个好东西,可以轻易开发基于Google Map地图的应用,要注意到的是com.google.android.maps库不是标准的Android sdk内容,如果之前安装sdk时没有安装时,那就需要通过"android sdk and avd manager"来安装Google Map API,如下图: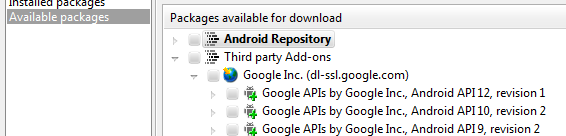
安装完毕就可以进行基于Android map api与Android location api开发应用。
然后在命令提示符下进入该目录,执行命令: keytool -list -keystore debug.keystore,当提示你输入密码时,输入默认的密码android,这样就可以取得MD5值。
最后打开申请Key的网站:申请链接。

记录下API Key,在下一步中就应用到。
开发前的准备工作还差两步就可以完成了,第一个是要建立一个基于Google API的AVD,第二个就是建立一个基于Google API的工程,这两步都是很基本的,就不详说了。
下面我们将通过maps包来实现一个地图浏览的程序。
Step1:修改AndroidManifest.xml文件,在里面定义如下信息:<uses-library android:name="com.google.android.maps"/>,注意该定义的位置(开始自己不仔细,把uses拼写成use而已,找了很久才发现是这里出了错),然后添加应用程序访问网络的权限:<uses-permission android:name="android.permission.INTERNET" />。
Step2:在main.xml中创建MapView,代码如下:
Step3:实现MapActivity,因为继承自MapActivity,所以要实现isRouteDisplayed方法,MapView提供3种模式的地图,如下:
Step4:MapController的使用,如果要设置地图显示的地点以及放大的倍数等,需要使用到MapController来控制地图,可以通过如下代码来获得MapController对象:mMapController=mMapView.getController();
要定位地点,先构建一个GeoPoint对象,然后使用animateTo方法指定位置,如下面代码
Step5:最后付上具体实现的代码清单:
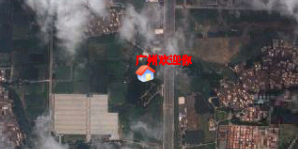
运行截图:
安装完毕就可以进行基于Android map api与Android location api开发应用。
一、开发前的准备工作
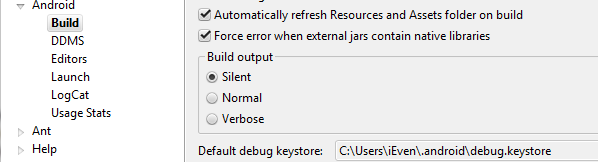
首先需要申请Android Map API Key,因为我们现在只要是进行测试熟悉Google map api的应用,所以可以使用Debug版的证明书即可,通过下图方法找到debug.keystore文件的位置。然后在命令提示符下进入该目录,执行命令: keytool -list -keystore debug.keystore,当提示你输入密码时,输入默认的密码android,这样就可以取得MD5值。
最后打开申请Key的网站:申请链接。
记录下API Key,在下一步中就应用到。
开发前的准备工作还差两步就可以完成了,第一个是要建立一个基于Google API的AVD,第二个就是建立一个基于Google API的工程,这两步都是很基本的,就不详说了。
二、Google Map API的应用
之前下载的扩展包com.google.android.maps中包含了一系列用于在Google Map上显示、控制和层叠信息的功能类,以下是该包中几个最重要的类:- MapActivity:任何想要显示MapView的activity都需要派生自MapActivty,并且在其派生类的onCreate()中,追寻一个MapView实例。
- MapView:用于显示地图的View组件。
- MapController:用于控制地图的移动、缩放等。
- Overlay:可显示于地图之上的可绘制的对象。
- GeoPoint:包含纬度位置的对象。
下面我们将通过maps包来实现一个地图浏览的程序。
Step1:修改AndroidManifest.xml文件,在里面定义如下信息:<uses-library android:name="com.google.android.maps"/>,注意该定义的位置(开始自己不仔细,把uses拼写成use而已,找了很久才发现是这里出了错),然后添加应用程序访问网络的权限:<uses-permission android:name="android.permission.INTERNET" />。
Step2:在main.xml中创建MapView,代码如下:
1 <com.google.android.maps.MapView
2 android:id="@+id/MapView01"
3 android:layout_width="fill_parent"
4 android:layout_height="fill_parent"
5 android:apiKey="03KPIn4oYNLRqlYAsIie3Ad2Gmr1P5uAVBSJ35Q"/>
2 android:id="@+id/MapView01"
3 android:layout_width="fill_parent"
4 android:layout_height="fill_parent"
5 android:apiKey="03KPIn4oYNLRqlYAsIie3Ad2Gmr1P5uAVBSJ35Q"/>
Step3:实现MapActivity,因为继承自MapActivity,所以要实现isRouteDisplayed方法,MapView提供3种模式的地图,如下:
- mMapView.setTraffic(true); //设置为交通模式。
- mMapView.setSatellite(true); //设置为卫星模式。
- mMapView.setStreetView(true); //设置为街道模式。
- mMapView.setBuiltInZoomComtrols(true); //设置地图是否技术缩放。
Step4:MapController的使用,如果要设置地图显示的地点以及放大的倍数等,需要使用到MapController来控制地图,可以通过如下代码来获得MapController对象:mMapController=mMapView.getController();
要定位地点,先构建一个GeoPoint对象,然后使用animateTo方法指定位置,如下面代码
1 //设置起点为广州
2 mGeoPoint = new GeoPoint((int) (23* 1000000), (int) (113* 1000000));
3 //定位到广州
4 mMapController.animateTo(mGeoPoint);
2 mGeoPoint = new GeoPoint((int) (23* 1000000), (int) (113* 1000000));
3 //定位到广州
4 mMapController.animateTo(mGeoPoint);
Step5:最后付上具体实现的代码清单:
package info.ellic.googlemapsample;
import com.google.android.maps.MapActivity;
import com.google.android.maps.MapView;
import android.os.Bundle;
import java.util.List;
import android.graphics.Bitmap;
import android.graphics.BitmapFactory;
import android.graphics.Canvas;
import android.graphics.Paint;
import android.graphics.Point;
import com.google.android.maps.GeoPoint;
import com.google.android.maps.MapController;
import com.google.android.maps.Overlay;
public class GoogleMapSample extends MapActivity
{
private MapView mMapView;
private MapController mMapController;
private GeoPoint mGeoPoint;
/** Called when the activity is first created. */
@Override
public void onCreate(Bundle savedInstanceState)
{
super.onCreate(savedInstanceState);
setContentView(R.layout.main);
mMapView = (MapView) findViewById(R.id.MapView01);
//设置为交通模式
//mMapView.setTraffic(true);
//设置为卫星模式
mMapView.setSatellite(true);
//设置为街景模式
//mMapView.setStreetView(false);
//取得MapController对象(控制MapView)
mMapController = mMapView.getController();
mMapView.setEnabled(true);
mMapView.setClickable(true);
//设置地图支持缩放
mMapView.setBuiltInZoomControls(true);
//设置起点为广州
mGeoPoint = new GeoPoint((int) (23* 1000000), (int) (113* 1000000));
//定位到广州
mMapController.animateTo(mGeoPoint);
//设置倍数(1-21)
mMapController.setZoom(12);
//添加Overlay,用于显示标注信息
MyLocationOverlay myLocationOverlay = new MyLocationOverlay();
List<Overlay> list = mMapView.getOverlays();
list.add(myLocationOverlay);
}
protected boolean isRouteDisplayed()
{
return false;
}
class MyLocationOverlay extends Overlay
{
@Override
public boolean draw(Canvas canvas, MapView mapView, boolean shadow, long when)
{
super.draw(canvas, mapView, shadow);
Paint paint = new Paint();
Point myScreenCoords = new Point();
// 将经纬度转换成实际屏幕坐标
mapView.getProjection().toPixels(mGeoPoint, myScreenCoords);
paint.setStrokeWidth(1);
paint.setARGB(255, 255, 0, 0);
paint.setStyle(Paint.Style.STROKE);
Bitmap bmp = BitmapFactory.decodeResource(getResources(), R.drawable.home);
canvas.drawBitmap(bmp, myScreenCoords.x, myScreenCoords.y, paint);
canvas.drawText("广州欢迎你", myScreenCoords.x, myScreenCoords.y, paint);
return true;
}
}
}
运行截图:
三、定位系统的应用
四、基于Google map api的创意应用
@:卿之 → http://www.cnblogs.com/wpdev
©:博文是本人当时的学习笔记及知识整理,由于自身局限错误在所难免,敬请斧正.
©:本文版权属于博客园和本人,版权基于署名 2.5 中国大陆许可协议发布,欢迎转载,但未经作者同意必须保留此段声明,且在文章页面明显位置给出原文连接和署名卿之(包含链接),不得删节,否则保留追究法律责任的权利。

 浙公网安备 33010602011771号