

Asp.net core下利用EF core实现从数据实现多租户(3): 按Schema分离 附加:EF Migration 操作
前言
前段时间写了EF core实现多租户的文章,实现了根据数据库,数据表进行多租户数据隔离。
今天开始写按照Schema分离的文章。
其实还有一种,是通过在数据表内添加一个字段做多租户的,但是这种模式我不打算讲了。
如果大家看了文章感觉完全衔接不上,可以先看看前面的系列文章:
Asp.net core下利用EF core实现从数据实现多租户(1)
Asp.net core下利用EF core实现从数据实现多租户(2) : 按表分离
EF core (code first) 通过自定义 Migration History 实现多租户使用同一数据库时更新数据库结构
关于EF core自动迁移:
可能有朋友会觉得EF core不使用自动迁移就偏离了EF core的设计初衷。其实我觉得技术是实施的手段,而不是束缚项目的绊脚石。
1. 首先EF core并不是只有code first模式,
2. 其次EF core对db first模式支持很好,对于一些经历几年发展的项目会更加友好,因为对旧数据库进行O/R不是1,2周可以完成的,
3. 再次在以往的EF migration经验中,即使项目完全按照code first模式发展,但实际上更新数据库的并不是通过的Web项目,而是通过一个控制台,里面包含了Migration文件、数据迁移、结构校验数据校验。
这个控制台,一般通过CI/CD执行或手动执行。这是由于数据量、系统结构(例如多租户等)决定的。
所以,EF core的自动迁移不是这个系列文章的主线主分支
如果想参考自动迁移的实施步骤,欢迎查看我的另一篇文章,是根据本文背景实现的自动迁移实施步骤:
EF core (code first) 通过自动迁移实现多租户数据分离 :按Schema分离数据
实施
项目介绍
本项目是用系列文章的主分支代码进行修改的。目前项目主要支持使用MySql,通过分库,分表实现多租户。
本文需要实现分Schema,MySql不能实现,所以引入了MSSqlServer。
项目依赖
1. .net core app 3.1。在机器上安装好.net core SDK, 版本3.1
2. Mysql. 使用 Pomelo.EntityFrameworkCore.MySql 包, 版本3.1.1
3. MS Sql Server. 使用 Microsoft.EntityFrameworkCore.SqlServer 包,版本3.1.1 (本文新增的依赖)
3. EF core,Microsoft.EntityFrameworkCore, 版本3.1.1。这里必须要用3.1的,因为ef core3.0是面向.net standard 2.1.
实施步骤
1. 由于我们引入了MsSql,所以要对 MultipleTenancyExtension 进行修改,对立面的所有方法都要添加db类型进行传参。
修改 AddDatabase 方法,立面需要对sql server和MySql进行判断


 1 internal static IServiceCollection AddDatabase<TDbContext>(this IServiceCollection services,
 2                 ConnectionResolverOption option)
 3             where TDbContext : DbContext, ITenantDbContext
 4 {
 5     services.AddSingleton(option);
 6
 7     services.AddScoped<TenantInfo>();
 8     services.AddScoped<ISqlConnectionResolver, TenantSqlConnectionResolver>();
 9
10     services.AddDbContext<TDbContext>((serviceProvider, options) =>
11     {
12         var dbContextManager = serviceProvider.GetService<IDbContextManager>();
13         var resolver = serviceProvider.GetRequiredService<ISqlConnectionResolver>();
14
15         DbContextOptionsBuilder dbOptionBuilder = null;
16         switch (option.DBType)
17         {
18             case DatabaseIntegration.SqlServer:
19                 dbOptionBuilder = options.UseSqlServer(resolver.GetConnection());
20                 break;
21             case DatabaseIntegration.Mysql:
22                 dbOptionBuilder = options.UseMySql(resolver.GetConnection());
23                 break;
24             default:
25                 throw new System.NotSupportedException("db type not supported");
26         }
27         if (option.Type == ConnectionResolverType.ByTabel || option.Type == ConnectionResolverType.BySchema)
28         {
29             dbOptionBuilder.ReplaceService<IModelCacheKeyFactory, TenantModelCacheKeyFactory<TDbContext>>();
30         }
31     });
32
33     return services;
34 }
添加2个 AddTenantDatabasePerSchema 方法,实现根据Schema的分离
 1 public static IServiceCollection AddTenantDatabasePerSchema<TDbContext>(this IServiceCollection services,
 2         string connectionStringName, string key = "default")
 3     where TDbContext : DbContext, ITenantDbContext
 4 {
 5     var option = new ConnectionResolverOption()
 6     {
 7         Key = key,
 8         Type = ConnectionResolverType.BySchema,
 9         ConnectinStringName = connectionStringName,
10         DBType = DatabaseIntegration.SqlServer
11     };
12
13
14     return services.AddTenantDatabasePerSchema<TDbContext>(option);
15 }
16
17 public static IServiceCollection AddTenantDatabasePerSchema<TDbContext>(this IServiceCollection services,
18         ConnectionResolverOption option)
19     where TDbContext : DbContext, ITenantDbContext
20 {
21     if (option == null)
22     {
23         option = new ConnectionResolverOption()
24         {
25             Key = "default",
26             Type = ConnectionResolverType.BySchema,
27             ConnectinStringName = "default",
28             DBType = DatabaseIntegration.SqlServer
29         };
30     }
31
32     return services.AddTenantDatabasePerTable<TDbContext>(option);
33 }
2. 添加 DatabaseIntegration 枚举,用于标记db的类型
1 public enum DatabaseIntegration
2 {
3     None = 0,
4     Mysql = 1,
5     SqlServer = 2
6 }
3. 修改 TenantSqlConnectionResolver 类立面的GetConection 方法,在switch中添加添加一个case。就是代码中高亮部分
 1 public string GetConnection()
 2 {
 3     string connectionString = null;
 4     switch (this.option.Type)
 5     {
 6         case ConnectionResolverType.ByDatabase:
 7             connectionString = configuration.GetConnectionString(this.tenantInfo.Name);
 8             break;
 9         case ConnectionResolverType.ByTabel:
10         case ConnectionResolverType.BySchema:
11             connectionString = configuration.GetConnectionString(this.option.ConnectinStringName);
12             break;
13     }
14
15     if (string.IsNullOrEmpty(connectionString))
16     {
17         throw new NullReferenceException("can not find the connection");
18     }
19     return connectionString;
20 }
4. 修改 StoreDbContext 里的 OnModelCreating 方法,把之前按照Table分离数据的代码注释,重新添加按Schema分离数据的代码。
这里需要注意的是,在项目目前的结构,同一个DbContext,同时只能支持按Table或Schema其中的一种。
其实实际项目中,也的确没有必要需要对一个DbContext同时支持Table或Schema的支持,因为本质上这2种方式都是同时保存在一个数据库。
不过这是能实现的,本文暂不做实现。
1 protected override void OnModelCreating(ModelBuilder modelBuilder)
2 {
3     // seperate by table
4     // modelBuilder.Entity<Product>().ToTable(this.tenantInfo.Name + "_Products");
5
6     // seperate by Schema
7     modelBuilder.Entity<Product>().ToTable(nameof(this.Products), "dbo."+this.tenantInfo.Name);
8 }
5. 修改 Startup 类里面的 ConfigureServices 方法,把之前按照Table分离数据的注入代码注释,重新添加新的代码。
1 public void ConfigureServices(IServiceCollection services)
2 {
3     // services.AddConnectionByDatabase<StoreDbContext>();
4     // services.AddTenantDatabasePerTable<StoreDbContext>("default");
5     services.AddTenantDatabasePerSchema<StoreDbContext>("mssql");
6     services.AddControllers();
7 }
验证效果
启动项目
本文没有加入EF core的自动迁移代码,如果需要需要查看如果实现自动迁移,请参考我的另一篇文章,是系列文章的附加内容,并不是项目中的主要内容。
自动迁移文章
EF core (code first) 通过自动迁移实现多租户数据分离 :按Schema分离数据
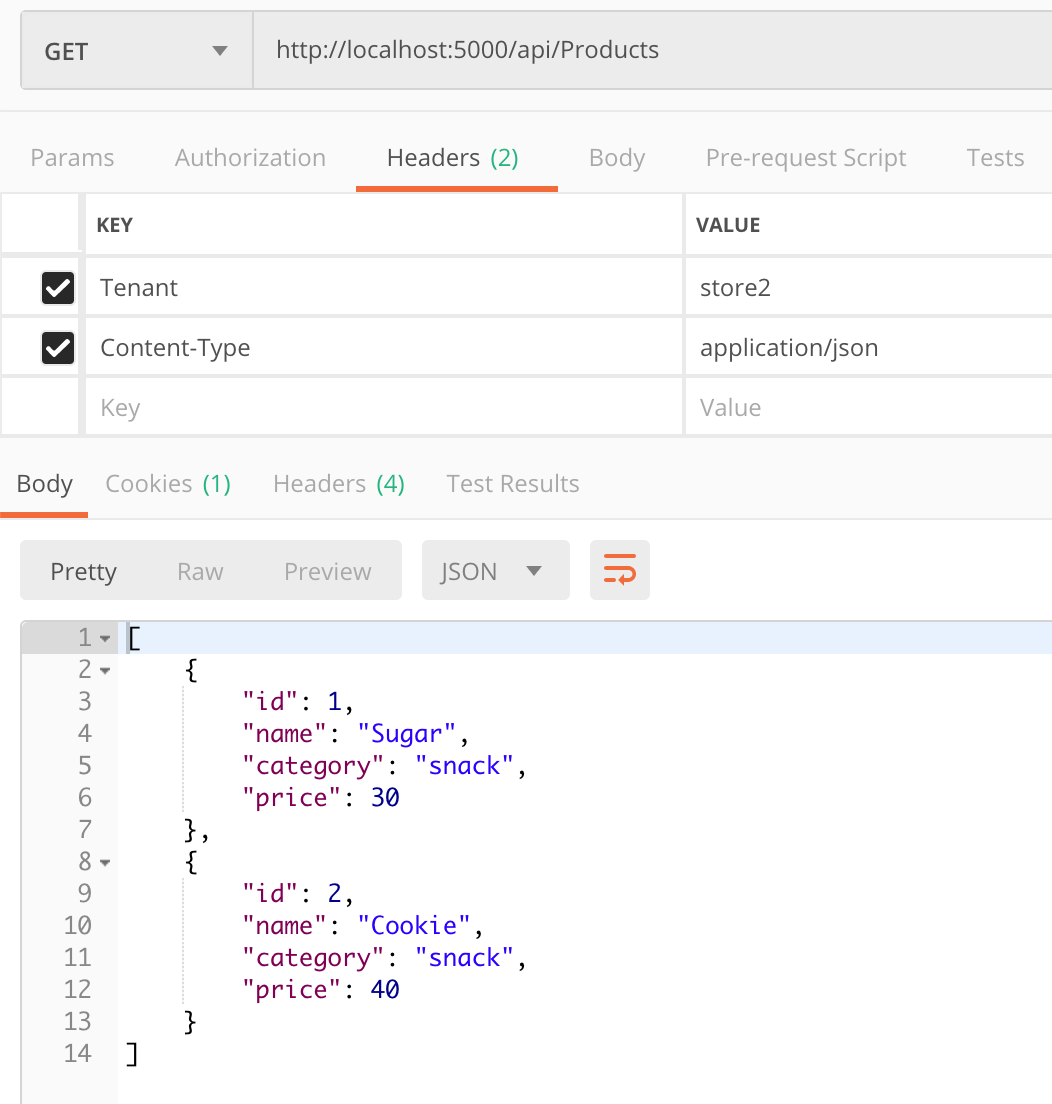
调用接口
1. 我们还是跟本系列的其他文章一样,分别在store1和store2中添加数据。
其中怎么添加的就不再重复贴图了,简单来说就是调用controller的post方法在数据库中添加数据
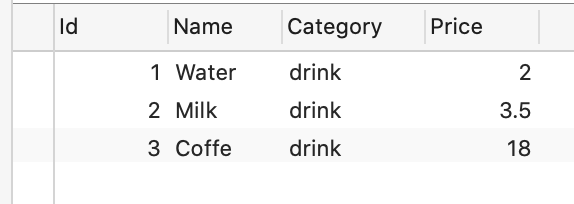
下面是store1的查询结果

store2的查询结果
查看数据库数据和结构
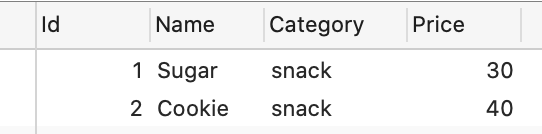
可以看到在multiple_tenancy_default3里面,有4个Schema,其中 dbo.store1 和 dob.store2 是存放我们的表。

store1中的数据
store2中的数据
总结
本文跟本系列一样,都是非常简单的实操性指引。完成本文之后,实际上已经实现了本项目的所有需求,分别是按数据库,按表,按Schema分离数据。
但是如果把这种代码结构全搬进去实际商用项目中,还是操之过早,希望阁下可以等待我们把代码结构整理和抽象后再结合到项目。因为系列主线文章比较简单,这种代码结构实际上不适合项目长期发展。
关于代码
本系列文章全部在github上。
请查看part3分支的代码
https://github.com/woailibain/EFCore.MultipleTenancyDemo/tree/part3

 浙公网安备 33010602011771号