《图像处理实例》 之 拓扑重建
拓扑重建
这是http://www.imagepy.org/的作者原创,我只是对其理解之后改进和说明,欢迎大家使用这个小软件!
第一个用Python写的小项目,不算自创的,大部分都是参考别人的,由于第一次用python写opencv遇到了无数的问题,最后也算完成了。
opencv的入门我就不写了,以前都学过差不多,在此记录一下基础!
基础操作
首先说一下python条件下用opencv,重点记录,不重点看文档就好!
1.如何创建一个空白图片
A.
1 test = np.array([[0,255,0],[0,0,0],[0,0,0]])
2 np.array([[0,255,0],[0,0,0],[0,0,0]],np.uint8)#千万别写成这种格式,他把格式也存进去了
B.
1 showImage = np.zeros((inputImage.shape[0],inputImage.shape[1],3),np.uint8)
C.
1 showImage = inputImage.copy()
2 showImage = cv2.cvtColor(showImage,cv2.COLOR_GRAY2BGR)
2.如何读写一个图片
A.
1 img[j,i] = 255#单通道读写
B.
1 #三通道读写
2 img[j,i,0]= 255
3 img[j,i,1]= 255
4 img[j,i,2]= 255
C.
1 img.itemset((10,10,2),100)#写入
2 img.item(10,10,2)#读
3.画图形
1 cv2.circle(showImage,(j+1,i+1), 5, (0,0,255), -1)#画圆注意圆心是X,Y
4.python大部分函数都有返回值
#python的函数貌似都有返回值
img = cv2.cvtColor(img,cv2.COLOR_BGR2GRAY)
ret2,img = cv2.threshold(img,0,255,cv2.THRESH_BINARY | cv2.THRESH_OTSU)
5.
1 Shape of image is accessed by img.shape. It returns a tuple of number of rows, columns and channels
1 Total number of pixels is accessed by img.size:
1 Image datatype is obtained by img.dtype:
骨架提取
废话说了不少开始实战了:

在此说明:
本程序和算法主要参考:http://www.cnblogs.com/xianglan/archive/2011/01/01/1923779.html写的非常好,大家初学直接看大佬的博客就行了。
本文后续拓普重建主要是:https://github.com/yxdragon/sknw没有看这位大佬的程序,但是他的思想帮助我很多。
因为得到别人帮助才有我自己的收获,所以乐于分享其他初学者!
以下是和大佬的对话,没经过本人同意所以打了马,非常乐于助人的大佬!


  1 import cv2
  2 import numpy as np
  3 from matplotlib import pyplot as plt
  4
  5 array = [0,0,1,1,0,0,1,1,1,1,0,1,1,1,0,1,\
  6          1,1,0,0,1,1,1,1,0,0,0,0,0,0,0,1,\
  7          0,0,1,1,0,0,1,1,1,1,0,1,1,1,0,1,\
  8          1,1,0,0,1,1,1,1,0,0,0,0,0,0,0,1,\
  9          1,1,0,0,1,1,0,0,0,0,0,0,0,0,0,0,\
 10          0,0,0,0,0,0,0,0,0,0,0,0,0,0,0,0,\
 11          1,1,0,0,1,1,0,0,1,1,0,1,1,1,0,1,\
 12          0,0,0,0,0,0,0,0,0,0,0,0,0,0,0,0,\
 13          0,0,1,1,0,0,1,1,1,1,0,1,1,1,0,1,\
 14          1,1,0,0,1,1,1,1,0,0,0,0,0,0,0,1,\
 15          0,0,1,1,0,0,1,1,1,1,0,1,1,1,0,1,\
 16          1,1,0,0,1,1,1,1,0,0,0,0,0,0,0,0,\
 17          1,1,0,0,1,1,0,0,0,0,0,0,0,0,0,0,\
 18          1,1,0,0,1,1,1,1,0,0,0,0,0,0,0,0,\
 19          1,1,0,0,1,1,0,0,1,1,0,1,1,1,0,0,\
 20          1,1,0,0,1,1,1,0,1,1,0,0,1,0,0,0]
 21
 22 def Thin(image,array):
 23     '''未改进算法'''
 24     #midImage = image.copy()
 25     for i in range(image.shape[0]-2):
 26         for j in range(image.shape[1]-2):
 27             if image[i+1,j+1] == 0:
 28                 a = [1]*9           #定义list[9]
 29                 for k in range(3):
 30                     for l in range(3):
 31                         a[k*3+l] = 0 if image[i+k,j+l]==0 else 1
 32                 sum = a[0]*1+a[1]*2+a[2]*4+a[3]*8+a[5]*16+a[6]*32+a[7]*64+a[8]*128
 33                 image[i+1,j+1] = array[sum]*255
 34     return image
 35
 36 def HThin(image,array):
 37     flag = True         #如果该点被删除,跳过下一个点
 38     midImage = image.copy()
 39     for i in range(image.shape[0]-2):
 40         for j in range(image.shape[1]-2):
 41             if flag == False:
 42                 flag == True
 43             else:
 44                 if image[i+1,j+1] == 0 and (image[i+1,j] != 0 or image[i+1,j+2] != 0):#左右都为黑点不处理
 45                     a = [1]*9           #定义list[9]
 46                     for k in range(3):
 47                         for l in range(3):
 48                             a[k*3+l] = 0 if midImage[i+k,j+l]==0 else 1
 49                     sum = a[0]*1+a[1]*2+a[2]*4+a[3]*8+a[5]*16+a[6]*32+a[7]*64+a[8]*128
 50                     midImage[i+1,j+1] = array[sum]*255
 51     return midImage
 52 def VThin(image,array):
 53     flag = True         #如果该点被删除,跳过下一个点
 54     midImage = image.copy()
 55     for i in range(image.shape[1]-2):
 56         for j in range(image.shape[0]-2):
 57             if flag == False:
 58                 flag == True
 59             else:
 60                 if image[j+1,i+1] == 0 and (image[j,i+1] != 0 or image[j+2,i+1] != 0):#左右都为黑点不处理
 61                     a = [1]*9           #定义list[9]
 62                     for k in range(3):
 63                         for l in range(3):
 64                             a[k*3+l] = 0 if midImage[j+k,i+l]==0 else 1
 65                     sum = a[0]*1+a[1]*2+a[2]*4+a[3]*8+a[5]*16+a[6]*32+a[7]*64+a[8]*128
 66                     midImage[j+1,i+1] = array[sum]*255
 67     return midImage
 68
 69 def wjy_Bone(inputImage,num=100):
 70      '''改进算法'''
 71      for i in range(num):
 72          inputImage = VThin(HThin(inputImage,array),array)
 73      return inputImage
 74
 75 def ThredImage(image,thred):
 76     '''二值化图像'''
 77     imageGray = cv2.cvtColor(image,cv2.COLOR_BGR2GRAY)
 78     midimage = np.zeros((imageGray.shape[0],imageGray.shape[1]),imageGray.dtype)
 79     for i in range(imageGray.shape[0]):
 80         for j in range(imageGray.shape[1]):
 81             midimage[i,j] = 0 if imageGray[i,j] < int(thred) else 255
 82     return midimage
 83
 84 def drawBone(inputImage):
 85     #showImage = np.zeros((inputImage.shape[0],inputImage.shape[1],3),np.uint8)
 86     showImage = inputImage.copy()
 87     showImage = cv2.cvtColor(showImage,cv2.COLOR_GRAY2BGR)
 88     for i in range(inputImage.shape[0]-2):
 89         for j in range(inputImage.shape[1]-2):
 90             if inputImage[i+1,j+1] == 255 : continue
 91             flag = -1
 92             for J in range(3):
 93                 for K in range(3):
 94                     if inputImage[i+J,j+K] == 0:
 95                         flag += 1
 96             if(flag==1 or flag>=3):
 97                 showImage = cv2.circle(showImage,(j+1,i+1), 5, (0,0,255), -1)
 98                 showImage[i+1,j+1,0] = 255
 99                 showImage[i+1,j+1,1] = 0
100                 showImage[i+1,j+1,2] = 0
101     return showImage
102
103 if __name__ == '__main__':
104     img = cv2.imread("5.jpg")
105     #test = np.array([[0,255,0],[0,0,0],[0,0,0]])
106     #千万写写成np.array([[0,255,0],[0,0,0],[0,0,0]],np.uint8)
107     img = cv2.cvtColor(img,cv2.COLOR_BGR2GRAY)
108     ret2,img = cv2.threshold(img,0,255,cv2.THRESH_BINARY | cv2.THRESH_OTSU)
109     #testImage = Thin(img,array)
110     #testImage = wjy_Bone(img)
111     testImage = drawBone(wjy_Bone(img,10))
112     plt.imshow(testImage,cmap='gray',interpolation = 'bicubic')
113     plt.show()
114
轮廓追溯
第一步:
对骨架提取之后的图片变换成(0,1)图,骨架为0,背景为1
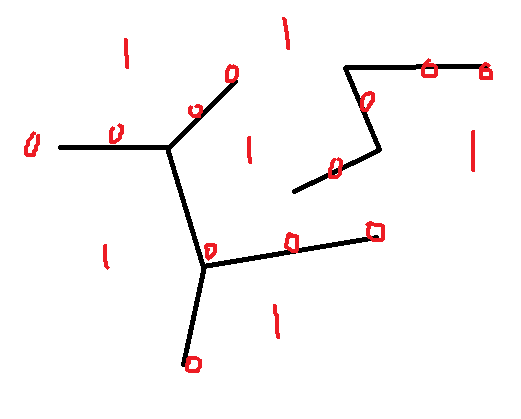
第二步:
提取骨架角点,方法在骨架提取的时候有说明。

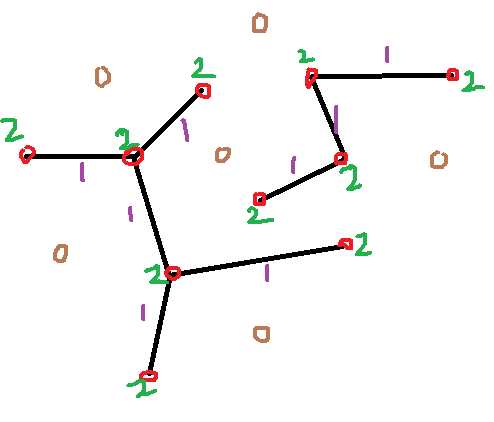
第三步:
在提取角点的基础上标记骨架图,对角点标记为2,对轮廓标记为1,对背景标记为0
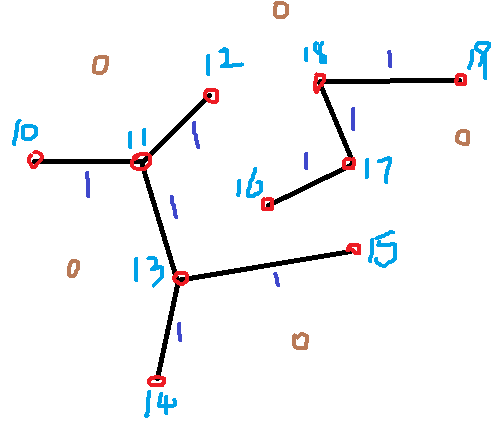
第四步:
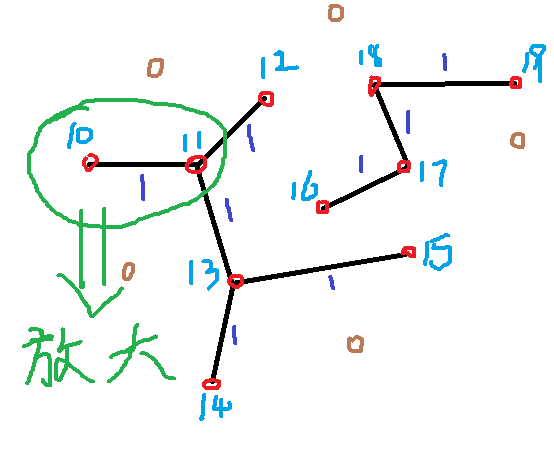
对角点进行标记区分,10、11、12、13.......
第五步:(此处是对程序的另行说明,是整个程序核心点)
对标号点进行路径追溯操作
先说本程序使用的方法:
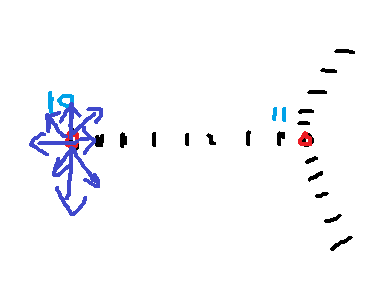
先从角点进行周围检测,找边缘
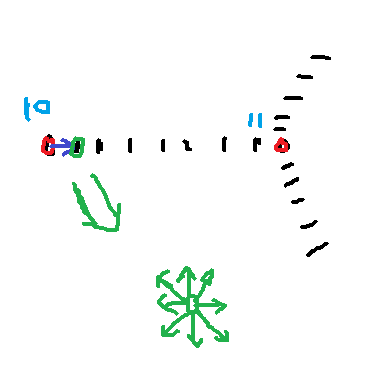
以找到的边界点为中心向四周寻找边界(角点)
在寻找路径的过程中把路径的点记录下来。
防止寻找重复,就是在寻找之后把路径清除。
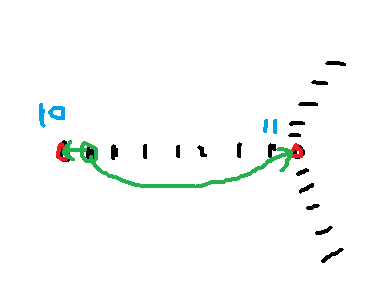
找的结果就是10和11这两个点
再说说我自己的想法:
我的想法比本程序的稍微简单一些,思路基本是相同的。就是直接以角点为基础向四周寻找角点。

第六步:
把得到的角点和路径存放到一个“图”中,这样使用的时候就非常方便了
PS:图我还没有学过,这里不过多说明。
上代码:
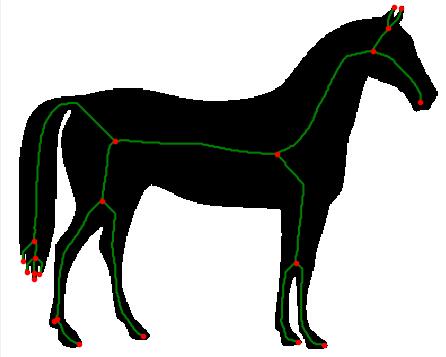
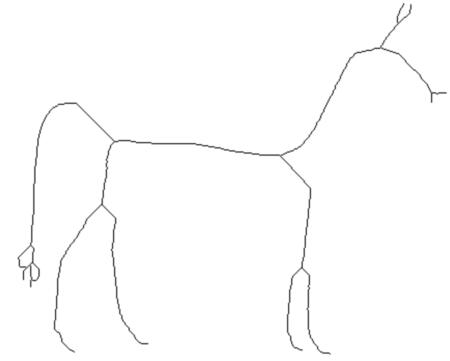
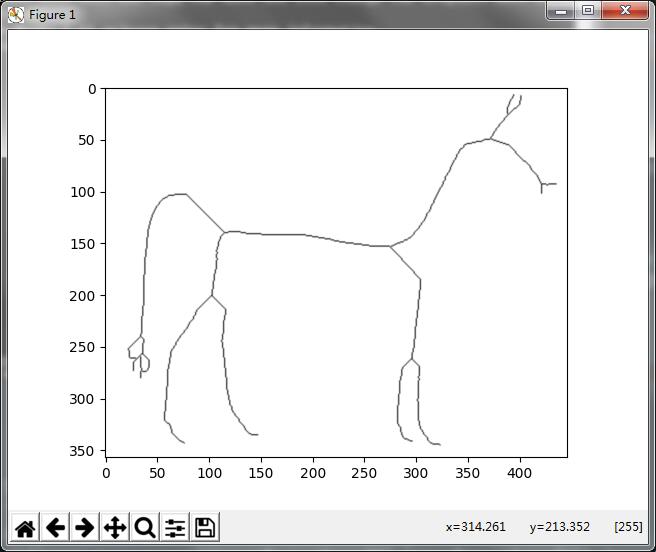
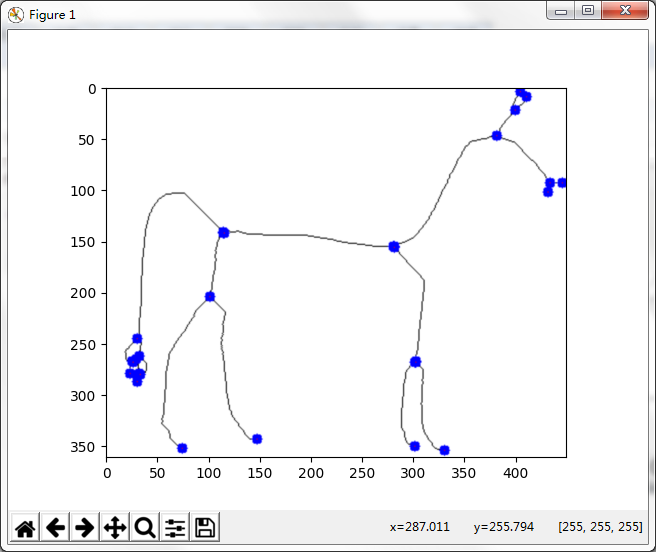
  1 from cv2 import *
  2 import numpy as np
  3 import matplotlib.pyplot as plt
  4 import networkx as nx
  5 from numba import jit
  6
  7 @jit# get neighbors d index
  8 #得到领域的坐标(如果是二维直接算可以,但如果是三维就不一样了)
  9 #这里是作者的改进适合多维图像,每句话的含义我没有弄懂
 10 def neighbors(shape):#传进来的是二值图,所以维度是2
 11     '''答案是:[-1921 -1920 -1919    -1     1  1919  1920  1921]'''
 12     dim = len(shape)
 13     block = np.ones([3]*dim)    #维度为dim,数据3X3
 14     block[tuple([1]*dim)] = 0     #取[1,1]位置为0
 15     idx = np.where(block>0)          #非零区域的位置信息
 16     idx = np.array(idx, dtype=np.uint8).T   #idx转换成矩阵,并且转置
 17     idx = np.array(idx-[1]*dim)             #全部值减一
 18     acc = np.cumprod((1,)+shape[::-1][:-1]) #叠乘
 19     return np.dot(idx, acc[::-1])           #点乘
 20
 21 @jit # my mark
 22     #标记骨架图每个点的含义
 23     #0:不是骨架
 24     #1:骨架路径上的点
 25     #2:端点或者角点
 26 def mark(img): # mark the array use (0, 1, 2)
 27     nbs = neighbors(img.shape)
 28     img = img.ravel()
 29     for p in range(len(img)):
 30         if img[p]==0:continue
 31         s = 0
 32         '''判断中心点领域八个点的情况'''
 33         for dp in nbs:
 34             if img[p+dp]!=0:s+=1
 35         if s==2:img[p]=1
 36         else:img[p]=2
 37
 38
 39 @jit  # trans index to r, c...
 40 # 坐标转换,图像被转换成一行处理,现在得把关键点转换回来(x,y)
 41 def idx2rc(idx, acc):
 42     rst = np.zeros((len(idx), len(acc)), dtype=np.int16)
 43     for i in range(len(idx)):
 44         for j in range(len(acc)):
 45             rst[i, j] = idx[i] // acc[j]
 46             idx[i] -= rst[i, j] * acc[j]
 47     return rst
 48
 49
 50 @jit  # fill a node (may be two or more points)
 51 # 标记节点,把节点打上不同的编码img.copy()=(2,2,2,2.....)----->>>>(10,11,12,13......)
 52 # 并且把行坐标转换成(x,y)类型的坐标存放
 53 def fill(img, p, num, nbs, acc, buf):
 54     back = img[p]  # 位置点的值存放
 55     img[p] = num  # 计数值
 56     buf[0] = p  # 位置点存放
 57     cur = 0;
 58     s = 1;
 59     while True:
 60         p = buf[cur]  #
 61         for dp in nbs:
 62             cp = p + dp
 63             if img[cp] == back:
 64                 img[cp] = num
 65                 buf[s] = cp
 66                 s += 1
 67         cur += 1
 68         if cur == s: break
 69     return idx2rc(buf[:s], acc)
 70
 71
 72 @jit # trace the edge and use a buffer, then buf.copy, if use [] numba not works
 73 #路径跟踪找边缘
 74 def trace(img, p, nbs, acc, buf):
 75     '''这里的c1和c2是找的一条路径的两个端点,存放的端点标记>=10'''
 76     c1 = 0
 77     c2 = 0
 78     newp = 0        #更新之后的位置
 79     cur = 0            #计数,用来计算路径上点的数量
 80
 81     b = p==97625    #b = (p==97625)
 82     #while找的是一条路径(具体说明请看附图)
 83     while True:
 84         buf[cur] = p#位置存储
 85         img[p] = 0    #当前位置置0(搜索过得路径置0,防止重复搜索)
 86         cur += 1    #光标加一(移动一个位置)
 87         for dp in nbs:
 88             cp = p + dp
 89             if img[cp] >= 10:#判断是否为端点
 90                 if c1==0:    c1=img[cp]#找的第一个端点()
 91                 else:         c2 = img[cp]#
 92             if img[cp] == 1:
 93                 newp = cp
 94         p = newp
 95         if c2!=0:break
 96     return (c1-10, c2-10, idx2rc(buf[:cur], acc))
 97
 98
 99 @jit  # parse the image then get the nodes and edges
100 # 找节点和边缘
101 def parse_struc(img):
102     nbs = neighbors(img.shape)
103     acc = np.cumprod((1,) + img.shape[::-1][:-1])[::-1]  # (1,img.shape[0])
104     img = img.ravel()
105     pts = np.array(np.where(img == 2))[0]
106     buf = np.zeros(20, dtype=np.int64)
107     num = 10
108     nodes = []
109     for p in pts:
110         if img[p] == 2:
111             nds = fill(img, p, num, nbs, acc, buf)
112             num += 1
113             nodes.append(nds)
114
115     buf = np.zeros(10000, dtype=np.int64)
116     edges = []
117     # 这个for循环是找一个点上对应的多个路径
118     for p in pts:
119         for dp in nbs:
120             if img[p + dp] == 1:  # 找路径,img路径点值为1
121                 edge = trace(img, p + dp, nbs, acc, buf)
122                 edges.append(edge)
123     return nodes, edges
124
125
126 # use nodes and edges build a networkx graph
127 #将建立的节点和路径存放到NX的图中
128 def build_graph(nodes, edges):
129     graph = nx.Graph()
130     for i in range(len(nodes)):
131         graph.add_node(i, pts=nodes[i], o=nodes[i].mean(axis=0))
132     for s,e,pts in edges:
133         l = np.linalg.norm(pts[1:]-pts[:-1], axis=1).sum()
134         graph.add_edge(s,e, pts=pts, weight=l)
135     return graph
136 #建立一个图
137 def build_sknw(ske):
138     mark(ske)
139     nodes, edges = parse_struc(ske.copy())
140     return build_graph(nodes, edges)
141 #画出一个'图'
142 # draw the graph
143 def draw_graph(img, graph):
144     for idx in graph.nodes():
145         pts = graph.node[idx]['pts']
146         img[pts[:,0], pts[:,1]] = 255
147     for (s, e) in graph.edges():
148         pts = graph[s][e]['pts']
149         img[pts[:,0], pts[:,1]] = 128
150
151 array = [0,0,1,1,0,0,1,1,1,1,0,1,1,1,0,1,
152          1,1,0,0,1,1,1,1,0,0,0,0,0,0,0,1,
153          0,0,1,1,0,0,1,1,1,1,0,1,1,1,0,1,
154          1,1,0,0,1,1,1,1,0,0,0,0,0,0,0,1,
155          1,1,0,0,1,1,0,0,0,0,0,0,0,0,0,0,
156          0,0,0,0,0,0,0,0,0,0,0,0,0,0,0,0,
157          1,1,0,0,1,1,0,0,1,1,0,1,1,1,0,1,
158          0,0,0,0,0,0,0,0,0,0,0,0,0,0,0,0,
159          0,0,1,1,0,0,1,1,1,1,0,1,1,1,0,1,
160          1,1,0,0,1,1,1,1,0,0,0,0,0,0,0,1,
161          0,0,1,1,0,0,1,1,1,1,0,1,1,1,0,1,
162          1,1,0,0,1,1,1,1,0,0,0,0,0,0,0,0,
163          1,1,0,0,1,1,0,0,0,0,0,0,0,0,0,0,
164          1,1,0,0,1,1,1,1,0,0,0,0,0,0,0,0,
165          1,1,0,0,1,1,0,0,1,1,0,1,1,1,0,0,
166          1,1,0,0,1,1,1,0,1,1,0,0,1,0,0,0]
167
168 @jit#横向细化
169 def HThin(image,array):
170     flag = True         #如果该点被删除,跳过下一个点
171     midImage = image.copy()
172     for i in range(image.shape[0]-2):
173         for j in range(image.shape[1]-2):
174             if flag == False:
175                 flag = True
176             else:
177                 if image[i+1,j+1] == 0 and (image[i+1,j] != 0 or image[i+1,j+2] != 0):#左右都为黑点不处理
178                     a = [0]*9           #定义list[9]
179                     for k in range(3):
180                         for l in range(3):
181                             a[k*3+l] = 0 if midImage[i+k,j+l]==0 else 1
182                     sum = a[0]*1+a[1]*2+a[2]*4+a[3]*8+a[5]*16+a[6]*32+a[7]*64+a[8]*128
183                     midImage[i+1,j+1] = array[sum]*255
184     return midImage
185 @jit#纵向细化
186 def VThin(image,array):
187     flag = True         #如果该点被删除,跳过下一个点
188     midImage = image.copy()
189     for i in range(image.shape[1]-2):
190         for j in range(image.shape[0]-2):
191             if flag == False:
192                 flag = True
193             else:
194                 if image[j+1,i+1] == 0 and (image[j,i+1] != 0 or image[j+2,i+1] != 0):#左右都为黑点不处理
195                     a = [0]*9           #定义list[9]
196                     for k in range(3):
197                         for l in range(3):
198                             a[k*3+l] = 0 if midImage[j+k,i+l]==0 else 1
199                     sum = a[0]*1+a[1]*2+a[2]*4+a[3]*8+a[5]*16+a[6]*32+a[7]*64+a[8]*128
200                     midImage[j+1,i+1] = array[sum]*255
201     return midImage
202 @jit#横向和纵向合并
203 def wjy_Bone(inputImage,num=100):
204      '''改进算法'''
205      for i in range(num):
206          inputImage = VThin(HThin(inputImage,array),array)
207      return inputImage
208 @jit#骨架提取
209 def drawBone(inputImage):
210     #showImage = np.zeros((inputImage.shape[0],inputImage.shape[1],3),np.uint8)
211     showImage = inputImage.copy()
212     showImage = cvtColor(showImage,COLOR_GRAY2BGR)
213     for i in range(inputImage.shape[0]-2):
214         for j in range(inputImage.shape[1]-2):
215             if inputImage[i+1,j+1] > 0 : continue
216             flag = -1
217             for J in range(3):
218                 for K in range(3):
219                     if inputImage[i+J,j+K] == 0:
220                         flag += 1
221             if(flag==1 or flag>=3):
222                 showImage = circle(showImage,(j+1,i+1), 5, (0,0,255), -1)
223                 showImage[i+1,j+1,0] = 255
224                 showImage[i+1,j+1,1] = 0
225                 showImage[i+1,j+1,2] = 0
226     return showImage
227
228 if __name__ == '__main__':
229     img = imread('5.jpg')
230     img = cvtColor(img,COLOR_BGR2GRAY)
231     ret2, img = threshold(img, 0, 255, THRESH_BINARY | THRESH_OTSU)
232     #wjy2 = drawBone(wjy_Bone(img, num = 500))
233     img = wjy_Bone(img,num=500).astype(np.uint16)#细化之后从uint8转换到uint16
234     img = np.where(img > 0, np.uint16(img/255),0)
235     img = np.where(img > 0, img - 1 , img + 1)
236     graph = build_sknw(img)#这里传进来的图像数值为(0 or 1) ,类型是uint16
237
238     plt.imshow(img, cmap='gray')
239     for (s, e) in graph.edges():
240         ps = graph[s][e]['pts']
241         plt.plot(ps[:, 1], ps[:, 0], 'green')
242
243     node, nodes = graph.node, graph.nodes()
244     ps = np.array([node[i]['o'] for i in nodes])
245     plt.plot(ps[:, 1], ps[:, 0], 'r.')
246     plt.title('Build Graph')
247     plt.show()
不是太完美的图,应该是细化出问题了
推广一下大佬的开源项目:http://www.imagepy.org/开源的精神值得我们学习,问问题的时候尽量发个红包,不在多少在心意。
参考:
http://blog.csdn.net/sunny2038/article/details/9080047 (基础操作)
http://opencv-python-tutroals.readthedocs.io/en/latest/py_tutorials/py_core/py_basic_ops/py_basic_ops.html#basic-ops (英文文档)
-------------------------------------------
个性签名:衣带渐宽终不悔,为伊消得人憔悴!
如果觉得这篇文章对你有小小的帮助的话,记得关注再下的公众号,同时在右下角点个“推荐”哦,博主在此感谢!


 浙公网安备 33010602011771号