Bullet 学习笔记之 Rigid Body Physics Pipeline
在 Bullet User Manual 第3章 Library Overview 中,介绍了 Bullet Physics 的 pipeline,如下图所示:
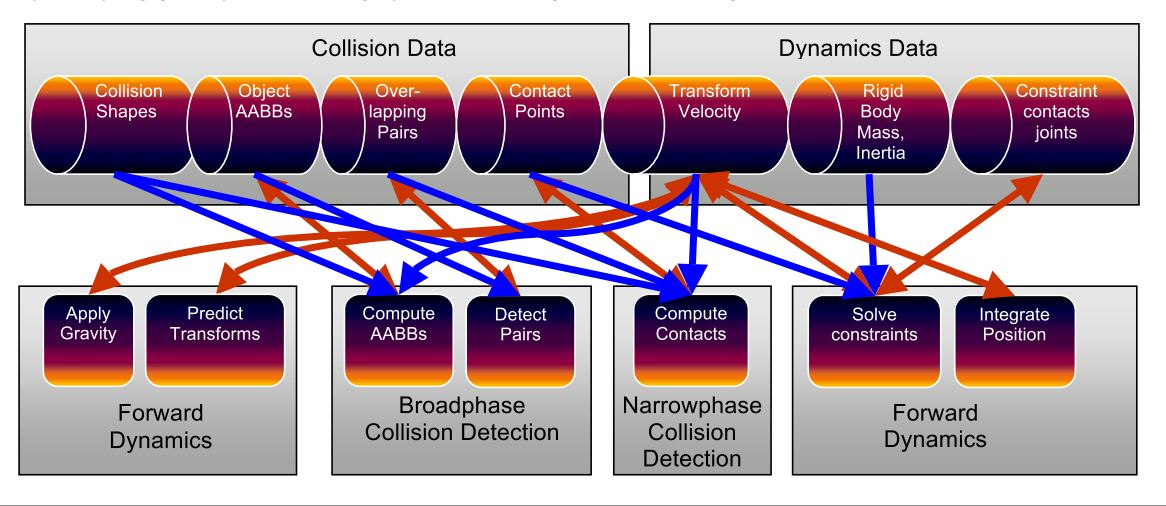
这部分工作,都包含在了函数 btDiscreteDynamicsWorld::stepSimulation(...) 中。下面结合具体代码,详细介绍下,各个环节具体都做了什么。
0、 Collision Data & Dynamics Data
1、Forward Dynamics
在 Forward Dynamics 环节,工作也很简单,就是施加重力作用,并使物体/刚体在重力的作用下运动,不考虑约束等的作用。
这部分代码包括了 btDiscreteDynamicsWorld::saveKinematicState(...) 、 btDiscreteDynamicsWorld::applyGravity() 、以及 btDiscreteDynamicsWorld::internalSingleStepSimulation(...) 中的 btDiscreteDynamicsWorld::predictUnconstraintMotion(timeStep) 等代码。
1.0、Save Kinematic State
计算并存储场景中所有运动学刚体的状态(主要是各种速度),是通过函数 btDiscreteDynamicsWorld::saveKinematicState(...) 完成的。
(注:在物理引擎中,刚体通常分为 staticObject 、dynamicObject 、kinematicObject 等不同类型。其中,staticObject 表示刚体是固定不动的;dynamicObject 表示物体是“自由”的,需要根据物理学运动定律进行状态的实时更新计算;kinematicObject 表示物体的状态是由用户输入的,由用户/程序设定当前物体的状态。)
遍历场景中的 isKinematicObject 物体,通过函数
//to calculate velocities next frame
body->saveKinematicState(timeStep);
计算 kinematicObject 类型的物体的状态。具体来说,是对每一个 kinematicObject 物体,做了以下计算:
btRigidBody.m_worldTransform = btRigidBody.m_optionalMotionState.getWorldTransform();
计算 timeStep 时长内,由 btRigidBody.m_interpolationWorldTransform 运动至 btRigidBody.m_worldTransform 所达到的速度,并写入 btRigidBody.m_linearVelocity 及 btRigidBody.m_angularVelocity
btRigidBody.m_interpolationLinearVelocity = btRigidBody.m_linearVelocity;
btRigidBody.m_interpolationAngularVelocity = btRigidBody.m_angularVelocity;
btRigidBody.m_interpolationWorldTransform = btRigidBody.m_worldTransform;
这部分工作,其实就是计算并更新了 kinematicObject 的状态。
1.1、Apply Gravity
对应 btDiscreteDynamicsWorld 中的函数 btDiscreteDynamicsWorld::applyGravity() 。在该函数中,遍历场景中的 btDiscreteDynamicsWorld.m_nonStaticRigidBodies 物体,对其施加重力。通过函数
body->applyGravity();
施加重力作用。具体来说,就是对每一个刚体,做了以下变量的更新:
btRigidBody.m_totalForce += btRigidBody.m_gravity * btRigidBody.m_linearFactor;
1.2、Predict Transforms
这部分工作,就是根据刚体的运动学定律,在不考虑约束的情况下,进行运动状态的更新计算。在 btDiscreteDynamicsWorld 中,对应的代码为:
btDiscreteDynamicsWorld::predictUnconstraintMotion(btScalar timeStep)
具体来说,就是遍历场景中的刚体(非 body->isStaticOrKinematicObject()),第一,施加阻尼;第二,计算下一帧的位置(暂不更新速度)。代码为:
//don't integrate/update velocities here, it happens in the constraint solver

body->applyDamping(timeStep);

body->predictIntegratedTransform(timeStep, body->getInterpolationWorldTransform());
damping 这里就先不去细究了,阻尼算法也有挺多的。对于刚体位置的更新,主要完成了以下变量的计算更新:
由刚体当前位置 btRigidBody.m_worldTransform ,在时间步长 timeStep 内,速度为 btRigidBody.m_linearVelocity 及 btRigidBody.m_angularVelocity ,得到下一帧的刚体位置,存放到 body->getInterpolationWorldTransform() 中(即 btCollisionObject.m_interpolationWorldTransform)。
2、Broadphase Collision Detection
总体来说,broadphase 阶段的碰撞检测,主要是判断场景中的物体的 AABB 是否发生相交,如果相交,则说明可能发生了碰撞,于是,建立 overlapping pair ,并存放到 btCollisionWorld.m_broadphasePairCache->m_paircache 中。
broadphase 和 narrowphase 阶段的碰撞检测,都包含在了以下代码中:
btCollisionWorld::performDiscreteCollisionDetection()
在这之前,有一部分工作是预测 contact,形成一些可能的碰撞点 predictive manifolds;之后,是更新 AABB;接下来,才是 overlapping pair 的检测。
2.0、Create Predictive Contacts (专门针对 CCD)
不知道是什么原理,要先预测一部分可能的接触,形成一些可能的碰撞点 predictive manifolds 。可能是为了实现 CCD 的某些功能吧。具体工作及代码如下:
首先,清空所有的 predictive manifolds ,即清空 btDiscreteDynamicsWorld.m_predictiveManifolds 。
接下来,如果是用连续碰撞检测(CCD)的话,如果刚体在这一帧的位移量超过了CCD检测的阈值,则执行xxx一些列计算。形成的 contact point 存储在 btDiscreteDynamicsWorld.m_predictiveManifolds 中。
这部分的工作,代码全部包含在以下代码中
btDiscreteDynamicsWorld::createPredictiveContacts(timeStep);
2.1、Compute AABBs
更新 AABBs ,也没什么好说的,具体的东西就不去细究了。总体代码在 btCollisionWorld::performDiscreteCollisionDetection() 中,即为:btCollisionWorld::updateAabbs(); 。具体来说,就是遍历场景中所有的物体(isActive),执行:
btCollisionWorld::updateSingleAabb(colObj);
2.2、Detect Pairs
这部分代码,就是根据更新后的 AABBs 信息,检测场景中物体的 AABB 是否发生了相交,并将结果形成 overlapping pair ,存放在 btCollisionWorld.m_broadphasePairCache 中。
具体的代码为:
void btCollisionWorld::computeOverlappingPairs()
{
	BT_PROFILE("calculateOverlappingPairs");
	m_broadphasePairCache->calculateOverlappingPairs(m_dispatcher1);
}
也就是说,要通过 btBroadphaseInterface 及其派生类中的函数,来进行 broadphase 阶段的功能。在 Basic Example 示例中,broadphase 类使用的是 btDbvtBroadphase 。
那么,执行的就是以下函数:
void btDbvtBroadphase::calculateOverlappingPairs(btDispatcher* dispatcher)
{
	collide(dispatcher);

	performDeferredRemoval(dispatcher);
}
得到的结果就存放在 btDbvtBroadphase.m_paircache 中,即为检测得到的 overlapping pairs 。其存储类型为 btOverlappingPairCache 的派生类,这里常用 btHashedOverlappingPairCache 类。进一步,具体的结果放在数组 btHashedOverlappingPairCache.m_overlappingPairArray 中,每一个元素都是 btBroadphasePair 。
每个 btBroadphasePair 中,都包含了两个 btBroadphaseProxy 对象,为 m_pProxy0 和 m_pProxy1 ,分别记录了相交的两个物体的信息,比如指向物体的指针、物体的 collisionFilterGroup Mask 等。
3、Narrowphase Collision Detection
narrow phase of collision detection 可以认为是精确的碰撞检测,通过对 overlapping pairs 进行进一步检测,得到最终的碰撞结果(contact point),并存储在 btCollisionDispatcher.m_manifoldsPtr 中,为最终的碰撞检测结果。
整个代码的调用过程特别的复杂,可能也是某种模式的固定方式吧,不太清楚。
3.1 narrowphase 碰撞检测过程
这部分代码包含在 btCollisionWorld::performDiscreteCollisionDetection() 中,即为:
btDispatcher* dispatcher = getDispatcher();
{
	BT_PROFILE("dispatchAllCollisionPairs");
	if (dispatcher)
		dispatcher->dispatchAllCollisionPairs(m_broadphasePairCache->getOverlappingPairCache(), dispatchInfo, m_dispatcher1);
}
在 Basic Example 中,dispatcher 使用的是 btCollisionDispatcher 类,那么,执行的函数即为 btCollisionDispatcher::dispatchAllCollisionPairs(...) ,该函数定义为:
void btCollisionDispatcher::dispatchAllCollisionPairs(btOverlappingPairCache* pairCache, const btDispatcherInfo& dispatchInfo, btDispatcher* dispatcher)
{
	//m_blockedForChanges = true;

	btCollisionPairCallback collisionCallback(dispatchInfo, this);

	{
		BT_PROFILE("processAllOverlappingPairs");
		pairCache->processAllOverlappingPairs(&collisionCallback, dispatcher, dispatchInfo);
	}

	//m_blockedForChanges = false;
}
也就是说,执行的是 overlapping pair 的存储类 btHashedOverlappingPairCache (派生自 btOverlappingPairCache)的成员函数 btHashedOverlappingPairCache::processAllOverlappingPairs 。再进一步,该函数定义为:
void btHashedOverlappingPairCache::processAllOverlappingPairs(btOverlapCallback* callback, btDispatcher* dispatcher)
{
	BT_PROFILE("btHashedOverlappingPairCache::processAllOverlappingPairs");
	int i;

	//	printf("m_overlappingPairArray.size()=%d\n",m_overlappingPairArray.size());
	for (i = 0; i < m_overlappingPairArray.size();)
	{
		btBroadphasePair* pair = &m_overlappingPairArray[i];
		if (callback->processOverlap(*pair))
		{
			removeOverlappingPair(pair->m_pProxy0, pair->m_pProxy1, dispatcher);
		}
		else
		{
			i++;
		}
	}
}
也就是说,遍历所有的 overlapping pairs,执行函数 callback->processOverlap(*pair) 。那么,再回到 btCollisionPairCallback collisionCallback(dispatchInfo, this); ,其对应的成员函数定义为:
virtual bool processOverlap(btBroadphasePair& pair)
{
	(*m_dispatcher->getNearCallback())(pair, *m_dispatcher, m_dispatchInfo);
	return false;
}
再进一步,执行的函数是 dispatcher 中的 nearCallback 函数,回到 btCollisionDispatcher.m_nearCallback 这是 btCollisionDispatcher 类的成员变量,是一个算法类,应该是针对不同类型的物体碰撞,从碰撞矩阵中选取相应的算法。
然后,看一下,这个算法类,是在什么地方赋值的,对应的是哪一些函数。发现,在 btCollisionDispatcher 类的构造函数中,是这样设定 btCollisionDispatcher.m_nearCallback 的:
setNearCallback(defaultNearCallback);
也就是说,遍历 overlapping pairs,对所有的 overlapping pair ,执行了函数 defaultNearCallback
接下来,看一下,针对每个 overlapping pair ,这个函数都做了些什么,如下:
//by default, Bullet will use this near callback
void btCollisionDispatcher::defaultNearCallback(btBroadphasePair& collisionPair, btCollisionDispatcher& dispatcher, const btDispatcherInfo& dispatchInfo)
{
	btCollisionObject* colObj0 = (btCollisionObject*)collisionPair.m_pProxy0->m_clientObject;
	btCollisionObject* colObj1 = (btCollisionObject*)collisionPair.m_pProxy1->m_clientObject;

	if (dispatcher.needsCollision(colObj0, colObj1))
	{
		btCollisionObjectWrapper obj0Wrap(0, colObj0->getCollisionShape(), colObj0, colObj0->getWorldTransform(), -1, -1);
		btCollisionObjectWrapper obj1Wrap(0, colObj1->getCollisionShape(), colObj1, colObj1->getWorldTransform(), -1, -1);

		//dispatcher will keep algorithms persistent in the collision pair
		if (!collisionPair.m_algorithm)
		{
			collisionPair.m_algorithm = dispatcher.findAlgorithm(&obj0Wrap, &obj1Wrap, 0, BT_CONTACT_POINT_ALGORITHMS);
		}

		if (collisionPair.m_algorithm)
		{
			btManifoldResult contactPointResult(&obj0Wrap, &obj1Wrap);

			if (dispatchInfo.m_dispatchFunc == btDispatcherInfo::DISPATCH_DISCRETE)
			{
				//discrete collision detection query

				collisionPair.m_algorithm->processCollision(&obj0Wrap, &obj1Wrap, dispatchInfo, &contactPointResult);
			}
			else
			{
				//continuous collision detection query, time of impact (toi)
				btScalar toi = collisionPair.m_algorithm->calculateTimeOfImpact(colObj0, colObj1, dispatchInfo, &contactPointResult);
				if (dispatchInfo.m_timeOfImpact > toi)
					dispatchInfo.m_timeOfImpact = toi;
			}
		}
	}
}
概括来说,就是先从碰撞检测矩阵中,查找相应的碰撞检测算法:
collisionPair.m_algorithm = dispatcher.findAlgorithm(&obj0Wrap, &obj1Wrap, 0, BT_CONTACT_POINT_ALGORITHMS);
接下来,分别针对 DCD 和 CCD ,执行相应的碰撞检测算法
btManifoldResult contactPointResult(&obj0Wrap, &obj1Wrap);

if (dispatchInfo.m_dispatchFunc == btDispatcherInfo::DISPATCH_DISCRETE)
{
	//discrete collision detection query

	collisionPair.m_algorithm->processCollision(&obj0Wrap, &obj1Wrap, dispatchInfo, &contactPointResult);
}
else
{
	//continuous collision detection query, time of impact (toi)
	btScalar toi = collisionPair.m_algorithm->calculateTimeOfImpact(colObj0, colObj1, dispatchInfo, &contactPointResult);
	if (dispatchInfo.m_timeOfImpact > toi)
	dispatchInfo.m_timeOfImpact = toi;
}
那么,m_algorithm->processCollision(..) 以及 m_algorithm->calculateTimeOfImpact(..) 具体做了什么呢?举个例子来说,在 btConvexConvexAlgorithm 类中,btConvexConvexAlgorithm ::processCollision(..) 完成了以下事情:(1)新生成了一个 manifold,如下:
if (!m_manifoldPtr)
{
	//swapped?
	m_manifoldPtr = m_dispatcher->getNewManifold(body0Wrap->getCollisionObject(), body1Wrap->getCollisionObject());
	m_ownManifold = true;
}
resultOut->setPersistentManifold(m_manifoldPtr);
(2)一通碰撞检测算法,把结果存入了该新生成的 manifold 中。
3.2、碰撞检测结果(contact point)之 Manifold
总的来说,场景中全部物体碰撞检测得到的结果被存放在 btCollisionDispatcher.m_manifoldsPtr 中,它是一个数组,其中存放的是各组物体的碰撞结果。具体到某两个物体的碰撞结果,则保存在 btPersistentManifold 类中,其定义及解释如下:
///btPersistentManifold is a contact point cache, it stays persistent as long as objects are overlapping in the broadphase.
///Those contact points are created by the collision narrow phase.
///The cache can be empty, or hold 1,2,3 or 4 points. Some collision algorithms (GJK) might only add one point at a time.
///updates/refreshes old contact points, and throw them away if necessary (distance becomes too large)
///reduces the cache to 4 points, when more then 4 points are added, using following rules:
///the contact point with deepest penetration is always kept, and it tries to maximuze the area covered by the points
///note that some pairs of objects might have more then one contact manifold.

//ATTRIBUTE_ALIGNED128( class) btPersistentManifold : public btTypedObject
ATTRIBUTE_ALIGNED16(class)
btPersistentManifold : public btTypedObject
{
        btManifoldPoint m_pointCache[MANIFOLD_CACHE_SIZE];

	/// this two body pointers can point to the physics rigidbody class.
	const btCollisionObject* m_body0;
	const btCollisionObject* m_body1;

	int m_cachedPoints;

	btScalar m_contactBreakingThreshold;
	btScalar m_contactProcessingThreshold;

...
}
其中包括了发生碰撞的两个物体的指针 m_body0 和 m_body1,以及发生碰撞的点(0~4个点) m_pointCache[MANIFOLD_CACHE_SIZE] 。由此,便可以访问场景中所发生的所有碰撞信息。
4、Forward Dynamics
这部分是当前最想弄清楚的地方了,主要涉及到了碰撞/约束的处理。想看一下 Bullet 引擎中是如何处理约束的,自己又有哪些方式,可以对其代码进行修改,从而实现自己预想的一些功能。
待续---

 浙公网安备 33010602011771号