

深入浅出的webpack4构建工具--webpack4+vue+route+vuex项目构建(十七)
2018-10-09 21:51 龙恩0707 阅读(7256) 评论(1) 收藏 举报阅读目录
三:webpack4+vue+route+vuex 项目架构
一:vue传值方式有哪些?
在vue项目开发过程中,经常会使用组件来进行项目开发,那么在组件中会调用另一个组件来作为自己的子组件,那么我们如何进行给子组件进行传值呢?或者说,子组件如何给父组件传值呢?父子组件数据是如何通信的呢?
因此vue常用的传值方式有如下几种:
1. 父传子
2. 子传父
3. 非父子传值
父子组件传递数据可以看如下图所示
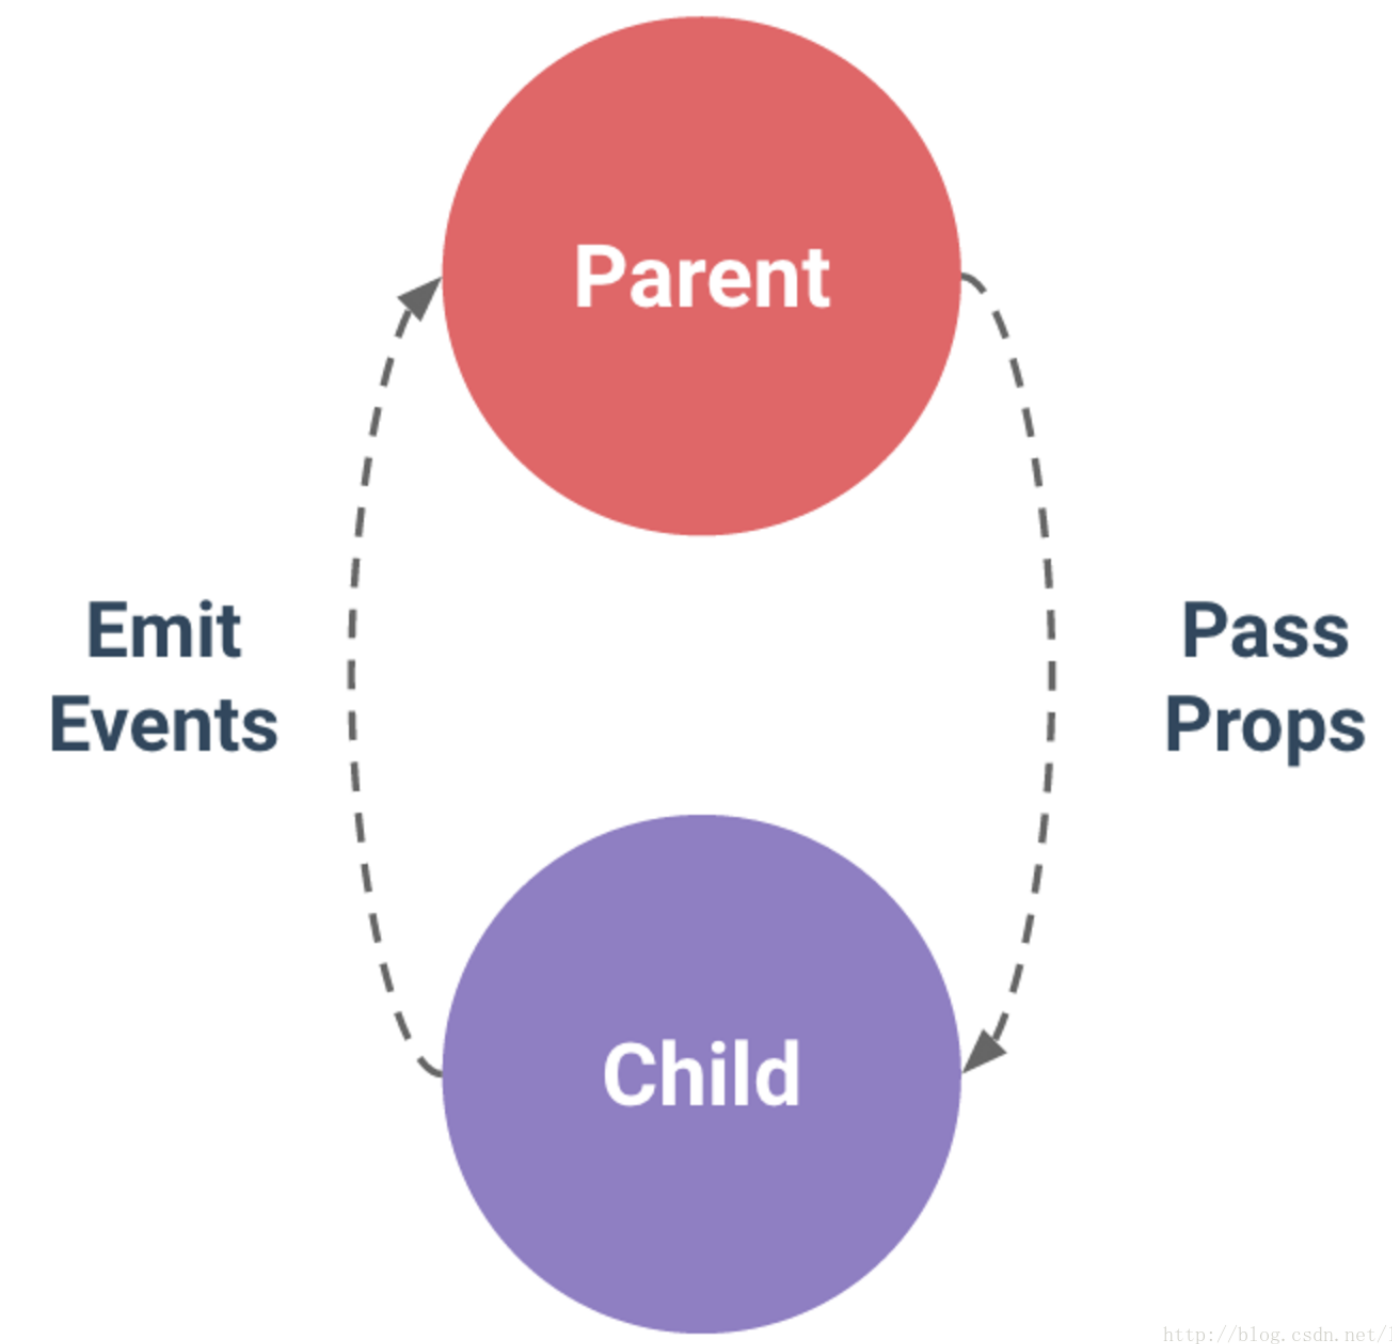
总结是:父组件向子组件传递数据,可以通过prop属性向下传递数据,子组件向父组件传递数据是通过事件给父组件发送消息。
下面我们看如下父子组件的demo。在看demo之前,我们看下项目目录的结构如下:
### 目录结构如下:
demo1                                       # 工程名
|   |--- dist                               # 打包后生成的目录文件
|   |--- node_modules                       # 所有的依赖包
|   |--- app
|   | |---index
|   | | |-- views                           # 存放所有vue页面文件
|   | | | |-- parent.vue                    # 父组件
|   | | | |-- child.vue                     # 子组件
|   | | | |-- index.vue
|   | | |-- components                      # 存放vue公用的组件
|   | | |-- js                              # 存放js文件的
|   | | |-- app.js                          # vue入口配置文件
|   | | |-- router.js                       # 路由配置文件
|   |--- views
|   | |-- index.html                        # html文件
|   |--- webpack.config.js                  # webpack配置文件
|   |--- .gitignore
|   |--- README.md
|   |--- package.json
|   |--- .babelrc                           # babel转码文件
1. 父组件向子组件传值demo如下:
app/index/views/parent.vue 代码如下:
<template>
  <div>
    <div>
      <label>父组件:</label>
      <input type='text' v-model = 'name' />
      <br />
      <!-- 引入子组件 -->
      <child :inputName="name"></child>
    </div>
  </div>
</template>

<script type="text/javascript">
  import child from './child';
  export default {
    data() {
      return {
        name: ''
      }
    },
    components: {
      child: child
    }
  }
</script>
app/index/views/child.vue 代码如下:
<template>
  <div>
    <label>子组件:</label>
    <span>{{inputName}}</span>
  </div>
</template>

<script type="text/javascript">
  export default {
    // 接收父组件的值
    props: {
      inputName: String,
      required: true
    }
  }
</script>
app/index/views/index.vue 代码如下:
<style lang="stylus">

</style>

<template>
  <div id="app">
    <header>
      <router-link to="/parent" tag='li'>parent</router-link>
    </header>
    <!-- 对应组件的内容渲染到router-view中 -->
    <router-view></router-view>
  </div>
</template>

<script type="text/javascript">
  export default {
    data() {
      return {

      }
    }
  }
</script>
app/index/router.js 代码如下:
import Vue from 'vue';
import VueRouter from 'vue-router';

// 告诉 vue 使用 vueRouter
Vue.use(VueRouter);

const routes = [
  {
    path: '/parent',
    name: 'parent',
    component: resolve => require(['./views/parent'], resolve)
  },
  {
    path: '*', // 其他没有的页面都重定向到 home页面去
    redirect: '/parent'
  }
]

var router = new VueRouter({
  base: '/app/index', // 配置单页应用的基路径
  routes: routes
});

export default router;
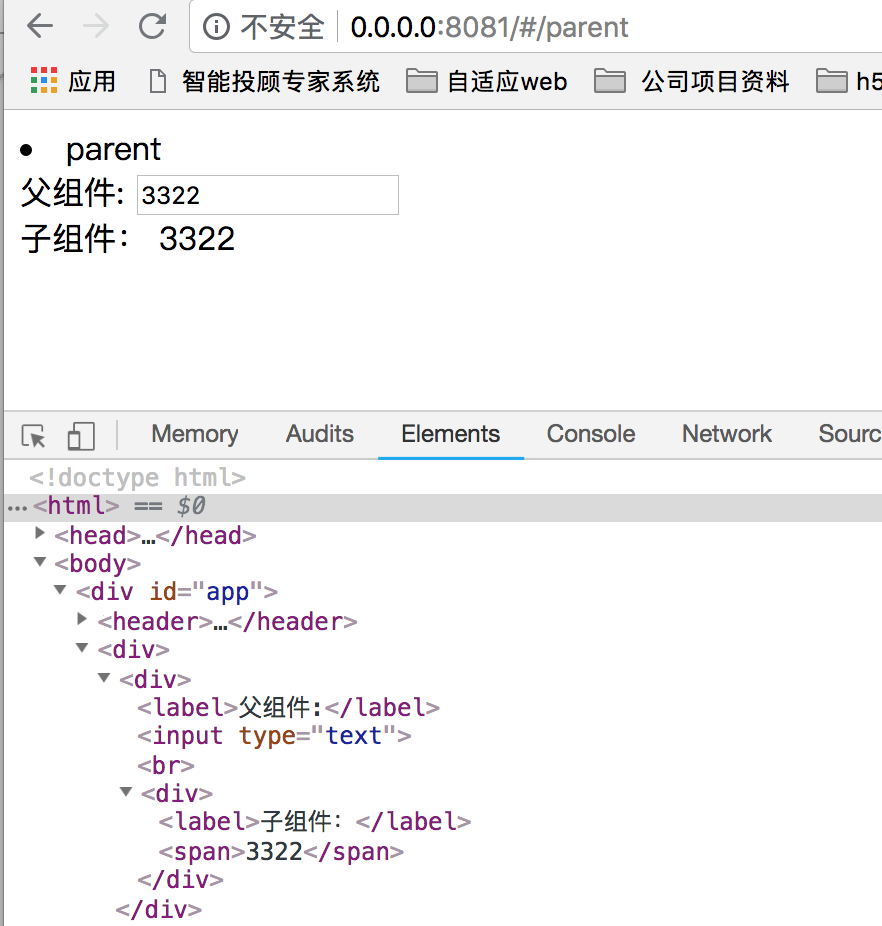
因此页面运行效果如下图所示:
2. 子组件向父组件传值方式demo如下:
app/index/views/parent.vue 代码改成如下:
<template>
  <div>
    <div>
      <label>父组件:</label>
      <span style="color:red;">{{name}}</span>
      <br />
      <!-- 引入子组件 定义一个方法来监听子组件的状态值 -->
      <child @childChange="childChangeFunc"></child>
    </div>
  </div>
</template>

<script type="text/javascript">
  import child from './child';
  export default {
    data() {
      return {
        name: ''
      }
    },
    methods: {
      childChangeFunc(value) {
        // value 就是子组件传递过来的值
        this.name = value;
      }
    },
    components: {
      child: child
    }
  }
</script>
app/index/views/child.vue 代码改成如下:
<template>
  <div>
    <label>子组件:</label>
    <span>{{childValue}}</span>
    <!-- 子组件事件传值 -->
    <input type='button' value='点击触发' @click="childClick" />
  </div>
</template>

<script type="text/javascript">
  export default {
    data() {
      return {
        childValue: '我是子组件的数据'
      }
    },
    methods: {
      childClick() {
        // 子组件触发事件
        this.$emit('childChange', this.childValue);
      }
    }
  }
</script>
运行如下:
么有触发点击之前的效果图如下:
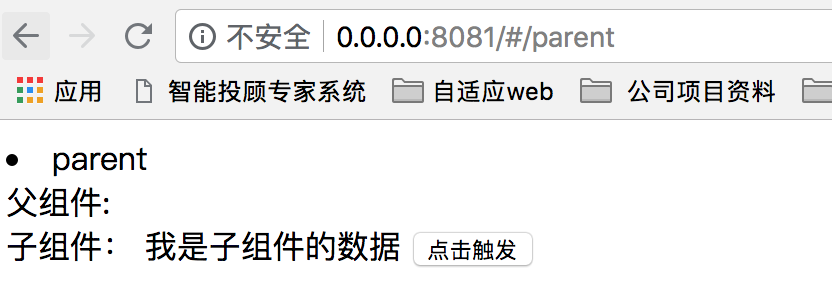
点击触发按钮后,效果图如下:

3. 非父子组件进行传值
非父子组件之间传值,需要定义个公共的实列文件来作为中间仓库来传值的。比如定义一个叫 bus.js 文件。
所谓中间仓库就是创建一个事件中心,相当于中转站,可以使用它来传递事件和接收事件的。
在app/index 下新建一个js文件夹,在文件夹内新建一个bus.js文件,代码如下:
import Vue from 'vue';

export default new Vue();
在app/index/views/a.vue, 代码如下:
<template>
  <div>
    <label>A组件:</label>
    <span>{{value}}</span>
    <input type="button" value="点击触发" @click="clickFunc" />
  </div>
</template>

<script type="text/javascript">
  // 引入公共的bus
  import Bus from '../js/bus.js';
  export default {
    data() {
      return {
        value: 1
      }
    },
    methods: {
      clickFunc() {
        Bus.$emit('val', this.value);
      }
    }
  }
</script>
在app/index/views/b.vue, 代码如下:
<template>
  <div>
    <label>B组件:</label>
    <input type='button' value='点击触发' @click="getDataFunc" />
    <span>{{name}}</span>
  </div>
</template>

<script type="text/javascript">
  import Bus from '../js/bus.js';
  export default {
    data() {
      return {
        name: 0
      }
    },
    mounted() {
      const vm = this;
      // 使用$on事件来接收参数
      Bus.$on('val', (data) => {
        console.log(data);
        vm.name = data;
      });
    },
    methods: {
      getDataFunc() {
        this.name++;
      }
    }
  }
</script>
app/index/views/index.vue 代码改成如下:
<style lang="stylus">

</style>

<template>
  <div id="app">
    <A></A>
    <B></B>
  </div>
</template>

<script type="text/javascript">
  import A from './a';
  import B from './b';
  export default {
    data() {
      return {

      }
    },
    components: {
      A: A,
      B: B
    }
  }
</script>
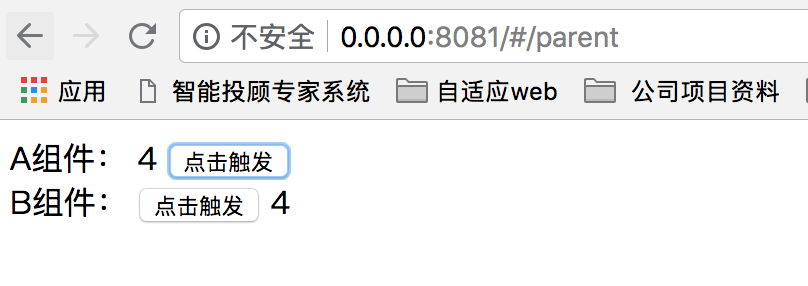
页面进来的时候,页面渲染成如下图所示
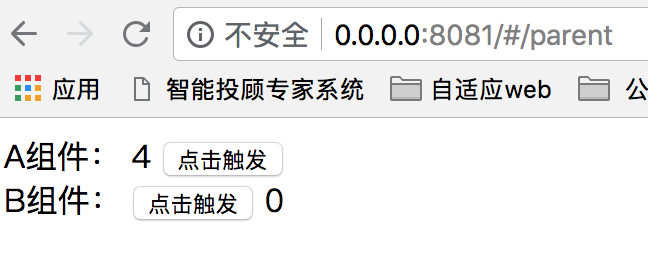
当点击 A 组件后的点击触发后,B组件的值变成了4,如下图所示:
二:理解使用Vuex
1. 什么是vuex?
Vuex官网的解释:Vuex是一个专为vue.js 应用程序开发的状态管理模式。它采用集中式存储管理应用的所有组件的状态,并以相应的规则保证状态以一种可预测的方式发生变化。
官网的解释很模糊。其实在vue组件开发中,经常会需要将当前的组件的数据传递给其他的组件,父子组件通信的话,我们可以采用props+emit 这种方式,如上面的demo方式来传递数据,但是当通信双方不是父子组件甚至根本不存在任何关系的时候,或者说一个状态需要共享给多个组件的时候,那么就会非常麻烦,数据维护也相当的不好维护,因此就出现了vuex。它能帮助我们把公用的状态抽出来放在vuex的容器中,然后根据一定的规则进行管理。vuex采用了集中式存储管理所有组件的状态,并以相应的规则保证状态以一种可预测的方式发生变化。
2. 怎么使用vuex?
如下demo使用:
<!DOCTYPE html>
<html lang="en">
<head>
  <meta charset="UTF-8">
  <meta name="viewport" content="width=device-width, initial-scale=1.0">
  <meta http-equiv="X-UA-Compatible" content="ie=edge">
  <title>Document</title>
  <script type="text/javascript" src='https://unpkg.com/vue/dist/vue.js'></script>
  <script type="text/javascript" src='https://unpkg.com/vuex@3.0.1/dist/vuex.js'></script>
</head>
<body>
  <div id='app'></div>
  <script type="text/javascript">
    Vue.use(Vuex); // 使用vuex
    var myStore = new Vuex.Store({
      // state是存储状态 定义应用状态全局的数据结构
      state: {
        name: 'kongzhi',
        todoLists: []
      },
      /*
        mutations是提交状态修改,也就是set、get中的set,这是vuex中唯一修改state的方式,但是不支持异步操作。
        每个mutation都有一个字符串的事件类型(type)和一个回调函数(handler)
        第一个参数默认是state,外部调用方式为:store.commit('SET_AGE', 30).
      */
      mutations: {
        // 新增list
        ADDLIST(state, item) {
          state.todoLists.push(item);
        },
        // 删除list中的项
        DELLIST(state, index) {
          state.todoLists.splice(index, 1);
        },
        // 设置 错误提示信息
        SETERROR(state, msg) {
          state.message = msg;
        }
      },
      /*
        getters是从state中派生出状态的。也就是set、get中的get,它有两个可选的参数,state和getters,
        分别可以获取state中的变量和其他的getters。外部调用的方式:store.getters.todoCount()
      */
      getters: {
        todoCount(state) {
          return state.todoLists.length;
        }
      },
      /*
       和上面的mutations类似,但是actions支持异步操作的,外部调用方式为:store.dispatch('nameAction')
       常见的使用是:从服务器端获取数据,在数据获取完成后会调用 store.commit()来更改Store中的状态。
       Action函数接收一个与store实列具有相同方法和属性的context对象,因此我们可以使用 context.commit 提交一个
       mutation,或者通过 context.state 和 context.getters来获取state和getters
      */
      actions: {
        addList(context, item) {
          if (item) {
            context.commit('ADDLIST', item);
            context.commit('SETERROR', '');
          } else {
            context.commit('SETERROR', '添加失败');
          }
        },
        delList(context, index) {
          context.commit('DELLIST', index);
          context.commit('SETERROR', '删除成功');
        }
      },
      /*
       modules 对象允许将单一的Store拆分为多个Store的同时保存在单一的状态树中。
      */
      modules: {

      }
    });
    new Vue({
      el: '#app',
      data: {
        name: 'init name'
      },
      store: myStore,
      mounted: function() {
        console.log(this);
      }
    })
  </script>
</body>
</html>
如上代码,new Vuex.store({}) 含义是创建一个Vuex实列。store是vuex的一个核心方法,字面含义为 '仓库'的意思。实列化完成后,需要注入到vue实列中,它有五个核心的选项,state、mutations、getters、actions和modules。如下图所示: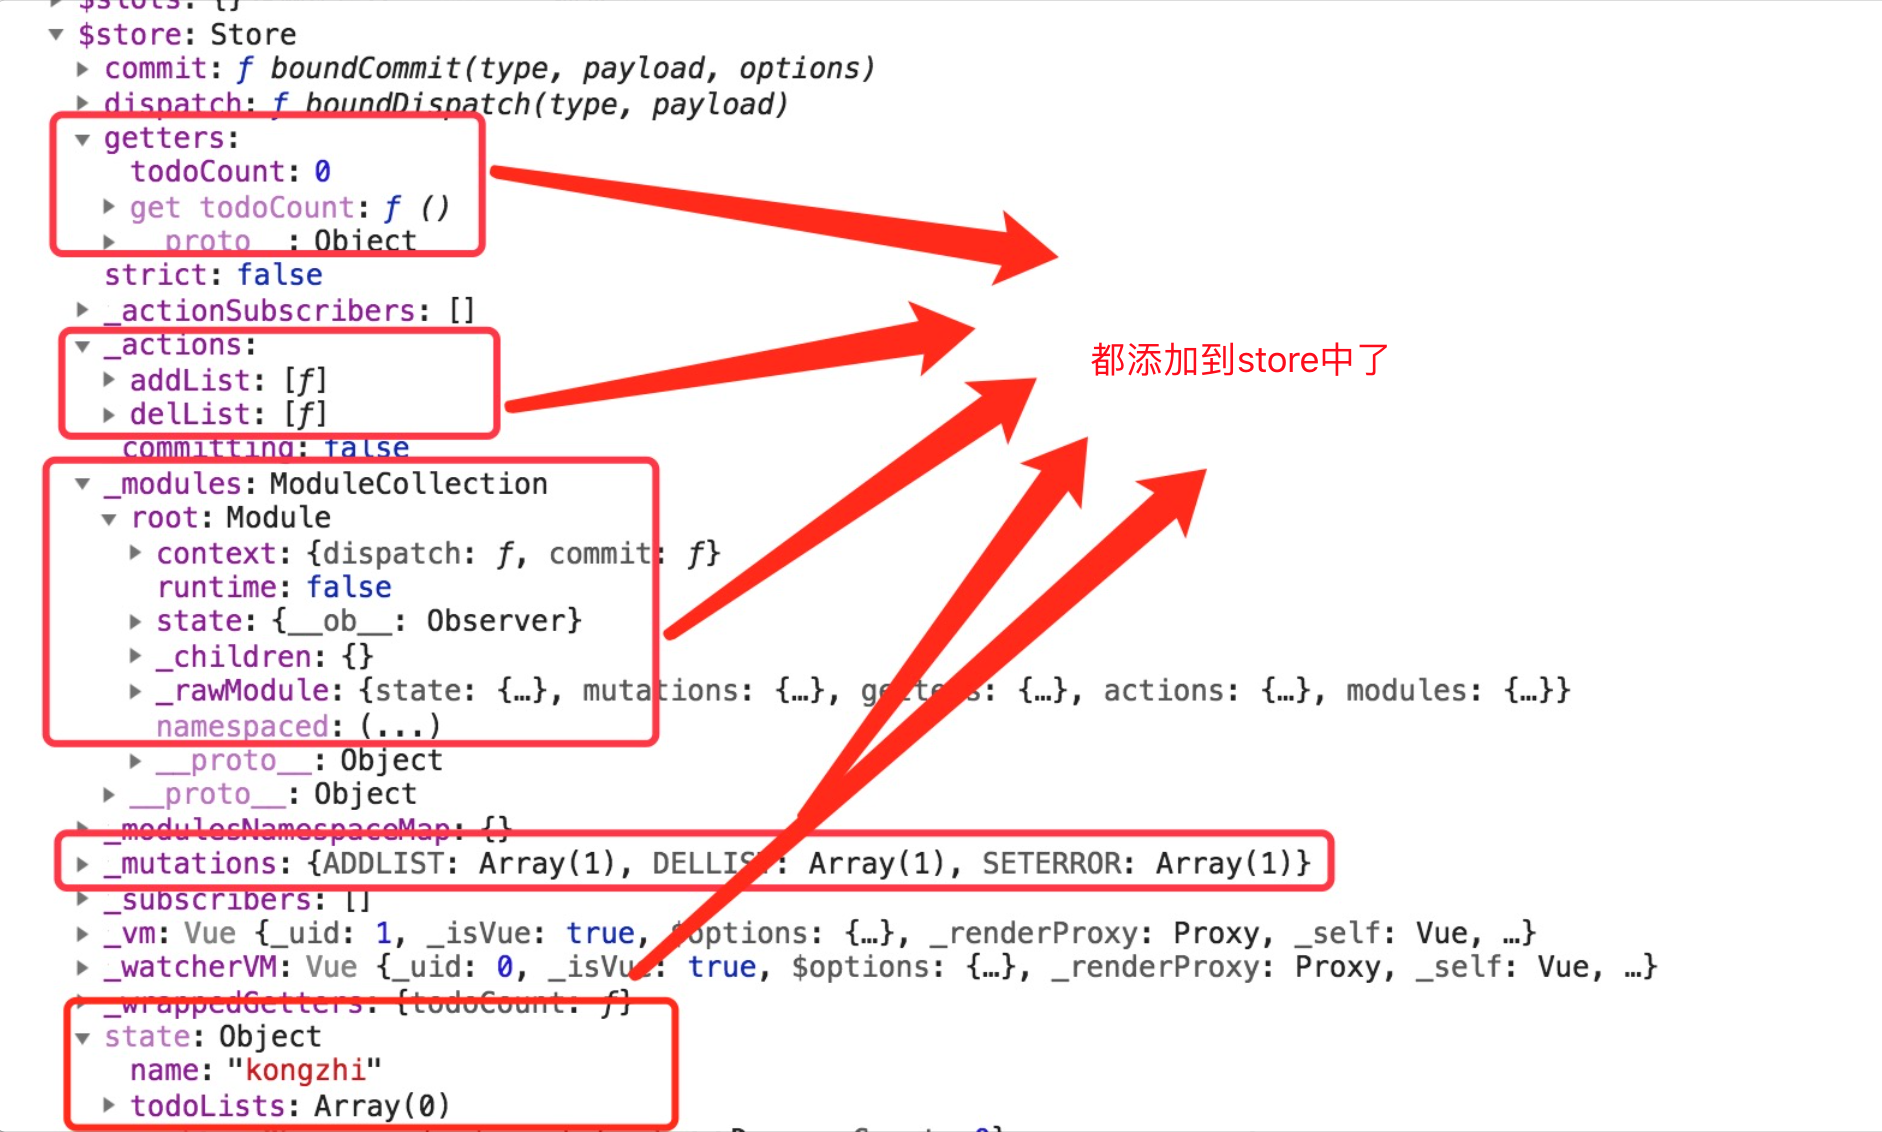
3. vuex中如何获取state的数据呢?
下面我们来注册一个组件,那么在组件内部中的computed来获取state的数据(computed是实时响应的)。如下代码:
<!DOCTYPE html>
<html lang="en">
<head>
  <meta charset="UTF-8">
  <meta name="viewport" content="width=device-width, initial-scale=1.0">
  <meta http-equiv="X-UA-Compatible" content="ie=edge">
  <title>Document</title>
  <script type="text/javascript" src='https://unpkg.com/vue/dist/vue.js'></script>
  <script type="text/javascript" src='https://unpkg.com/vuex@3.0.1/dist/vuex.js'></script>
</head>
<body>
  <div id='app'>
    <xxx></xxx>
  </div>
  <script type="text/javascript">
    Vue.use(Vuex); // 使用vuex
    var myStore = new Vuex.Store({
      // state是存储状态 定义应用状态全局的数据结构
      state: {
        name: 'kongzhi',
        todoLists: []
      },
      /*
        mutations是提交状态修改,也就是set、get中的set,这是vuex中唯一修改state的方式,但是不支持异步操作。
        每个mutation都有一个字符串的事件类型(type)和一个回调函数(handler)
        第一个参数默认是state,外部调用方式为:store.commit('SET_AGE', 30).
      */
      mutations: {
        // 新增list
        ADDLIST(state, item) {
          state.todoLists.push(item);
        },
        // 删除list中的项
        DELLIST(state, index) {
          state.todoLists.splice(index, 1);
        },
        // 设置 错误提示信息
        SETERROR(state, msg) {
          state.message = msg;
        }
      },
      /*
        getters是从state中派生出状态的。也就是set、get中的get,它有两个可选的参数,state和getters,
        分别可以获取state中的变量和其他的getters。外部调用的方式:store.getters.todoCount()
      */
      getters: {
        todoCount(state) {
          return state.todoLists.length;
        }
      },
      /*
       和上面的mutations类似,但是actions支持异步操作的,外部调用方式为:store.dispatch('nameAction')
       常见的使用是:从服务器端获取数据,在数据获取完成后会调用 store.commit()来更改Store中的状态。
       Action函数接收一个与store实列具有相同方法和属性的context对象,因此我们可以使用 context.commit 提交一个
       mutation,或者通过 context.state 和 context.getters来获取state和getters
      */
      actions: {
        addList(context, item) {
          if (item) {
            context.commit('ADDLIST', item);
            context.commit('SETERROR', '');
          } else {
            context.commit('SETERROR', '添加失败');
          }
        },
        delList(context, index) {
          context.commit('DELLIST', index);
          context.commit('SETERROR', '删除成功');
        }
      },
      /*
       modules 对象允许将单一的Store拆分为多个Store的同时保存在单一的状态树中。
      */
      modules: {

      }
    });
    // 注册vue组件 xxx
    Vue.component('xxx', {
      template: "<div>{{name}}</div>",
      computed: {
        name: function() {
          console.log(this.$store.state);
          return this.$store.state.name;
        }
      },
      mounted: function() {
        console.log(this);
      }
    });
    new Vue({
      el: '#app',
      data: {
        name: 'init name'
      },
      store: myStore,
      mounted: function() {
        console.log(this);
      }
    })
  </script>
</body>
</html>
运行效果如下图所示:

4. 如何对state的数据进行筛选和过滤。
有时候,我们需要对state的数据进行刷选和过滤操作,比如后台请求回来的数据,我们需要进行数据过滤操作,getters就可以了。具体代码可以看如下demo:
<!DOCTYPE html>
<html lang="en">
<head>
  <meta charset="UTF-8">
  <meta name="viewport" content="width=device-width, initial-scale=1.0">
  <meta http-equiv="X-UA-Compatible" content="ie=edge">
  <title>Document</title>
  <script type="text/javascript" src='https://unpkg.com/vue/dist/vue.js'></script>
  <script type="text/javascript" src='https://unpkg.com/vuex@3.0.1/dist/vuex.js'></script>
</head>
<body>
  <div id='app'>
    <xxx></xxx>
  </div>
  <script type="text/javascript">
    Vue.use(Vuex); // 使用vuex
    var myStore = new Vuex.Store({
      // state是存储状态 定义应用状态全局的数据结构
      state: {
        name: 'kongzhi',
        todoLists: []
      },
      /*
        mutations是提交状态修改,也就是set、get中的set,这是vuex中唯一修改state的方式,但是不支持异步操作。
        每个mutation都有一个字符串的事件类型(type)和一个回调函数(handler)
        第一个参数默认是state,外部调用方式为:store.commit('SET_AGE', 30).
      */
      mutations: {
        // 新增list
        ADDLIST(state, item) {
          state.todoLists.push(item);
        },
        // 删除list中的项
        DELLIST(state, index) {
          state.todoLists.splice(index, 1);
        },
        // 设置 错误提示信息
        SETERROR(state, msg) {
          state.message = msg;
        }
      },
      /*
        getters是从state中派生出状态的。也就是set、get中的get,它有两个可选的参数,state和getters,
        分别可以获取state中的变量和其他的getters。外部调用的方式:store.getters.todoCount()
      */
      getters: {
        todoCount(state) {
          return state.todoLists.length;
        }
      },
      /*
       和上面的mutations类似,但是actions支持异步操作的,外部调用方式为:store.dispatch('nameAction')
       常见的使用是:从服务器端获取数据,在数据获取完成后会调用 store.commit()来更改Store中的状态。
       Action函数接收一个与store实列具有相同方法和属性的context对象,因此我们可以使用 context.commit 提交一个
       mutation,或者通过 context.state 和 context.getters来获取state和getters
      */
      actions: {
        addList(context, item) {
          if (item) {
            context.commit('ADDLIST', item);
            context.commit('SETERROR', '');
          } else {
            context.commit('SETERROR', '添加失败');
          }
        },
        delList(context, index) {
          context.commit('DELLIST', index);
          context.commit('SETERROR', '删除成功');
        }
      },
      /*
       modules 对象允许将单一的Store拆分为多个Store的同时保存在单一的状态树中。
      */
      modules: {

      }
    });
    // 注册vue组件 xxx
    Vue.component('xxx', {
      template: "<div>{{name}}, 总数:{{todoCount}}</div>",
      computed: {
        name: function() {
          console.log(this.$store.state);
          return this.$store.state.name;
        },
        todoCount: function() {
          return this.$store.getters.todoCount;
        }
      },
      mounted: function() {
        console.log(this);
      },

    });
    new Vue({
      el: '#app',
      data: {
        name: 'init name'
      },
      store: myStore,
      mounted: function() {
        console.log(this);
      }
    })
  </script>
</body>
</html>
运行效果 如下图所示

5. mutations操作来改变state数据
如上是如何获取state的数据了,那么现在我们使用mutations来改变state的数据了,在Vuex中,改变状态state的唯一方式是通过提交commit的一个mutations,mutations下的对应函数接收第一个参数state,第二个参数为payload(载荷),payload一般是一个对象,用来记录开发时使用该函数的一些信息。mutations是处理同步的请求。不能处理异步请求的。看如下demo
<!DOCTYPE html>
<html lang="en">
<head>
  <meta charset="UTF-8">
  <meta name="viewport" content="width=device-width, initial-scale=1.0">
  <meta http-equiv="X-UA-Compatible" content="ie=edge">
  <title>Document</title>
  <script type="text/javascript" src='https://unpkg.com/vue/dist/vue.js'></script>
  <script type="text/javascript" src='https://unpkg.com/vuex@3.0.1/dist/vuex.js'></script>
</head>
<body>
  <div id='app'>
    <xxx></xxx>
  </div>
  <script type="text/javascript">
    Vue.use(Vuex); // 使用vuex
    var myStore = new Vuex.Store({
      // state是存储状态 定义应用状态全局的数据结构
      state: {
        name: 'kongzhi',
        todoLists: []
      },
      /*
        mutations是提交状态修改,也就是set、get中的set,这是vuex中唯一修改state的方式,但是不支持异步操作。
        每个mutation都有一个字符串的事件类型(type)和一个回调函数(handler)
        第一个参数默认是state,外部调用方式为:store.commit('SET_AGE', 30).
      */
      mutations: {
        // 新增list
        ADDLIST(state, item) {
          console.log(state.todoLists);
          state.todoLists.push(item);
        },
        // 删除list中的项
        DELLIST(state, index) {
          state.todoLists.splice(index, 1);
        },
        // 设置 错误提示信息
        SETERROR(state, msg) {
          state.message = msg;
        }
      },
      /*
        getters是从state中派生出状态的。也就是set、get中的get,它有两个可选的参数,state和getters,
        分别可以获取state中的变量和其他的getters。外部调用的方式:store.getters.todoCount()
      */
      getters: {
        todoCount(state) {
          return state.todoLists.length;
        }
      },
      /*
       和上面的mutations类似,但是actions支持异步操作的,外部调用方式为:store.dispatch('nameAction')
       常见的使用是:从服务器端获取数据,在数据获取完成后会调用 store.commit()来更改Store中的状态。
       Action函数接收一个与store实列具有相同方法和属性的context对象,因此我们可以使用 context.commit 提交一个
       mutation,或者通过 context.state 和 context.getters来获取state和getters
      */
      actions: {
        addList(context, item) {
          if (item) {
            context.commit('ADDLIST', item);
            context.commit('SETERROR', '');
          } else {
            context.commit('SETERROR', '添加失败');
          }
        },
        delList(context, index) {
          context.commit('DELLIST', index);
          context.commit('SETERROR', '删除成功');
        }
      },
      /*
       modules 对象允许将单一的Store拆分为多个Store的同时保存在单一的状态树中。
      */
      modules: {

      }
    });
    // 注册vue组件 xxx
    Vue.component('xxx', {
      template: "<div>{{name}}, 总数:{{todoCount}} <span @click='addList'>点击改变总数</span></div>",
      computed: {
        name: function() {
          return this.$store.state.name;
        },
        todoCount: function() {
          return this.$store.getters.todoCount;
        }
      },
      mounted: function() {
        console.log(this);
      },
      data: function() {
        return {
          count: 0
        }
      },
      methods: {
        addList: function() {
          var count = this.count++;
          this.$store.commit('ADDLIST', count);
        }
      }
    });
    new Vue({
      el: '#app',
      data: {
        name: 'init name'
      },
      store: myStore,
      mounted: function() {
        console.log(this);
      }
    })
  </script>
</body>
</html>
如上代码,在组件xxx中的template添加代码 <span @click='addList'>点击改变总数</span>,每次点击的时候,会调用自身内部的addList的函数,然后count自增1,然后会继续调用 this.$store.commit('ADDLIST', count); 来提交 commit的一个mutations,因此state.todoLists.push(item);会增加一项数据后,在组件xxx内部通过 todoCount 可以实时获取到数据的改变状态。
6. actions操作mutations异步来改变state数据
actions可以异步操作,actions提交mutations,通过mutations来提交数据的变更。它是异步修改state的状态的。
外部调用方式是 this.$store.dispatch('nameAsyn');
下面我们看如下demo
<!DOCTYPE html>
<html lang="en">
<head>
  <meta charset="UTF-8">
  <meta name="viewport" content="width=device-width, initial-scale=1.0">
  <meta http-equiv="X-UA-Compatible" content="ie=edge">
  <title>Document</title>
  <script type="text/javascript" src='https://unpkg.com/vue/dist/vue.js'></script>
  <script type="text/javascript" src='https://unpkg.com/vuex@3.0.1/dist/vuex.js'></script>
</head>
<body>
  <div id='app'>
    <xxx></xxx>
  </div>
  <script type="text/javascript">
    Vue.use(Vuex); // 使用vuex
    var myStore = new Vuex.Store({
      // state是存储状态 定义应用状态全局的数据结构
      state: {
        name: 'kongzhi',
        todoLists: [],
        // 添加count字段
        count: 1
      },
      /*
        mutations是提交状态修改,也就是set、get中的set,这是vuex中唯一修改state的方式,但是不支持异步操作。
        每个mutation都有一个字符串的事件类型(type)和一个回调函数(handler)
        第一个参数默认是state,外部调用方式为:store.commit('SET_AGE', 30).
      */
      mutations: {
        // 新增list
        ADDLIST(state, item) {
          console.log(state.todoLists);
          state.todoLists.push(item);
        },
        // 删除list中的项
        DELLIST(state, index) {
          state.todoLists.splice(index, 1);
        },
        // 设置 错误提示信息
        SETERROR(state, msg) {
          state.message = msg;
        },
        // 异步操作count
        COUNTASYNC(state, param) {
          console.log(state.count += param);
        }
      },
      /*
        getters是从state中派生出状态的。也就是set、get中的get,它有两个可选的参数,state和getters,
        分别可以获取state中的变量和其他的getters。外部调用的方式:store.getters.todoCount()
      */
      getters: {
        todoCount(state) {
          return state.todoLists.length;
        }
      },
      /*
       和上面的mutations类似,但是actions支持异步操作的,外部调用方式为:store.dispatch('nameAction')
       常见的使用是:从服务器端获取数据,在数据获取完成后会调用 store.commit()来更改Store中的状态。
       Action函数接收一个与store实列具有相同方法和属性的context对象,因此我们可以使用 context.commit 提交一个
       mutation,或者通过 context.state 和 context.getters来获取state和getters
      */
      actions: {
        addList(context, item) {
          if (item) {
            context.commit('ADDLIST', item);
            context.commit('SETERROR', '');
          } else {
            context.commit('SETERROR', '添加失败');
          }
        },
        delList(context, index) {
          context.commit('DELLIST', index);
          context.commit('SETERROR', '删除成功');
        },
        // 设置延时来演示一下异步提交
        addFunc(context, value) {
          console.log(context);
          setTimeout(function(){
            // 异步提交 actions操作Mutations
            context.commit('COUNTASYNC', value);
          }, 100);
        }
      },
      /*
       modules 对象允许将单一的Store拆分为多个Store的同时保存在单一的状态树中。
      */
      modules: {

      }
    });
    // 注册vue组件 xxx
    Vue.component('xxx', {
      template:
        `<div>
          {{name}}, 总数:{{todoCount}}
          <span @click='addList'>点击改变总数</span>
          <button @click='addFuncAnsyc'>点击我actions改变数据</button>
        </div>`,
      computed: {
        name: function() {
          return this.$store.state.name;
        },
        todoCount: function() {
          return this.$store.getters.todoCount;
        }
      },
      mounted: function() {
        console.log(this);
      },
      data: function() {
        return {
          count: 0
        }
      },
      methods: {
        addList: function() {
          var count = this.count++;
          this.$store.commit('ADDLIST', count);
        },
        addFuncAnsyc: function() {
          this.$store.dispatch('addFunc', 1);
        }
      }
    });
    new Vue({
      el: '#app',
      data: {
        name: 'init name'
      },
      store: myStore,
      mounted: function() {
        console.log(this);
      }
    })
  </script>
</body>
</html>
如上代码,template中新增代码 <button @click='addFuncAnsyc'>点击我actions改变数据</button>,点击后,触发内部函数 addFuncAnsyc后,会调用 this.$store.dispatch('addFunc', 1);调用来操作actions中的方法,第一个参数对应actions中的方法名,第二个是参数值,在actions中的函数 addFunc 打印出 context, 如下图所示: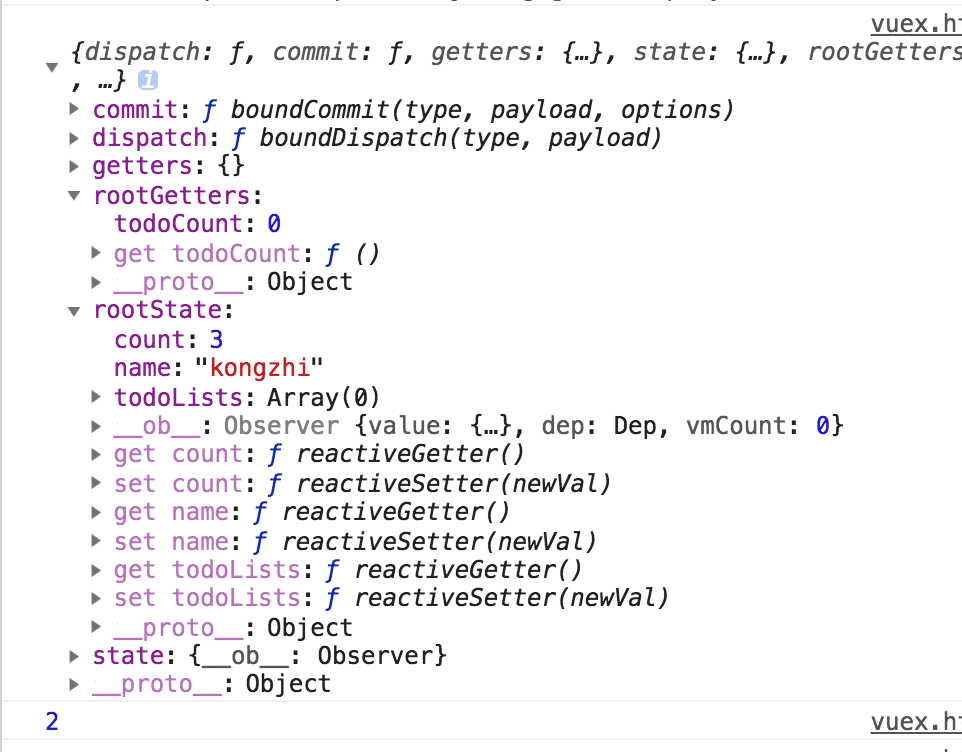
addFunc函数会调用 context.commit('COUNTASYNC', value); 代码,会找到 mutations中对应的COUNTASYNC,然后会对state数据进行更改。
理解context: context是和 this.$store 具有相同的方法和属性的对象。我们可以通过 context.state 和 context.getters来获取state和getters。
理解dispatch: 它含有异步操作,含义可以理解为 '派发',比如向后台提交数据,可以为 this.$store.dispatch('actions方法名', 值);
三:webpack4+vue+route+vuex 项目架构
如上代码是基本的demo,但是在项目中,我们是如何配置的呢?下面再来看看使用store来重构项目,整个目录架构如下:
### 目录结构如下:
demo1                                       # 工程名
|   |--- dist                               # 打包后生成的目录文件
|   |--- node_modules                       # 所有的依赖包
|   |--- app
|   | |---index
|   | | |-- views                           # 存放所有vue页面文件
|   | | | |-- parent.vue                    # 父组件
|   | | | |-- child.vue                     # 子组件
|   | | | |-- index.vue
|   | | |-- components                      # 存放vue公用的组件
|   | | |-- js                              # 存放js文件的
|   | | |-- store                           # store仓库
|   | | | |--- actions.js
|   | | | |--- mutations.js
|   | | | |--- state.js
|   | | | |--- mutations-types.js
|   | | | |--- index.js
|   | | |-- app.js                          # vue入口配置文件
|   | | |-- router.js                       # 路由配置文件
|   |--- views
|   | |-- index.html                        # html文件
|   |--- webpack.config.js                  # webpack配置文件
|   |--- .gitignore
|   |--- README.md
|   |--- package.json
|   |--- .babelrc                           # babel转码文件
在app/index/views 下新建 testvue.vue, 代码如下:
<template>
  <div>
    {{name}}, 总数:{{todoCount}}
    <span @click='addList'>点击改变总数</span>
    <button @click='addFuncAnsyc'>点击我actions改变数据</button>
  </div>
</template>

<script type="text/javascript">
  export default {
    data() {
      return {
        name: '我是空智',
        count: 1,
        todoLists: []
      }
    },
    created() {

    },
    computed: {
      todoCount: function() {
        return this.$store.state.add;
      }
    },
    methods: {
      addList() {
        var count = this.count++;
        this.$store.commit('ADD', count);
      },
      addFuncAnsyc() {
        const obj = {

        };
        Promise.all([this.$store.dispatch('commonActionGet', ['getPower:COUNTASYNC', obj])]).then((res) => {

        });
      }
    }
  }
</script>
模板代码中 <span @click='addList'>点击改变总数</span> 点击一下 触发 addList 函数,该函数会调用 this.$store.commit('ADD', count); 该方法,commit方法是同步的,它会寻找mutations.js对应的 'ADD'函数.
因此,app/index/store/mutations-types.js 代码可以改成如下:
// 新增list
export const ADD = 'ADD';

// 设置错误提示
export const SETERROR = 'SETERROR';

// 异步操作count
export const COUNTASYNC = 'COUNTASYNC';
app/index/store/mutations.js 代码改造成如下:
import * as types from './mutations-types';

export default {
  [types.ADD] (state, payload) {
    state.add = payload;
  },
  [types.SETERROR] (state, payload) {
    state.errors = payload;
  },

  [types.COUNTASYNC] (state, payload) {
    state.counts = payload;
  }
}
app/index/store/state.js 改造代码如下:
export default {
  add: 0,
  errors: '',
  counts: 0
};
app/index/store/actions.js 改造代码如下, 封装了常见的ajax中的get和POST方法:
import * as types from './mutations-types';
import Vue from 'vue';
const ajaxHandle = () => {
  const buildUrl = (url, params, childParams) => {
    let str = '?'
    for (const key in params) {
      url += str + key + '=' + params[key];
      str = '&';
    }
    if (childParams) {
      return url + '/' + childParams;
    }
    return url;
  };
  const ajaxGet = (url, fn) => {
    let results = null;
    Vue.http.get(url, { emulateJSON: true, credentials: true }).then((response) => {
      if (response.ok) {
        results = response.body;
        fn && fn(1, results);
      } else {
        fn && fn(0, results);
      }
    }, (error) => {
      if (error) {
        fn && fn(0, results);
      }
    });
  };
  const ajaxGetJSON = (url, fn) => {
    let results = null;
    Vue.http.get(url, { credentials: true }).then((response) => {
      if (response.ok) {
        results = response.body;
        fn && fn(1, results);
      } else {
        fn && fn(0, results);
      }
    }, (error) => {
      if (error) {
        fn && fn(0, results);
      }
    });
  };
  const ajaxPost = (url, params, options, fn) => {
    let results = null;
    if (typeof options === 'function' && arguments.length <= 3) {
      fn = options;
      options = {};
    }
    Vue.http.interceptors.push((request, next) => {
      request.credentials = true;
      next();
    });
    Vue.http.post(url, params, { emulateJSON: true }).then((response) => {
      if (response.ok) {
        results = response.body;
        fn && fn(1, results);
      } else {
        fn && fn(0, results);
      }
    }, (error) => {
      if (error) {
        fn && fn(0, results);
      }
    })
  };
  const ajaxPostJSON = (url, params, options, fn) => {
    let results = null;
    if (typeof options === 'function' && arguments.length <= 3) {
      fn = options;
      options = {};
    }
    Vue.http.interceptors.push((request, next) => {
      request.credentials = true;
      next();
    });
    Vue.http.post(url, params).then((response) => {
      if (response.ok) {
        results = response.body;
        fn && fn(1, results);
      } else {
        fn && fn(0, results);
      }
    }, (error) => {
      if (error) {
        fn && fn(0, results);
      }
    })
  };
  return {
    buildUrl: buildUrl,
    ajaxGet: ajaxGet,
    ajaxGetJSON: ajaxGetJSON,
    ajaxPost: ajaxPost,
    ajaxPostJSON: ajaxPostJSON
  }
};

const ah = ajaxHandle();
const prefix = '//xxx.abc.com';

const apiObj = {
  API_GET_POWER: prefix + '/xxxx/yyy', // 获取用户信息
};

const apiFuncObj = {
  getPower: 'API_GET_POWER', // 获取用户信息
};

export default {
  commonActionPost ({ commit }, payload) {
    let url = apiObj[apiFuncObj[payload[0].split(':')[0]]];
    const mutationsName = payload[0].split(':')[1];

    const params = payload[1] ? payload[1] : {};
    return new Promise((reslove, reject) => {
      ah.ajaxPost(url, params, (state, results) => {
        if (state) {
          reslove(results);
        } else {
          reject();
        }
        if (mutationsName) {
          commit(mutationsName, results);
        }
      });
    });
  },
  commonActionPostJSON({ commit }, payload) {
    let url = apiObj[apiFuncObj[payload[0].split(':')[0]]];
    const mutationsName = payload[0].split(':')[1];

    const params = payload[1] ? payload[1] : {};
    return new Promise((reslove, reject) => {
      ah.ajaxPostJSON(url, params, (state, results) => {
        if (state) {
          reslove(results);
        } else {
          reject();
        }
        if (mutationsName) {
          commit(mutationsName, results);
        }
      });
    });
  },
  commonActionGet ({ commit }, payload) {
    let url = apiObj[apiFuncObj[payload[0].split(':')[0]]];
    const mutationsName = payload[0].split(':')[1];

    const params = payload[1] ? payload[1] : {};
    const childParams = payload[2] ? payload[2] : '';
    url = ah.buildUrl(url, params, childParams);
    return new Promise((reslove, reject) => {
      ah.ajaxGet(url, (state, results) => {
        if (state) {
          reslove(results);
        } else {
          reject();
        }
        if (mutationsName) {
          commit(mutationsName, results);
        }
      });
    });
  },
  commonActionGetJSON ({ commit }, payload) {
    let url = apiObj[apiFuncObj[payload[0].split(':')[0]]];
    const mutationsName = payload[0].split(':')[1];

    const params = payload[1] ? payload[1] : {};
    url = ah.buildUrl(url, params);
    return new Promise((reslove, reject) => {
      ah.ajaxGetJSON(url, (state, results) => {
        if (state) {
          reslove(results);
        } else {
          reject();
        }
        if (mutationsName) {
          commit(mutationsName, results);
        }
      });
    });
  }
}
app/index/store/index.js 改造代码如下
import Vue from 'vue';
import Vuex from 'vuex';

import state from './state';
import mutations from './mutations';
import actions from './actions';

Vue.use(Vuex);

Vue.config.devtools = true;

export default new Vuex.Store({
  state,
  mutations,
  actions
});
然后在我们入口文件 app/index/app.js 引入store即可,如下代码:
import Vue from 'vue';

// 添加store
import store from './store/index';

// 暂时先用 vue-resource 演示
import VueResource from 'vue-resource';

import Index from './views/index';

// 引入路由
import router from './router';

// Resource
Vue.use(VueResource);

new Vue({
  el: '#app',
  router: router,
  // vue实列添加store
  store: store,
  render: h => h(Index)
});

 浙公网安备 33010602011771号