muduo源码剖析:01.一个线程一个Eventloop
前言:再探 muduo,一次与过去的对话
记得自己刚开始学 C++ 的时候,刚学会语法,学完 Linux 系统编程,也是在知乎上搜各种回答,以什么样的方式提升自己的 C++ 编程水平,看什么书让自己的编程水平突飞猛进,那些书让你的 C++ 水平顿悟的感觉等等问题。后来也是搜索到了一个回答是看 muduo 网络库,当时尝试去看,很惭愧,完全看不进去,看《Linux 多线程服务器编程》这本书也是,看了和没看一样。
现在工作了一段时间了,积累了一些经验,突然之间又在刷知乎的时候看到了这个问题,并且刷到了 muduo 这个库,想着趁这个机会再看看,看自己是不是能看懂了,也算是对过去的自己的一个交代吧。
muduo 的设计哲学:基于对象与事件驱动
一个自己能够做主的开源程序,体现的大多是作者本身在软件设计上的理念。陈硕大佬在《Linux 多线程服务器编程》这本书中,清晰地表达了他的几个核心观点:
- 核心事件: 网络连接中的几个重要事件:建立新连接、关闭连接、收到消息、消息发送完成(所谓的“三个半事件”)。
- 线程模型: 一个好的网络库的模型应该是“一个线程一个事件循环 (One Loop Per Thread)”。
- 设计风格: muduo 是基于对象的 (Object-Based),而不是面向对象的 (Object-Oriented),并表达了对面向对象中虚函数与继承滥用的不满。
我们的 muduo 源码剖析系列文章,就将围绕陈硕大佬是如何在 muduo 这个库中实现这些核心观点的来展开。
而本篇文章,我们将着重分析第一个核心观点——“一个线程一个 EventLoop” 是如何实现的,以及第二个关键问题——EventLoop 自身的操作(特别是跨线程提交任务)是如何保证在其所属的线程中执行的。
从 echo 示例说起:muduo 的直观用法
在深入源码之前,我们先看一个 muduo 最简单的 echo 示例,了解其基本用法:
#include <muduo/net/TcpServer.h>
#include <muduo/net/EventLoop.h>
#include <muduo/base/Logging.h>
#include <unistd.h>
#include <functional>

class EchoServer
{
 public:
  EchoServer(muduo::net::EventLoop* loop,
             const muduo::net::InetAddress& listenAddr)
    : server_(loop, listenAddr, "EchoServer")
  {
    server_.setConnectionCallback(
        std::bind(&EchoServer::onConnection, this, std::placeholders::_1));
    server_.setMessageCallback(
        std::bind(&EchoServer::onMessage, this,
                  std::placeholders::_1, std::placeholders::_2, std::placeholders::_3));
  }

  void start()
  {
    server_.start();
  }

 private:
  void onConnection(const muduo::net::TcpConnectionPtr& conn)
  {
    LOG_INFO << "EchoServer - " << conn->peerAddress().toIpPort() << " -> "
             << conn->localAddress().toIpPort() << " is "
             << (conn->connected() ? "UP" : "DOWN");
  }

  void onMessage(const muduo::net::TcpConnectionPtr& conn,
                 muduo::net::Buffer* buf,
                 muduo::Timestamp time)
  {
    muduo::string msg(buf->retrieveAllAsString());
    LOG_INFO << conn->name() << " echo " << msg.size() << " bytes, "
             << "data received at " << time.toString();
    conn->send(msg);
  }

  muduo::net::TcpServer server_;
};

int main()
{
  LOG_INFO << "pid = " << getpid();
  muduo::net::EventLoop loop; // 1. 创建主 EventLoop
  muduo::net::InetAddress listenAddr(2007);
  EchoServer server(&loop, listenAddr); // 2. 创建 EchoServer (内部包含 TcpServer)
  server.start(); // 3. 启动服务器 (内部会启动 I/O 线程池和 Acceptor)
  loop.loop(); // 4. 启动主 EventLoop 的事件循环
}
可以看到,使用 muduo 确实很简单:创建一个主 EventLoop,用它和监听地址构造 TcpServer(通过组合),设置好连接和消息处理的回调函数,然后启动 TcpServer,最后启动主 EventLoop 的循环。
多个 EventLoop 的启动与线程绑定
那么,TcpServer 是如何实现 "One Loop Per Thread" 并启动多个 EventLoop 的呢?关键在于 TcpServer::start() 方法和其内部的 EventLoopThreadPool。
1. TcpServer::start() - 启动引擎
void TcpServer::start()
{
  if (started_.getAndSet(1) == 0) // 通过原子操作保证只启动一次
  {
    threadPool_->start(threadInitCallback_); // 1. 启动 EventLoopThreadPool

    assert(!acceptor_->listenning());
    // 2. 将 Acceptor::listen 任务提交到主 EventLoop 执行
    loop_->runInLoop(
        std::bind(&Acceptor::listen, get_pointer(acceptor_)));
  }
}
TcpServer::start() 主要做了两件事:启动 EventLoopThreadPool 和启动 Acceptor 的监听。我们先关注第一件。
2. EventLoopThreadPool::start() - 创建并启动 I/O 线程
EventLoopThreadPool 负责管理一组 I/O 线程,每个线程运行一个 EventLoop。
void EventLoopThreadPool::start(const ThreadInitCallback& cb)
{
  assert(!started_);
  baseLoop_->assertInLoopThread(); // 确保在主 EventLoop 线程中调用

  started_ = true;

  for (int i = 0; i < numThreads_; ++i) // 根据配置的线程数循环
  {
    char buf[name_.size() + 32];
    snprintf(buf, sizeof buf, "%s%d", name_.c_str(), i);
    // 创建 EventLoopThread 对象
    EventLoopThread* t = new EventLoopThread(cb, buf);
    threads_.push_back(std::unique_ptr<EventLoopThread>(t));
    // 启动线程并获取 EventLoop 指针,存入 loops_ 向量
    loops_.push_back(t->startLoop());
  }
  if (numThreads_ == 0 && cb)
  {
    cb(baseLoop_);
  }
}
这里可以看到,线程池会根据用户通过 TcpServer::setThreadNum() 设置的线程数(如果没设置,默认为 0,即所有 I/O 都在主 EventLoop 中),创建相应数量的 EventLoopThread 对象,并调用 startLoop() 获取 EventLoop 指针。
3. EventLoopThread - "One Loop Per Thread" 的实现者
EventLoopThread 是实现 "One Loop Per Thread" 的核心。它在构造时会创建一个 muduo::Thread 对象,并将自己的 threadFunc 作为线程入口函数。
EventLoopThread::EventLoopThread(const ThreadInitCallback& cb,
                                 const string& name)
  : loop_(NULL),
    exiting_(false),
    thread_(std::bind(&EventLoopThread::threadFunc, this), name), // 创建线程对象
    mutex_(),
    cond_(mutex_),
    callback_(cb)
{
}
startLoop() 方法负责启动这个线程,并阻塞等待新线程中的 EventLoop 创建完成。
EventLoop* EventLoopThread::startLoop()
{
  assert(!thread_.started());
  thread_.start(); // 启动新线程,执行 threadFunc

  EventLoop* loop = NULL;
  {
    MutexLockGuard lock(mutex_);
    while (loop_ == NULL) // 使用条件变量等待 loop_ 被赋值
    {
      cond_.wait();
    }
    loop = loop_; // 获取 EventLoop 指针
  }

  return loop;
}
新线程启动后,会执行 threadFunc:
void EventLoopThread::threadFunc()
{
  EventLoop loop; // 1. 在新线程的栈上创建 EventLoop 对象

  if (callback_) // 2. 执行线程初始化回调
  {
    callback_(&loop);
  }

  {
    MutexLockGuard lock(mutex_);
    loop_ = &loop; // 3. 将 EventLoop 指针赋值给成员变量
    cond_.notify(); // 4. 通知 startLoop() 已创建完毕
  }

  loop.loop(); // 5. 启动事件循环,阻塞在此

  MutexLockGuard lock(mutex_); // loop 退出后清理
  loop_ = NULL;
}
EventLoop 的构造函数中会检查 thread_local EventLoop* t_loopInThisThread 变量,如果该线程已有 EventLoop,则会 LOG_FATAL 退出,从而保证了每个线程只有一个 EventLoop。
4. 启动流程总结与时序图
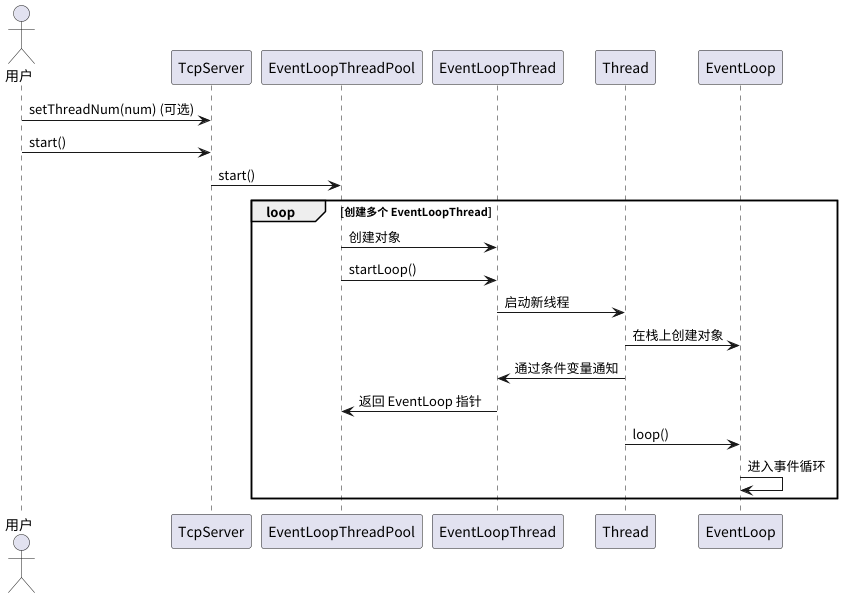
总结一下,启动多个事件循环的流程是:
- 用户(可选)调用 TcpServer::setThreadNum() 设置 I/O 线程数。
- 用户调用 TcpServer::start()。
- TcpServer 调用 EventLoopThreadPool::start()。
- EventLoopThreadPool 循环创建 EventLoopThread 对象。
- 每个 EventLoopThread 对象调用 startLoop()。
- startLoop() 启动一个新线程。
- 新线程执行 threadFunc(),在自己的栈上创建 EventLoop 对象,并通过条件变量通知 startLoop()。
- startLoop() 返回 EventLoop 指针给 EventLoopThreadPool。
- 新线程执行 EventLoop::loop(),进入事件循环。
下面是这个过程的时序图:
runInLoop:确保任务在正确的 EventLoop 中执行
理解了 EventLoop 如何与线程绑定后,我们来看第二个关键问题:muduo 如何保证对 EventLoop 及其管理的对象的操作,都在其所属的线程中执行?核心在于 EventLoop::runInLoop 和 EventLoop::queueInLoop。
runInLoop 的逻辑很清晰:如果当前线程就是 EventLoop 所在的线程,则直接执行回调函数 cb;否则,将 cb 交给 queueInLoop 处理。
void EventLoop::runInLoop(Functor cb)
{
  if (isInLoopThread()) // 判断是否在当前 EventLoop 线程
  {
    cb(); // 是,则直接执行
  }
  else
  {
    queueInLoop(std::move(cb)); // 不是,则入队
  }
}
queueInLoop 负责将任务放入 pendingFunctors_ 队列,并唤醒目标 EventLoop 线程(如果它正在阻塞等待)。
void EventLoop::queueInLoop(Functor cb)
{
  {
    MutexLockGuard lock(mutex_); // 加锁保护 pendingFunctors_
    pendingFunctors_.push_back(std::move(cb));
  }

  // 如果调用者不是 EventLoop 线程,或者 EventLoop 线程正在处理任务队列则需要唤醒
  if (!isInLoopThread() || callingPendingFunctors_)
  {
    wakeup();
  }
}
唤醒操作通过向 EventLoop 内部的 wakeupFd_ (一个 eventfd) 写入一个字节来实现。这个 wakeupFd_ 已经被封装成一个 Channel 并注册到了 Poller 中,监听读事件。
EventLoop::EventLoop()
  :  ...
    wakeupFd_(createEventfd()), // 创建 eventfd
    wakeupChannel_(new Channel(this, wakeupFd_)), // 创建 Channel
     ...
{
   ...
  wakeupChannel_->setReadCallback(
      std::bind(&EventLoop::handleRead, this)); // 设置读回调
  wakeupChannel_->enableReading(); // 启用读事件监听
}
void EventLoop::wakeup()
{
  uint64_t one = 1;
  // 向 wakeupFd_ 写入 1 个字节,触发可读事件
  ssize_t n = sockets::write(wakeupFd_, &one, sizeof one);
  if (n != sizeof one)
  {
    LOG_ERROR << "EventLoop::wakeup() writes " << n << " bytes instead of 8";
  }
}

void EventLoop::handleRead() // wakeupChannel_ 的读回调
{
  uint64_t one = 1;
  // 读取 wakeupFd_ 的数据,清空事件通知
  ssize_t n = sockets::read(wakeupFd_, &one, sizeof one);
  if (n != sizeof one)
  {
    LOG_ERROR << "EventLoop::handleRead() reads " << n << " bytes instead of 8";
  }
}
当 Poller::poll() 因为 wakeupFd_ 可读而返回后,EventLoop::loop() 会处理 wakeupChannel_ 的 handleRead 事件,之后会调用 doPendingFunctors() 来执行队列中的所有任务。
void EventLoop::loop()
{
  // ...
  while (!quit_)
  {
    activeChannels_.clear();
    pollReturnTime_ = poller_->poll(kPollTimeMs, &activeChannels_); // 等待事件
    // ... 处理 I/O 事件 ...
    eventHandling_ = true;
    for (Channel* channel : activeChannels_)
    {
      currentActiveChannel_ = channel;
      currentActiveChannel_->handleEvent(pollReturnTime_);
    }
    currentActiveChannel_ = NULL;
    eventHandling_ = false;
    doPendingFunctors(); // 处理队列中的任务
  }
  // ...
}

void EventLoop::doPendingFunctors()
{
  std::vector<Functor> functors;
  callingPendingFunctors_ = true; // 标记正在处理任务

  {
    MutexLockGuard lock(mutex_);
    functors.swap(pendingFunctors_); // 将任务队列交换出来,减小临界区
  }

  for (const Functor& functor : functors) // 执行所有任务
  {
    functor();
  }
  callingPendingFunctors_ = false; // 标记处理完毕
}
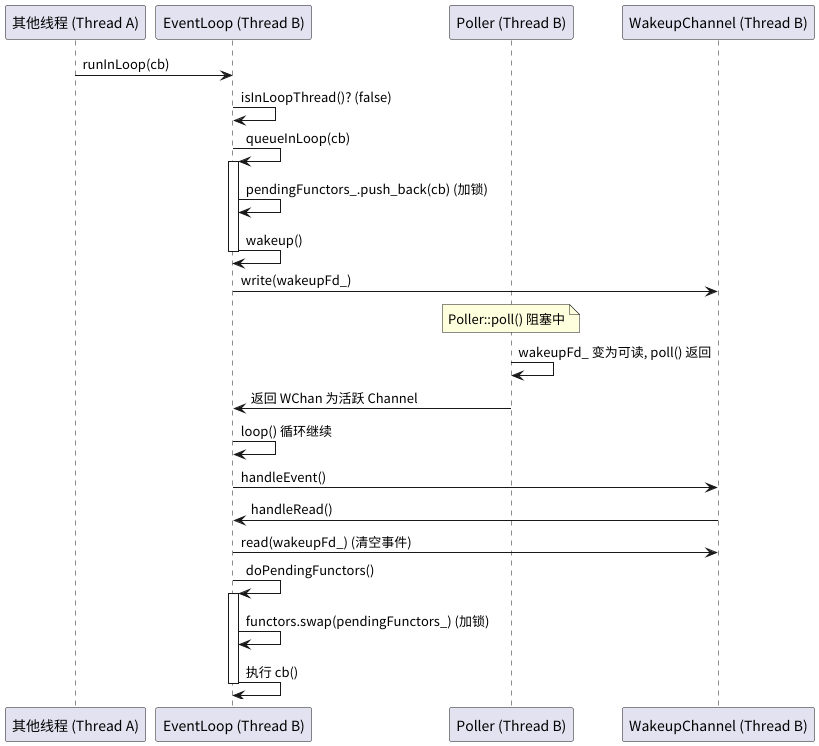
这样,muduo 就通过 runInLoop / queueInLoop 结合 eventfd 唤醒机制,巧妙地实现了跨线程任务提交,并严格保证了所有操作都在其所属的 EventLoop 线程中执行,完美诠释了陈硕大佬的设计思想。
下面是这个过程的时序图:
后记
文学家用文字表达自己的思想,程序开发人员用程序表达自己对软件设计的思想。我始终坚信,程序开发人员,应该坚信自己的程序是表达自己想法的工作,我们是 艺术家 而不是单纯的码农,我们在自己能够做主的程序里,应该去体现自己的思想。
在这个系列的文章中,我们不是要去争论对与错,不是要去争论程序设计面向对象的优缺点,到底是该基于对象还是面向对象。我们可以有自己的偏好,认同某些观点,我们要做的是从开源代码中学习这个思想。无论我们是认同一个观点还是学习一个观点,我们都应该深入学习一个观点。
通过对 muduo 启动流程和跨线程调用机制的分析,我们得以一窥其“One Loop Per Thread”模型实现的精妙之处。这只是 muduo 设计魅力的冰山一角,在接下来的文章中,我们将继续探索其事件处理、连接管理等核心机制。

 浙公网安备 33010602011771号