
5.MCScanX 与circos下载、安装、运用
一、MCSCAN
参考 :http://chibba.pgml.uga.edu/mcscan2/MCScanX.zip http://chibba.pgml.uga.edu/mcscan2/#tm
安装 :unzip MCscanX.zip && cd MCScanX && make
安装报错:

报错解决:
这个错误的原因是,MCScanX 不支持64位系统。如果要在 64位上运行,需要修改下源代码。只需要给 msa.h, dissect_multiple_alignment.h, and detect_collinear_tandem_arrays.h 这三个文件 前面添加 #include <unistd.h>
1.1 准备 *.blast
/export/software/python-2.7.13/bin/python /home/fanjp/bin/gffStat.py -g A.hypogaea.Chrom.gene.gff3 ##提取最长转录本
getGene.pl gffStat.out/A.hypogaea.Chrom.gene.gff3.longest.gff3 A.hypogaea.genome.fasta >A.hypogaea.genome.fasta.cds
/export/personal/zoum/bin/cds2aa.pl A.hypogaea.genome.fasta.cds >A.hypogaea.genome.fasta.pep
makeblastdb -dbtype prot -parse_seqids -in A.hypogaea.genome.fasta.pep -out A.hypogaea.genome.fasta.pep ##建库,物种间共线性
blastp -query A.hypogaea.genome.fasta.pep -db A.hypogaea.genome.fasta.pep -out Dr_An.blast -evalue 1e-5 -num_threads 16 -outfmt 6 -num_alignments 5 ##Dr_An.blast
1.2 准备 *.gff
perl -lane 'if($F[2]=~/mRNA/){/ID=(.*?)\;/;print join("\t",$F[0],$1,$F[3],$F[4])}' ../A.nigrocauda/A.nigrocauda.final.gff.longest.new.gff3 >Dr_An.gff ##基于最长转录本提取gff, 获得Dr_An.gff
perl -lane 'if($F[2]=~/mRNA/){/ID=(.*?)\;/;print join("\t",$F[0],$1,$F[3],$F[4])}' ../D.rerio/D.rerio.gff >>Dr_An.gff
1.3 共线性分析
sort -nk1 A.hypogaea.genome.fasta.fai|perl -lane 'BEGIN{$a=0}{print join("\t","chr","-",$F[0],$F[0],"0",$F[1],"chr".$a);$a++}' >chr.txt
/export/personal1/mengmh/1.software/MCScanX/MCScanX/MCScanX Dr_An ## Dr_An.collinearity Dr_An.html
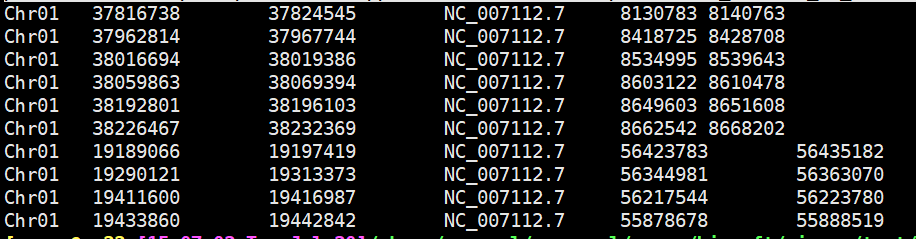
perl /share/erapool/personal/renpp/biosoft/circos/script/convert_McScanX_to_links.pl -i1 Dr_An.gff -i2 Dr_An.collinearity >links.txt ##结果如下:
perl -lane 'print join("\t",@F,"color=".lc($F[3]))' links.txt ##增加第七列颜色
二、circos
参考 :http://circos.ca/software/download/ http://circos.ca/documentation/tutorials/ https://www.jianshu.com/p/17117766573a http://blog.sina.com.cn/s/blog_485b444b0102whp4.html https://www.jianshu.com/p/e7ebb8f0100c
安装 :tar xf circos-0.69-9.tgz -C ./ && ./circos-0.69-9/bin/circos -h && circos -modules
/share/erapool/personal/renpp/biosoft/circos/circos-0.69-9/bin/circos -h
用法:
source /share/erapool/personal/renpp/.bashrc
circos -conf circos.conf
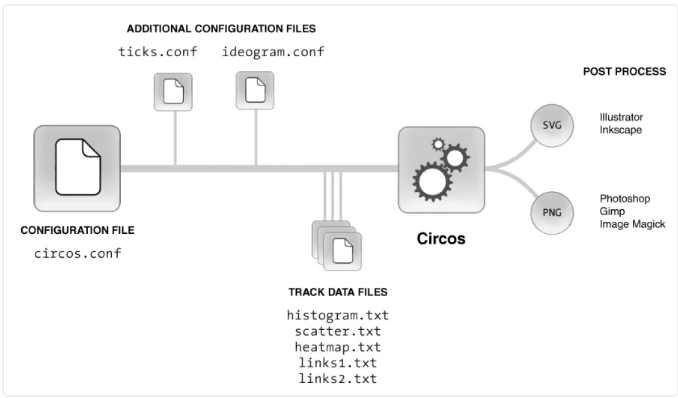
2.1 circos流程 和 主要的配置 (1.配置文件 2、输入文件)
2.2 基本的circos配置文件 变量
karyotype = data/karyotype/karyotype.human.txt
<ideogram>
<spacing>
default = 0.005r
</spacing>
radius = 0.90r
thickness = 20p
fill = yes
stroke_color = dgrey
stroke_thickness = 2p
</ideogram>
<image>
<<include etc/image.conf>>
</image>
<<include etc/colors_fonts_patterns.conf>> ###colors.ucsc.conf 1500p
<<include etc/housekeeping.conf>>
2.3 karyotype:共有7列:chr - ID LABEL START END COLOR
perl -lane '{$a+=1;print join("\t","chr","-",$F[0],$F[0],"0",$F[1],"chr$a")}' ../0HWJHB.final_Chr.fasta.fai|head -24 >chr.txt
perl -lane '{$a+=1;print join("\t","chr","-",$F[0],$a,"0",$F[1],"chr$a")}' ../3D.rerio.fna.fai |less|head -25 >>chr.txt
karyotype = ./chr.txt
chromosomes_units = 2000000
chromosomes_display_default = yes
chromosomes = -ContigUN;
#chromosomes = hs1;hs2;hs3;-hs4;hs5:1-100;-hs6:50-);/hs[7-9]$/
#chromosomes_reverse = hs2;hs3;/hs[234]/
#chromosomes_order = hs1;hs3;hs2;^,hs5;hs4,$
#chromosomes_colors = hs1=red,hs2=orange,hs3=green,hs4=blue
#chromosomes_radius = hs1:0.5r;hs2:0.55r;hs3:0.6r
#chromosomes_scale = /hs[234]/=0.5rn
2.4 ideogram
<ideogram>
<spacing>
default = 0.005r
<pairwise Chr01;Chr02>
spacing = 4r
</pairwise>
</spacing>
#position configuration
radius = 0.80r
thickness = 20p
fill = yes
#fill_color = black
stroke_thickness = 3
stroke_color = dgrey
#label configuration
show_label = yes
label_font = default
label_radius = dims(ideogram,radius) + 0.065r
label_size = 30
label_parallel = yes
#band configuration
# show_bands = yes
# fill_bands = yes
# band_stroke_thickness = 2
# band_stroke_color = white
# band_transparency = 0
</ideogram>
2.3 ticks
show_ticks = yes
show_tick_labels = yes
<ticks>
radius = dims(ideogram,radius_outer)
color = black
thickness = 2p
multiplier = 1e-6
format = %d
<tick>
spacing = 1u
size = 10p
color = lgrey
show_label = no
</tick>
<tick>
spacing = 5u
size = 15p
show_label = yes
label_size = 20p
label_offset = 10p
format = %d
</tick>
</ticks>
2.4 plots
<plots>
<plot>
type = histogram
file = ./chr1.txt.11
r0 = 0.70r
r1 = 0.75r
max = 1
min = 0
orientation = out
fill_color = blue ##line heatmap histogram
</plot>
<plot>
type = heatmap
file = ./chr1.txt.12
r0 = 0.60r
r1 = 0.65r
max = 1
min = 0
color = yellow
</plot>
<plot>
type = scatter ##scatter line heatmap
file = ./chr1.txt.13
r0 = 0.50r
r1 = 0.55r
max = 1
min = 0
fill_color = black
stroke_color = black
</plot>
</plots>
2.5 links.conf
示例1:hs1 400 550 hs3 500 750 color=red ##1、共有7列定义不同染色体links的染色
<links>
<link>
file = ref/MCSCAN/Dr_An_links.txt
radius = 0.90r
bezier_radius = 0r
color = black_a4
thickness = 2
</link>
</links>
示例2:hs1 400 550 hs3 500 750 ##共有六列
<rules>
<rule>
condition = var(intrachr) ##染色体内的 links 对不显示
show = no
</rule>
<rule>
condition = 1
color = var(chr2) #2、所有links的颜色都是第二条染色体的颜色,也就是结束一端的颜色。如果写成color = var(chr2)那所有的线就是都是2号染色体的颜色了。前提的是:颜色的配置文件中要有自定义好的别名(如chr1 chr2 等),组型文件中至少有一个是染色体提用到别名 etc/colors.ucsc.conf 3、通过列表获得:https://www.jianshu.com/p/3fd9175abad0
flow = continue
</rule>
<rule>
condition = between(hs1,hs2) ###两个染色体间的 links 显示的染色
color = green
z = 10
flow = continue
</rule>
<rule>
condition = between(hs2,hs3)
color = blue
thickness = 4
z = 15
</rule>
</rule>
condition支持的函数 :
1、value 获取指定字段的值,var返回值可以分成以下3类 字符串,数字,逻辑值
CHRn var(chr1), var(chr2) #字符串
STARTn var(start1), var(start2)
SIZEn var(size1), var(size2) #数字
INTERCHR var(interchr) 如果一个link连接的两个区域位于两条染色体上,返回值为1 #逻辑值
INTRACHR var(intrachr) 如果一个link连接的两个区域位于同一条染色体上,返回值为1
2、between
condition = between(hs1, hs2)
http://circos.ca/documentation/tutorials/links/rules2/ https://www.jianshu.com/p/3fd9175abad0 ##links

 浙公网安备 33010602011771号