
SpringBoot系统列 2 - 配置文件,多环境配置(dev,qa,online)
实现项目的多环境配置的方法有很多,比如通过在Pom.xml中配置profiles(最常见) 然后在Install项目打War包的时候,根据需求打不同环境的包,如图:

这种配置多环境的方法在SSM框架中使用的最多,但在SpringBoot中使用最多的是在启动SpringBoot项目的时候指定运行环境,下面也是主要描述这种配置的方法:
1.添加配置文件
在SpringBoot的Resources目录下建4个配置文件 application.yml、application-dev.yml、application-qa.yml、application-online.yml
dev:开发环境
qa:测试环境
online:生产环境
然后在application.yml配置文件中配置默认的运行环境:
spring:
  profiles:
    active: dev
然后在dev、qa、online中分别配置不同的配置内容,例如变更端口:
dev
server:
  port: 8085
  servlet:
    context-path: /api
  tomcat:
    max-threads: 100
  connection-timeout: 5000
spring:
  profiles: dev
qa
server:
  port: 8086
  servlet:
    context-path: /api
  tomcat:
    max-threads: 100
  connection-timeout: 5000
spring:
  profiles: qa
online
server:
  port: 8087
  servlet:
    context-path: /api
  tomcat:
    max-threads: 100
  connection-timeout: 5000
spring:
  profiles: online
然后在 SpringBoot系统列 1 - HelloWorld! 的基础上继续添加代码,新建WebConfig用于存放SpringBoot的一些配置信息(SpringBoot的配置即可以在配置文件中配置,也可以在类中配置):
import org.springframework.beans.factory.annotation.Value;
import org.springframework.boot.SpringBootConfiguration;

/**
 * 配置类
 * @author XIHONGLEI
 * @date 2018-10-31
 */
@SpringBootConfiguration
public class WebConfig {

    @Value("${server.port}")
    public String port;
}
然后改造一下HelloContrlller,为了区分环境,我们在请求/api/hello的时候将端口号展示出:
import com.hello.WebConfig;
import org.springframework.beans.factory.annotation.Autowired;
import org.springframework.web.bind.annotation.RequestMapping;
import org.springframework.web.bind.annotation.RestController;

@RestController

public class HelloController {

    @Autowired
    private WebConfig webConfig;

    @RequestMapping("hello")
    public String hello() {
        return "Hello World! port:".concat(webConfig.port);
    }
}
然后在pom.xml配置Jar包的打包配置:
<packaging>jar</packaging>
    <build>
        <finalName>spring-boot-hello</finalName>
        <resources>
            <resource>
                <directory>src/main/java</directory>
                <includes>
                    <include>**/*.yml</include>
                    <include>**/*.properties</include>
                    <include>**/*.xml</include>
                </includes>
                <filtering>false</filtering>
            </resource>
            <resource>
                <directory>src/main/resources</directory>
                <includes>
                    <include>**/*.yml</include>
                    <include>**/*.properties</include>
                    <include>**/*.xml</include>
                </includes>
                <filtering>false</filtering>
            </resource>
        </resources>
        <plugins>
            <plugin>
                <groupId>org.springframework.boot</groupId>
                <artifactId>spring-boot-maven-plugin</artifactId>
                <configuration>
                    <fork>true</fork>
                    <mainClass>com.hello.Application</mainClass>
                </configuration>
                <executions>
                    <execution>
                        <goals>
                            <goal>repackage</goal>
                        </goals>
                    </execution>
                </executions>
            </plugin>
            <plugin>
                <artifactId>maven-resources-plugin</artifactId>
                <version>2.5</version>
                <configuration>
                    <encoding>UTF-8</encoding>
                    <useDefaultDelimiters>true</useDefaultDelimiters>
                </configuration>
            </plugin>
            <plugin>
                <groupId>org.apache.maven.plugins</groupId>
                <artifactId>maven-surefire-plugin</artifactId>
                <version>2.18.1</version>
                <configuration>
                    <skipTests>true</skipTests>
                </configuration>
            </plugin>
            <plugin>
                <groupId>org.apache.maven.plugins</groupId>
                <artifactId>maven-compiler-plugin</artifactId>
                <version>2.3.2</version>
                <configuration>
                    <source>1.8</source>
                    <target>1.8</target>
                </configuration>
            </plugin>
        </plugins>
    </build>
然后Install,找打Jar包 spring-boot-hello.jar;
在Window控制台或者Linux中可以使用java -jar spring-boot-hello.jar来启动SpringBoot项目,然后通过在后方添加--spring.profiles.active来指定启动SpringBoot项目时使用的环境:
# Dev环境
$ java -jar spring-boot-hello.jar --spring.profiles.active=dev

# qa环境
$ java -jar spring-boot-hello.jar --spring.profiles.active=qa

# online环境
$ java -jar spring-boot-hello.jar --spring.profiles.active=online
例启动Online环境:
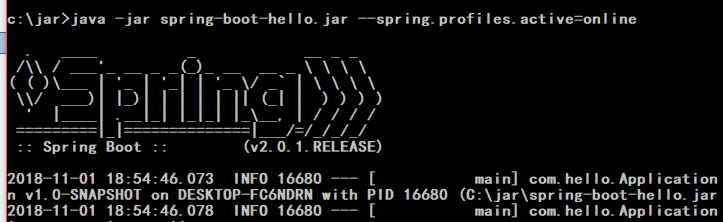
然后通过 http://localhost:8087/api/hello 来访问,因为Online中配置的端口是8087

完成!
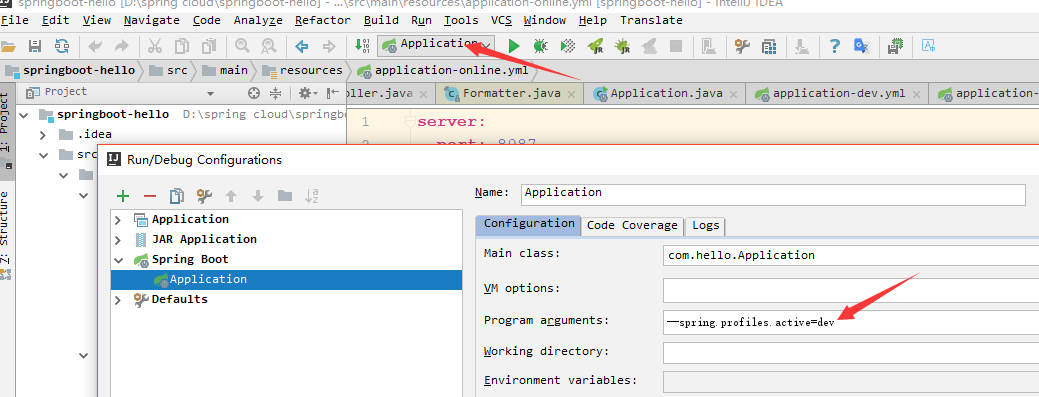
在IDEA中怎么在运行的时候选定执行环境,可以通过配置Application的program arguments中配置运行环境:

 浙公网安备 33010602011771号