机器人仿真笔记[5]-webots无人机起飞悬停
摘要
在webots中仿真无人机的起飞和悬停, 并获取机身摄像头画面.
关键词
webots;drone;take off;hover;simulation;
关键信息
代码地址:
- [https://github.com/ByeIO/bye.orbslam3.rs/blob/dev1/crates/seekslam_webots/tests/controllers/mavic2pro_takeoff/mavic2pro_takeoff.py]
- [https://github.com/ByeIO/bye.orbslam3.rs/blob/dev1/crates/seekslam_webots/tests/controllers/mavic2pro_camera/mavic2pro_camera.py]
- webots 2025a
原理简介
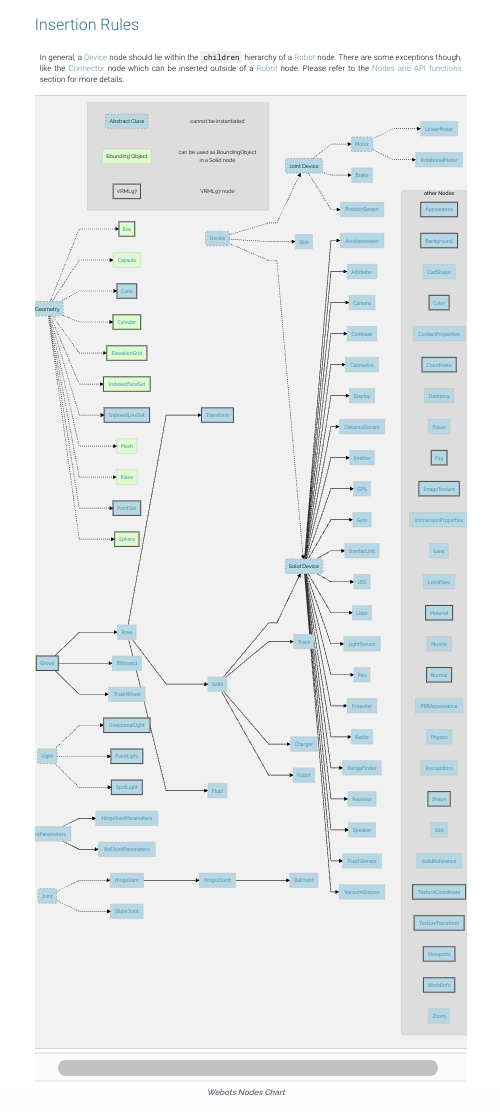
webots的节点树
[https://jasonli0012.github.io/6e66865d/]
[https://cyberbotics.com/doc/reference/worldinfo]
[https://raw.githubusercontent.com/cyberbotics/webots/refs/heads/master/docs/reference/node-chart.md]
The Webots Node Chart outlines all the nodes available to build Webots worlds.
In the chart, an arrow between two nodes represents an inheritance relationship. The inheritance relationship indicates that a derived node (at the arrow head) inherits all the fields and API functions of a base node (at the arrow tail). For example, the Solid node inherits from the Pose node, and therefore all the fields and functions available in the Pose node are also available in the Solid node.
Boxes depicted with a dashed line (like Light, Device or Geometry) represent abstract nodes, that is, nodes that cannot be instantiated (either using the SceneTree or in a ".wbt" file). Abstract nodes are used to group common fields and functions that are shared by derived nodes.
A box with a green background indicates a node that can be used directly (or composed using Group and Pose nodes) to build a boundingObject used to detect collisions between Solid objects. Note that not all geometry nodes can be used as boundingObjects.
In general, a Device node should lie within the children hierarchy of a Robot node. There are some exceptions though, like the Connector node which can be inserted outside of a Robot node. Please refer to the Nodes and API functions section for more details.
graph LR
  subgraph ""
    AbstractClass(Abstract Class) --- AbstractClassDefinition[cannot be instantiated]
    BoundingObject[Bounding Object] --- BoundingObjectDefinition[can be used as BoundingObject<br>in a Solid node]
    VRML97[VRML97] --- VRML97Definition[VRML97 node]
  end
  PositionSensor --- Appearance
  AbstractClassDefinition --- JointDevice
  linkStyle 0 stroke-width:0px;
  linkStyle 1 stroke-width:0px;
  linkStyle 2 stroke-width:0px;
  linkStyle 3 stroke-width:0px;
  linkStyle 4 stroke-width:0px;

  Geometry(Geometry) -.-> Box[[Box](box.md)]
  Geometry -.-> Capsule[[Capsule](capsule.md)]
  Geometry -.-> Cone[[Cone](cone.md)]
  Geometry -.-> Cylinder[[Cylinder](cylinder.md)]
  Geometry -.-> ElevationGrid[[ElevationGrid](elevationgrid.md)]
  Geometry -.-> IndexedFaceSet[[IndexedFaceSet](indexedfaceset.md)]
  Geometry -.-> IndexedLineSet[[IndexedLineSet](indexedlineset.md)]
  Geometry -.-> Mesh[[Mesh](mesh.md)]
  Geometry -.-> Plane[[Plane](plane.md)]
  Geometry -.-> PointSet[[PointSet](pointset.md)]
  Geometry -.-> Sphere[[Sphere](sphere.md)]

  Device([Device](device.md)) -.-> JointDevice(Joint Device)
  Device -.-> Skin[[Skin](skin.md)]
  Device -.-> SolidDevice(Solid Device)

  Group[[Group](group.md)] --> Pose[[Pose](pose.md)]
  Group --> Billboard[[Billboard](billboard.md)]
  Group --> TrackWheel[[TrackWheel](trackwheel.md)]
    Pose --> Transform[[Transform](transform.md)]
    Pose --> Solid[[Solid](solid.md)]
        Solid --> SolidDevice
          SolidDevice --> Accelerometer[[Accelerometer](accelerometer.md)]
          SolidDevice --> Altimeter[[Altimeter](altimeter.md)]
          SolidDevice --> Camera[[Camera](camera.md)]
          SolidDevice --> Compass[[Compass](compass.md)]
          SolidDevice --> Connector[[Connector](connector.md)]
          SolidDevice --> Display[[Display](display.md)]
          SolidDevice --> DistanceSensor[[DistanceSensor](distancesensor.md)]
          SolidDevice --> Emitter[[Emitter](emitter.md)]
          SolidDevice --> GPS[[GPS](gps.md)]
          SolidDevice --> Gyro[[Gyro](gyro.md)]
          SolidDevice --> InertialUnit[[InertialUnit](inertialunit.md)]
          SolidDevice --> LED[[LED](led.md)]
          SolidDevice --> Lidar[[Lidar](lidar.md)]
          SolidDevice --> LightSensor[[LightSensor](lightsensor.md)]
          SolidDevice --> Pen[[Pen](pen.md)]
          SolidDevice --> Propeller[[Propeller](propeller.md)]
          SolidDevice --> Radar[[Radar](radar.md)]
          SolidDevice --> RangeFinder[[RangeFinder](rangefinder.md)]
          SolidDevice --> Receiver[[Receiver](receiver.md)]
          SolidDevice --> Speaker[[Speaker](speaker.md)]
          SolidDevice --> TouchSensor[[TouchSensor](touchsensor.md)]
          SolidDevice --> VacuumGripper[[VacuumGripper](vacuumgripper.md)]
        Solid --> Track[[Track](track.md)]
        Solid --> Charger[[Charger](charger.md)]
        Solid --> Robot[[Robot](robot.md)]
    Pose --> Fluid[[Fluid](fluid.md)]

  JointDevice -.-> Motor([Motor](motor.md))
    Motor -.-> LinearMotor[[LinearMotor](linearmotor.md)]
    Motor -.-> RotationalMotor[[RotationalMotor](rotationalmotor.md)]
  JointDevice -.-> Brake[[Brake](brake.md)]
  JointDevice -.-> PositionSensor[[PositionSensor](positionsensor.md)]

  Light([Light](light.md)) -.-> DirectionalLight[[DirectionalLight](directionallight.md)]
  Light -.-> PointLight[[PointLight](pointlight.md)]
  Light -.-> SpotLight[[SpotLight](spotlight.md)]

  Joint([Joint](joint.md)) -.-> HingeJoint[[HingeJoint](hingejoint.md)]
    HingeJoint --> Hinge2Joint[[Hinge2Joint](hinge2joint.md)]
      Hinge2Joint --> BallJoint[[BallJoint](balljoint.md)]
  Joint -.-> SliderJoint[[SliderJoint](sliderjoint.md)]

  JointParameters[[JointParameters](jointparameters.md)] --> HingeJointParameters[[HingeJointParameters](hingejointparameters.md)]
  JointParameters --> BallJointParameters[[BallJointParameters](balljointparameters.md)]

  subgraph other Nodes
    Appearance[[Appearance](appearance.md)]
    Background[[Background](background.md)]
    CadShape[[CadShape](cadshape.md)]
    Color[[Color](color.md)]
    ContactProperties[[ContactProperties](contactproperties.md)]
    Coordinate[[Coordinate](coordinate.md)]
    Damping[[Damping](damping.md)]
    Focus[[Focus](focus.md)]
    Fog[[Fog](fog.md)]
    ImageTexture[[ImageTexture](imagetexture.md)]
    ImmersionProperties[[ImmersionProperties](immersionproperties.md)]
    Lens[[Lens](lens.md)]
    LensFlare[[LensFlare](lensflare.md)]
    Material[[Material](material.md)]
    Muscle[[Muscle](muscle.md)]
    Normal[[Normal](normal.md)]
    PBRAppearance[[PBRAppearance](pbrappearance.md)]
    Physics[[Physics](physics.md)]
    Recognition[[Recognition](recognition.md)]
    Shape[[Shape](shape.md)]
    Slot[[Slot](slot.md)]
    SolidReference[[SolidReference](solidreference.md)]
    TextureCoordinate[[TextureCoordinate](texturecoordinate.md)]
    TextureTransform[[TextureTransform](texturetransform.md)]
    Viewpoint[[Viewpoint](viewpoint.md)]
    WorldInfo[[WorldInfo](worldinfo.md)]
    Zoom[[Zoom](zoom.md)]
  end

  classDef AbstractClassStyle stroke-width:3px,stroke-dasharray:5,5;
  classDef DefinitionStyle fill:#ddd,stroke-width:0px;
  style VRML97 fill:#ddd,stroke:#444444,stroke-width:3px;

  class AbstractClass,Device,Geometry,Joint,JointDevice,Light,Motor,SolidDevice AbstractClassStyle;
  class BoundingObject,Capsule,Mesh,Plane secondaryNode;
  class Box,Cylinder,ElevationGrid,IndexedFaceSet,Sphere highlightedSecondaryNode;
  class Appearance,Background,Color,Cone,Coordinate,DirectionalLight,Fog,Group,ImageTexture,IndexedLineSet,Material,Normal,PointLight,PointSet,Shape,SpotLight,TextureCoordinate,TextureTransform,Transform,Viewpoint,WorldInfo highlightedNode;
  class AbstractClassDefinition,BoundingObjectDefinition,VRML97Definition DefinitionStyle;
| 节点图 |
|---|
 |
Webots中的相机节点
[https://github.com/cyberbotics/webots/blob/master/docs/reference/camera.md]
Camera节点用于模拟机器人的机载摄像头,生成的图像可显示在3D窗口中。根据配置不同,该节点可模拟线性相机、标准RGB相机或具有球面畸变的鱼眼镜头。
字段摘要
-
fieldOfView:相机的水平视场角(弧度)。
若projection字段设为"planar",则该值限制在0到π之间;其他模式下无上限。
由于相机像素为正方形,垂直视场角可通过以下公式计算:
垂直视场角 = 2 * atan(tan(水平视场角 * 0.5) * (高度 / 宽度)) -
width:图像宽度(像素)。 -
height:图像高度(像素)。 -
projection:切换平面、球面或柱面投影模式。
球面投影模拟鱼眼镜头,柱面投影生成等距柱状图像。详见下文对应小节。 -
near:定义相机到近裁剪平面的距离。
该平面平行于相机视网膜(即投影平面)。近平面决定了OpenGL深度缓冲的精度。
值过小会导致叠加多边形间的深度冲突,产生随机重叠。详见下文视锥体说明。 -
far:定义相机到远裁剪平面的距离。 -
exposure:场景的光度曝光量(单位:焦耳/平方米,J/m²)。 -
antiAliasing:启用/禁用(默认关闭)相机图像抗锯齿效果。
锯齿现象表现为边缘锯齿(或摩尔纹、频闪等)。抗锯齿技术会选择性模糊锯齿边缘,类似真实相机传感器中的抗锯齿滤镜。 -
ambientOcclusionRadius:设置场景中几何遮挡搜索的半径。
增大半径可增强远距离物体的遮挡效果,但在低质量级别下,近场遮挡可能随半径增加而消失。
默认值为0表示禁用该效果,设为任意正数即可启用。 -
bloomThreshold:定义像素开始"泛光"的亮度阈值。
低于阈值时,像素会像相机过曝一样向周围泄漏光线。
默认阈值-1表示禁用,设为0或正数启用。注意该效果非物理模拟(不同于GTAO环境光遮蔽或PBR),仅为相机过曝的近似效果。 -
motionBlur:若大于0.0,相机或视野中物体的运动会导致图像模糊。
该值表示相机像素的响应时间(毫秒),即像素达到新颜色值99.5%所需时间(选择99.5%是因8位色深下无法检测更小的变化)。
注:此功能计算开销大,可能显著降低仿真速度。且设置值小于相机时间步长时无可见效果。 -
noise:若大于0.0,会为彩色图像的每个RGB通道添加高斯噪声。
0.0表示无噪声以节省计算时间,1.0表示噪声标准差为255(通道表示范围)。详见下文噪声说明。 -
noiseMaskUrl:指定用户定义的噪声遮罩(透明PNG图像)。
若以http://或https://开头,Webots会从网络获取文件;否则使用相对路径(参见纹理路径规则)。
建议使用2的幂次方分辨率(如8x8、2048x64等)且大于相机分辨率的纹理,避免缩放导致像素精度损失。
噪声遮罩会在仿真中随机平移以产生闪烁效果,因此纹理越大随机性越好。此功能不适用于球面相机。 -
lens:可包含Lens节点,用于模拟镜头畸变。 -
focus:可包含Focus节点,为相机提供可调焦系统。设为NULL时无对焦功能。 -
zoom:可包含Zoom节点,为相机提供变焦系统。设为NULL时无变焦功能。 -
recognition:可包含Recognition节点,赋予相机物体识别能力。
仅能识别recognitionColors非空的Solid节点,物体尺寸通过其boundingObject及子节点估算。若无包围盒则基于形状估算(通常严重高估)。 -
lensFlare:可包含LensFlare节点,为相机图像添加镜头光晕效果(需有光源产生光晕)。
相机图像
相机设备通过OpenGL渲染图像。可通过wb_camera_get_image函数获取像素信息,并使用wb_camera_image_get_*系列函数提取RGB通道。
每次刷新相机时都会执行OpenGL渲染,并将颜色信息复制到wb_camera_get_image返回的缓冲区。缓冲区内容在wb_robot_step_begin和wb_robot_step_end调用间可能变化,因此若需在步进中访问数据,应在步进开始前复制缓冲区。缓冲区格式为BGRA(32位),建议使用wb_camera_image_get_*函数访问,因内部格式可能变更。
注意 [MATLAB]:MATLAB API使用RGB三元组的三维数组表示彩色图像,详见
wb_camera_get_image函数的MATLAB示例。
视锥体
视锥体是定义相机可见范围的截头金字塔。完全位于视锥体外的3D形状不会被渲染。距离相机过近(位于相机与近平面之间)的物体不会显示。可通过菜单项视图|可选渲染|显示相机视锥体以洋红线框显示。
near字段定义近裁剪平面位置(x, y, -near)。fieldOfView定义视锥体水平角度。fieldOfView、width和height共同确定垂直角度(见上文公式)。
far字段定义远裁剪平面,设为0时表示无限远。设置远平面可过滤远处物体,显著提升渲染性能。
Webots中相机默认无远裁剪平面(与其他OpenGL程序不同),可视距离无限。球面相机的视锥体较为特殊,近/远平面变为以相机为中心的球面部分,且fieldOfView可超过π。
噪声
通过noise字段可快速为相机添加噪声。0.0表示无噪声。每次刷新时,会为每个通道添加标准差为噪声值乘以通道范围(彩色相机为256)的高斯噪声。
球面与柱面投影
OpenGL原生仅支持平面投影,但球面和柱面投影对模拟曲面镜或生物眼睛的鱼眼效果非常有用。通过切换projection字段即可启用。
内部实现中,根据视场角大小,球面/柱面相机会使用1到6个朝向立方体面的OpenGL子相机(启用显示相机视锥体时以洋红方块显示)。再通过算法将子相机结果合成为球面/柱面投影。此模式性能开销较大,降低分辨率或优化视场角以减少子相机数量可提升性能。
图像显示
相机图像默认以洋红边框叠加在3D窗口上(参见示意图)。用户可通过鼠标拖拽移动位置,点击右下角图标调整大小,点击右上角关闭按钮隐藏图像。暂停仿真时,鼠标悬停在叠加图像上会在状态栏显示当前像素的RGB值。选中机器人后,也可通过机器人|相机设备菜单项控制叠加图像的显示。
双击图像可在外置窗口中显示,此时叠加图像消失,关闭窗口后自动恢复。
webots的仿真步进方式
[https://github.com/cyberbotics/webots/tree/master]
[https://github.com/cyberbotics/webots/blob/4bcca6b05171cae3700640495447d49abc506ed3/src/webots/ode/WbOdeDebugger.hpp#L31]
- robot.step(robot.time_step) != -1
仿真时间步长
- 基本时间步长:Webots 中的仿真时间是离散的,以基本时间步长(
basicTimeStep)为单位逐步推进。basicTimeStep是WorldInfo节点的一个属性,单位为毫秒,表示仿真世界中每个时间步的持续时间。例如,设置basicTimeStep为 32 毫秒,意味着仿真世界中的时间以 32 毫秒为一个步长逐步增加。 - 控制器时间步长:控制器程序中也有自己的时间步长,通常与仿真世界的基本时间步长一致。控制器在每个时间步中根据传感器数据计算并发送控制指令给执行器,从而驱动机器人运动。
仿真控制流程
- 初始化:在仿真开始时,Webots 会加载世界文件(.wbt),初始化仿真环境中的各种对象和参数,包括机器人的位置、姿态、传感器状态等。
- 暂停与恢复:用户可以通过点击暂停按钮暂停仿真,此时仿真时间停止增加,机器人和环境的状态保持不变。点击恢复按钮后,仿真继续从暂停的状态开始运行。
- 单步运行:用户可以点击单步运行按钮,使仿真只执行一个时间步。这有助于观察和调试机器人在每个时间步中的行为变化。
- 实时运行:在实时运行模式下,仿真时间会按照设定的基本时间步长逐步推进,机器人根据控制器的指令实时运动。
物理仿真
- 碰撞检测与响应:Webots 的物理引擎会检测机器人与环境或其他物体之间的碰撞,并根据物理规则计算碰撞后的响应,如反弹、摩擦力等,从而影响机器人的运动。
- 动力学仿真:对于机器人的运动,Webots 会根据牛顿动力学原理计算其加速度、速度和位移。例如,对于轮式机器人,根据电机的扭矩和轮子的转速,计算出机器人的线速度和角速度。
传感器与执行器的交互
- 传感器数据读取:在每个时间步中,控制器可以调用 Webots 提供的 API 函数,从传感器设备中读取数据,如距离传感器的测量值、摄像头的图像数据等。
- 执行器控制:控制器根据传感器数据计算出控制指令,然后通过 API 函数将指令发送给执行器,如设置电机的速度或位置。
python的闭环控制库
[https://python-control.readthedocs.io/en/0.10.1/generated/control.matlab.dlqe.html#control.matlab.dlqe]
[https://python-control.readthedocs.io/en/0.10.1/matlab.html]
Python-control 软件包是一组用于反馈控制系统分析与设计的Python类和函数集,其初始目标是实现Åström与Murray合著的教材《反馈系统》中所有案例演示所需功能。该软件包提供MATLAB兼容模块,可调用与MATLAB控制系统工具箱命令相对应的多种常用函数。
Python-control 软件包基于NumPy和SciPy构建。NumPy与MATLAB的通用差异可参阅此链接文档。
就该软件包的特殊性而言,需特别注意以下事项:
- 向量元素必须用逗号分隔。例如[1 2 3]应写作[1, 2, 3]
- 返回多参数的函数使用元组形式
- 不可使用大括号表示集合,需改用元组
- 时序数据的最后一个索引为时间维度(参见"时序数据"章节说明)
The python-control package is a set of python classes and functions that implement common operations for the analysis and design of feedback control systems. The initial goal is to implement all of the functionality required to work through the examples in the textbook Feedback Systems by Astrom and Murray. A MATLAB compatibility module is available that provides many of the common functions corresponding to commands available in the MATLAB Control Systems Toolbox.
The python-control package makes use of NumPy and SciPy. A list of general differences between NumPy and MATLAB can be found here.
In terms of the python-control package more specifically, here are some things to keep in mind:
You must include commas in vectors. So [1 2 3] must be [1, 2, 3].
Functions that return multiple arguments use tuples.
You cannot use braces for collections; use tuples instead.
Time series data have time as the final index (see Time series data).
实现
- 起飞
# 测试起飞、悬停和降落mav2pro

# webots2025a环境

from controller import Robot
import sys
import time
import numpy as np

def clamp(value, value_min, value_max):
    """将数值限制在最小值和最大值之间"""
    return min(max(value, value_min), value_max)


class Mavic (Robot):
    # 控制常量
    K_VERTICAL_THRUST = 68.5  # 基础升力
    K_VERTICAL_OFFSET = 0.6   # 垂直偏移补偿
    K_VERTICAL_P = 3.0        # 垂直PID的P参数
    K_ROLL_P = 50.0           # 横滚PID的P参数
    K_PITCH_P = 30.0          # 俯仰PID的P参数

    def __init__(self):
        Robot.__init__(self)
        self.time_step = int(self.getBasicTimeStep())

        # 初始化传感器

        # 初始化相机,否则预览画面全黑
        self.camera = self.getDevice("camera")
        self.camera.enable(self.time_step)

        self.imu = self.getDevice("inertial unit")
        self.imu.enable(self.time_step)
        self.gps = self.getDevice("gps")
        self.gps.enable(self.time_step)
        self.gyro = self.getDevice("gyro")
        self.gyro.enable(self.time_step)

        # 初始化电机
        self.front_left_motor = self.getDevice("front left propeller")
        self.front_right_motor = self.getDevice("front right propeller")
        self.rear_left_motor = self.getDevice("rear left propeller")
        self.rear_right_motor = self.getDevice("rear right propeller")

        motors = [self.front_left_motor, self.front_right_motor,
                  self.rear_left_motor, self.rear_right_motor]
        for motor in motors:
            motor.setPosition(float('inf'))
            motor.setVelocity(0)  # 初始速度为0

        # 飞行状态变量
        self.current_pose = [0, 0, 0, 0, 0, 0]  # X,Y,Z,roll,pitch,yaw
        self.target_altitude = 2.5  # 目标高度2.5米
        self.state = "TAKEOFF"      # 初始状态为起飞
        self.hover_start_time = 0    # 悬停开始时间

    def set_position(self, pos):
        """更新当前姿态"""
        self.current_pose = pos

    def run(self):
        """主控制循环"""
        while self.step(self.time_step) != -1:
            # 读取传感器数据
            roll, pitch, yaw = self.imu.getRollPitchYaw()
            x_pos, y_pos, altitude = self.gps.getValues()
            roll_acceleration, pitch_acceleration, _ = self.gyro.getValues()
            self.set_position([x_pos, y_pos, altitude, roll, pitch, yaw])

            # 状态机控制
            if self.state == "TAKEOFF":
                # 起飞阶段:达到目标高度后进入悬停状态
                if altitude > self.target_altitude - 0.1:  # 达到目标高度附近
                    self.state = "HOVER"
                    self.hover_start_time = self.getTime()
                    print("已达到目标高度,开始悬停")

            elif self.state == "HOVER":
                # 悬停阶段:保持5秒后进入降落状态
                if self.getTime() - self.hover_start_time > 5.0:
                    self.state = "LAND"
                    print("悬停完成,开始降落")

            elif self.state == "LAND":
                # 降落阶段:当高度低于0.3米时关闭电机并退出
                if altitude < 0.3:
                    self.state = "SHUTDOWN"
                    print("降落完成,关闭电机")
                    # 关闭所有电机
                    # self.front_left_motor.setVelocity(0)
                    # self.front_right_motor.setVelocity(0)
                    # self.rear_left_motor.setVelocity(0)
                    # self.rear_right_motor.setVelocity(0)
                    return  # 退出程序

            # 根据状态设置目标高度
            if self.state == "LAND":
                target_altitude = 0  # 降落目标高度为0
            else:
                target_altitude = self.target_altitude

            # PID控制计算
            roll_input = self.K_ROLL_P * clamp(roll, -1, 1) + roll_acceleration
            pitch_input = self.K_PITCH_P * clamp(pitch, -1, 1) + pitch_acceleration
            yaw_input = 0  # 不需要偏航控制

            # 高度控制
            clamped_altitude_diff = clamp(target_altitude - altitude + self.K_VERTICAL_OFFSET, -1, 1)
            vertical_input = self.K_VERTICAL_P * pow(clamped_altitude_diff, 3.0)

            # 计算电机输入(保持稳定)
            front_left = self.K_VERTICAL_THRUST + vertical_input - yaw_input + pitch_input - roll_input
            front_right = self.K_VERTICAL_THRUST + vertical_input + yaw_input + pitch_input + roll_input
            rear_left = self.K_VERTICAL_THRUST + vertical_input + yaw_input - pitch_input - roll_input
            rear_right = self.K_VERTICAL_THRUST + vertical_input - yaw_input - pitch_input + roll_input

            # 设置电机速度(注意不同电机旋转方向不同)
            self.front_left_motor.setVelocity(front_left)
            self.front_right_motor.setVelocity(-front_right)
            self.rear_left_motor.setVelocity(-rear_left)
            self.rear_right_motor.setVelocity(rear_right)


# 创建并运行控制器
robot = Mavic()
print("启动无人机控制程序")
print("起飞到2.5米高度...")
robot.run()
print("程序正常结束")
- 拍照并保存图片到目录
# 测试1Hz获取camera图像添加序号并保存到文件夹

# Webots Python代码:1Hz频率获取相机图像并添加序号保存到文件夹

from controller import Robot, Camera
import cv2
import os
import time

class ImageCaptureRobot(Robot):
    def __init__(self):
        super().__init__()
        # 初始化设备
        self.timestep = int(self.getBasicTimeStep())

        # 获取相机设备
        self.camera = self.getDevice('camera')
        self.camera.enable(self.timestep)

        # 图像保存设置
        self.save_folder = 'captured_images'
        self.image_counter = 0
        self.last_capture_time = 0
        self.capture_interval = 1000  # 1秒 = 1000毫秒

        # 创建保存目录
        if not os.path.exists(self.save_folder):
            os.makedirs(self.save_folder)
            print(f"已创建图像保存目录: {self.save_folder}")

    def run(self):
        print("开始以1Hz频率捕获并保存图像...")
        print(f"图像将保存到: {os.path.abspath(self.save_folder)}")

        while self.step(self.timestep) != -1:
            current_time = self.getTime() * 1000  # 转换为毫秒

            # 检查是否到达捕获间隔
            if current_time - self.last_capture_time >= self.capture_interval:
                self.last_capture_time = current_time
                self.capture_image()

    def capture_image(self):
        """捕获当前相机图像并保存"""
        # 获取图像数据
        image_data = self.camera.getImage()

        if image_data:
            # 转换为OpenCV格式 (BGRA)
            width = self.camera.getWidth()
            height = self.camera.getHeight()
            image = np.frombuffer(image_data, dtype=np.uint8).reshape((height, width, 4))

            # 转换为BGR格式 (去掉Alpha通道)
            image_bgr = cv2.cvtColor(image, cv2.COLOR_BGRA2BGR)

            # 添加序号文本
            # text = f"Frame: {self.image_counter:04d}"
            # cv2.putText(image_bgr, text, (10, 30),
                       # cv2.FONT_HERSHEY_SIMPLEX, 1, (0, 255, 0), 2)

            # 保存图像
            filename = os.path.join(self.save_folder, f"img_{self.image_counter:04d}.jpg")
            cv2.imwrite(filename, image_bgr)

            print(f"已保存::: {filename}")
            self.image_counter += 1

# 主程序
if __name__ == "__main__":
    import numpy as np  # 确保numpy已安装

    robot = ImageCaptureRobot()
    robot.run()
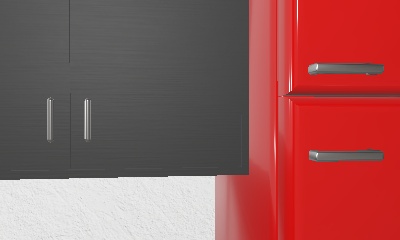
效果
| 拍照保存的图片 |
|---|
 |

 浙公网安备 33010602011771号