折腾笔记[23]-使用rust进行图像分割
摘要
使用rust和ort库(onnxruntime后端)推理SAM2.1模型并获取图像分割结果.
关键词
rust;onnx;SAM2;segment;predict;
关键信息
项目地址:[https://github.com/ByeIO/bye.orbslam3.rs/blob/dev1/crates/seekslam_examples/examples/ort_segment.rs]
配置文件:
[workspace.package]
version = "0.0.1"
edition = "2024"
[workspace.dependencies]
# 错误处理
anyhow = "1.0.97"
# 时间格式化
chrono = "0.4.40"
# Model Context Protocol协议定义
rust-mcp-schema = { version = "0.2.2", path = "./static/rust-mcp-schema" }
# Model Context Protocol开发工具
# rust-mcp-sdk = { version = "0.1.2", path = "./static/rust-mcp-sdk/crates/rust-mcp-sdk" }
rust-mcp-sdk = { version = "0.1.2" }
# 多线程框架
tokio = { version = "1.44.1", features = ["full"] }
# ros2接口
ros2-interfaces-humble = "0.0.1"
# 日志后端
log = { version = "0.4.27", features = ["std"] }
# prototxt文件读取
protokit = "0.2.0"
# protobuf处理
prost = "0.13.5"
prost-build = { version = "0.13.5", features = ["cleanup-markdown"] }
# onnx运行时
wonnx = { version = "0.5.1", path = "./static/wonnx/wonnx" }
# 线性代数
nalgebra = { version = "0.33.2", features = ["rand"] }
ndarray = { version = "0.16.1", path = "./static/ndarray" }
# 随机数
rand = "0.9.0"
rand_distr = "0.5.1"
# 图像处理
image = "0.25.6"
imageproc = "0.25.0"
# 图优化
factrs = "0.2.0"
# wasm运行时
wasmtime-cli = { version = "31.0.0", path="./static/wasmtime-cli-31.0.0" }
# tract运行时
tract-onnx = { version = "0.21.11", features = ["getrandom-js"], path = "./static/tract-onnx"}
# javascript/ESM运行时
deno_cli = { version = "2.2.8", path = "./static/deno" }
# 临时文件
tempfile = "3.19.1"
# 嵌入文件
embed-file = "0.2.0"
# onnxruntime(C绑定), 默认特性
ort = { version = "2.0.0-rc.9", path = "./static/ort" }
# YOLOv11
yolo-rs = "0.1.2"

[patch.crates-io]
# 替换依赖文件
ndarray = { version = "0.16.1", path = "./static/ndarray" }
原理简介
ort库简介
[https://github.com/pykeio/ort]
[https://ort.pyke.io/]
[https://github.com/pykeio/ort/discussions/categories/show-and-tell]
ort既可以使用C++绑定的onnxruntime后端(自动下载), 也可以使用纯rust的tract后端
这些文档是针对最新 alpha 版本的 ort,即 2.0.0-rc.9。此版本已具备生产环境的可用性(只是 API 尚未稳定),我们推荐新旧项目都使用该版本。
ort 让机器学习模型通过 ONNX Runtime 部署到生产环境变得轻松,ONNX Runtime 是一种硬件加速的推理引擎。借助 ort 和 ONNX Runtime,你几乎可以在任何硬件上运行几乎所有机器学习模型(包括 ResNet、YOLOv8、BERT、LLaMA 等),通常比 PyTorch 更快,并且额外享有 Rust 的高效性。
ONNX 是一种可互操作的神经网络规范。你所选择的机器学习框架——PyTorch、TensorFlow、Keras、PaddlePaddle 等——会将你的模型转化为由基本操作(如 MatMul 或 Add)组成的 ONNX 图。然后,这个图可以被转换为另一个框架中的模型,或者直接通过 ONNX Runtime 进行推理。
将神经网络转化为类似 ONNX 的图表示,为更多优化和更广泛的加速硬件支持打开了大门。ONNX Runtime 可以显著提高大多数模型的推理速度 / 延迟,并且能够通过 NVIDIA CUDA & TensorRT、Intel OpenVINO、Qualcomm QNN、华为 CANN 等实现加速。
ort 是 Rust 通往 ONNX Runtime 的桥梁,让你可以通过易于使用且符合人体工程学的 API 推理你的 ONNX 模型。许多商业、开源和研究项目都在一些相当重要的生产场景中使用 ort 来提升推理性能:
- Twitter 在其推荐系统的部分环节使用 ort,每天处理数亿次请求。
- Bloop 的语义代码搜索功能由 ort 提供支持。
- SurrealDB 强大的 SurrealQL 查询语言支持通过 ort 调用机器学习模型,包括 ONNX 图。
- Google 的 Magika 文件类型检测库由 ort 提供支持。
- Wasmtime,一个开源的 WebAssembly 运行时,通过 ort 支持 WASI-NN 标准的 ONNX 推理。
- rust-bert 在 Rust 中实现了许多现成可用的 NLP 管道,类似于 Hugging Face Transformers,同时支持 tch 和 ort 后端。
Fast ML inference & training for ONNX models in Rust
These docs are for the latest alpha version of ort, 2.0.0-rc.9. This version is production-ready (just not API stable) and we recommend new & existing projects use it.
ort makes it easy to deploy your machine learning models to production via ONNX Runtime, a hardware-accelerated inference engine. With ort + ONNX Runtime, you can run almost any ML model (including ResNet, YOLOv8, BERT, LLaMA) on almost any hardware, often far faster than PyTorch, and with the added bonus of Rust’s efficiency.
ONNX is an interoperable neural network specification. Your ML framework of choice — PyTorch, TensorFlow, Keras, PaddlePaddle, etc. — turns your model into an ONNX graph comprised of basic operations like MatMul or Add. This graph can then be converted into a model in another framework, or inferenced directly with ONNX Runtime.
Converting a neural network to a graph representation like ONNX opens the door to more optimizations and broader acceleration hardware support. ONNX Runtime can significantly improve the inference speed/latency of most models and enable acceleration with NVIDIA CUDA & TensorRT, Intel OpenVINO, Qualcomm QNN, Huawei CANN, and much more.
ort is the Rust gateway to ONNX Runtime, allowing you to infer your ONNX models via an easy-to-use and ergonomic API. Many commercial, open-source, & research projects use ort in some pretty serious production scenarios to boost inference performance:
Twitter uses ort in part of their recommendations system, serving hundreds of millions of requests a day.
Bloop’s semantic code search feature is powered by ort.
SurrealDB’s powerful SurrealQL query language supports calling ML models, including ONNX graphs through ort.
Google’s Magika file type detection library is powered by ort.
Wasmtime, an open-source WebAssembly runtime, supports ONNX inference for the WASI-NN standard via ort.
rust-bert implements many ready-to-use NLP pipelines in Rust à la Hugging Face Transformers with both tch & ort backends.
图像分割概念简介
编码器(Encoder)
- 功能:编码器的作用是将输入图像转换为一组特征表示,这些特征能够捕捉图像中的语义信息、纹理、形状等关键信息,为后续的分割任务提供基础的视觉特征。
- 代码体现:在代码中,
encoder_session用于加载编码器模型,通过调用self.encoder_session.run,将输入图像image传递给编码器模型,得到编码器的输出特征high_res_feats_0、high_res_feats_1和image_embed。
解码器(Decoder)
- 功能:解码器的作用是将编码器提取的特征进一步处理,结合其他输入(如提示信息等),生成最终的分割掩码(masks)。它需要根据编码器提供的特征,理解图像中不同区域的语义,并输出每个像素所属的类别或对象的掩码。
- 代码体现:
decoder_session用于加载解码器模型。在predict方法中,通过调用self.decoder_session.run,将编码器的特征features、提示信息(如点坐标point_coords、点标签point_labels、边框box等)以及一些其他辅助信息(如mask_input、has_mask_input、orig_im_size等)传递给解码器模型,得到分割掩码masks和 IoU 预测值iou_pred。
图像语义分割
目标是理解图像内容,为每个像素分配正确的语义标签,使计算机能够“读懂”图像中的物体.
分割掩码(Masks)
- 功能:分割掩码是图像分割任务的输出,它是一个与输入图像尺寸相同的二维或三维数组,其中每个像素的值表示该像素属于某个特定对象或类别的置信度或标签。通过分割掩码,可以清晰地看到图像中不同对象的边界和区域。
- 代码体现:在代码中,
masks是解码器输出的一个重要结果。它经过一系列的处理,包括调整大小到原始图像尺寸等操作,最终用于生成分割结果的可视化图像。
点提示(Point Prompts)
- 功能:点提示是用户在图像上指定的某些点,这些点可以用来引导分割模型关注特定的区域或对象。通过提供点提示,用户可以告诉模型哪些区域是感兴趣的,从而帮助模型更准确地分割出目标对象。
- 代码体现:代码中的
point_coords和point_labels分别表示点提示的坐标和对应的标签。在predict方法中,会根据这些点提示信息来调整分割的逻辑和结果。
边框提示(Box Prompts)
- 功能:边框提示是用户在图像上指定的一个矩形区域,用于指示模型关注该区域内的对象。它可以帮助模型更好地定位和分割出边框内的目标对象。
- 代码体现:
box是边框提示的输入,在代码中会对其进行处理,如转换坐标等操作,并将其作为解码器的输入之一,以影响分割结果。
IoU 预测值(IoU Predictions)
- 功能:IoU(Intersection over Union)预测值是模型对分割结果质量的一种评估。它表示预测的分割掩码与真实标注之间的重叠程度,通常用于衡量分割的准确性。在某些情况下,IoU 预测值可以帮助用户了解模型对分割结果的置信度。
- 代码体现:
iou_pred是解码器输出的一个结果,它与分割掩码一起返回,为用户提供关于分割质量的参考信息。
低分辨率掩码(Low-Resolution Masks)
- 功能:低分辨率掩码是在较低分辨率下生成的分割掩码,它通常用于后续的处理或作为中间结果。低分辨率掩码可以减少计算量和存储需求,同时在一些情况下也能提供足够的分割信息。
- 代码体现:在代码中,
low_res_masks是从解码器输出的masks中提取出来的,它可能用于一些后续的处理步骤,如进一步的优化或分析。
提示编码器(Prompt Encoder)
- 功能:提示编码器的作用是将用户提供的提示信息(如点提示、边框提示等)进行编码,转换为模型能够理解和处理的格式。它将提示信息与图像特征相结合,使模型能够根据提示来调整分割的逻辑。
- 代码体现:虽然代码中没有直接出现“提示编码器”的具体实现,但从解码器的输入中可以看出,点提示和边框提示等信息被传递给解码器,这暗示了解码器内部可能包含了提示编码器的功能,对这些提示信息进行了处理。
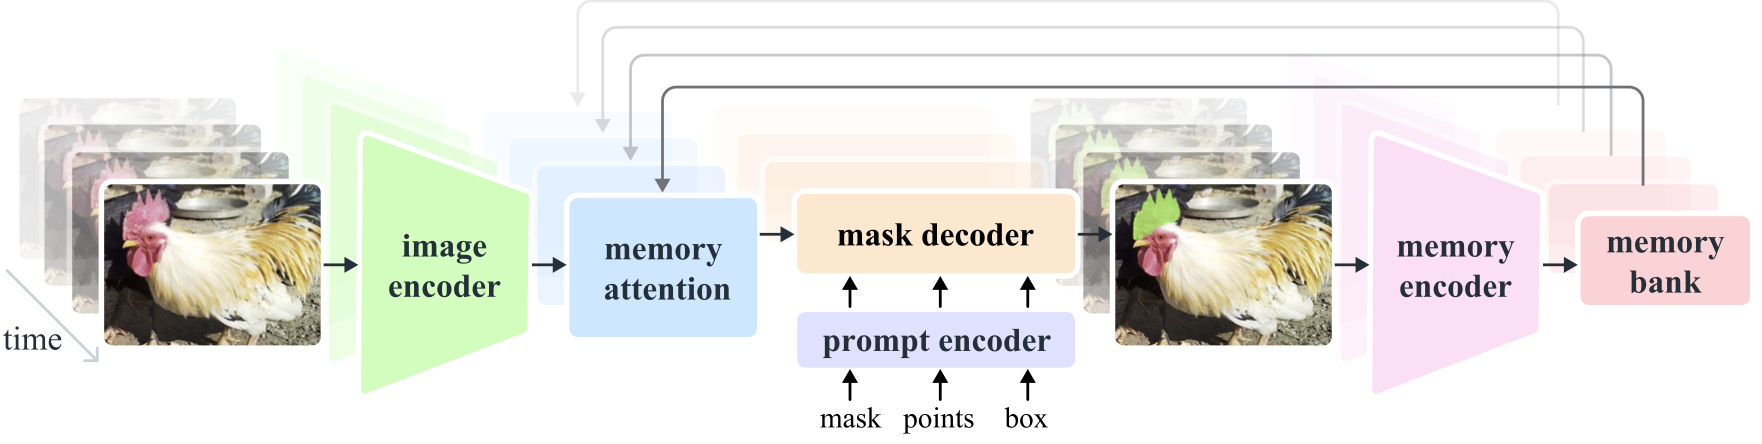
记忆机制(Memory Mechanism)
- 功能:记忆机制主要用于处理视频分割任务中的时间依赖性和物体遮挡问题。它通过存储过去帧的信息,帮助模型在当前帧中更好地理解物体的运动和变化,从而实现对物体的连续跟踪和准确分割。
- 代码体现:虽然代码中没有明确的“记忆机制”实现,但根据 SAM2.1 模型的架构描述,记忆机制是其核心组成部分之一,它在处理视频分割任务时起着关键作用。
图像分割一般使用步骤
- 加载模型
- 设置图像:使用预测器的 set_image() 方法设置图像
- 提供提示:指定点、框或掩码作为提示,指示您想要分割的对象
- 生成掩码:调用预测器的 predict() 方法生成图像的分割掩码
- 使用或可视化结果:模型将返回分割掩码,您可以根据需要使用或可视化这些掩码(叠加掩码到图像)
SAM(Segment-Anything 2.1)简介
[https://ai-bot.cn/sam-2-1/]
[https://ai.meta.com/blog/fair-news-segment-anything-2-1-meta-spirit-lm-layer-skip-salsa-sona/?utm_source=ai-bot.cn]
[https://www.jiqizhixin.com/articles/2023-04-17-3]
[https://arxiv.org/abs/2408.00714]
[https://github.com/facebookresearch/sam2]
Segment Anything Model 2(SAM 2)是一个用于解决图像和视频中可提示视觉分割的基础模型。我们将SAM扩展到视频领域,即将图像视为只有单帧的视频。该模型设计为简单的Transformer架构,并配备流式内存以实现实时视频处理。我们构建了一个模型在环(model-in-the-loop)的数据引擎,通过用户交互来改进模型和数据,从而收集了我们目前最大的视频分割数据集——SA-V数据集。在我们的数据上训练的SAM 2在各种任务和视觉领域中都展现出了强大的性能。
Segment Anything Model 2 (SAM 2) is a foundation model towards solving promptable visual segmentation in images and videos. We extend SAM to video by considering images as a video with a single frame. The model design is a simple transformer architecture with streaming memory for real-time video processing. We build a model-in-the-loop data engine, which improves model and data via user interaction, to collect our SA-V dataset, the largest video segmentation dataset to date. SAM 2 trained on our data provides strong performance across a wide range of tasks and visual domains.
OVSeg(open-vocabulary segmentation) 简介
[https://github.com/facebookresearch/ov-seg]
[https://huggingface.co/spaces/facebook/ov-seg]
[https://jeff-liangf.github.io/projects/ovseg/]
开放词汇语义分割旨在根据文本描述将图像分割成语义区域,这些文本描述可能在训练过程中并未见过。最近的两阶段方法首先生成类别无关的掩码提议,然后利用预训练的视觉-语言模型(例如CLIP)对掩码区域进行分类。我们发现这种范式的性能瓶颈在于预训练的CLIP模型,因为它在掩码图像上表现不佳。为了解决这个问题,我们提出对CLIP进行微调,使用收集到的掩码图像区域及其对应的文本描述。我们通过挖掘现有的图像-标题数据集(例如COCO Captions),利用CLIP将掩码图像区域与图像标题中的名词进行匹配,来收集训练数据。与更精确且手动标注的固定类别分割标签(例如COCO-Stuff)相比,我们发现我们这种噪声较多但多样化的数据集能够更好地保留CLIP的泛化能力。除了对整个模型进行微调外,我们还利用掩码图像中的“空白”区域,采用我们称之为掩码提示调整的方法。实验表明,掩码提示调整在不修改CLIP任何权重的情况下带来了显著的改进,并且可以进一步改进一个完全微调的模型。特别是,在COCO上训练并在ADE20K-150上评估时,我们最好的模型达到了29.6%的mIoU,比之前的最佳水平高出8.5%。这是首次开放词汇通用模型在没有针对特定数据集进行调整的情况下,与2017年的监督专家模型性能相匹配。
Open-Vocabulary Semantic Segmentation with Mask-adapted CLIP
Open-vocabulary semantic segmentation aims to segment an image into semantic regions according to text descriptions, which may not have been seen during training. Recent two-stage methods first generate class-agnostic mask proposals and then leverage pre-trained vision-language models, e.g., CLIP, to classify masked regions. We identify the performance bottleneck of this paradigm to be the pre-trained CLIP model, since it does not perform well on masked images. To address this, we propose to finetune CLIP on a collection of masked image regions and their corresponding text descriptions. We collect training data by mining an existing image-caption dataset (e.g., COCO Captions), using CLIP to match masked image regions to nouns in the image captions. Compared with the more precise and manually annotated segmentation labels with fixed classes (e.g., COCO-Stuff), we find our noisy but diverse dataset can better retain CLIP's generalization ability. Along with finetuning the entire model, we utilize the "blank" areas in masked images using a method we dub mask prompt tuning. Experiments demonstrate mask prompt tuning brings significant improvement without modifying any weights of CLIP, and it can further improve a fully finetuned model. In particular, when trained on COCO and evaluated on ADE20K-150, our best model achieves 29.6% mIoU, which is +8.5% higher than the previous state-of-the-art. For the first time, open-vocabulary generalist models match the performance of supervised specialist models in 2017 without dataset specific adaptations.
使用SAM2.1进行图像分割的数学原理
[https://arxiv.org/abs/2408.00714]
[https://docs.ultralytics.com/zh/models/sam-2/]
SAM2是一个基于Transformer的统一模型,用于图像和视频分割任务。其核心数学原理可以分解为以下几个部分
- 方法细节
- 图像编码器:使用MAE预训练的Hiera图像编码器,提供每帧的特征嵌入。
- 记忆注意力:通过堆叠L个Transformer块,将当前帧的特征与过去的记忆特征进行交叉注意力操作。
- 提示编码器和掩码解码器:与SAM相同,能够处理点、框或掩码作为提示。
- 记忆编码器:通过卷积模块下采样预测掩码,并将其与未条件化的帧嵌入相结合,生成记忆。
- 记忆库:保留过去预测的内存,用于后续帧的使用。
| 方法概括 |
|---|
 |
1. 核心任务
SAM2的目标是可提示视觉分割(Promptable Visual Segmentation, PVS),其数学形式可表示为:
其中:
- \(I\):输入图像或视频帧。
- \(P\):用户提示(点击、框、掩码)。
- \(M_{\text{mem}}\):记忆模块存储的历史信息。
- \(\mathcal{M}\):输出的分割掩码。
2. 关键模块与数学原理
2.1 图像编码器(Image Encoder)
- 基于分层Transformer(Hiera架构),提取多尺度特征:
- 输入帧\(I\)通过编码器生成特征金字塔\(\{F_s\}_{s=4,8,16,32}\)(\(s\)为步长)。
- 高层特征(\(s=16,32\))用于记忆模块,低层特征(\(s=4,8\))通过跳跃连接注入掩码解码器,保留细节。
2.2 记忆模块(Memory Bank)
- 记忆更新:对第\(t\)帧,记忆编码器生成记忆向量\(m_t\):\[m_t = \text{Conv}(F_t^{16} \oplus \text{Downsample}(\mathcal{M}_t)) \]其中\(\oplus\)表示逐元素相加,\(\text{Downsample}\)为空间下采样。
- 记忆存储:维护两个FIFO队列:
- 空间记忆:存储最近\(N\)帧的\(m_t\)。
- 对象指针:轻量级向量,记录语义信息。
2.3 记忆注意力(Memory Attention)
- 当前帧特征\(F_t\)与记忆模块交互:\[\tilde{F}_t = \text{CrossAttn}(F_t, \{m_{t-k}\}_{k=1}^N) + \text{SelfAttn}(F_t) \]
- 使用2D-RoPE相对位置编码,增强时空一致性。
- 跨注意力机制聚合历史信息,无需GRU等递归结构。
2.4 掩码解码器(Mask Decoder)
- 类似SAM的两路Transformer结构,输入为:
- 提示嵌入\(P\)(通过位置编码+类型嵌入)。
- 记忆增强的特征\(\tilde{F}_t\)。
- 输出多尺度掩码:\[\mathcal{M}_t = \text{MLP}(\text{Upsample}(\tilde{F}_t \oplus F_t^{4,8})) \]其中低层特征\(F_t^{4,8}\)通过跳跃连接补充细节。
3. 训练策略
- 数据混合:联合训练图像(SA-1B)和视频(SA-V)数据,损失函数为掩码IoU和交叉熵:\[\mathcal{L} = \lambda_1 \mathcal{L}_{\text{IoU}} + \lambda_2 \mathcal{L}_{\text{CE}} \]
- 交互模拟:在训练时随机采样提示(点击/框/掩码),模拟用户交互。
4. 关键创新
- 统一建模:通过记忆模块将图像分割(SAM)推广到视频,静态场景下记忆为空,退化为SAM。
- 高效注意力:移除相对位置偏置(RPB),采用FlashAttention-2加速计算。
- 数据引擎:通过模型-人工协同标注(Phase 1→3),生成大规模数据集SA-V(35.5M掩码)。
5. 数学优势
- 实时性:流式处理(逐帧编码+记忆缓存),速度达43.8 FPS(A100)。
- 泛化性:通过零样本任务验证,在17个视频和37个图像数据集上超越SAM(6倍加速)。
实现
-
模型下载
[https://huggingface.co/IRPC/frogforge-sam2.1-onnx/tree/main]
[https://huggingface.co/IRPC/frogforge-sam2.1-onnx/resolve/main/onnx/fp32/sam2.1_base_plus.encoder.onnx]
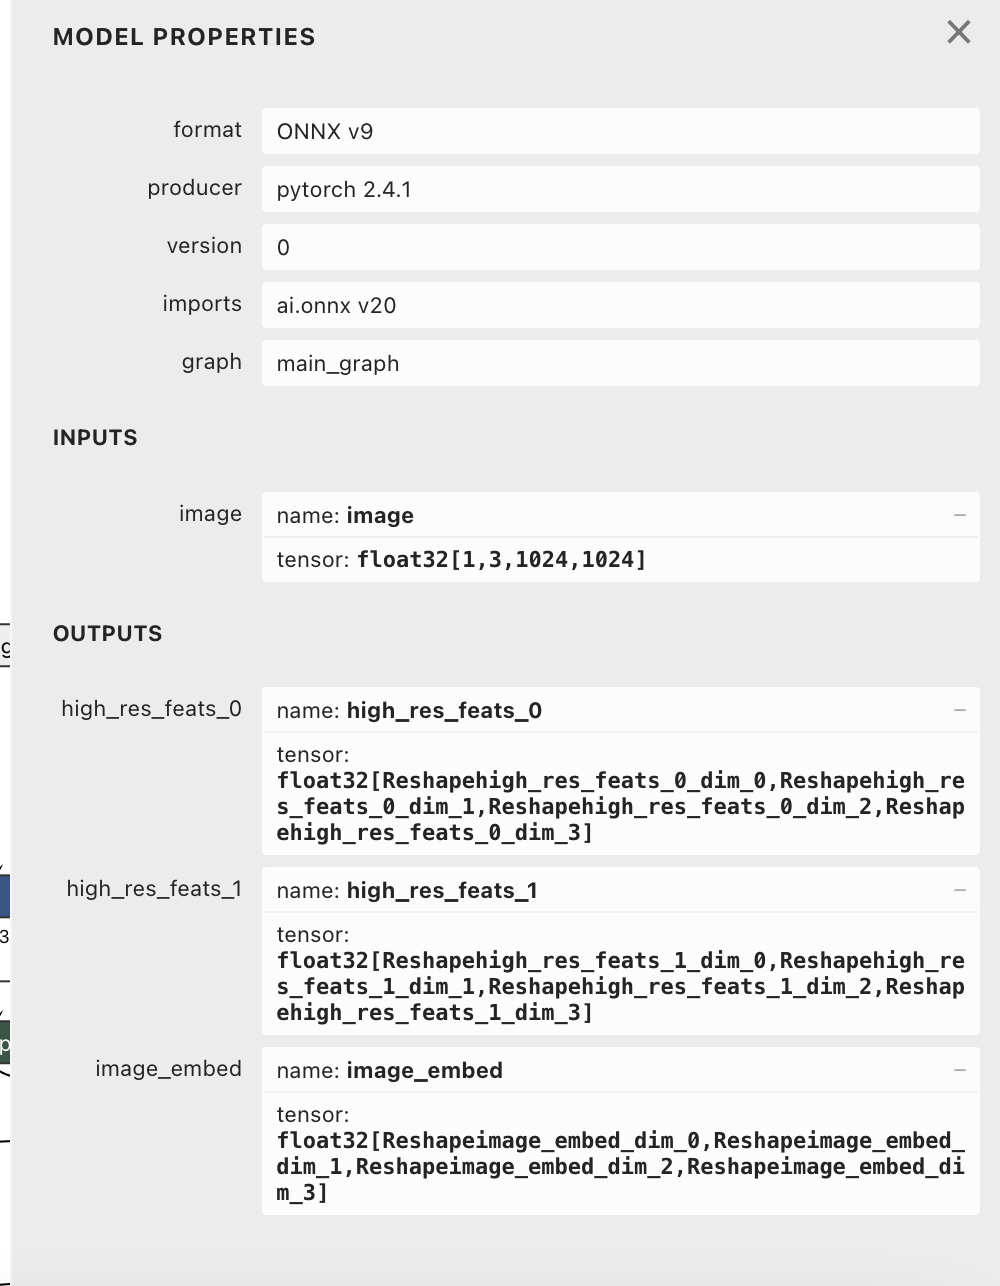
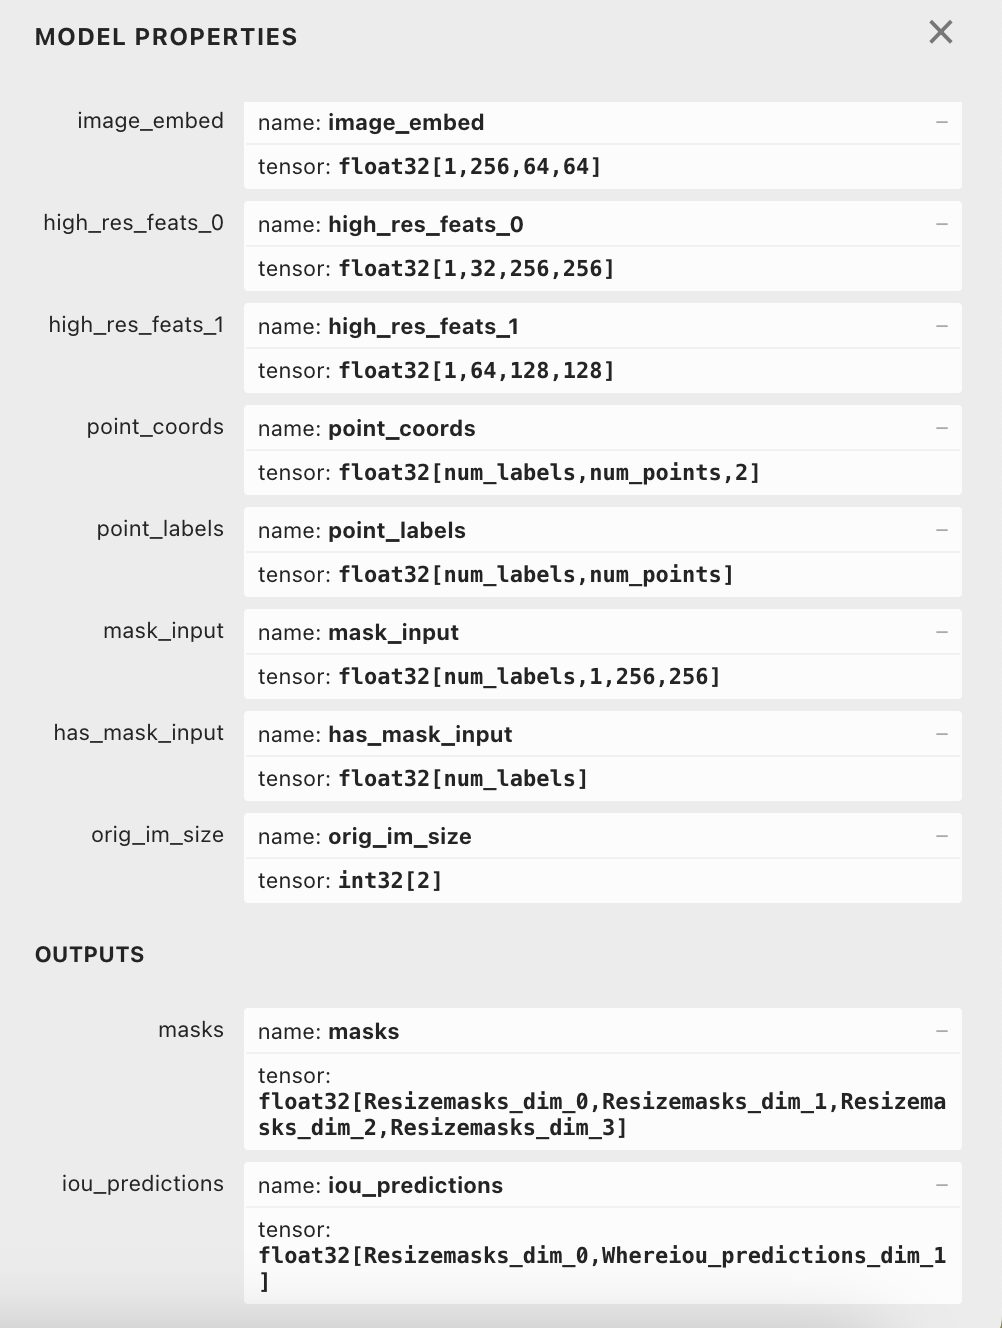
[https://huggingface.co/IRPC/frogforge-sam2.1-onnx/resolve/main/onnx/fp32/sam2.1_base_plus.decoder.onnx]- 使用netron软件查看onnx模型的输入和输出
编码器 解码器 ![]()
![]()
-
Python版本代码
# 测试SAM2.1图片分割

# 编码模型: ../../../assets/ailia-models/segment-anything-2/sam2.1_base_plus.encoder.onnx
## 输出:
## high_res_feats_0
## name: high_res_feats_0
## tensor: float32[Reshapehigh_res_feats_0_dim_0,Reshapehigh_res_feats_0_dim_1,Reshapehigh_res_feats_0_dim_2,Reshapehigh_res_feats_0_dim_3]
## high_res_feats_1
## name: high_res_feats_1
## tensor: float32[Reshapehigh_res_feats_1_dim_0,Reshapehigh_res_feats_1_dim_1,Reshapehigh_res_feats_1_dim_2,Reshapehigh_res_feats_1_dim_3]
## image_embed
## name: image_embed
## tensor: float32[Reshapeimage_embed_dim_0,Reshapeimage_embed_dim_1,Reshapeimage_embed_dim_2,Reshapeimage_embed_dim_3]

# 解码模型: ../../../assets/ailia-models/segment-anything-2/sam2.1_base_plus.decoder.onnx
## 输出:
## masks
## name: masks
## tensor: float32[Resizemasks_dim_0,Resizemasks_dim_1,Resizemasks_dim_2,Resizemasks_dim_3]
## iou_predictions
## name: iou_predictions
## tensor: float32[Resizemasks_dim_0,Whereiou_predictions_dim_1]

# 输入图片../assets/rgb1.png
# 输出../result/segment_onnx.png

import os
import cv2
import numpy as np
import onnxruntime as ort

class SAM2ImagePredictor:
    def __init__(self, encoder_model_path, decoder_model_path):
        """
        初始化 SAM2 图像分割预测器
        :param encoder_model_path: 编码器模型路径
        :param decoder_model_path: 解码器模型路径
        """
        self.encoder_session = ort.InferenceSession(encoder_model_path)
        self.decoder_session = ort.InferenceSession(decoder_model_path)

    def trunc_normal(self, size, std=0.02, a=-2, b=2):
        """
        生成截断正态分布的随机数
        :param size: 输出数组的形状
        :param std: 标准差
        :param a: 截断下限
        :param b: 截断上限
        :return: 截断正态分布的随机数数组
        """
        values = np.random.normal(loc=0., scale=std, size=size)
        values = np.clip(values, a * std, b * std)
        return values

    def set_image(self, image):
        """
        设置输入图像并获取编码器的特征
        :param image: 输入图像
        :return: 编码器的特征
        """
        # 调整图像大小为模型期望的尺寸
        image = cv2.resize(image, (1024, 1024))
        # 调整通道顺序为模型期望的顺序(CHW)
        image = np.transpose(image, (2, 0, 1))
        # 添加批量维度
        image = np.expand_dims(image, axis=0).astype(np.float32)
        outputs = self.encoder_session.run(None, {"image": image})
        high_res_feats_0, high_res_feats_1, image_embed = outputs
        features = {
            "high_res_feats_0": high_res_feats_0,
            "high_res_feats_1": high_res_feats_1,
            "image_embed": image_embed
        }
        return features

    def predict(self, features, orig_hw, point_coords=None, point_labels=None, box=None, mask_input=None):
        """
        进行图像分割预测
        :param features: 编码器的特征
        :param orig_hw: 原始图像的高和宽
        :param point_coords: 点提示的坐标
        :param point_labels: 点提示的标签
        :param box: 边框提示
        :param mask_input: 掩码输入
        :return: 分割掩码、IoU 预测值和低分辨率掩码
        """
        if point_coords is not None and len(point_coords) != 0:
            point_coords = point_coords.astype(np.float32)
            unnorm_coords = self.transform_coords(point_coords, orig_hw)
            labels = point_labels.astype(np.float32)
            if len(unnorm_coords.shape) == 2:
                unnorm_coords, labels = unnorm_coords[None, ...], labels[None, ...]
        else:
            unnorm_coords, labels = None, None

        if box is not None:
            box = box.astype(np.float32)
            unnorm_box = self.transform_boxes(box, orig_hw)
        else:
            unnorm_box = None

        if mask_input is not None:
            mask_input = mask_input.astype(np.float32)
            if len(mask_input.shape) == 3:
                mask_input = mask_input[None, :, :, :]
        else:
            # 确保 mask_input 的维度为 4
            mask_input = np.zeros((1, 1, 256, 256), dtype=np.float32)

        # 如果没有点提示和边框提示,创建一个默认的点提示
        if unnorm_coords is None and unnorm_box is None:
            unnorm_coords = np.array([[[0.5, 0.5]]], dtype=np.float32)  # 默认点提示在图像中心
            labels = np.array([[1]], dtype=np.float32)  # 默认标签为1,修改为 float32

        if unnorm_coords is not None:
            concat_points = (unnorm_coords, labels)
        else:
            concat_points = None

        if unnorm_box is not None:
            box_coords = unnorm_box.reshape(-1, 2, 2)
            box_labels = np.array([[2, 3]], dtype=np.float32)  # 修改为 float32
            box_labels = box_labels.repeat(unnorm_box.shape[0], 1)
            if concat_points is not None:
                concat_coords = np.concatenate([box_coords, concat_points[0]], axis=1)
                concat_labels = np.concatenate([box_labels, concat_points[1]], axis=1)
                concat_points = (concat_coords, concat_labels.astype(np.int32))
            else:
                concat_points = (box_coords, box_labels.astype(np.int32))

        if mask_input is None:
            mask_input_dummy = np.zeros((1, 256, 256), dtype=np.float32)
            masks_enable = np.array([0], dtype=np.float32)
        else:
            mask_input_dummy = mask_input
            masks_enable = np.array([1], dtype=np.float32)

        if concat_points is None:
            raise ValueError("concat_points must be exists")

        orig_im_size = np.array(orig_hw, dtype=np.int32)

        sparse_embeddings, dense_embeddings = self.decoder_session.run(
            None,
            {
                "point_coords": concat_points[0],  # 修改为模型期望的输入名称 f32
                "point_labels": concat_points[1],  # 修改为模型期望的输入名称 f32
                "mask_input": mask_input_dummy,   # 修改为模型期望的输入名称 f32
                "has_mask_input": masks_enable,   # 修改为模型期望的输入名称 f32
                "orig_im_size": orig_im_size,     # 添加模型期望的输入 i32
                "image_embed": features["image_embed"],  # 修改为模型期望的输入名称 f32
                "high_res_feats_0": features["high_res_feats_0"],  # 修改为模型期望的输入名称 f32
                "high_res_feats_1": features["high_res_feats_1"]   # 修改为模型期望的输入名称 f32
            }
        )

        masks, iou_pred = sparse_embeddings, dense_embeddings

        low_res_masks = masks[:, 1:, :, :]
        iou_predictions = iou_pred[:, 1:]

        masks = self.postprocess_masks(masks, orig_hw)

        return masks, iou_predictions, low_res_masks

    def transform_coords(self, coords, orig_hw):
        """
        转换坐标
        :param coords: 坐标
        :param orig_hw: 原始图像的高和宽
        :return: 转换后的坐标
        """
        h, w = orig_hw
        coords = coords.copy()
        coords[..., 0] = coords[..., 0] / w
        coords[..., 1] = coords[..., 1] / h

        resolution = 1024
        coords = coords * resolution
        return coords

    def transform_boxes(self, boxes, orig_hw):
        """
        转换边框
        :param boxes: 边框
        :param orig_hw: 原始图像的高和宽
        :return: 转换后的边框
        """
        boxes = self.transform_coords(boxes.reshape(-1, 2, 2), orig_hw)
        return boxes

    def postprocess_masks(self, masks, orig_hw):
        interpolated_masks = []
        for mask in masks:
            # 打印 mask 的形状,便于调试
            print("Original mask shape:", mask.shape)

            # 确保 mask 的形状为 (num_masks, height, width)
            if len(mask.shape) == 4:  # 如果有 batch 维度,去掉 batch 维度
                mask = np.squeeze(mask, axis=0)
            if len(mask.shape) == 3:  # 如果已经是 (num_masks, height, width),直接使用
                pass
            else:
                raise ValueError(f"Unexpected mask shape: {mask.shape}")

            # 转换为 (height, width, num_masks)
            mask = np.transpose(mask, (1, 2, 0))

            # 调整大小到原始图像尺寸
            resized_mask = cv2.resize(mask, (orig_hw[1], orig_hw[0]), interpolation=cv2.INTER_LINEAR)

            # 打印 resized_mask 的形状,便于调试
            print("Resized mask shape:", resized_mask.shape)

            # 如果 resized_mask 是二维的,添加一个新的维度
            if len(resized_mask.shape) == 2:
                resized_mask = resized_mask[:, :, np.newaxis]

            # 转换回 (num_masks, height, width)
            resized_mask = np.transpose(resized_mask, (2, 0, 1))

            interpolated_masks.append(resized_mask)

        interpolated_masks = np.array(interpolated_masks)

        return interpolated_masks

if __name__ == "__main__":
    # 输入图片路径
    input_image_path = "../assets/rgb1.png"
    # 输出图片路径
    output_image_path = "../result/segment_onnx.png"
    # 编码器模型路径
    encoder_model_path = "../../../assets/ailia-models/segment-anything-2/sam2.1_base_plus.encoder.onnx"
    # 解码器模型路径
    decoder_model_path = "../../../assets/ailia-models/segment-anything-2/sam2.1_base_plus.decoder.onnx"

    # 读取输入图片
    image = cv2.imread(input_image_path)
    image = cv2.cvtColor(image, cv2.COLOR_BGR2RGB)
    orig_hw = image.shape[:2]

    # 初始化 SAM2 图像分割预测器
    predictor = SAM2ImagePredictor(encoder_model_path, decoder_model_path)

    # 设置输入图像并获取编码器的特征
    features = predictor.set_image(image)

    # 进行图像分割预测
    masks, iou_predictions, low_res_masks = predictor.predict(features, orig_hw)

    # 将分割掩码转换为可视化图像
    mask = masks[0, 0].astype(np.uint8) * 255
    mask = cv2.cvtColor(mask, cv2.COLOR_GRAY2BGR)

    # 将分割掩码叠加到原始图像上
    result = cv2.addWeighted(image, 0.5, mask, 0.5, 0)
    result = cv2.cvtColor(result, cv2.COLOR_RGB2BGR)

    # 保存输出图片
    cv2.imwrite(output_image_path, result)
- Rust版本代码
#![allow(unused)]
#![allow(deprecated)]

//! 测试 SAM2.1 图片分割
//! 编码模型: ../../../assets/ailia-models/segment-anything-2/sam2.1_base_plus.encoder.onnx
//! 输出:
//! high_res_feats_0
//! name: high_res_feats_0
//! tensor: float32[Reshapehigh_res_feats_0_dim_0,Reshapehigh_res_feats_0_dim_1,Reshapehigh_res_feats_0_dim_2,Reshapehigh_res_feats_0_dim_3]
//! high_res_feats_1
//! name: high_res_feats_1
//! tensor: float32[Reshapehigh_res_feats_1_dim_0,Reshapehigh_res_feats_1_dim_1,Reshapehigh_res_feats_1_dim_2,Reshapehigh_res_feats_1_dim_3]
//! image_embed
//! name: image_embed
//! tensor: float32[Reshapeimage_embed_dim_0,Reshapeimage_embed_dim_1,Reshapeimage_embed_dim_2,Reshapeimage_embed_dim_3]
//!
//! 解码模型: ../../../assets/ailia-models/segment-anything-2/sam2.1_base_plus.decoder.onnx
//! 输出:
//! masks
//! name: masks
//! tensor: float32[Resizemasks_dim_0,Resizemasks_dim_1,Resizemasks_dim_2,Resizemasks_dim_3]
//! iou_predictions
//! name: iou_predictions
//! tensor: float32[Resizemasks_dim_0,Whereiou_predictions_dim_1]
//!
//! 输入图片 ./assets/rgb1.png
//! 输出 ./result/segment_onnx.png

// 导入标准库路径处理模块
use std::path::Path;

// 导入 ORT 相关模块
use ort::{inputs, session::Session};
use ort::value::Tensor;

// 图像处理相关模块
use image::{GenericImageView, ImageBuffer, Rgb};

// 错误处理模块
use anyhow::Result;

// 线性代数库
use ndarray::{
    Array, ArrayD, ArrayViewD,
    Dim, Ix1, Ix2, Ix3, Ix4,
    IxDyn, stack, Axis,
    IxDynImpl, ArrayBase,
};
use ndarray::OwnedRepr;

// 随机数
use rand::rng;

// 随机分布
use rand_distr::{ Normal, Distribution};

// 生成截断正态分布的随机数
fn trunc_normal(size: &[usize], std: f32, a: f32, b: f32) -> ArrayD<f32> {
    // 创建正态分布(需处理可能的错误)
    let dist = Normal::new(0.0, std as f64).expect("Invalid normal distribution parameters");
    let mut rng = rand::rng();

    // 使用 mapv 进行向量化操作
    ArrayD::zeros(size).mapv(|_ : f32| {
        let v = dist.sample(&mut rng) as f32;
        v.clamp(a * std, b * std) // 等价于 max(a).min(b)
    })
}

// 转换坐标
fn transform_coords(coords: &mut Array<f32, Ix2>, orig_hw: (u32, u32)) {
    let (h, w) = (orig_hw.0 as f32, orig_hw.1 as f32);
    coords.index_axis_mut(ndarray::Axis(1), 0).mapv_inplace(|x| x / w);
    coords.index_axis_mut(ndarray::Axis(1), 1).mapv_inplace(|y| y / h);

    let resolution = 1024.0;
    coords.mapv_inplace(|x| x * resolution);
}

// 转换边框
fn transform_boxes(boxes: &mut Array<f32, Ix2>, orig_hw: (u32, u32)) {
    // 直接处理二维数组
    transform_coords(boxes, orig_hw);
}

// 后处理掩码
fn postprocess_masks(masks: &Array<f32, Ix4>, orig_hw: (u32, u32)) -> Array<f32, Ix4> {

    // 创建一个用于存储插值后的掩码的向量
    let mut interpolated_masks = Vec::new();

    // 遍历输入的掩码数组
    for mask in masks.outer_iter() {

        // 将当前掩码转换为动态维度数组
        let mut _mask = mask.into_dyn();

        // 使用临时变量解决借用冲突
        let mut temp_mask: ArrayViewD<f32>;

        // 检查掩码的维度,如果为4,则提取第一个维度的数据
        if _mask.ndim() == 4 {
            // 转换为动态维度
            temp_mask = _mask.index_axis(ndarray::Axis(0), 0).into_dyn();
        } else {
            // 如果不是4维,直接赋值, 使用「视图」
            temp_mask = _mask.view();
        }

        // 如果掩码的维度不是3,则抛出异常
        if _mask.ndim() != 3 {
            panic!("Unexpected mask shape: {:?}", mask.shape());
        }

        // 翻转掩码的坐标轴
        let mut mask_ = temp_mask.reversed_axes();
        // 使用image库将掩码转换为图像,并进行缩放
        let resized_mask = image::imageops::resize(
            &ImageBuffer::from_fn(
                mask_.shape()[1] as u32,
                mask_.shape()[0] as u32,
                |x, y| Rgb([(mask_[[y as usize, x as usize, 0]] * 255.0) as u8; 3]),
            ),
            orig_hw.1,
            orig_hw.0,
            image::imageops::FilterType::Nearest,
        );

        // 将缩放后的图像转换为数组
        let mut resized_mask = Array::from_shape_fn(
            (resized_mask.height() as usize, resized_mask.width() as usize, 1),
            |(y, x, _)| resized_mask.get_pixel(x as u32, y as u32)[0] as f32 / 255.0,
        );

        // 再次翻转数组的坐标轴
        resized_mask = resized_mask.reversed_axes();

        // 将处理后的掩码添加到向量中
        interpolated_masks.push(resized_mask);
    }
    // 创建一个视图数组
    let views: Vec<_> = interpolated_masks.iter()
        .map(|arr| arr.view())
        .collect();

    // 将视图数组堆叠成一个新的数组
    ndarray::stack(ndarray::Axis(0), &views).unwrap()
}

struct SAM2ImagePredictor {
    encoder_session: Session,
    decoder_session: Session,
}

impl SAM2ImagePredictor {
    // 构造函数
    fn new(encoder_model_path: &str, decoder_model_path: &str) -> Result<Self> {
        let encoder_session = Session::builder()?.commit_from_file(encoder_model_path)?;
        let decoder_session = Session::builder()?.commit_from_file(decoder_model_path)?;
        Ok(SAM2ImagePredictor {
            encoder_session,
            decoder_session,
        })
    }

    // 修正返回类型,明确返回的三个数组的具体形状
    fn set_image(&mut self, image: &image::DynamicImage) -> Result<(Array<f32, Ix4>, Array<f32, Ix4>, Array<f32, Ix4>)> {
        // 调整图像大小为模型期望的尺寸
        let resized_img = image.resize_exact(1024, 1024, image::imageops::FilterType::Nearest);
        // 创建四维数组保存预处理数据 [batch=1, channels=3, height=1024, width=1024]
        let mut input_array = Array::zeros((1, 3, 1024, 1024));
        // 遍历所有像素进行归一化处理
        for (x, y, pixel) in resized_img.to_rgb8().enumerate_pixels() {
            // 归一化 R 通道
            input_array[[0, 0, y as usize, x as usize]] = pixel[0] as f32 / 255.0;
            // 归一化 G 通道
            input_array[[0, 1, y as usize, x as usize]] = pixel[1] as f32 / 255.0;
            // 归一化 B 通道
            input_array[[0, 2, y as usize, x as usize]] = pixel[2] as f32 / 255.0;
        }
        // 将数组转换为 ORT 张量
        let input_tensor = ort::value::Value::from_array(input_array.clone())?;

        // 运行编码器模型推理
        let outputs = self.encoder_session.run(inputs![input_tensor])?;
        // 提取推理结果中的特征和嵌入向量
        let (high_res_feats_0_shape, high_res_feats_0) = outputs["high_res_feats_0"].try_extract_tensor::<f32>()?;
        let (high_res_feats_1_shape, high_res_feats_1) = outputs["high_res_feats_1"].try_extract_tensor::<f32>()?;
        let (image_embed_shape, image_embed) = outputs["image_embed"].try_extract_tensor::<f32>()?;

        // println!("high_res_feats_0的shape大小: {}", outputs["high_res_feats_0"].try_extract_tensor::<f32>()?.0);
        // println!("high_res_feats_1的shape大小: {}", outputs["high_res_feats_1"].try_extract_tensor::<f32>()?.0);
        // println!("image_embed的shape大小: {}", outputs["image_embed"].try_extract_tensor::<f32>()?.0);

        // 将特征和嵌入向量转换为 ndarray 数组
        Ok((
            // 高分辨率特征 0
            Array::from_shape_vec(
                Dim::<[usize; 4]>::new(
                    [high_res_feats_0_shape[0] as usize, high_res_feats_0_shape[1] as usize,
                    high_res_feats_0_shape[2] as usize, high_res_feats_0_shape[3] as usize]
                ),
                high_res_feats_0.to_vec()
            )?,
            // 高分辨率特征 1
            Array::from_shape_vec(
                Dim::<[usize; 4]>::new(
                    [high_res_feats_1_shape[0] as usize, high_res_feats_1_shape[1] as usize,
                    high_res_feats_1_shape[2] as usize, high_res_feats_1_shape[3] as usize]
                ),
                high_res_feats_1.to_vec()
            )?,
            // 图像嵌入向量
            Array::from_shape_vec(
                Dim::<[usize; 4]>::new(
                    [image_embed_shape[0] as usize, image_embed_shape[1] as usize,
                    image_embed_shape[2] as usize, image_embed_shape[3] as usize]
                ),
                image_embed.to_vec()
            )?,
        ))
    }

    // 执行预测
    fn predict(
        &mut self,
        features: (Array<f32, Ix4>, Array<f32, Ix4>, Array<f32, Ix4>),
        orig_hw: (u32, u32),
        point_coords: Option<Array<f32, Ix2>>,
        point_labels: Option<Array<f32, Ix1>>,
        box_coords: Option<Array<f32, Ix2>>,
        mask_input: Option<Array<f32, Ix4>>,
    ) -> Result<(Array<f32, Ix4>, Array<f32, Ix2>, Array<f32, Ix4>)> {
        // 初始化未归一化的坐标和标签
        let mut unnorm_coords: Option<ArrayD<f32>> = None;
        let mut labels: Option<ArrayD<f32>> = None;

        // 如果有输入点坐标
        if let Some(mut coords) = point_coords {
            if coords.len() != 0 {
                // 转换坐标
                transform_coords(&mut coords, orig_hw);

                // 插入轴
                let coords_3d = coords.insert_axis(Axis(0)).into_dyn();
                let lbls = point_labels.unwrap().insert_axis(Axis(0)).into_dyn();

                // 设置未归一化的坐标
                unnorm_coords = Some(coords_3d);
                // 设置标签
                labels = Some(lbls);
            }
        }

        // 初始化未归一化的边框
        let mut unnorm_box: Option<ArrayD<f32>> = None;
        if let Some(mut box_) = box_coords {
            // 调整边框形状
            let mut box_3d = box_
                .to_shape((1, 2, 2))
                .unwrap()
                .into_owned()
                .into_dyn();

            // 转换边框
            // 动态数组转为固定维度数组再调用处理函数
            // 转换为固定二维数组
            let mut fixed_box_3d: ArrayBase<_, Ix2> = match box_3d.view_mut().to_owned().into_dimensionality::<Ix2>() {
                Ok(array) => array,
                Err(_) => panic!("The array is not 2-dimensional!"),
            };
            transform_boxes(&mut fixed_box_3d.to_owned(), orig_hw);
            unnorm_box = Some(box_3d);
        }

        // 处理输入掩码
        let mut mask_input = mask_input.map(|mut m| {
            if m.ndim() == 3 {
                // 插入轴
                // m = m.insert_axis(Axis(0));
            }
            m.into_dyn()
        });
        // 如果没有输入掩码,创建一个默认的掩码
        if mask_input.is_none() {
            mask_input = Some(Array::zeros((1, 1, 256, 256)).into_dyn());
        }

        // 如果没有点坐标和边框,创建默认的点坐标和标签
        if unnorm_coords.is_none() && unnorm_box.is_none() {
            unnorm_coords = Some(Array::from_shape_vec((1, 1, 2), vec![0.5, 0.5]).unwrap().into_dyn());
            labels = Some(Array::from_shape_vec((1, 1), vec![1.0]).unwrap().into_dyn());
        }

        // 合并点坐标和边框
        let mut concat_points: Option<(ArrayD<f32>, ArrayD<f32>)> = None;
        if let Some(coords) = unnorm_coords {
            concat_points = Some((coords, labels.unwrap()));
        }

        if let Some(mut box_coords) = unnorm_box {
            // 创建边框标签
            let box_labels = Array::from_shape_vec((1, 2), vec![2.0, 3.0]).unwrap().into_dyn();
            if let Some((mut concat_coords, mut concat_labels)) = concat_points {
                // 合并点坐标和边框坐标
                let concat_coords = ndarray::stack(Axis(1), &[box_coords.view(), concat_coords.view()]).unwrap().into_dyn();
                // 合并点标签和边框标签
                let concat_labels = ndarray::stack(Axis(1), &[box_labels.view(), concat_labels.view()]).unwrap().into_dyn();
                concat_points = Some((concat_coords, concat_labels));
            } else {
                concat_points = Some((box_coords, box_labels));
            }
        }

        // 获取掩码输入
        let mask_input_dummy = mask_input.unwrap();
        // 创建掩码启用标志
        let masks_enable = Array::from_shape_vec((1,), vec![if mask_input_dummy.len() > 0 { 1.0 } else { 0.0 }]).unwrap().into_dyn();

        // 解构输入特征
        let (high_res_feats_0, high_res_feats_1, image_embed) = features;
        // 创建原始图像大小数组
        let orig_im_size = Array::from_shape_vec((2,), vec![orig_hw.0 as i32, orig_hw.1 as i32]).unwrap().into_dyn();

        // 获取合并后的点坐标和标签
        let (concat_coords, concat_labels) = concat_points.ok_or_else(|| anyhow::anyhow!("concat_points must be exists"))?;

        // 在 predict 方法中
        let outputs = self.decoder_session.run(inputs![
            "point_coords" => ort::value::Value::from_array(concat_coords.mapv(|x| x as f32))?,
            "point_labels" => ort::value::Value::from_array(concat_labels.mapv(|x| x as f32))?,
            "mask_input" => ort::value::Value::from_array(mask_input_dummy.mapv(|x| x as f32))?,
            "has_mask_input" => ort::value::Value::from_array(masks_enable.mapv(|x| x as f32))?,
            "orig_im_size" => ort::value::Value::from_array(orig_im_size.mapv(|x| x as i32))?,
            "image_embed" => ort::value::Value::from_array(image_embed.mapv(|x| x as f32))?,
            "high_res_feats_0" => ort::value::Value::from_array(high_res_feats_0.mapv(|x| x as f32))?,
            "high_res_feats_1" => ort::value::Value::from_array(high_res_feats_1.mapv(|x| x as f32))?
        ])?;

        // 提取推理结果
        let (masks_shape, masks) = outputs["masks"].try_extract_tensor::<f32>()?;
        let (iou_pred_shape, iou_pred) = outputs["iou_predictions"].try_extract_tensor::<f32>()?;

        println!("masks_shape: {}", masks_shape);
        println!("iou_pred_shape: {}", iou_pred_shape);

        // 将推理结果转换为 ndarray 数组, 掩码
        let mut masks = Array::from_shape_vec((masks.len(),), masks.to_vec())?.into_dyn();
        // IOU 预测
        let iou_pred = Array::from_shape_vec((iou_pred.len(),), iou_pred.to_vec())?.into_dyn();

        // FIXME: 这两个返回值没有用到, 所以直接忽略
        // 提取低分辨率掩码
        // let low_res_masks = masks.slice(ndarray::s![.., 1.., .., ..]).to_owned();
        let low_res_masks: Array<f32, Ix4> = masks.clone().into_shape((1, 1, 480, 640))?;
        // 提取 IOU 预测
        // let iou_predictions = iou_pred.slice(ndarray::s![.., 1..]).to_owned();
        let iou_predictions: Array<f32, Ix2> = iou_pred.clone().into_shape((1, 1))?;

        // 后处理掩码
        // 动态数组转为固定维度数组再调用处理函数
        // 转换为固定四维数组

        let mut fixed_masks = low_res_masks.clone();
        // let mut fixed_masks: ArrayBase<_, Ix4> = match masks.view_mut().to_owned().into_dimensionality::<Ix4>() {
        //     Ok(array) => array,
        //     Err(_) => {
        //         // panic!("The array is not 4-dimensional!"),
        //     }
        // };


        let masks = postprocess_masks(&mut fixed_masks, orig_hw);

        // 返回结果
        Ok((masks, iou_predictions, low_res_masks))
        // Ok((masks, Array<f32, Ix2>::zeros(), Array<f32, Ix4>::zeros()))
    }

}

fn main() -> Result<()> {
    // 输入图片路径
    let input_image_path = "./assets/rgb1.png";
    // 输出图片路径
    let output_image_path = "./result/ort_segment.png";
    // 编码器模型路径
    let encoder_model_path = "../../assets/ailia-models/segment-anything-2/sam2.1_base_plus.encoder.onnx";
    // 解码器模型路径
    let decoder_model_path = "../../assets/ailia-models/segment-anything-2/sam2.1_base_plus.decoder.onnx";

    // 创建输出目录(如果不存在)
    std::fs::create_dir_all(Path::new(output_image_path).parent().unwrap())?;

    // 读取输入图片
    let image = image::open(input_image_path)?;
    let orig_hw = (image.height(), image.width());

    // 初始化 SAM2 图像分割预测器
    let mut predictor = SAM2ImagePredictor::new(encoder_model_path, decoder_model_path)?;

    // 设置输入图像并获取编码器的特征
    let features = predictor.set_image(&image)?;

    // 进行图像分割预测
    let (masks, iou_predictions, low_res_masks) = predictor.predict(features, orig_hw, None, None, None, None)?;

    // FIXME: 绘图错误
    // 将分割掩码转换为可视化图像
    let mask = masks.slice(ndarray::s![0, 0, .., ..]).mapv(|x| (x * 255.0) as u8);
    let mut img_buffer = ImageBuffer::from_fn(orig_hw.1, orig_hw.0, |x, y| Rgb([mask[[x as usize, y as usize]]; 3]));

    // 将分割掩码叠加到原始图像上
    let orig_img = image.to_rgb8();
    for (x, y, pixel) in img_buffer.enumerate_pixels_mut() {
        let orig_pixel = orig_img.get_pixel(x, y);
        *pixel = Rgb([
            ((orig_pixel[0] as f32 * 0.5 + pixel[0] as f32 * 0.5) as u8),
            ((orig_pixel[1] as f32 * 0.5 + pixel[1] as f32 * 0.5) as u8),
            ((orig_pixel[2] as f32 * 0.5 + pixel[2] as f32 * 0.5) as u8),
        ]);
    }

    // 保存输出图片
    img_buffer.save(output_image_path)?;

    Ok(())
}
效果对比
| 原图 | Python结果 | Rust结果 |
|---|---|---|
 |
 |
 |

 浙公网安备 33010602011771号