

NIO学习笔记
java的NIO的学习教程,网上一大把,本文只是学习的笔记。
本文参考和复制如下内容:
https://www.cnblogs.com/mikechenshare/p/16587635.html
https://blog.csdn.net/K_520_W/article/details/123454627
https://www.zhihu.com/question/29005375
一、NIO简介
NIO 同步非阻塞IO,多路复用,其目的是提高速度。主要的使用场景是在网络IO。对于传统的文件IO,优势不明显。
NIO是面向缓冲区(Buffer)的。
用实际的实例来学习一下把!
1、NIO复制文件和传统IO复制文件的demo


package com.muxue.utils;

import java.io.*;
import java.nio.ByteBuffer;
import java.nio.channels.FileChannel;

/**
 * @author:lipu
 * @Date:2023/2/6 0006
 * @Descrption:com.muxue.utils
 * @Version:1.0
 */
public class SimpleFileTransferTest {

    private long transferFile(File source, File des) throws IOException {
        long startTime = System.currentTimeMillis();

        if (!des.exists())
            des.createNewFile();

        BufferedInputStream bis = new BufferedInputStream(new FileInputStream(source));
        BufferedOutputStream bos = new BufferedOutputStream(new FileOutputStream(des));

        //将数据源读到的内容写入目的地--使用数组
        byte[] bytes = new byte[1024 * 1024];
        int len;
        while ((len = bis.read(bytes)) != -1) {
            bos.write(bytes, 0, len);
        }

        long endTime = System.currentTimeMillis();
        return endTime - startTime;
    }

    /**
     * 使用nio 拷贝文件
     * @param source
     * @param des
     * @return
     * @throws IOException
     */
    private long transferFileWithNIO(File source, File des) throws IOException {
        long startTime = System.currentTimeMillis();

        if (!des.exists())
            des.createNewFile();

        RandomAccessFile read = new RandomAccessFile(source, "rw");
        RandomAccessFile write = new RandomAccessFile(des, "rw");

        FileChannel readChannel = read.getChannel();
        FileChannel writeChannel = write.getChannel();


        ByteBuffer byteBuffer = ByteBuffer.allocate(1024 * 1024);//1M缓冲区

        while (readChannel.read(byteBuffer) > 0) {
            byteBuffer.flip();
            writeChannel.write(byteBuffer);
            byteBuffer.clear();
        }

        writeChannel.close();
        readChannel.close();
        long endTime = System.currentTimeMillis();
        return endTime - startTime;
    }

    public static void main(String[] args) throws IOException {
        SimpleFileTransferTest simpleFileTransferTest = new SimpleFileTransferTest();
        File sourse = new File("F:\\电影\\猜火车-cd1.rmvb");
        File des = new File("F:\\Users\\Desktop\\io.avi");
        File nio = new File("F:\\Users\\Desktop\\nio.avi");

        long time = simpleFileTransferTest.transferFile(sourse, des);
        System.out.println(time + ":普通字节流时间");

        long timeNio = simpleFileTransferTest.transferFileWithNIO(sourse, nio);
        System.out.println(timeNio + ":NIO时间");


    }
}
这个例子是用来学习的,其实NIO的主要用途不是文件IO,是网络IO,下面讲的都是基于网络IO 。
可简单认为:
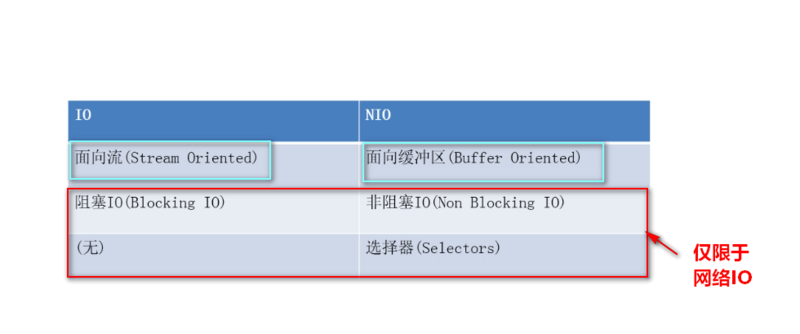
IO是面向流的处理,NIO是面向块(缓冲区)的处理
面向流的I/O 系统一次一个字节地处理数据。
一个面向块(缓冲区)的I/O系统以块的形式处理数据。
NIO主要有三个核心部分组成:
buffer缓冲区
Channel管道,
Selector选择器
二、 buffer缓冲区和Channel管道
在NIO中并不是以流的方式来处理数据的,而是以buffer缓冲区和Channel管道配合使用来处理数据。
简单理解一下:Channel管道比作成铁路,buffer缓冲区比作成火车(运载着货物)。
而我们的NIO就是通过Channel管道运输着存储数据的Buffer缓冲区的来实现数据的处理!
要时刻记住:Channel不与数据打交道,它只负责运输数据。与数据打交道的是Buffer缓冲区。
Channel-->运输
Buffer-->数据
相对于传统IO而言,流是单向的。对于NIO而言,有了Channel管道这个概念,我们的读写都是双向的(铁路上的火车能从广州去北京、自然就能从北京返还到广州)!
1、buffer缓冲区核心要点
我们来看看Buffer缓冲区有什么值得我们注意的地方。
Buffer是缓冲区的抽象类:
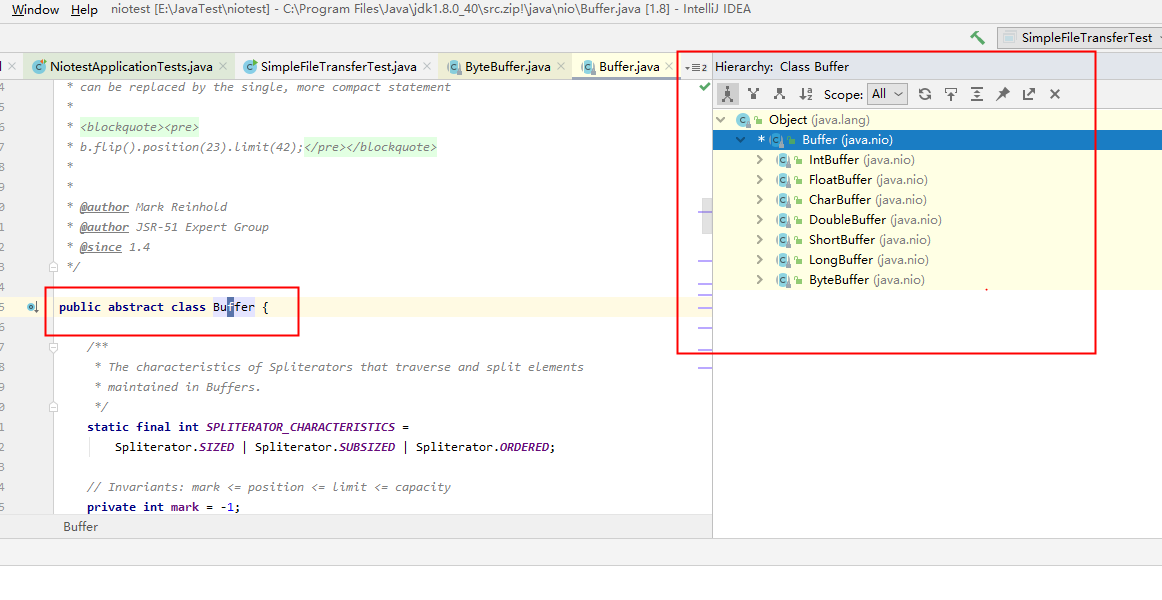
其中ByteBuffer是用得最多的实现类(在管道中读写字节数据)。
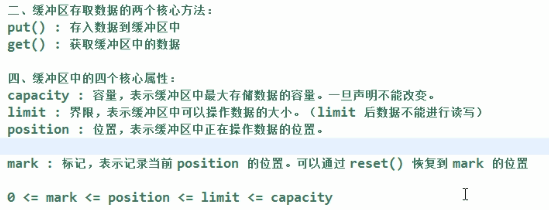
拿到一个缓冲区我们往往会做什么?很简单,就是读取缓冲区的数据/写数据到缓冲区中。所以,缓冲区的核心方法就是:
put()get()
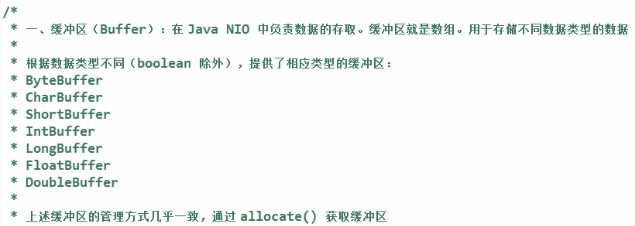
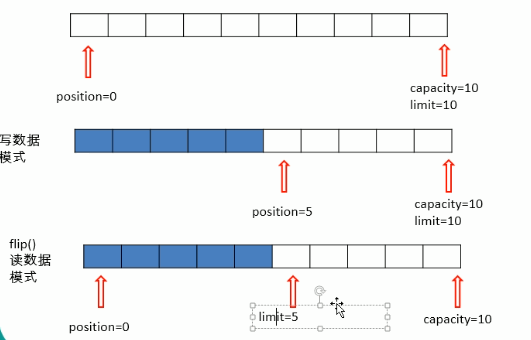
Buffer类维护了4个核心变量属性来提供关于其所包含的数组的信息。它们是:
- 容量Capacity
- 缓冲区能够容纳的数据元素的最大数量。容量在缓冲区创建时被设定,并且永远不能被改变。(不能被改变的原因也很简单,底层是数组嘛)
- 上界Limit
- 缓冲区里的数据的总数,代表了当前缓冲区中一共有多少数据。
- 位置Position
- 下一个要被读或写的元素的位置。Position会自动由相应的
get( )和put( )函数更新。 - 标记Mark
- 一个备忘位置。用于记录上一次读写的位置。
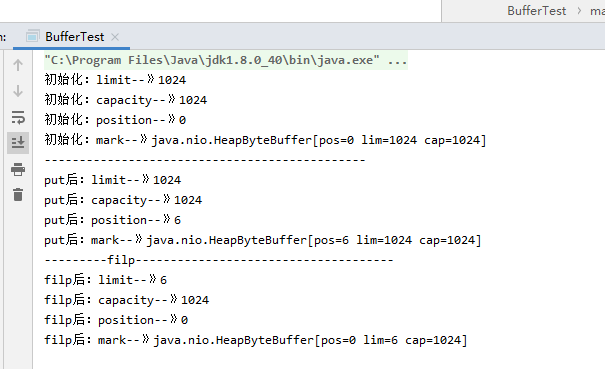
package com.muxue.utils;

import java.nio.ByteBuffer;

public class BufferTest {

    public static void main(String[] args) {

        ByteBuffer byteBuffer = ByteBuffer.allocate(1024);//1kb
        System.out.println("初始化:limit--》" + byteBuffer.limit());
        System.out.println("初始化:capacity--》" + byteBuffer.capacity());
        System.out.println("初始化:position--》" + byteBuffer.position());
        System.out.println("初始化:mark--》" + byteBuffer.mark());
        System.out.println("----------------------------------------------");

        String str = "Java3y";
        byteBuffer.put(str.getBytes());

        System.out.println("put后:limit--》" + byteBuffer.limit());
        System.out.println("put后:capacity--》" + byteBuffer.capacity());
        System.out.println("put后:position--》" + byteBuffer.position());
        System.out.println("put后:mark--》" + byteBuffer.mark());

        System.out.println("---------filp -------------------------------------");
        byteBuffer.flip();
        System.out.println("filp后:limit--》" + byteBuffer.limit());
        System.out.println("filp后:capacity--》" + byteBuffer.capacity());
        System.out.println("filp后:position--》" + byteBuffer.position());
        System.out.println("filp后:mark--》" + byteBuffer.mark());


    }
}
运行结果:
现在我想要从缓存区拿数据,怎么拿呀??
NIO给了我们一个flip()方法。这个方法可以改动position和limit的位置!
还是上面的代码,我们flip()一下后,再看看4个核心属性的值会发生什么变化:
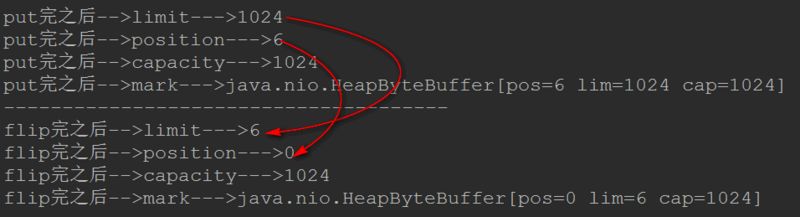
很明显的是:
- limit变成了position的位置了
- 而position变成了0
看到这里的同学可能就会想到了:当调用完filp()时:limit是限制读到哪里,而position是从哪里读
一般我们称filp()为“切换成读模式”
- 每当要从缓存区的时候读取数据时,就调用
filp()“切换成读模式”
读完我们还想写数据到缓冲区,那就使用clear()函数,这个函数会“清空”缓冲区:
- 数据没有真正被清空,只是被遗忘掉了
2、Channel的技术要点
Channel(通道):Channel 是一个通道,管道,网络数据通过Channel读取和写入,Channel和流Stream的不同之处在于Channel是双向的,流只在一个方向上移动(InputStream/OutputStream),而Channel可以用于读写同时进行,即Channel是全双工的。

channel的类结构图
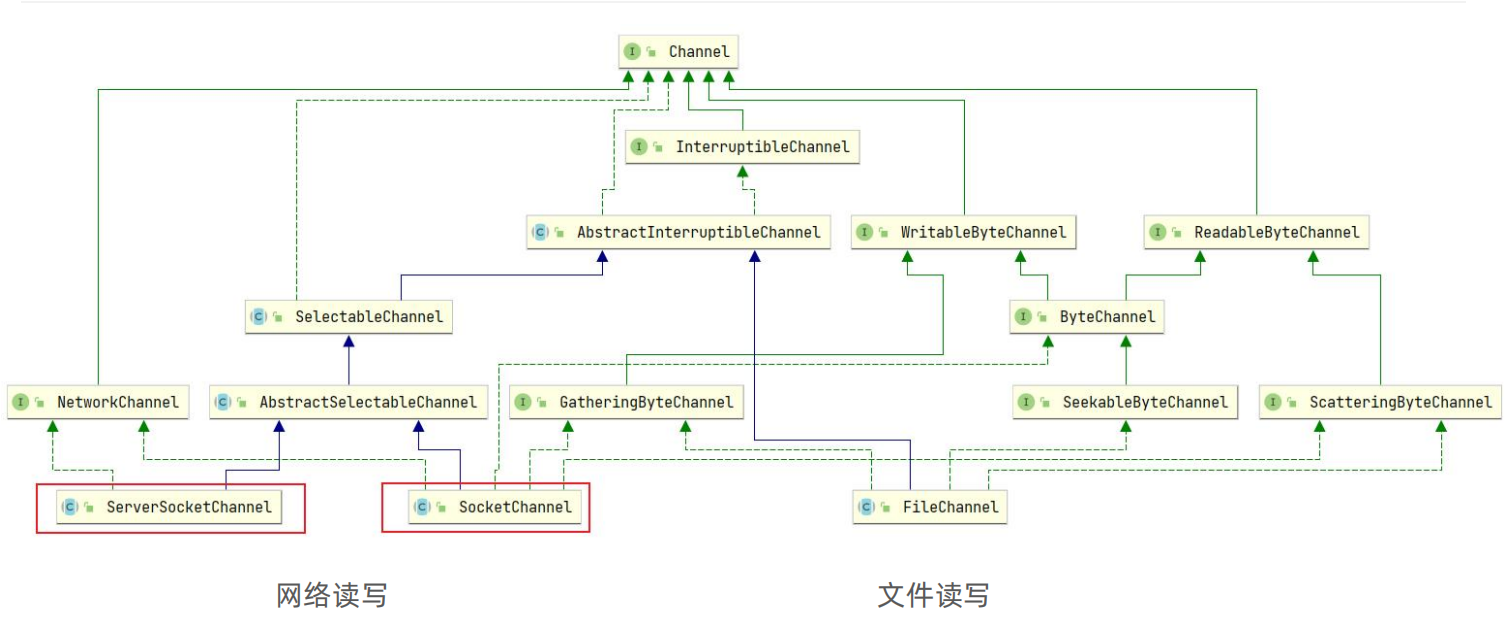
我们主要要记住 网络读写 ,也就是 ServerSocketChannel和SocketChannel 。
(1)、网络读写的流程图:
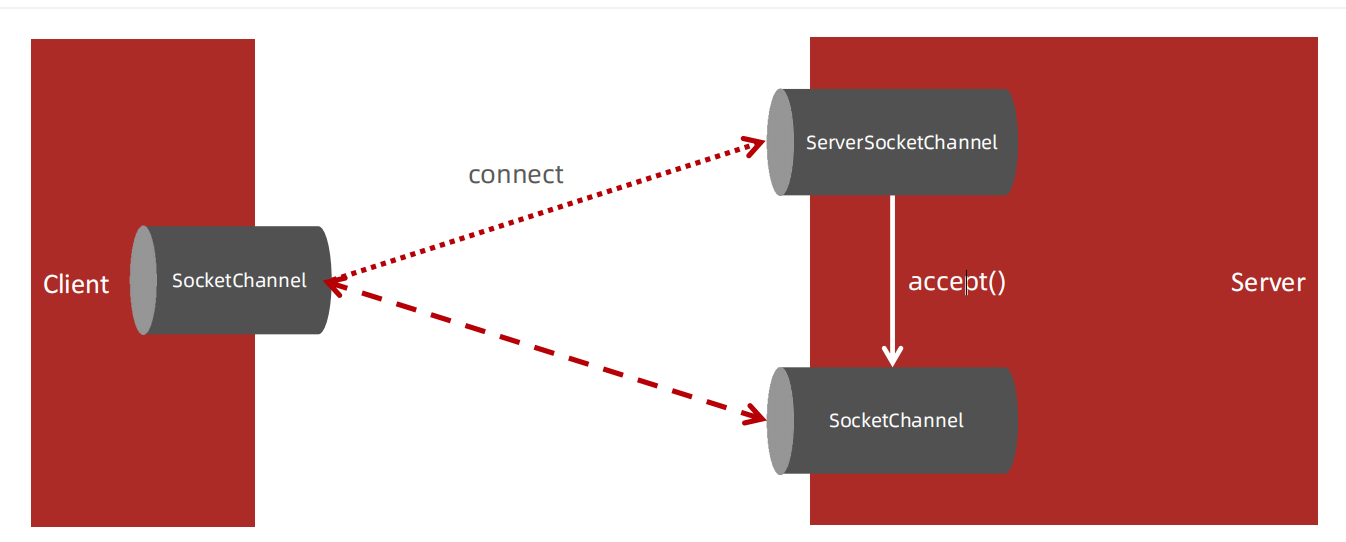
(2)、SocketChannel和ServerSocketChannel对应的事件
这个事件需要注册到Selector,所以需要熟知 channel对应哪几个事件。

三、选择器Selector
selector选择器是NIO中最核心的东西。
selector 的作用就是配合一个线程来管理多个 channel,获取这些 channel 上发生的事件,这些 channel 工作在非阻塞模式下,不会让线程吊死在一个 channel 上。适合连接数特别多,但流量低的场景(low traffic)。
Selector(选择器/多路复用器):Selector会不断轮询注册在其上的Channel,如果某个Channel上面发生读或者写事件,即该Channel处于就绪状态,它就会被Selector轮询出来,然后通过selectedKeys可以获取就绪Channel的集合,进行后续的I/O操作。
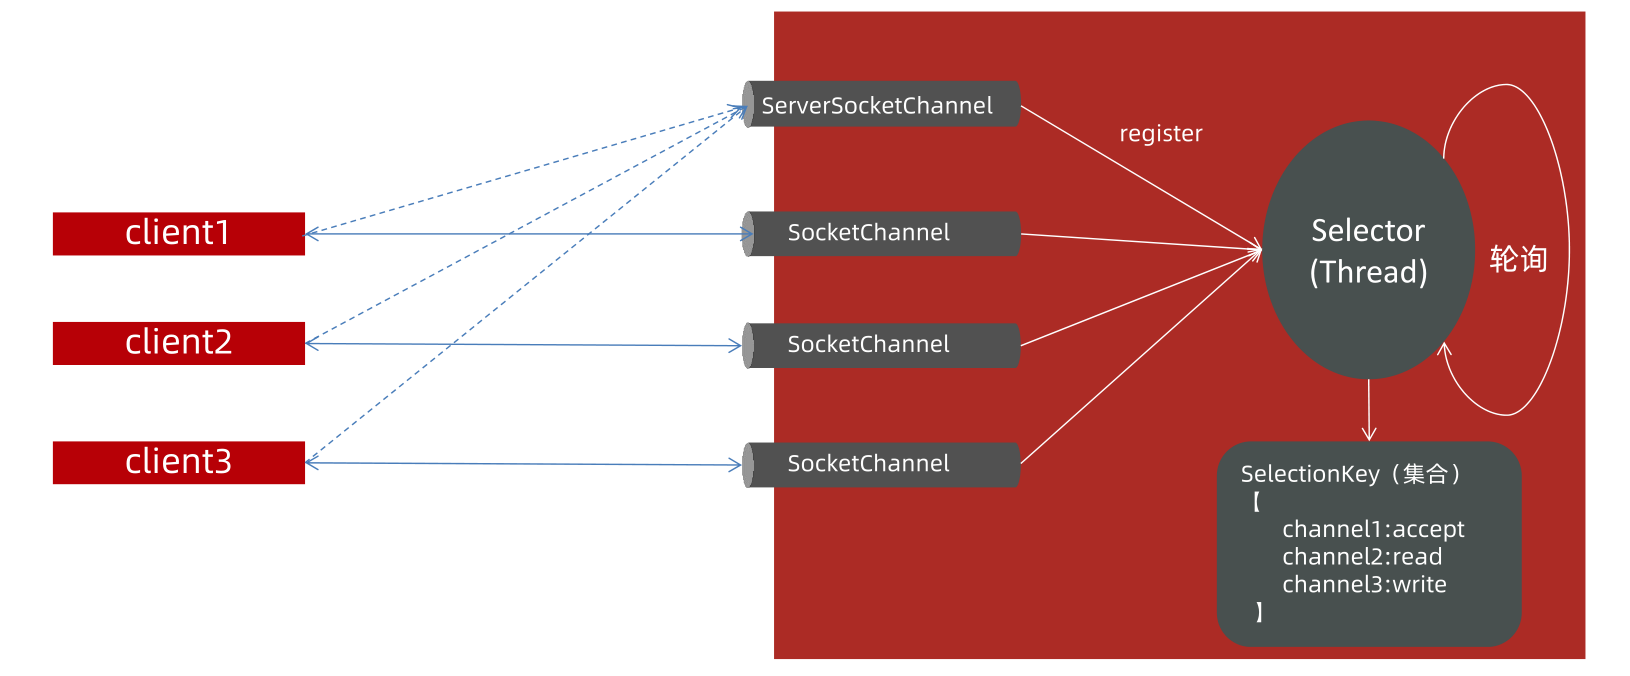
一个线程能够管理多个Channel的状态。
1、为了更好地理解,我们先来写一下NIO在网络中是阻塞的状态代码,随后看看非阻塞是怎么写的就更容易理解了。
- 是阻塞的就没有Selector选择器了,就直接使用Channel和Buffer就完事了。
服务端代码:
package com.muxue.utils;

import java.io.IOException;
import java.net.InetSocketAddress;
import java.nio.ByteBuffer;
import java.nio.channels.FileChannel;
import java.nio.channels.ServerSocketChannel;
import java.nio.channels.SocketChannel;
import java.nio.file.Paths;
import java.nio.file.StandardOpenOption;

/**
 * @author:lipu
 * @Date:2023/2/7 0007
 * @Descrption:com.muxue.utils
 * @Version:1.0
 */
public class BlockServer {

    public static void main(String[] args) throws IOException {

        // 1.获取通道
        ServerSocketChannel server = ServerSocketChannel.open();

        // 2. 绑定链接
        server.bind(new InetSocketAddress(6666));

        // 3. 获取客户端的连接(阻塞的)
        SocketChannel client = server.accept();

            // 4. 要使用NIO,有了Channel,就必然要有Buffer,Buffer是与数据打交道的呢
        ByteBuffer buffer = ByteBuffer.allocate(1024);

        // 得到文件通道,将客户端传递过来的图片写到本地项目下(写模式、没有则创建)
        FileChannel outChannel = FileChannel.open(Paths.get("new21d.jpg"), StandardOpenOption.WRITE, StandardOpenOption.CREATE);

        // 6.将客户端传递过来的图片保存在本地中
        while (client.read(buffer) != -1) {

            // 在读之前都要切换成读模式
            buffer.flip();

            outChannel.write(buffer);

            // 读完切换成写模式,能让管道继续读取文件的数据
            buffer.clear();

        }

        // 7.关闭通道
        outChannel.close();
        client.close();
        server.close();
    }

}
客户端代码:
package com.muxue.utils;

import java.io.IOException;
import java.net.InetSocketAddress;
import java.nio.ByteBuffer;
import java.nio.channels.FileChannel;
import java.nio.channels.SocketChannel;
import java.nio.file.Paths;
import java.nio.file.StandardOpenOption;

/**
 * @author:lipu
 * @Date:2023/2/7 0007
 * @Descrption:com.muxue.utils
 * @Version:1.0
 */
public class BlockNIOClient {

    public static void main(String[] args) throws IOException {

        // 1. 获取通道
        SocketChannel socketChannel = SocketChannel.open(new InetSocketAddress("127.0.0.1", 6666));

        // 2. 发送一张图片给服务端吧
        FileChannel fileChannel = FileChannel.open(Paths.get("D:\\Test\\2.jpg"), StandardOpenOption.READ);

        // 3.要使用NIO,有了Channel,就必然要有Buffer,Buffer是与数据打交道的呢
        ByteBuffer buffer = ByteBuffer.allocate(1024);

        // 4.读取本地文件(图片),发送到服务器
        while (fileChannel.read(buffer) != -1) {

            // 在读之前都要切换成读模式
            buffer.flip();

            socketChannel.write(buffer);

            // 读完切换成写模式,能让管道继续读取文件的数据
            buffer.clear();
        }

        // 5. 关闭流
        fileChannel.close();
        socketChannel.close();
    }
}
先运行服务端代码,再运行客户端代码,
idea的根目录下就会有new21d.jpg文件了。
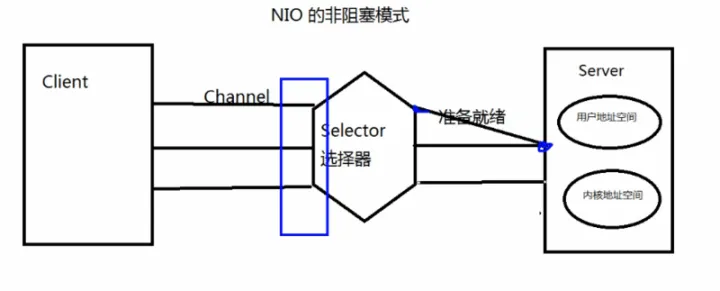
2、NIO非阻塞形态
如果使用非阻塞模式的话,那么我们就可以不显式告诉服务器已经发完数据了。我们下面来看看怎么写:
客户端:
package com.muxue.utils;

import java.io.IOException;
import java.net.InetSocketAddress;
import java.nio.ByteBuffer;
import java.nio.channels.FileChannel;
import java.nio.channels.SocketChannel;
import java.nio.file.OpenOption;
import java.nio.file.Paths;
import java.nio.file.StandardOpenOption;

public class NoBlockClient {

    public static void main(String[] args) throws IOException {

        //1 开启一个socket通道
        SocketChannel socketChannel=SocketChannel.open(new InetSocketAddress("127.0.0.1",6655));
        //2 设置非阻塞
        socketChannel.configureBlocking(false);

        //3 分配一个Buffer  大小是1m
        ByteBuffer byteBuffer=ByteBuffer.allocate(1024);

        //4  将文件传给服务端
        FileChannel fileChannel=FileChannel.open(Paths.get("E:\\JavaTest\\old.png"), StandardOpenOption.READ);


        //5 文件写入到Buffer里;
        while (fileChannel.read(byteBuffer)!=-1){

            //6 buffer切换读模式
            byteBuffer.flip();

            //7 向服务端发送buffer
            socketChannel.write(byteBuffer);

            //8 buffer 清理,变成写模式
            byteBuffer.clear();
        }

        //9 关闭文件和socker的 Channel
        fileChannel.close();
        socketChannel.close();


    }
}
服务端:
package com.muxue.utils;

import java.io.File;
import java.io.IOException;
import java.net.InetSocketAddress;
import java.nio.ByteBuffer;
import java.nio.channels.*;
import java.nio.file.Paths;
import java.nio.file.StandardOpenOption;
import java.util.Iterator;
import java.util.Set;

public class NoBlockServ {


    public static void main(String[] args) throws IOException {

        //1 卡开启服务端
        ServerSocketChannel serverSocketChannel = ServerSocketChannel.open();

        //2 设置 非阻塞
        serverSocketChannel.configureBlocking(false);

        //3 绑定端口号
        serverSocketChannel.bind(new InetSocketAddress(6655));

        //4 开启选择器
        Selector selector = Selector.open();

        //5 将服务端socket注册到选择器上,指定接收“监听通道" 事件
        serverSocketChannel.register(selector, SelectionKey.OP_ACCEPT);

        //6 轮询选择器上已“就绪”的事件,---》只要select()>0,说明已就绪
        while (selector.select() > 0) {

            //7 获取当前选择器所有注册的“选择键”(已就绪的监听事件)
            Set<SelectionKey> selectionKeySet = selector.selectedKeys();

            // 枚举器 遍历
            Iterator<SelectionKey> iterator = selectionKeySet.iterator();

            // 8  获取已“就绪”的事件,(不同的事件做不同的事)
            while (iterator.hasNext()) {

                SelectionKey selectionKey = iterator.next();
                if (selectionKey.isAcceptable()) {  //接收的事件就绪

                    // 9 服务端的socket 接收到客户端的socket,创建客户端的socket
                    SocketChannel client = serverSocketChannel.accept();

                    // 10  客户端socket设置非阻塞
                    client.configureBlocking(false);

                    //11 客户端socket 注册 读事件 -->拿到客户端的连接为了读取通道的数据(监听读就绪事件)
                    client.register(selector, SelectionKey.OP_READ);

                } else if (selectionKey.isReadable()) { // 读事件就绪

                    // 12 获取当前选择器读就绪状态的通道
                    SocketChannel client = (SocketChannel) selectionKey.channel();

                    // 读取数据
                    ByteBuffer byteBuffer = ByteBuffer.allocate(1024 * 1024);

                    //得到文件通道,将客户端传递过来的图片写到本地项目下(写模式、没有则创建)
                    FileChannel fileChannel=FileChannel.open(Paths.get("new2.png"), StandardOpenOption.WRITE,StandardOpenOption.CREATE);

                    while (client.read(byteBuffer)!=-1){
                        // 在读之前都要切换成读模式
                        byteBuffer.flip();
                        fileChannel.write(byteBuffer);
                        // 读完切换成写模式,能让管道继续读取文件的数据
                        byteBuffer.clear();
                    }

                }
                // 100 取消选择键(已经处理过的事件,就应该取消掉了)
                iterator.remove();

            }


        }

        serverSocketChannel.close();


    }
}
收到图片后,给客户端答复的代码:
客户端:
package com.muxue.utils;

import java.io.IOException;
import java.net.InetSocketAddress;
import java.nio.ByteBuffer;
import java.nio.channels.*;
import java.nio.file.OpenOption;
import java.nio.file.Paths;
import java.nio.file.StandardOpenOption;
import java.util.Iterator;

public class NoBlockClient {

    public static void main(String[] args) throws IOException {

        //1 开启一个socket通道
        SocketChannel socketChannel=SocketChannel.open(new InetSocketAddress("127.0.0.1",6655));
        //2 设置非阻塞
        socketChannel.configureBlocking(false);

        //下面是监听接收消息的事件
        Selector selector=Selector.open();
        socketChannel.register(selector, SelectionKey.OP_READ);


        //3 分配一个Buffer  大小是1m
        ByteBuffer byteBuffer=ByteBuffer.allocate(1024);

        //4  将文件传给服务端
        FileChannel fileChannel=FileChannel.open(Paths.get("E:\\JavaTest\\old.png"), StandardOpenOption.READ);


        //5 文件写入到Buffer里;
        while (fileChannel.read(byteBuffer)!=-1){

            //6 buffer切换读模式
            byteBuffer.flip();

            //7 向服务端发送buffer
            socketChannel.write(byteBuffer);

            //8 buffer 清理,变成写模式
            byteBuffer.clear();
        }


        while (selector.select()>0){

            Iterator<SelectionKey> iterator = selector.selectedKeys().iterator();

            while (iterator.hasNext()){

                SelectionKey selectionKey = iterator.next();

                if(selectionKey.isReadable()){
                    System.out.println("----接收服务端的答复------");

                    SocketChannel readSocket =(SocketChannel) selectionKey.channel();
                    ByteBuffer readBuffer=ByteBuffer.allocate(1024);
                    int readBytes = readSocket.read(readBuffer);
                    readBuffer.flip();

                    System.out.println(new String(readBuffer.array(),0,readBytes));

                    readBuffer.clear();

                }


                iterator.remove();
            }


        }


        //9 关闭文件和socker的 Channel
        fileChannel.close();
        socketChannel.close();


    }
}
服务端:
package com.muxue.utils;

import java.io.File;
import java.io.IOException;
import java.net.InetSocketAddress;
import java.nio.ByteBuffer;
import java.nio.channels.*;
import java.nio.file.Paths;
import java.nio.file.StandardOpenOption;
import java.util.Iterator;
import java.util.Set;

public class NoBlockServ {


    public static void main(String[] args) throws IOException {

        //1 卡开启服务端
        ServerSocketChannel serverSocketChannel = ServerSocketChannel.open();

        //2 设置 非阻塞
        serverSocketChannel.configureBlocking(false);

        //3 绑定端口号
        serverSocketChannel.bind(new InetSocketAddress(6655));

        //4 开启选择器
        Selector selector = Selector.open();

        //5 将服务端socket注册到选择器上,指定接收“监听通道" 事件
        serverSocketChannel.register(selector, SelectionKey.OP_ACCEPT);

        //6 轮询选择器上已“就绪”的事件,---》只要select()>0,说明已就绪
        while (selector.select() > 0) {

            //7 获取当前选择器所有注册的“选择键”(已就绪的监听事件)
            Set<SelectionKey> selectionKeySet = selector.selectedKeys();

            // 枚举器 遍历
            Iterator<SelectionKey> iterator = selectionKeySet.iterator();

            // 8  获取已“就绪”的事件,(不同的事件做不同的事)
            while (iterator.hasNext()) {

                SelectionKey selectionKey = iterator.next();
                if (selectionKey.isAcceptable()) {  //接收的事件就绪

                    // 9 服务端的socket 接收到客户端的socket,创建客户端的socket
                    SocketChannel client = serverSocketChannel.accept();

                    // 10  客户端socket设置非阻塞
                    client.configureBlocking(false);

                    //11 客户端socket 注册 读事件 -->拿到客户端的连接为了读取通道的数据(监听读就绪事件)
                    client.register(selector, SelectionKey.OP_READ);

                } else if (selectionKey.isReadable()) { // 读事件就绪
                    System.out.println("----------------读事件就绪---------------------------");
                    // 12 获取当前选择器读就绪状态的通道
                    SocketChannel client = (SocketChannel) selectionKey.channel();

                    // 读取数据
                    ByteBuffer byteBuffer = ByteBuffer.allocate(1024);

                    //得到文件通道,将客户端传递过来的图片写到本地项目下(写模式、没有则创建)
                    FileChannel fileChannel = FileChannel.open(Paths.get("new6.png"), StandardOpenOption.WRITE, StandardOpenOption.CREATE);

                    //这里必须是大于0,而非  !=-1
                    while (client.read(byteBuffer) > 0) {
                        // 在读之前都要切换成读模式
                        byteBuffer.flip();
                        fileChannel.write(byteBuffer);
                        // 读完切换成写模式,能让管道继续读取文件的数据
                        byteBuffer.clear();
                    }
                    //  client.register(selector,SelectionKey.OP_WRITE);
                    System.out.println("----------------告知客户端---------------------------");

                    ByteBuffer writeBuffer = ByteBuffer.allocate(1024);
                    writeBuffer.put("图片已收到,谢谢。".getBytes());
                    writeBuffer.flip();
                    client.write(writeBuffer);
                    //byteBuffer.clear();


                }
                // 100 取消选择键(已经处理过的事件,就应该取消掉了)
                iterator.remove();

            }


        }

        serverSocketChannel.close();


    }
}
作者:沐雪
文章均系作者原创或翻译,如有错误不妥之处,欢迎各位批评指正。本文版权归作者和博客园共有,如需转载恳请注明。
如果您觉得阅读这篇博客让你有所收获,请点击右下方【推荐】
为之网-热爱软件编程 http://www.weizhi.cc/

 浙公网安备 33010602011771号