MLflow (机器学习/深度学习 mlops平台 kubeflow)
MLflow 是一个功能强大的ML生命周期管理平台,主要用于 ML/DL/LLM 实验管理、模型跟踪、模型部署等。
1. 核心概念
-
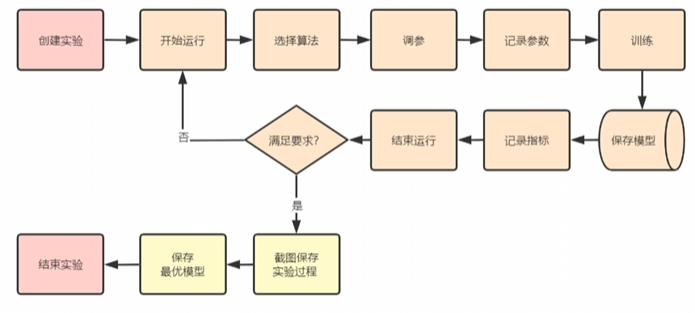
实验(Experiment):MLflow 的基本组织单位,用于将相关的运行组织在一起。每个实验包含多次运行,通常对应一个特定的 ML 项目
-
运行(Run):单次执行代码的记录,包含代码版本、参数、指标、输出文件和模型等数据。
-
项目(Project):可重用、可复现的代码包格式,使用
MLproject文件定义依赖项和入口点。
2. 跟踪组件
-
参数(Parameters):运行的输入配置,如超参数(key-value 形式)。
-
指标(Metrics):运行的评估指标(如准确率、损失),支持随时间更新和查询。
-
标签(Tags):为运行或实验添加的键值对元数据,用于组织和筛选。
-
工件(Artifacts):运行生成的任意文件输出:
-
模型文件
-
数据可视化图表
-
预处理数据
-
日志文件
-
3. 模型管理
-
模型(Model):MLflow 的标准化打包格式,支持多种框架(TensorFlow、PyTorch、Scikit-learn 等)。
-
模型注册表(Model Registry):中心化的模型存储和管理系统:
-
阶段(Stages):
Staging、Production、Archived -
版本控制(Versioning):模型的不同迭代版本
-
注释(Annotations):模型版本的描述和标记
-
4. 后端存储
-
后端存储(Backend Store):存储实验、运行元数据(参数、指标等),支持:
-
文件系统
-
数据库(SQLite、PostgreSQL、MySQL)
-
-
工件存储(Artifact Store):存储模型、文件等大型数据,支持:
-
本地文件系统
-
云存储(S3、Azure Blob、GCS)
-
HDFS
-
Databricks 工作区
-
import mlflow

# 创建/设置实验
mlflow.set_experiment("my_experiment")

# 开始一个运行
with mlflow.start_run():
    # 记录参数
    mlflow.log_param("learning_rate", 0.01)

    # 记录指标
    mlflow.log_metric("accuracy", 0.95)

    # 记录标签
    mlflow.set_tag("model_type", "random_forest")

    # 保存模型
    mlflow.sklearn.log_model(model, "model")

    # 保存工件
    mlflow.log_artifact("output.png")
后端和工件存储配置:
| 存储内容 | 存储位置 | 说明 |
|---|---|---|
| 模型参数(Parameters) | 后端存储(数据库/文件) | 作为运行元数据存储 |
| 模型文件(Artifact) | 工件存储(文件系统/云存储) | 作为工件存储 |
| 模型元数据 | 后端存储 | 如模型名称、框架、签名等 |
# 后端存储(元数据:实验、运行、参数、指标)
export MLFLOW_TRACKING_URI="sqlite:///mlflow.db"  # SQLite
# 或
export MLFLOW_TRACKING_URI="postgresql://user:pass@host:5432/mlflowdb"  # PostgreSQL
# 或
export MLFLOW_TRACKING_URI="mysql+pymysql://user:pass@host:3306/mlflowdb"  # MySQL

# 工件存储(模型、文件等大型数据)
export MLFLOW_ARTIFACT_ROOT="s3://my-bucket/mlflow-artifacts"  # S3
# 或
export MLFLOW_ARTIFACT_ROOT="file:///path/to/artifacts"  # 本地文件系统
# 或
export MLFLOW_ARTIFACT_ROOT="wasbs://container@account.blob.core.windows.net"  # Azure Blob

# .env 文件
MLFLOW_TRACKING_URI=sqlite:///mlruns.db
MLFLOW_ARTIFACT_ROOT=file://./mlartifacts
MLFLOW_EXPERIMENT_NAME=dev-experiment
# 1.1 创建虚拟环境
conda create -n mlflow-env python=3.10
conda activate mlflow-env

# 1.2 Install mlflow
pip install mlflow

# 2.1 Run a local Tracking Server
mlflow server --host 127.0.0.1 --port 8080 # 默认5000

# 3. 构建demo训练
mkdir /your/path/mlflow-demo
cd /your/path/mlflow-demo

# 3.1 Train a model and prepare metadata for logging
vi train.py

========================================================
import mlflow
from mlflow.models import infer_signature

import pandas as pd
from sklearn import datasets
from sklearn.model_selection import train_test_split
from sklearn.linear_model import LogisticRegression
from sklearn.metrics import accuracy_score, precision_score, recall_score, f1_score

# 配置mlflow地址
mlflow.set_tracking_uri(uri="http://192.168.77.20:62060/")

# Load the Iris dataset
X, y = datasets.load_iris(return_X_y=True)
X_train, X_test, y_train, y_test = train_test_split(
    X, y, test_size=0.2, random_state=42
)

# Define the model hyperparameters
params = {
    "solver": "lbfgs",
    "max_iter": 1000,
    "multi_class": "auto",
    "random_state": 8888,
}

# Train the model
iris_model = LogisticRegression(**params) # 使用 ** 解包字典
iris_model.fit(X_train, y_train)
y_pred = iris_model.predict(X_test)

# Calculate metrics
accuracy = accuracy_score(y_test, y_pred)

# mlflow.create_experiment("MLflow test iris 20251210")
mlflow.set_experiment("MLflow test iris 20251210")

# Start an MLflow run
with mlflow.start_run(run_name="my_experiment_run"):
    # Log the hyperparameters
    mlflow.log_params(params)

    # Log the loss metric
    mlflow.log_metric("accuracy", accuracy)

    # Infer the model signature
    signature = infer_signature(X_train, iris_model.predict(X_train))

    # Log the model, which inherits the parameters and metric
    model_info = mlflow.sklearn.log_model(
        sk_model=iris_model,
        artifact_path="iris_model",
        signature=signature,
        input_example=X_train,
        registered_model_name="iris_model",
    )

    # Set a tag that we can use to remind ourselves what this model was for
    mlflow.set_tag(
        model_info.model_uuid, {"Training Info": "Basic LR model for iris data"}
    )


# 4. Load the model as a Python Function (pyfunc) and use it for inference
# Load the model back for predictions as a generic Python Function model
loaded_model = mlflow.pyfunc.load_model(model_info.model_uri)


predictions = loaded_model.predict(X_test)
iris_feature_names = datasets.load_iris().feature_names

result = pd.DataFrame(X_test, columns=iris_feature_names)
result["actual_class"] = y_test
result["predicted_class"] = predictions

print(result)
import mlflow
import mlflow.sklearn
from sklearn.ensemble import RandomForestClassifier

# 配置存储
mlflow.set_tracking_uri("sqlite:///mlflow.db")  # 后端存储:SQLite
# 工件存储默认为 mlruns 目录下的 artifacts

with mlflow.start_run():
    # 1. 记录参数到后端存储
    params = {
        "n_estimators": 100,
        "max_depth": 10,
        "random_state": 42
    }
    mlflow.log_params(params)  # ✅ 存储在后端数据库

    # 训练模型
    model = RandomForestClassifier(**params)
    model.fit(X_train, y_train)

    # 2. 保存模型文件到工件存储
    mlflow.sklearn.log_model(
        sk_model=model,
        artifact_path="model",  # ✅ 存储在工件存储
        registered_model_name="rf_model"
    )

    # 3. 记录指标到后端存储
    accuracy = model.score(X_test, y_test)
    mlflow.log_metric("accuracy", accuracy)  # ✅ 存储在后端数据库

 浙公网安备 33010602011771号