运维监控系统之Open-Falcon
一、Open-Falcon介绍
1、监控系统,可以从运营级别(基本配置即可),以及应用级别(二次开发,通过端口进行日志上报),对服务器、操作系统、中间件、应用进行全面的监控,及报警,对我们的系统正常运行的作用非常重要。
2、基础监控
CPU、Load、内存、磁盘、IO、网络相关、内核参数、ss 统计输出、端口采集、核心服务的进程存活信息采集、关键业务进程资源消耗、NTP offset采集、DNS解析采集,这些指标,都是open-falcon的agent组件直接支持的。
Linux运维基础采集项:http://book.open-falcon.org/zh/faq/linux-metrics.html
对于这些基础监控选项全部理解透彻的时刻,也就是对Linux运行原理及命令进阶的时刻。
3、第三方监控
术业有专攻,运行在OS上的应用甚多,Open-Falcon的开发团队不可能把所有的第三方应用的监控全部做完,这个就需要开源社区提供更多的插件,当前对于很多常用的第三方应用都有相关插件了。
4、JVM监控
对于Java作为主要开发语言的大多数公司,对于JVM的监控不可或缺。
每个JVM应用的参数,比如GC、类加载、JVM内存、进程、线程,都可以上报给Falcon,而这些参数的获得,都可以通过MxBeans实现。
使用 Java 平台管理 bean:http://www.ibm.com/developerworks/cn/java/j-mxbeans/
5、业务应用监控
对于业务需要监控的接口,比如响应时间等。可以根据业务的需要,上报相关数据到Falcon,并通过Falcon查看结果。
二、Zabbix、Nagios、Open-Falcon这3大开源运维监控工具的比较
三、Open-Falcon编写的整个脑洞历程
小米开源监控系统OpenFalcon应对高并发7种手段:http://h2ex.com/894
官网:
https://github.com/open-falcon/falcon-plus/releases
说明:Open-Falcon部署分为前端(客户端)和后端(服务端)
四、后端部署(服务端)
参考官方文档:https://book.open-falcon.org/zh_0_2/quick_install/prepare.html
1、系统环境
[root@open-falcon-server ~]# cat /etc/redhat-release
CentOS Linux release 7.2.1511 (Core)
2、系统优化
#安装下载软件
yum install wget -y

#更换aliyun源
mv /etc/yum.repos.d/CentOS-Base.repo /etc/yum.repos.d/CentOS-Base.repo.backup
wget -O /etc/yum.repos.d/CentOS-Base.repo http://mirrors.aliyun.com/repo/Centos-7.repo

#下载epel源
yum install epel-release.noarch -y
rpm -Uvh http://mirrors.aliyun.com/epel/epel-release-latest-7.noarch.rpm
yum clean all
yum makecache

#下载常用软件
yum install git telnet net-tools tree nmap sysstat lrzsz dos2unix tcpdump ntpdate -y

#配置时间同步
ntpdate cn.pool.ntp.org

#更改主机名
hostnamectl set-hostname open-falcon-server
hostname open-falcon-server

#开启缓存
sed -i 's#keepcache=0#keepcache=1#g' /etc/yum.conf
grep keepcache /etc/yum.conf

#关闭selinux
sed -i 's/SELINUX=enforcing/SELINUX=disabled/g' /etc/selinux/config
setenforce 0

#关闭防火墙
systemctl stop firewalld.service
systemctl disable firewalld.service
3、软件环境准备
#安装 redis
yum install redis -y
#redis常用命令
redis-server     redis 服务端

redis-cli    redis 命令行客户端

redis-benchmark  redis 性能测试工具

redis-check-aof   AOF文件修复工具

redis-check-dump  RDB文件修复工具

redis-sentinel     Sentinel 服务端
#启动redis
#启动redis
[root@open-falcon-server ~]# redis-server &
[1] 3308
[root@open-falcon-server ~]# 3308:C 27 Oct 08:37:26.435 # Warning: no config file specified, using the default config. In order to specify a config file use redis-server /path/to/redis.conf
3308:M 27 Oct 08:37:26.436 * Increased maximum number of open files to 10032 (it was originally set to 1024).
                _._
           _.-``__ ''-._
      _.-``    `.  `_.  ''-._           Redis 3.2.10 (00000000/0) 64 bit
  .-`` .-```.  ```\/    _.,_ ''-._
 (    '      ,       .-`  | `,    )     Running in standalone mode
 |`-._`-...-` __...-.``-._|'` _.-'|     Port: 6379
 |    `-._   `._    /     _.-'    |     PID: 3308
  `-._    `-._  `-./  _.-'    _.-'
 |`-._`-._    `-.__.-'    _.-'_.-'|
 |    `-._`-._        _.-'_.-'    |           http://redis.io
  `-._    `-._`-.__.-'_.-'    _.-'
 |`-._`-._    `-.__.-'    _.-'_.-'|
 |    `-._`-._        _.-'_.-'    |
  `-._    `-._`-.__.-'_.-'    _.-'
      `-._    `-.__.-'    _.-'
          `-._        _.-'
              `-.__.-'

3308:M 27 Oct 08:37:26.437 # WARNING: The TCP backlog setting of 511 cannot be enforced because /proc/sys/net/core/somaxconn is set to the lower value of 128.
3308:M 27 Oct 08:37:26.437 # Server started, Redis version 3.2.10
3308:M 27 Oct 08:37:26.437 # WARNING overcommit_memory is set to 0! Background save may fail under low memory condition. To fix this issue add 'vm.overcommit_memory = 1' to /etc/sysctl.conf and then reboot or run the command 'sysctl vm.overcommit_memory=1' for this to take effect.
3308:M 27 Oct 08:37:26.438 # WARNING you have Transparent Huge Pages (THP) support enabled in your kernel. This will create latency and memory usage issues with Redis. To fix this issue run the command 'echo never > /sys/kernel/mm/transparent_hugepage/enabled' as root, and add it to your /etc/rc.local in order to retain the setting after a reboot. Redis must be restarted after THP is disabled.
3308:M 27 Oct 08:37:26.438 * The server is now ready to accept connections on port 6379
#安装mysql
[root@open-falcon-server ~]#wget http://repo.mysql.com/mysql-community-release-el7-5.noarch.rpm

[root@open-falcon-server ~]# ll
total 12
-rw-------. 1 root root 1262 Oct 27  2017 anaconda-ks.cfg
-rw-r--r--. 1 root root 6140 Nov 12  2015 mysql-community-release-el7-5.noarch.rpm

[root@open-falcon-server ~]# rpm -ivh mysql-community-release-el7-5.noarch.rpm
Preparing...                          ################################# [100%]
Updating / installing...
   1:mysql-community-release-el7-5    ################################# [100%]
[root@open-falcon-server ~]# ll /etc/yum.repos.d/
total 48
-rw-r--r--. 1 root root 2573 Nov 21  2014 CentOS-Base.repo
-rw-r--r--. 1 root root 1664 Dec  9  2015 CentOS-Base.repo.backup
-rw-r--r--. 1 root root 1309 Dec  9  2015 CentOS-CR.repo
-rw-r--r--. 1 root root  649 Dec  9  2015 CentOS-Debuginfo.repo
-rw-r--r--. 1 root root  290 Dec  9  2015 CentOS-fasttrack.repo
-rw-r--r--. 1 root root  630 Dec  9  2015 CentOS-Media.repo
-rw-r--r--. 1 root root 1331 Dec  9  2015 CentOS-Sources.repo
-rw-r--r--. 1 root root 1952 Dec  9  2015 CentOS-Vault.repo
-rw-r--r--. 1 root root  951 Jun 24 23:04 epel.repo
-rw-r--r--. 1 root root 1050 Jun 24 23:04 epel-testing.repo
-rw-r--r--. 1 root root 1209 Jan 29  2014 mysql-community.repo
-rw-r--r--. 1 root root 1060 Jan 29  2014 mysql-community-source.repo

[root@open-falcon-server ~]#yum install -y mysql-server

#启动mysql并设置开机自启动
[root@open-falcon-server ~]# systemctl start mysqld.service
[root@open-falcon-server ~]# systemctl enable mysqld.service

[root@open-falcon-server ~]# mysql -uroot -p
Enter password:
Welcome to the MySQL monitor. Commands end with ; or \g.
Your MySQL connection id is 2
Server version: 5.6.38 MySQL Community Server (GPL)

Copyright (c) 2000, 2017, Oracle and/or its affiliates. All rights reserved.

Oracle is a registered trademark of Oracle Corporation and/or its
affiliates. Other names may be trademarks of their respective
owners.

Type 'help;' or '\h' for help. Type '\c' to clear the current input statement.

mysql> exit
Bye
#检查服务
[root@open-falcon-server ~]# netstat -lntup
Active Internet connections (only servers)
Proto Recv-Q Send-Q Local Address           Foreign Address         State       PID/Program name
tcp        0      0 0.0.0.0:6379            0.0.0.0:*               LISTEN      3308/redis-server *
tcp        0      0 0.0.0.0:22              0.0.0.0:*               LISTEN      1443/sshd
tcp        0      0 127.0.0.1:25            0.0.0.0:*               LISTEN      1634/master
tcp6       0      0 :::3306                 :::*                    LISTEN      3283/mysqld
tcp6       0      0 :::6379                 :::*                    LISTEN      3308/redis-server *
tcp6       0      0 :::22                   :::*                    LISTEN      1443/sshd
tcp6       0      0 ::1:25                  :::*                    LISTEN      1634/master
udp        0      0 0.0.0.0:68              0.0.0.0:*                           2042/dhclient
udp        0      0 0.0.0.0:4817            0.0.0.0:*                           2042/dhclient
udp6       0      0 :::20380                :::*                                2042/dhclient
4、初始化MySQL表结构(备注:导入表结构后,注意检查)
cd /tmp/ && git clone https://github.com/open-falcon/falcon-plus.git
cd /tmp/falcon-plus/scripts/mysql/db_schema/
mysql -h 127.0.0.1 -u root -p < 1_uic-db-schema.sql
mysql -h 127.0.0.1 -u root -p < 2_portal-db-schema.sql
mysql -h 127.0.0.1 -u root -p < 3_dashboard-db-schema.sql
mysql -h 127.0.0.1 -u root -p < 4_graph-db-schema.sql
mysql -h 127.0.0.1 -u root -p < 5_alarms-db-schema.sql
rm -rf /tmp/falcon-plus/
#设置数据库密码 (备注:用户名:root ,密码: password )
[root@open-falcon-server open-falcon]# mysqladmin -uroot password "password"
Warning: Using a password on the command line interface can be insecure.
#检查导入的数据库表
[root@open-falcon-server open-falcon]# mysql -uroot -p
Enter password:
Welcome to the MySQL monitor.  Commands end with ; or \g.
Your MySQL connection id is 35
Server version: 5.6.38 MySQL Community Server (GPL)

Copyright (c) 2000, 2017, Oracle and/or its affiliates. All rights reserved.

Oracle is a registered trademark of Oracle Corporation and/or its
affiliates. Other names may be trademarks of their respective
owners.

Type 'help;' or '\h' for help. Type '\c' to clear the current input statement.

mysql> show databases;
+--------------------+
| Database           |
+--------------------+
| information_schema |
| alarms             |
| dashboard          |
| falcon_portal      |
| graph              |
| mysql              |
| performance_schema |
| uic                |
+--------------------+
8 rows in set (0.00 sec)

mysql> exit
Bye
5、配置Go语言开发环境
#安装go语言开发包(备注:安装需要epel源)
yum install golang -y
#检查版本
[root@open-falcon-server ~]# go version
 go version go1.8.3 linux/amd64
#查看go的安装路径
[root@open-falcon-server ~]# find / -name go
/etc/alternatives/go
/var/lib/alternatives/go
/usr/bin/go
/usr/lib/golang/src/cmd/go  #需要的是这个路径
/usr/lib/golang/src/go
/usr/lib/golang/bin/go
/usr/lib/golang/pkg/linux_amd64/go
#设置环境变量GOROOT和GOPATH
export GOROOT=/usr/lib/golang
export GOPATH=/home
6、下载编译好的二进制版本
https://github.com/open-falcon/falcon-plus/releases
直接下载官方编译好的二进制版本(x86 64位平台)。
#开始安装open-falcon
[root@open-falcon-server ~]# export FALCON_HOME=/home/work
[root@open-falcon-server ~]# export WORKSPACE=$FALCON_HOME/open-falcon
[root@open-falcon-server ~]# mkdir -p $WORKSPACE

#上传软件
[root@open-falcon-server ~]# ll
-rw-r--r--. 1 root root 40031472 Oct 29 2017 open-falcon-v0.2.1.tar.gz

#解压
[root@open-falcon-server ~]# tar -xf open-falcon-v0.2.1.tar.gz -C $WORKSPACE
[root@open-falcon-server ~]# cd $WORKSPACE

#查看解压结果
[root@open-falcon-server open-falcon]# ll
total 3896
drwxrwxr-x. 7 501 501      67 Aug 15 19:16 agent
drwxrwxr-x. 5 501 501      40 Aug 15 19:16 aggregator
drwxrwxr-x. 5 501 501      40 Aug 15 19:16 alarm
drwxrwxr-x. 6 501 501      51 Aug 15 19:16 api
drwxrwxr-x. 5 501 501      40 Aug 15 19:16 gateway
drwxrwxr-x. 6 501 501      51 Aug 15 19:16 graph
drwxrwxr-x. 5 501 501      40 Aug 15 19:16 hbs
drwxrwxr-x. 5 501 501      40 Aug 15 19:16 judge
drwxrwxr-x. 5 501 501      40 Aug 15 19:16 nodata
-rwxrwxr-x. 1 501 501 3987469 Aug 15 19:16 open-falcon
lrwxrwxrwx. 1 501 501      16 Aug 15 19:16 plugins -> ./agent/plugins/
lrwxrwxrwx. 1 501 501      15 Aug 15 19:16 public -> ./agent/public/
drwxrwxr-x. 5 501 501      40 Aug 15 19:16 transfer
7、修改配置文件cfg.json
坑:
部分模块依赖连接数据库,因为如果不修改配置文件,aggregator模块会出现无法启动,graph、hbs、nodata、api、alarm模块会出现开启不报错但是状态为开启失败的情况。
如果需要每个模块都能正常启动,需要将上面模块的cfg.json的数据库信息进行修改。根据本教程的配置,需要修改配置文件所在的目录:
| 模块 | 配置文件所在路径 |
| aggregator | /home/work/aggregator/config/cfg.json |
| graph | /home/work/graph/config/cfg.json |
| hbs | /home/work/hbs/config/cfg.json |
| nodata | /home/work/nodata/config/cfg.json |
| api | /home/work/api/config/cfg.json |
| alarm | /home/work/alarm/config/cfg.json |
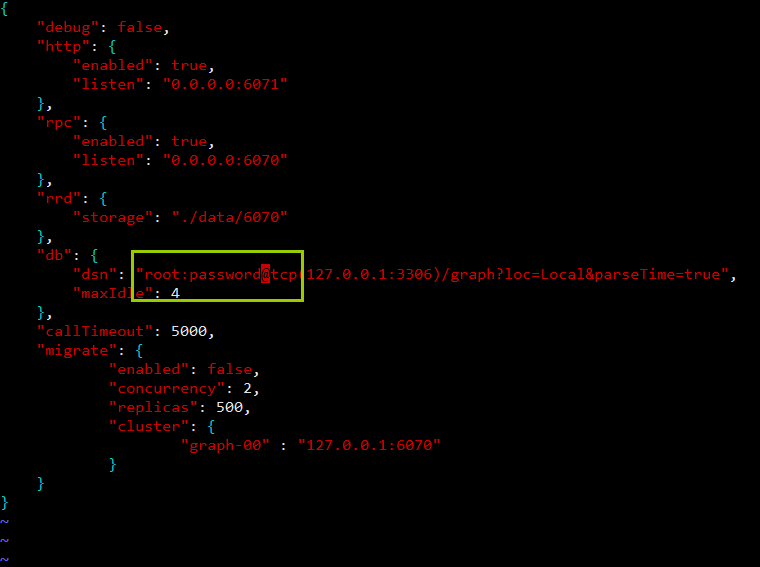
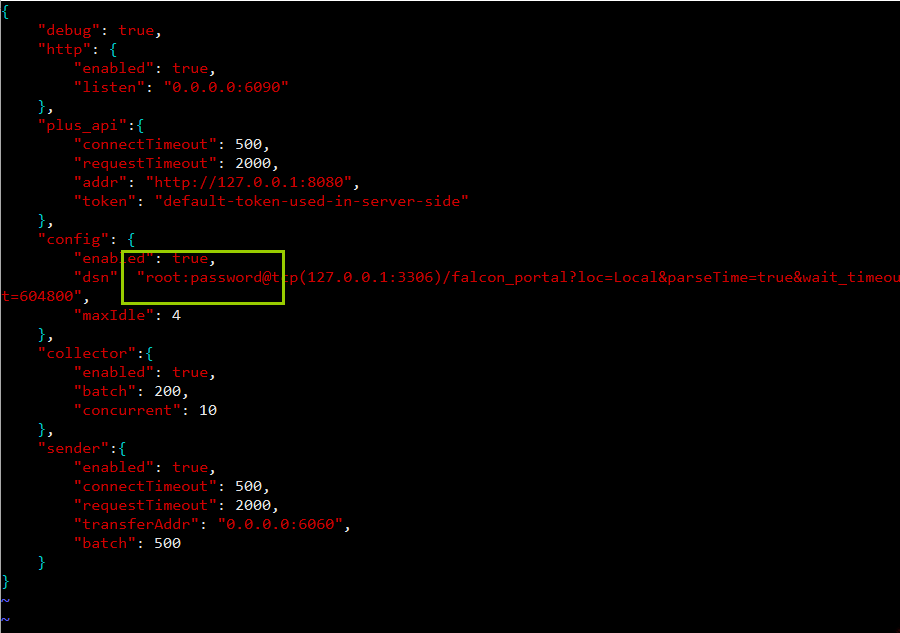
1)修改aggregator的配置文件
vim /home/work/aggregator/config/cfg.json
mysql的root密码为空,则去掉“password”,若不为空,则用root密码替换“password”。
2)修改graph的配置文件
vim /home/work/graph/config/cfg.json
mysql的root密码为空,则去掉“password”,若不为空,则用root密码替换“password”。
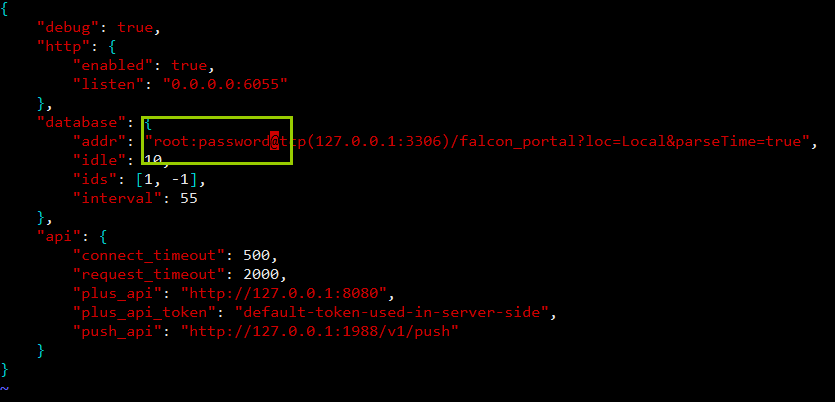
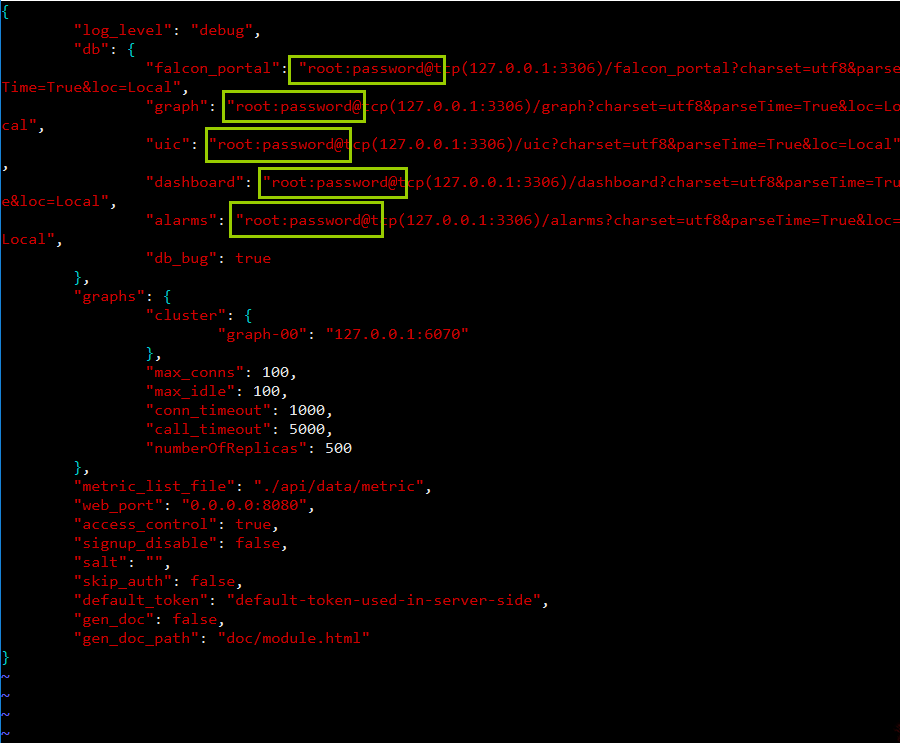
3)修改hbs的配置文件
vim /home/work/hbs/config/cfg.json
mysql的root密码为空,则去掉“password”,若不为空,则用root密码替换“password”。
4)修改nodata的配置文件
vim /home/work/nodata/config/cfg.json
mysql的root密码为空,则去掉“password”,若不为空,则用root密码替换“password”。
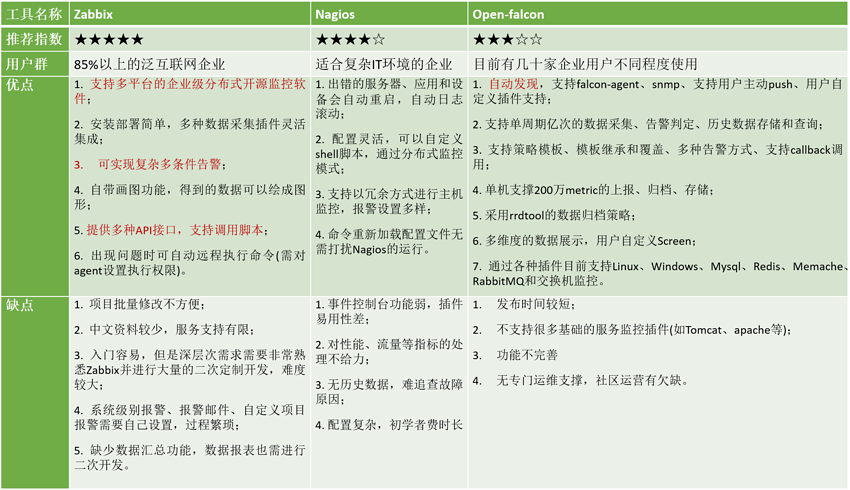
5)修改api的配置文件
vim /home/work/api/config/cfg.json
mysql的root密码为空,则去掉“password”,若不为空,则用root密码替换“password”。
6)修改alarm的配置文件
vim /home/work/alarm/config/cfg.json
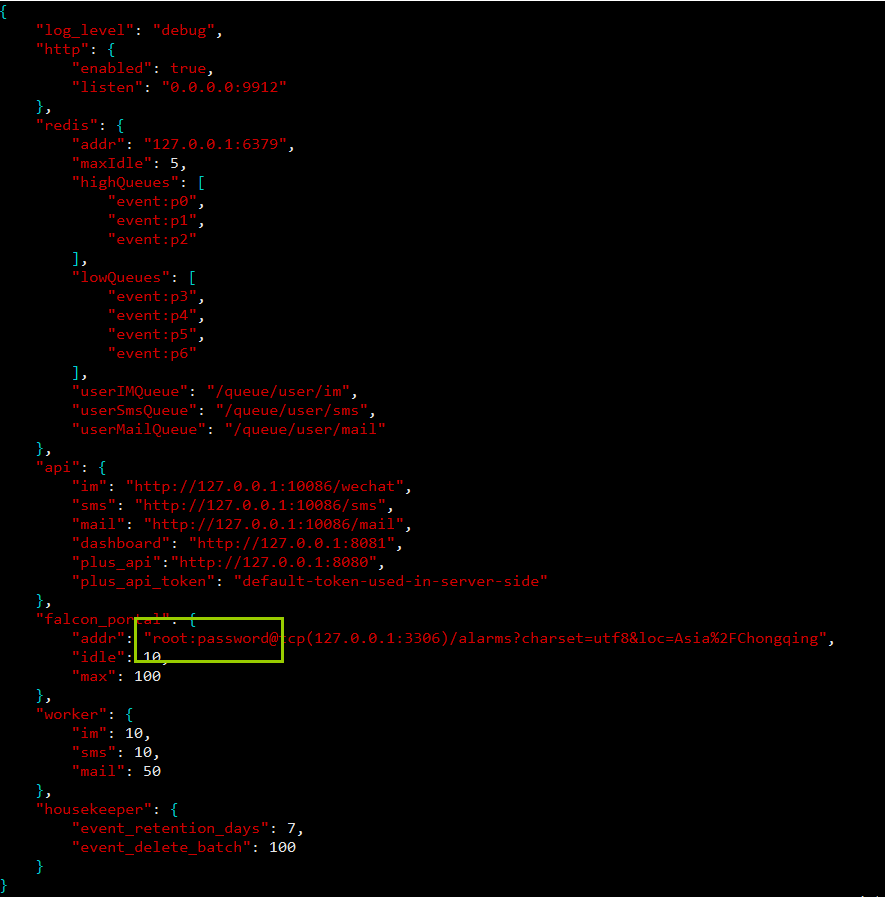
mysql的root密码为空,则去掉“password”,若不为空,则用root密码替换“password”。
8、启动后端模块
[root@open-falcon-server open-falcon]# cd /home/work/open-falcon

#启动服务
[root@open-falcon-server open-falcon]# ./open-falcon start
[falcon-graph] 25682
[falcon-hbs] 25691
[falcon-judge] 25699
[falcon-transfer] 25705
[falcon-nodata] 25711
[falcon-aggregator] 25718
[falcon-agent] 25726
[falcon-gateway] 25733
[falcon-api] 25739
[falcon-alarm] 25751

#检查服务启动状态
[root@open-falcon-server open-falcon]# ./open-falcon check
        falcon-graph         UP           25682
          falcon-hbs         UP           25691
        falcon-judge         UP           25699
     falcon-transfer         UP           25705
       falcon-nodata         UP           25711
   falcon-aggregator         UP           25718
        falcon-agent         UP           25726
      falcon-gateway         UP           25733
          falcon-api         UP           25739
        falcon-alarm         UP           25751
#更多的命令行工具用法
# ./open-falcon [start|stop|restart|check|monitor|reload] module
./open-falcon start agent

./open-falcon check
        falcon-graph         UP           53007
          falcon-hbs         UP           53014
        falcon-judge         UP           53020
     falcon-transfer         UP           53026
       falcon-nodata         UP           53032
   falcon-aggregator         UP           53038
        falcon-agent         UP           53044
      falcon-gateway         UP           53050
          falcon-api         UP           53056
        falcon-alarm         UP           53063

#For debugging , You can check $WorkDir/$moduleName/log/logs/xxx.log
至此后端部署完成。
8、其它用法
#重载配置(备注:修改vi cfg.json配置文件后,可以用下面命令重载配置)
curl 127.0.0.1:1988/config/reload
五、前端部署 (备注:在另外一台服务器上面操作)
1、创建工作目录
export HOME=/home/work
export WORKSPACE=$HOME/open-falcon
mkdir -p $WORKSPACE
cd $WORKSPACE
2、克隆前端组件代码
git clone https://github.com/open-falcon/dashboard.git
3、安装依赖包
yum install -y python-virtualenv
yum install -y python-devel
yum install -y openldap-devel
yum install -y mysql-devel
yum groupinstall "Development tools" -y
坑:
#省略下面这三步不操作(备注:因执行virtualenv ./env;安装的pip版本为1.4.1,再用pip安装pip_requirements.txt文件中的软件。
都会出现报错的情况,导致无法安装成功。主要原因就是pip版本的问题。)

解决这个问题,请参考第4步

#进入目录
cd $WORKSPACE/dashboard/
virtualenv ./env
source env/bin/activate

#如果安装了高版本pip,请先卸载
pip uninstall pip   再按两次y

#指定源安装包(备注:这步如果安装不成功,请检查pip版本是否为pip-9.0.1)
pip install -r pip_requirements.txt -i
4、先安装ez_setup.py,再安装pip
#下载ez_setup.py
wget --no-check-certificate https://bootstrap.pypa.io/ez_setup.py
python ez_setup.py --insecure

#下载pip
wget https://pypi.python.org/packages/11/b6/abcb525026a4be042b486df43905d6893fb04f05aac21c32c638e939e447/pip-9.0.1.tar.gz#md5=35f01da33009719497f01a4ba69d63c9

#解压并安装
tar xf pip-9.0.1.tar.gz
cd pip-9.0.1
python setup.py install
cd ..
#配置环境变量 (备注:这步不需要操作了)
#查看pip路径
[root@prometheus dashboard]# which pip
/usr/bin/pip

#配置pip环境变量
[root@prometheus dashboard]# vi /etc/profile
#pip path
export PATH="/usr/bin/pip/bin:$PATH"

#使环境变量生效
source /etc/profile

#测试是否可用
[root@prometheus dashboard]# pip
Usage:
pip <command> [options]
Commands:
install Install packages.
download Download packages.
uninstall Uninstall packages.
freeze Output installed packages in requirements format.
list List installed packages.
show Show information about installed packages.
check Verify installed packages have compatible dependencies.
search Search PyPI for packages.
wheel Build wheels from your requirements.
hash Compute hashes of package archives.
completion A helper command used for command completion.
help Show help for commands.
#查看需要安装的软件
[root@prometheus dashboard]# cat pip_requirements.txt
Flask==0.10.1
Flask-Babel==0.9
Jinja2==2.7.2
Werkzeug==0.9.4
gunicorn==19.1.1
python-dateutil==2.2
requests==2.3.0
mysql-python
python-ldap
#利用pip安装上面这些软件
[root@prometheus]# cd /home/work/open-falcon/dashboard

#安装软件
[root@prometheus dashboard]# pip install -r pip_requirements.txt
Collecting Flask==0.10.1 (from -r pip_requirements.txt (line 1))
Downloading Flask-0.10.1.tar.gz (544kB)
100% |████████████████████████████████| 552kB 955kB/s
Collecting Flask-Babel==0.9 (from -r pip_requirements.txt (line 2))
Downloading Flask-Babel-0.9.tar.gz
Collecting Jinja2==2.7.2 (from -r pip_requirements.txt (line 3))
Downloading Jinja2-2.7.2.tar.gz (378kB)
100% |████████████████████████████████| 378kB 2.0MB/s
Collecting Werkzeug==0.9.4 (from -r pip_requirements.txt (line 4))
Downloading Werkzeug-0.9.4.tar.gz (1.1MB)
100% |████████████████████████████████| 1.1MB 1.1MB/s
Collecting gunicorn==19.1.1 (from -r pip_requirements.txt (line 5))
Downloading gunicorn-19.1.1-py2.py3-none-any.whl (104kB)
100% |████████████████████████████████| 112kB 3.4MB/s
Collecting python-dateutil==2.2 (from -r pip_requirements.txt (line 6))
Downloading python-dateutil-2.2.tar.gz (259kB)
100% |████████████████████████████████| 266kB 1.9MB/s
Collecting requests==2.3.0 (from -r pip_requirements.txt (line 7))
Downloading requests-2.3.0-py2.py3-none-any.whl (452kB)
100% |████████████████████████████████| 460kB 305kB/s
Collecting mysql-python (from -r pip_requirements.txt (line 8))
Downloading MySQL-python-1.2.5.zip (108kB)
100% |████████████████████████████████| 112kB 2.4MB/s
Collecting python-ldap (from -r pip_requirements.txt (line 9))
Downloading python-ldap-2.4.45.tar.gz (296kB)
100% |████████████████████████████████| 296kB 2.6MB/s
Collecting itsdangerous>=0.21 (from Flask==0.10.1->-r pip_requirements.txt (line 1))
Downloading itsdangerous-0.24.tar.gz (46kB)
100% |████████████████████████████████| 51kB 2.4MB/s
Collecting Babel>=1.0 (from Flask-Babel==0.9->-r pip_requirements.txt (line 2))
Downloading Babel-2.5.1-py2.py3-none-any.whl (6.8MB)
100% |████████████████████████████████| 6.8MB 196kB/s
Collecting speaklater>=1.2 (from Flask-Babel==0.9->-r pip_requirements.txt (line 2))
Downloading speaklater-1.3.tar.gz
Collecting markupsafe (from Jinja2==2.7.2->-r pip_requirements.txt (line 3))
Downloading MarkupSafe-1.0.tar.gz
Collecting six (from python-dateutil==2.2->-r pip_requirements.txt (line 6))
Downloading six-1.11.0-py2.py3-none-any.whl
Requirement already satisfied: setuptools in ./env/lib/python2.7/site-packages/setuptools-33.1.1-py2.7.egg (from python-ldap->-r pip_requirements.txt (line 9))
Collecting pytz>=0a (from Babel>=1.0->Flask-Babel==0.9->-r pip_requirements.txt (line 2))
Downloading pytz-2017.2-py2.py3-none-any.whl (484kB)
100% |████████████████████████████████| 491kB 1.7MB/s
Installing collected packages: Werkzeug, markupsafe, Jinja2, itsdangerous, Flask, pytz, Babel, speaklater, Flask-Babel, gunicorn, six, python-dateutil, requests, mysql-python, python-ldap
Running setup.py install for Werkzeug ... done
Running setup.py install for markupsafe ... done
Running setup.py install for Jinja2 ... done
Running setup.py install for itsdangerous ... done
Running setup.py install for Flask ... done
Running setup.py install for speaklater ... done
Running setup.py install for Flask-Babel ... done
Running setup.py install for python-dateutil ... done
Running setup.py install for mysql-python ... done
Running setup.py install for python-ldap ... done
Successfully installed Babel-2.5.1 Flask-0.10.1 Flask-Babel-0.9 Jinja2-2.7.2 Werkzeug-0.9.4 gunicorn-19.1.1 itsdangerous-0.24 markupsafe-1.0 mysql-python-1.2.5 python-dateutil-2.2 python-ldap-2.4.45 pytz-2017.2 requests-2.3.0 six-1.11.0 speaklater-1.3
5、修改配置
#配置说明:
dashboard的配置文件为: 'rrd/config.py',请根据实际情况修改

## API_ADDR 表示后端api组件的地址
API_ADDR = "http://127.0.0.1:8080/api/v1"

## 根据实际情况,修改PORTAL_DB_*, 默认用户名为root,默认密码为""
## 根据实际情况,修改ALARM_DB_*, 默认用户名为root,默认密码为""
#修改方法
[root@Open-Falcon-client]#cd /home/work/open-falcon/dashboard/rrd

[root@Open-Falcon-client rrd]# cp config.py config.py.bak

(env)[root@Open-Falcon-client rrd]# vi config.py
#-*-coding:utf8-*-
# Copyright 2017 Xiaomi, Inc.
#
# Licensed under the Apache License, Version 2.0 (the "License");
# you may not use this file except in compliance with the License.
# You may obtain a copy of the License at
#
# http://www.apache.org/licenses/LICENSE-2.0
#
# Unless required by applicable law or agreed to in writing, software
# distributed under the License is distributed on an "AS IS" BASIS,
# WITHOUT WARRANTIES OR CONDITIONS OF ANY KIND, either express or implied.
# See the License for the specific language governing permissions and
# limitations under the License.


# app config
import os
LOG_LEVEL = os.environ.get("LOG_LEVEL",'DEBUG')
SECRET_KEY = os.environ.get("SECRET_KEY","secret-key")
PERMANENT_SESSION_LIFETIME = os.environ.get("PERMANENT_SESSION_LIFETIME",3600 * 24 * 30)
SITE_COOKIE = os.environ.get("SITE_COOKIE","open-falcon-ck")

# Falcon+ API
API_ADDR = os.environ.get("API_ADDR","http://192.168.1.180:8080/api/v1")

# portal database
# TODO: read from api instead of db
PORTAL_DB_HOST = os.environ.get("PORTAL_DB_HOST","192.168.1.180")
PORTAL_DB_PORT = int(os.environ.get("PORTAL_DB_PORT",3306))
PORTAL_DB_USER = os.environ.get("PORTAL_DB_USER","root")
PORTAL_DB_PASS = os.environ.get("PORTAL_DB_PASS","password")
PORTAL_DB_NAME = os.environ.get("PORTAL_DB_NAME","falcon_portal")

# alarm database
# TODO: read from api instead of db
ALARM_DB_HOST = os.environ.get("ALARM_DB_HOST","192.168.1.180")
ALARM_DB_PORT = int(os.environ.get("ALARM_DB_PORT",3306))
ALARM_DB_USER = os.environ.get("ALARM_DB_USER","root")
ALARM_DB_PASS = os.environ.get("ALARM_DB_PASS","password")
ALARM_DB_NAME = os.environ.get("ALARM_DB_NAME","alarms")

# ldap config
LDAP_ENABLED = os.environ.get("LDAP_ENABLED",False)
LDAP_SERVER = os.environ.get("LDAP_SERVER","ldap.forumsys.com:389")
LDAP_BASE_DN = os.environ.get("LDAP_BASE_DN","dc=example,dc=com")
LDAP_BINDDN_FMT = os.environ.get("LDAP_BINDDN_FMT","uid=%s,dc=example,dc=com")
LDAP_SEARCH_FMT = os.environ.get("LDAP_SEARCH_FMT","uid=%s")
LDAP_ATTRS = ["cn","mail","telephoneNumber"]
LDAP_TLS_START_TLS = False
LDAP_TLS_CACERTDIR = ""
LDAP_TLS_CACERTFILE = "/etc/openldap/certs/ca.crt"
LDAP_TLS_CERTFILE = ""
LDAP_TLS_KEYFILE = ""
LDAP_TLS_REQUIRE_CERT = True
LDAP_TLS_CIPHER_SUITE = ""

# i18n
BABEL_DEFAULT_LOCALE = 'zh_CN'
BABEL_DEFAULT_TIMEZONE = 'Asia/Shanghai'
# aviliable translations
LANGUAGES = {
'en': 'English',
'zh_CN': 'Chinese-Simplified',
}

# portal site config
MAINTAINERS = ['root']
CONTACT = 'root@open-falcon.org'

try:
from rrd.local_config import *
except:
print "[warning] no local config file"
#启动服务
#启动服务
有两种方法:
法一:
(env)[root@Open-Falcon-client dashboard]# bash control start
falcon-dashboard started..., pid=40853

法二:
(env)[root@Open-Falcon-client dashboard]# ./control start
falcon-dashboard started..., pid=40853

#查看日志
(env)[root@Open-Falcon-client dashboard]# ./control tail
[2017-10-29 15:30:20 +0000] [40853] [INFO] Starting gunicorn 19.1.1
[2017-10-29 15:30:20 +0000] [40853] [INFO] Listening at: http://0.0.0.0:8081 (40853)
[2017-10-29 15:30:20 +0000] [40853] [INFO] Using worker: sync
[2017-10-29 15:30:20 +0000] [40858] [INFO] Booting worker with pid: 40858
[2017-10-29 15:30:20 +0000] [40863] [INFO] Booting worker with pid: 40863
[2017-10-29 15:30:20 +0000] [40864] [INFO] Booting worker with pid: 40864
[2017-10-29 15:30:20 +0000] [40866] [INFO] Booting worker with pid: 40866

#退出env环境
(env)[root@Open-Falcon-client dashboard]# deactivate
[root@Open-Falcon-client dashboard]#
#访问网站
http://192.168.1.181:8081

#关于登录账号的问题或参考FAQ
请自行注册管理员用户名和密码
#登录界面

6、其它用法
#以开发者模式启动
./env/bin/python wsgi.py

open http://127.0.0.1:8081 in your browser.
#开启8081端口 (备注:如果关闭了防火墙,则直接忽略这步)
1)防火墙添加8081端口永久开放
firewall-cmd --add-port=8081/tcp --permanent
2)重新载入防火墙配置
firewall-cmd --reload
#停止dashboard运行
bash control stop
#查看dashboard运行状态
bash control status
六、FAQ
- Q: open-falcon v0.2 有管理员帐号吗?
- A: 可以通过dashboard自行注册新用户,第一个用户名为root的帐号会被认为是超级管理员,超级管理员可以设置其他用户为管理员。
- Q: open-falcon v0.2 dashboard 可以禁止用户自己注册吗?
- A: 可以的,在api组件的配置文件中,将
signup_disable配置项修改为true,重启api即可。

 浙公网安备 33010602011771号