
使用Vite+ Lit 构建webcomponent 组件
Vite+Lit.js 构建Web Component
web component作为前一个时代的方案,在特定场景下确有不一样的妙用
,在维护前后端不分离的项目,web component 是为数不多的选择,整理一下使用Lit 构建自己的web component组件库为传统项目提提速的过程。
使用vite 创建项目
Vite 里带了Lit模板,我们这里选用Lit+ts模板
pnpm create vite
目录结构
- src
- hello
- index.ts // 具体组件
- index.ts // 组件收集
- hello
- vite.config.ts 打包配置!
- index.ts // 组件注入!
适用于构建基础组件库,不适用太复杂的逻辑,利用web-components 自带的样式隔离等,可以很好的避免被上下文干扰。
构建打包项目
编写入口文件,注入组件
import * as allComponents from './src/main.ts'

const components = allComponents
const toKebabCase = (str: string): string => {
  return str
    .replace(/([a-z0-9])([A-Z])/g, '$1-$2')
    .replace(/([A-Z])([A-Z])(?=[a-z])/g, '$1-$2')
    .toLowerCase()
}
if (typeof window !== 'undefined') {
  (window as any).WebComponents = components

  Object.entries(components).forEach(([name, component]) => {
    const elementName = toKebabCase(name)
    const fullElementName = 'xk-' + elementName // 这里定义了全局组件名开头

    if (!customElements.get(fullElementName)) {
      customElements.define(fullElementName, component)
    }
  })
}
除了组件,也可以在这里注入全局方法等
构建打包脚本
使用vite 来构建很简单。
import { defineConfig } from 'vite'
import { resolve } from 'path'
import { fileURLToPath, URL } from 'node:url'

export default defineConfig({
  build: {
    lib: {
      entry: resolve(fileURLToPath(new URL('.', import.meta.url)), 'index.ts'),
      name: 'WebComponents',
      fileName: (format) => `lit-web-components.${format === 'es' ? 'js' : 'umd.js'}`,
      formats: ['es', 'umd']
    },
    outDir:"../dist/js", // 打包输出目录
    rollupOptions: {
      output: {
        extend: true,
        assetFileNames: 'lit-web-components.[ext]',
        manualChunks: undefined,
        compact: true, // 紧凑输出
      },
      treeshake: {
        moduleSideEffects: false,
        propertyReadSideEffects: false,
        tryCatchDeoptimization: false
      },
    },
    sourcemap: false, // 移除 source map
    minify: 'terser',
    target: 'es2022',
    terserOptions: {
      compress: {
        drop_console: true, // 移除所有 console
        drop_debugger: true, // 移除 debugger
        pure_funcs: ['console.log', 'console.info', 'console.debug', 'console.warn'], // 移除指定的纯函数
        unused: true, // 移除未使用的代码
        dead_code: true, // 移除死代码
        conditionals: true, // 优化条件语句
        evaluate: true, // 计算常量表达式
        booleans: true, // 优化布尔值
        sequences: true, // 连接连续语句
        switches: true, // 移除重复的 switch 分支
        reduce_vars: true, // 减少变量引用
        collapse_vars: true, // 内联变量
        passes: 3 // 多次压缩以获得更好的效果
      },
      mangle: {
        toplevel: true, // 混淆顶级作用域
        reserved: ['lit', 'LitElement', 'html', 'css', 'customElements'] // 保留重要的库名称
      },
      format: {
        comments: false // 移除所有注释
      }
    }
  },
  resolve: {
    alias: {
      '@': resolve(fileURLToPath(new URL('.', import.meta.url)), 'src')
    }
  }
})
编写一个简单的组件
src/hello/index.ts
import { LitElement,html,css } from "lit";
import { property } from "lit/decorators.js";

export class Hello extends LitElement{
    @property({type:String})
    text='Hello,Web Component'

    @property({type:String})
    color='#222'
    static style=css`
    :host{

    }
    `
    render(){
        return html`
            <span style="color:${this.color};">${this.text}</span>
        `
    }
}
在main.ts 里导入
export {Hello} from "./hello/index"
打包输出结果
lit-web-components.umd.js 16.92 kB │ gzip: 6.44 kB
注意:这里包含了lit 本身这个库,
使用
打包构建带入lit本身的库(建议) ,使用就很简单了
引入
<script src="./js/lit-web-components.umd.js"></script>
使用
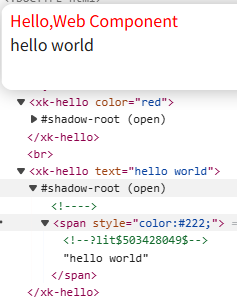
<xk-hello color="red"> </xk-hello> </br>
<xk-hello text="hello world"> </xk-hello>
输出效果和Dom
实际应用和思考
web component 可以为传统的老项目注入现代化开发能力,Lit 则大大减轻了这个过程,经过我在项目中的深入使用,明显带来的好处
- 样式隔离: 自带的样式隔离和行为,不会被之前的公共css等影响。减少了心智负担。
- 复用:沉淀了一大批组件,快速构建页面,统一了整站的交互性和ui 一致性。
- 跨框架: 后续升级框架时,之前的组件依然能用。减少了升级成本,还能保持原来的ui细节。
缺点
- 额外的学习成本:可以使用ai 来开发维护
- SEO影响 对于组件内部的一些隐藏属性,可能会影响SEO:建议增加描述,关键内容通过Slot可以消除
总结
如果无法对大型项目重构,大型项目开发起来又很痛苦,尝试webcomponent 方案吧。升级平滑,组件复用,还有样式隔离,插槽等现代化概念。

 浙公网安备 33010602011771号