【项目】基于 YOLO 的边缘入侵检测与可疑行为分析系统
【项目】基于 YOLO 的边缘入侵检测与可疑行为分析系统
YOLO训练
数据处理
首先在Kaggle上面找到合适的数据集

使用这个数据集的原因是有很多类似监控视角的街景,并且场景复杂度较大,训练起来效果会好一些
但是这个数据集并不是YOLO格式的,首先要把数据处理至YOLO格式
这个数据集的label是放在一个csv文件中的,如下所示:
| filename | width | height | class | xmin | ymin | xmax | ymax |
|---|---|---|---|---|---|---|---|
| 0002640_jpg.rf.a1f2d386da1e4821651f9dec0cf52541.jpg | 1280 | 964 | person | 165 | 511 | 217 | 642 |
| 2007_006841_jpg.rf.cdc00183ebc2771e932eb4f907e49971.jpg | 500 | 316 | person | 385 | 105 | 435 | 283 |
| 2007_006841_jpg.rf.cdc00183ebc2771e932eb4f907e49971.jpg | 500 | 316 | person | 488 | 117 | 499 | 215 |
| 2008_002523_jpg.rf.0504a335ef96ee9f9ac5153b237180ac.jpg | 500 | 375 | person | 232 | 10 | 369 | 180 |
| 2007_004065_jpg.rf.99a8c0f81203b9368f6938238b192c73.jpg | 500 | 375 | person | 451 | 187 | 474 | 244 |
| 2007_004065_jpg.rf.99a8c0f81203b9368f6938238b192c73.jpg | 500 | 375 | person | 4 | 192 | 25 | 240 |
| 2007_004065_jpg.rf.99a8c0f81203b9368f6938238b192c73.jpg | 500 | 375 | person | 340 | 166 | 366 | 200 |
| 2008_002838_jpg.rf.7fc2e21d81cd77bdacd32c14bea98bcc.jpg | 380 | 472 | person | 174 | 142 | 379 | 471 |
| 2008_002838_jpg.rf.7fc2e21d81cd77bdacd32c14bea98bcc.jpg | 380 | 472 | person | 0 | 241 | 185 | 471 |
| 2008_002838_jpg.rf.7fc2e21d81cd77bdacd32c14bea98bcc.jpg | 380 | 472 | person | 0 | 20 | 379 | 471 |
| images-4-_jpg.rf.47583fae1bbd36bc3856a76ce0d79c67.jpg | 260 | 194 | person | 106 | 63 | 112 | 77 |
| images-4-_jpg.rf.47583fae1bbd36bc3856a76ce0d79c67.jpg | 260 | 194 | person | 144 | 80 | 155 | 98 |
| images-4-_jpg.rf.47583fae1bbd36bc3856a76ce0d79c67.jpg | 260 | 194 | person | 158 | 76 | 167 | 95 |
| images-4-_jpg.rf.47583fae1bbd36bc3856a76ce0d79c67.jpg | 260 | 194 | person | 91 | 126 | 104 | 158 |
| images-4-_jpg.rf.47583fae1bbd36bc3856a76ce0d79c67.jpg | 260 | 194 | person | 15 | 145 | 33 | 173 |
| images-4-_jpg.rf.47583fae1bbd36bc3856a76ce0d79c67.jpg | 260 | 194 | person | 32 | 132 | 44 | 159 |
那么转换代码要写的就是把label按照filename分组,然后一个个拆出来就好
代码如下:
import os
import pandas as pd

SPLITS = ['train', 'valid', 'test']

CLASS_MAP = {
    'person' : 0
}

def convert_split(split_dir):
    csv_path = os.path.join(split_dir, '_annotations.csv');
    if not os.path.exists(csv_path):
        print(f'[WARN] {csv_path} not found, skip')
        return

    print(f'[INFO] Processing {csv_path}')

    df = pd.read_csv(csv_path)

    grouped = df.groupby("filename")

    for filename, group in grouped:
        label_path = os.path.join(
            split_dir,
            os.path.splitext(filename)[0] + '.txt'
        )

        with open(label_path, 'w') as f:
            for _, row in group.iterrows():
                cls_name = row["class"]

                if cls_name not in CLASS_MAP:
                    continue

                class_id = CLASS_MAP[cls_name]

                img_w = row['width']
                img_h = row['height']

                xmin = row['xmin']
                ymin = row['ymin']
                xmax = row['xmax']
                ymax = row['ymax']

                x_center = ((xmin + xmax) / 2.) / img_w
                y_center = ((ymin + ymax) / 2.) / img_h

                w = (xmax - xmin) / img_w
                h = (ymax - ymin) / img_h

                f.write(f'{class_id} {x_center : .6f} {y_center : .6f} {w : .6f} {h : .6f}\n')

    print(f'[OK] {split_dir} done.')

if __name__ == '__main__':
    for split in SPLITS:
        if os.path.isdir(split):
            convert_split(split)
        else:
            print(f'[WARN] {split} directory not found, skip.')
接下来就转换成正常的YOLO结构树了
dataset
├─images
│  ├─test
│  ├─train
│  └─valid
└─labels
    ├─test
    ├─train
    └─valid
环境搭建
接着租了台华为云的服务器,选择了比较激进的配置,训练起来快了很多
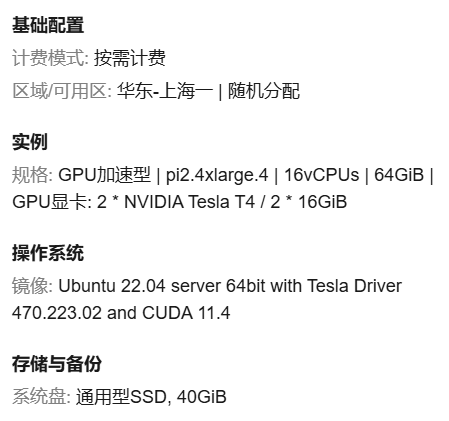
下面就是环境搭建,主要的流程:
- 安装一些系统必需的组件(如git,curl,wget等)
- 确定服务器状态:nvidia-smi(这次实践中就出了点问题,就是因为这个步骤才能够意识到并且重装driver)
- 搭建python环境:采用venv
sudo apt install -y python3-venv python3-pip

python3 -m venv yolo_env
source yolo_env/bin/activate

pip install --upgrade pip
-
接着是安装Pytorch和Ultralytics(华为云用的是cu11的架构,要显方指定wheel)
-
验证torch/YOLO是否可用
import torch
print("Torch version:", torch.__version__)
print("CUDA available:", torch.cuda.is_available())
print("GPU:", torch.cuda.get_device_name(0))
yolo checks
环境搭建好了,接下来需要把处理好的数据传上服务器,ssh拖拽并不保险,需要采用scp指令
scp -r dataset root@<your_server_ip>:/home/trainProcess/
如果是服务器传到主机,vscode点击下载或者是scp把两个路径反过来都可以
服务器在/home/trainProcess下工作,写个.yaml
path: /home/trainProcess/dataset

train: images/train
val: images/valid

nc: 1
names:
  - person
训练与测试
接着就可以写train指令了,由于租了个多卡的服务器,也想看看多卡性能如何
yolo detect train \
  model=./yolov8n.pt \
  data=/home/trainProcess/dataset/data.yaml \
  epochs=50 \
  imgsz=640 \
  batch=32 \
  device=0,1 \
  workers=8 \
  patience=10
其中patience=10是为了避免过度工作,连续十个epoch优化不大就立刻停止
另外预训练权重采用yolov8n.pt是为了适应未来可能的jetson nano计算
训练好之后用test数据集写个predict指令看效果
yolo detect predict \
  model=/home/trainProcess/runs/detect/train/weights/best.pt \
  source=/home/trainProcess/dataset/images/test \
  conf=0.15 \
  iou=0.7 \
  device=0
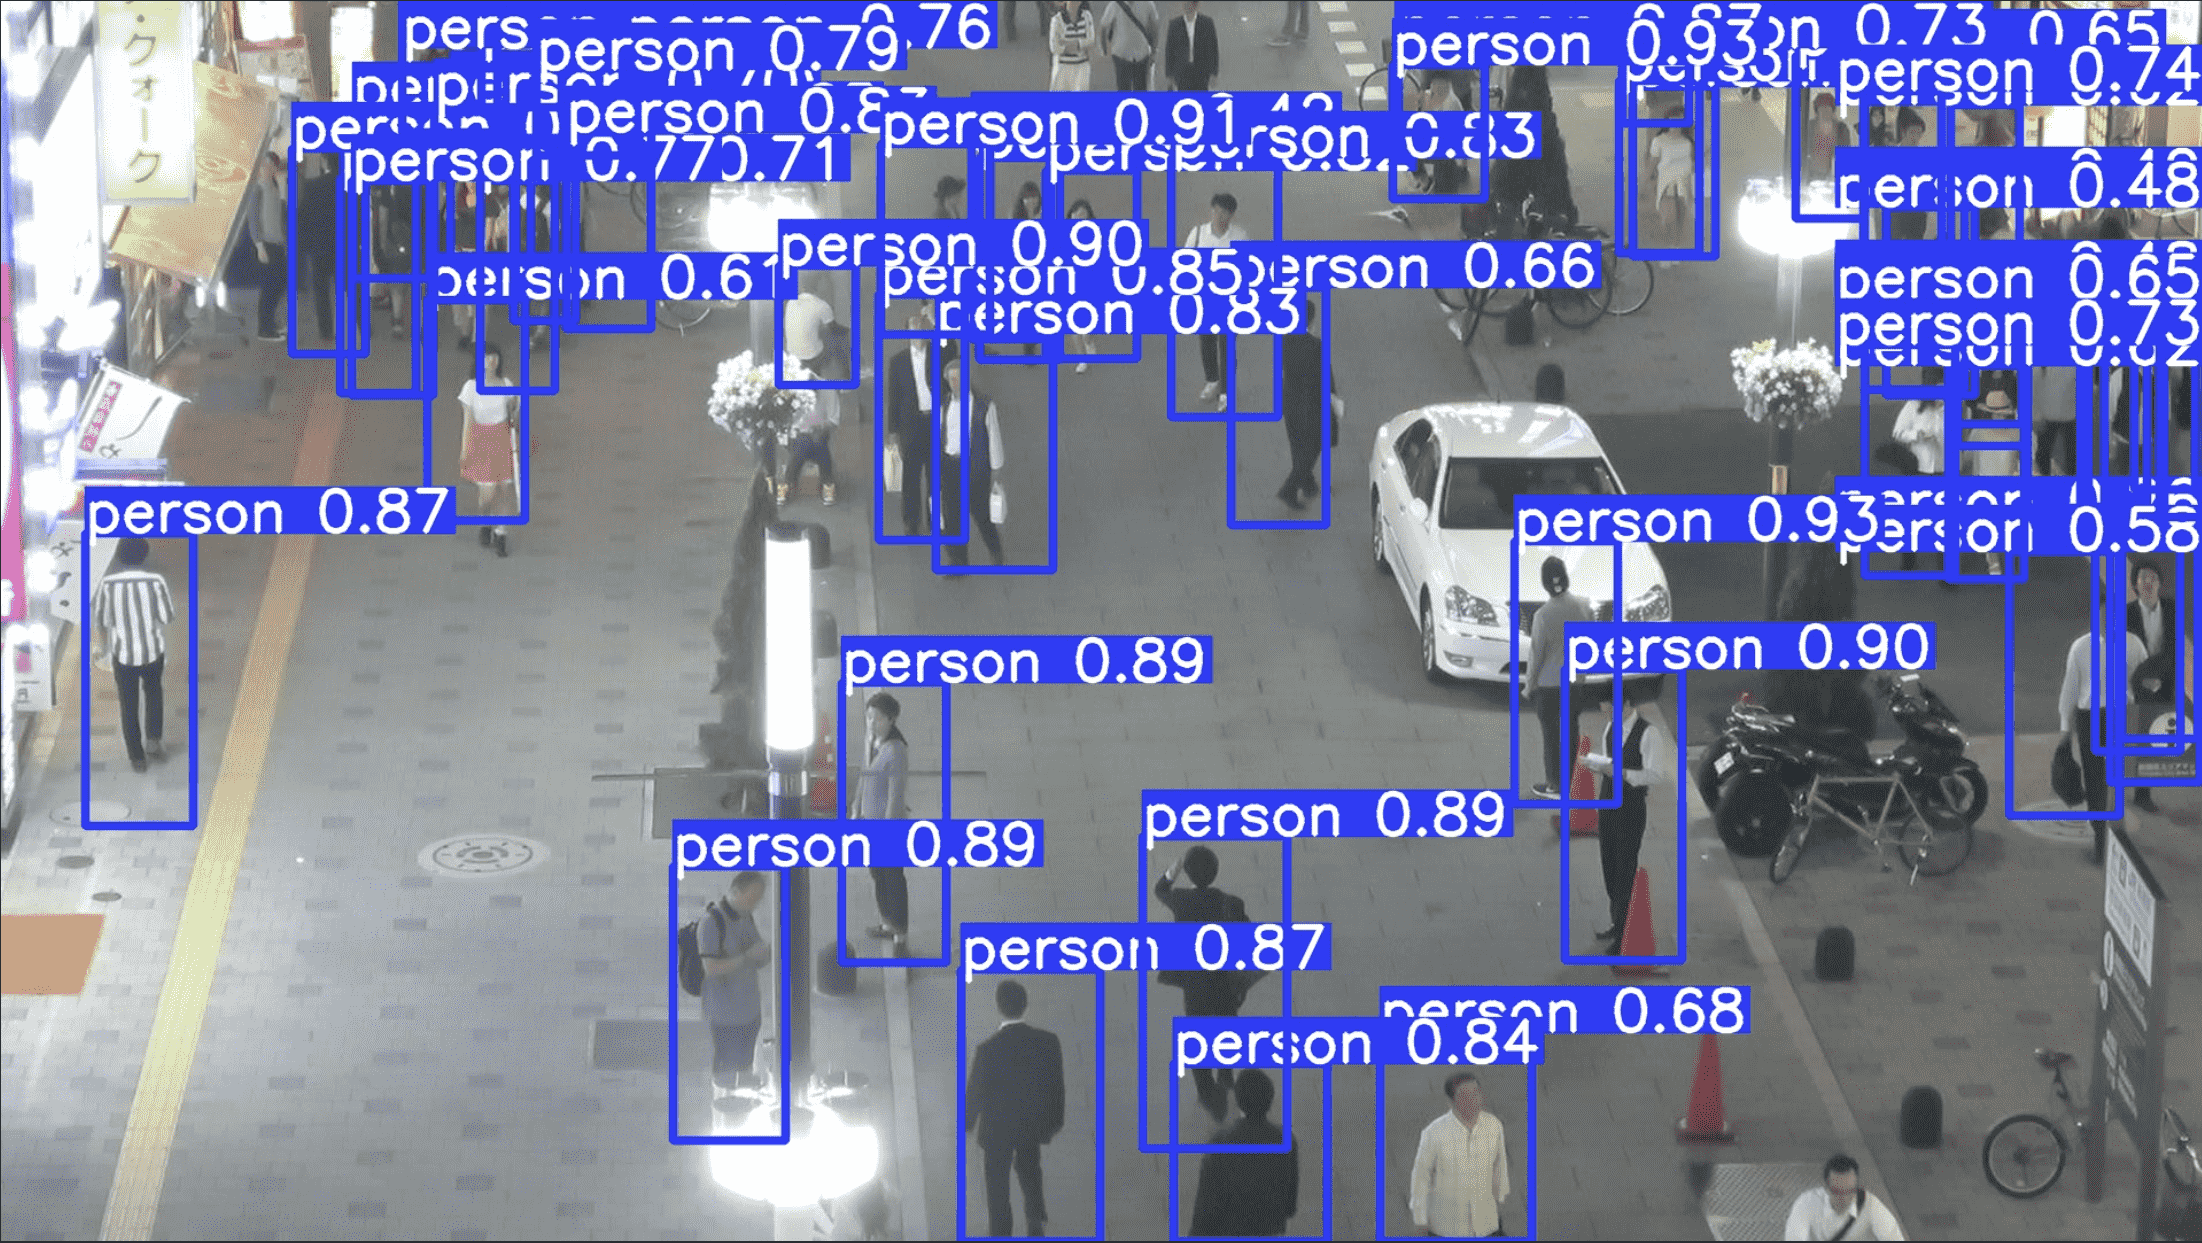
看得出来效果还是不错的
构建人物危险系数模型
视频采集
要适应一个类似监控的场景,首先要利用视频进行实验,所以第一步是视频的获取
我选择采用youtube上面的视频,因为有对应的python第三方库yt-dlp,指令如下:
yt-dlp -f `
"bestvideo[height<=1080][ext=mp4]+bestaudio[ext=m4a]/mp4" `
"https://www.youtube.com/watch?v=VIDEO_ID"
由于是在本机下载的视频,需要通过scp指令上传到云服务器
现在有了视频,就可以进行视频的检测了,首先试试基础功能
yolo detect predict \
  model=/home/trainProcess/myWeights/person.pt \
  source=/home/trainProcess/videos/test1.mp4 \
  conf=0.25 \
  iou=0.7 \
  device=0 \
  save=True
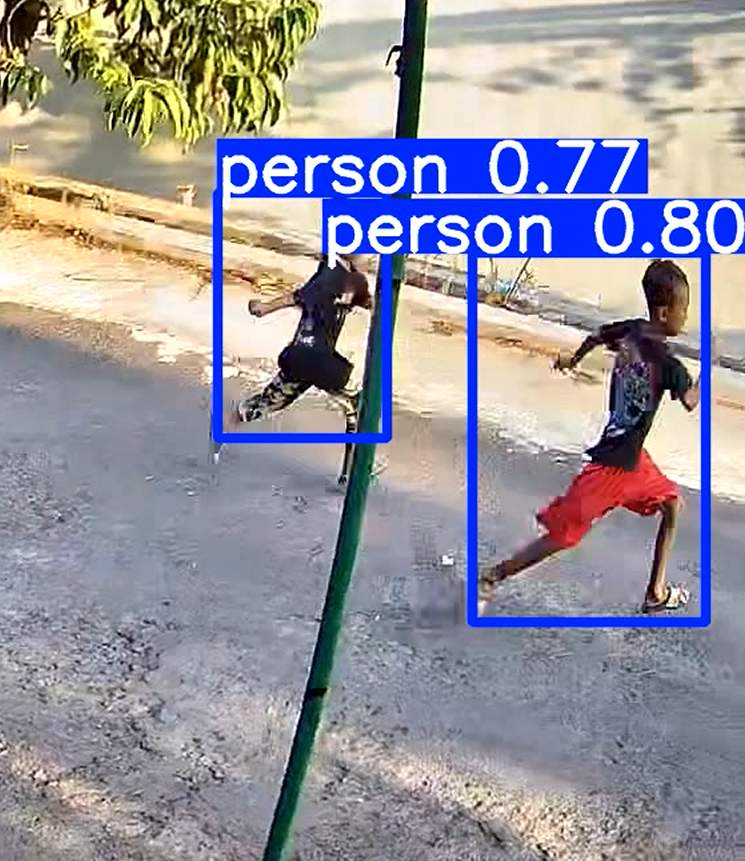
这是视频中有效的画面,基本功能没有问题
人物分配id
接下来就是给人物分id,便于后续的行动
本项目中采用SORT本体,SORT可以跟踪人物轨迹,并且输入恰好是YOLO的输出格式,因此完美适配
wget https://raw.githubusercontent.com/abewley/sort/master/sort.py
接下来先写个正常给人物分id的脚本
import cv2
import numpy as np
from ultralytics import YOLO
from sort.sort import Sort

# ====== 路径配置 ======
VIDEO_PATH = "/home/trainProcess/videos/test3.mp4"
MODEL_PATH = "/home/trainProcess/myWeights/person.pt"
OUTPUT_PATH = "/home/trainProcess/videos/test3_tracked.avi"

# ====== 初始化 ======
model = YOLO(MODEL_PATH)
tracker = Sort()

cap = cv2.VideoCapture(VIDEO_PATH)
if not cap.isOpened():
    raise RuntimeError("❌ 无法打开视频")

# ====== 读取视频属性 ======
fps = cap.get(cv2.CAP_PROP_FPS)
width = int(cap.get(cv2.CAP_PROP_FRAME_WIDTH))
height = int(cap.get(cv2.CAP_PROP_FRAME_HEIGHT))

print(f"Video info: {width}x{height} @ {fps:.2f} FPS")

# ====== VideoWriter ======
fourcc = cv2.VideoWriter_fourcc(*"XVID")
writer = cv2.VideoWriter(
    OUTPUT_PATH,
    fourcc,
    fps if fps > 0 else 25,
    (width, height)
)

frame_id = 0

while True:
    ret, frame = cap.read()
    if not ret:
        break

    frame_id += 1

    # ====== YOLO 推理 ======
    results = model(frame, conf=0.25, iou=0.7, device=0, verbose=False)

    dets = []

    for r in results:
        if r.boxes is None:
            continue

        boxes = r.boxes.xyxy.cpu().numpy()
        scores = r.boxes.conf.cpu().numpy()
        classes = r.boxes.cls.cpu().numpy()

        for box, score, cls in zip(boxes, scores, classes):
            if int(cls) != 0:  # person
                continue
            x1, y1, x2, y2 = box
            dets.append([x1, y1, x2, y2, score])

    if len(dets) == 0:
        dets = np.empty((0, 5))
    else:
        dets = np.array(dets)

    # ====== SORT 更新 ======
    tracks = tracker.update(dets)

    # ====== 可视化 ======
    for track in tracks:
        x1, y1, x2, y2, track_id = track
        x1, y1, x2, y2 = map(int, [x1, y1, x2, y2])

        cv2.rectangle(frame, (x1, y1), (x2, y2), (0, 255, 0), 2)
        cv2.putText(
            frame,
            f"ID {int(track_id)}",
            (x1, max(20, y1 - 10)),
            cv2.FONT_HERSHEY_SIMPLEX,
            0.6,
            (0, 255, 0),
            2
        )

    # ====== 写入视频 ======
    writer.write(frame)

cap.release()
writer.release()
print(f"✅ Tracking video saved to {OUTPUT_PATH}")
效果如下(用的是一个无厘头短视频,但是人物行动轨迹适合实验):

有一个小问题是bbox断开之后会赋予一个新id,有两种类别的解决方案:
- 不把同一个id视作同一”人“,而是一段行为轨迹,同一个人可以有不同行为轨迹,这样就不需要修改了
- 可以修改SORT类中的信息,认为断开多少帧依旧能认为是同一id
目前暂时采用第一种思路
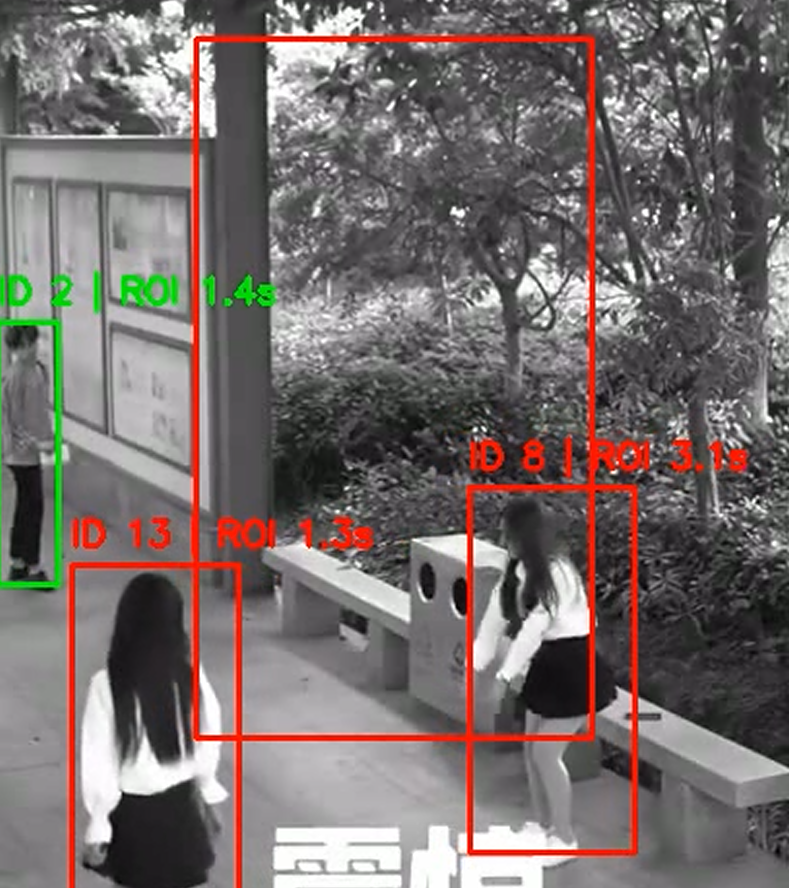
禁区ROI与危险分级
id分出来了,接下来需要画一个禁区ROI,人物与ROI有重合就标红,并且用一个滞留时间体现一下效果:
import cv2
import numpy as np
from ultralytics import YOLO
from sort.sort import Sort

# ================== 路径配置 ==================
VIDEO_PATH = "/home/trainProcess/videos/test3.mp4"
MODEL_PATH = "/home/trainProcess/myWeights/person.pt"
OUTPUT_PATH = "/home/trainProcess/videos/test3_roi_time_ex_1.avi"

# ================== 初始化 ==================
model = YOLO(MODEL_PATH)
tracker = Sort()

cap = cv2.VideoCapture(VIDEO_PATH)
if not cap.isOpened():
    raise RuntimeError("❌ 无法打开视频")

fps = cap.get(cv2.CAP_PROP_FPS)
fps = fps if fps > 0 else 25

width = int(cap.get(cv2.CAP_PROP_FRAME_WIDTH))
height = int(cap.get(cv2.CAP_PROP_FRAME_HEIGHT))

print(f"Video info: {width}x{height} @ {fps:.2f} FPS")

# ================== ROI(十六等分的正中间四格) ==================
wI = width // 4
hI = height // 4
ROI_POLYGON = np.array([
    [wI, hI],
    [3 * wI, hI],
    [3 * wI, 3 * hI],
    [wI, 3 * hI]
], dtype=np.int32)

def in_roi(bbox, roi_polygon):
    """
    判断 bbox 是否与 ROI 有重叠(只要有交集就算 inside)
    bbox: (x1, y1, x2, y2)
    roi_polygon: 十六等分的正中间四格矩形 polygon
    """
    x1, y1, x2, y2 = bbox

    # ROI 是矩形,取对角点即可
    roi_x1, roi_y1 = roi_polygon[0]  # (wI, hI)
    roi_x2, roi_y2 = roi_polygon[2]  # (3 * wI, 3 * hI)

    # AABB 不相交的 4 种情况
    if x2 < roi_x1:
        return False
    if x1 > roi_x2:
        return False
    if y2 < roi_y1:
        return False
    if y1 > roi_y2:
        return False

    return True

# ================== Track 状态缓存 ==================
track_roi_frames = dict()   # track_id -> frames in ROI

# ================== VideoWriter ==================
fourcc = cv2.VideoWriter_fourcc(*"XVID")
writer = cv2.VideoWriter(
    OUTPUT_PATH,
    fourcc,
    fps,
    (width, height)
)

frame_id = 0

# ================== 主循环 ==================
while True:
    ret, frame = cap.read()
    if not ret:
        break

    frame_id += 1

    # -------- YOLO 推理 --------
    results = model(frame, conf=0.25, iou=0.7, device=0, verbose=False)

    dets = []
    for r in results:
        if r.boxes is None:
            continue

        boxes = r.boxes.xyxy.cpu().numpy()
        scores = r.boxes.conf.cpu().numpy()
        classes = r.boxes.cls.cpu().numpy()

        for box, score, cls in zip(boxes, scores, classes):
            if int(cls) != 0:  # person
                continue
            x1, y1, x2, y2 = box
            dets.append([x1, y1, x2, y2, score])

    dets = np.array(dets) if len(dets) > 0 else np.empty((0, 5))

    # -------- SORT 更新 --------
    tracks = tracker.update(dets)

    # -------- 画 ROI --------
    cv2.polylines(frame, [ROI_POLYGON], True, (0, 0, 255), 2)

    # -------- 处理每个 track --------
    for track in tracks:
        x1, y1, x2, y2, track_id = track
        x1, y1, x2, y2 = map(int, [x1, y1, x2, y2])
        tid = int(track_id)

        bbox = (x1, y1, x2, y2)
        inside = in_roi(bbox, ROI_POLYGON)

        if tid not in track_roi_frames:
            track_roi_frames[tid] = 0

        if inside:
            track_roi_frames[tid] += 1

        time_in_roi = track_roi_frames[tid] / fps

        color = (0, 0, 255) if inside else (0, 255, 0)

        cv2.rectangle(frame, (x1, y1), (x2, y2), color, 2)
        cv2.putText(
            frame,
            f"ID {tid} | ROI {time_in_roi:.1f}s",
            (x1, max(20, y1 - 10)),
            cv2.FONT_HERSHEY_SIMPLEX,
            0.6,
            color,
            2
        )

    writer.write(frame)

# ================== 收尾 ==================
cap.release()
writer.release()
print(f"✅ ROI time video saved to {OUTPUT_PATH}")
有一个注意点是ROI的点位是顺时针表示的,第一次没注意给变成交叉的形状了
以下是成功案例:
2026/01/10 目前Vibe Coding出来了一个基本的完全体,但我不太想直接用AI生成出来的项目,所以暂时先记录一下修改的过程和展示的思路
下面是危险分级的部分,分成了三种等级:
- RISK:人体bbox和禁区ROI的重合面积在时间上的积分到达一定阈值
- POTENTIAL:不是RISK的前提下,人体bbox中心与禁区ROI中心的距离的反相关函数在时间上的积分到达一定阈值
刚开始我错误地以为距离在时间上的积分越大越可疑,事实上这是错的(甚至是TRAE发现的而不是GPT发现的)
这其实是一个思维惯性的错误,我习惯性认为距离可以说明可疑程度,进而可疑程度与距离正相关,其实并非
所以应该要采用一个与距离反相关的函数,大概函数是这样的:
\(\varepsilon\)是防止出现0时数据出问题而引入的偏置
- SAFE:既不是RISK也不是POTENTIAL的部分
等我自己能写代码之后再附上代码(
信息发送
根据从CTF学到的东西,我选择用python requests库来进行远程发包
这个时候有两个部分:
- 危险相关数据:危险等级、人物ID、框体数据等,这些用json可以直接发包
- 可视化数据:视频/图片
- 一开始我考虑使用视频,但测试起来感觉视频其实效果并不好,而且技术实现比较困难
- 于是我最终选择了发送图片,但是目前还是不太懂
好了现在懂了,其实原理和发json包差不多,先用multipart/form-data上传图片,再把返回的图片地址放到事件json里面上报,所以就是用两个路径接口工作:
- /api/uploads,用来存储图片,并且能够用绝对地址来区分图片
- /api/events,除了存储危险相关数据,还能存储图片url,进而可以使得前端访问到对应图片
前后端构建
与GPT畅谈之后我决定了用Node.js来作为服务器后端,并且前端就正常利用html+css+javascript
后端完成的事情:
- 接受json包
- 把json数据解析并把所需放在/api/events路径下让前端可访问
- 终端输出收到的信息
前端完成的事情:
- 显示报警信息
- 显示远程端状态
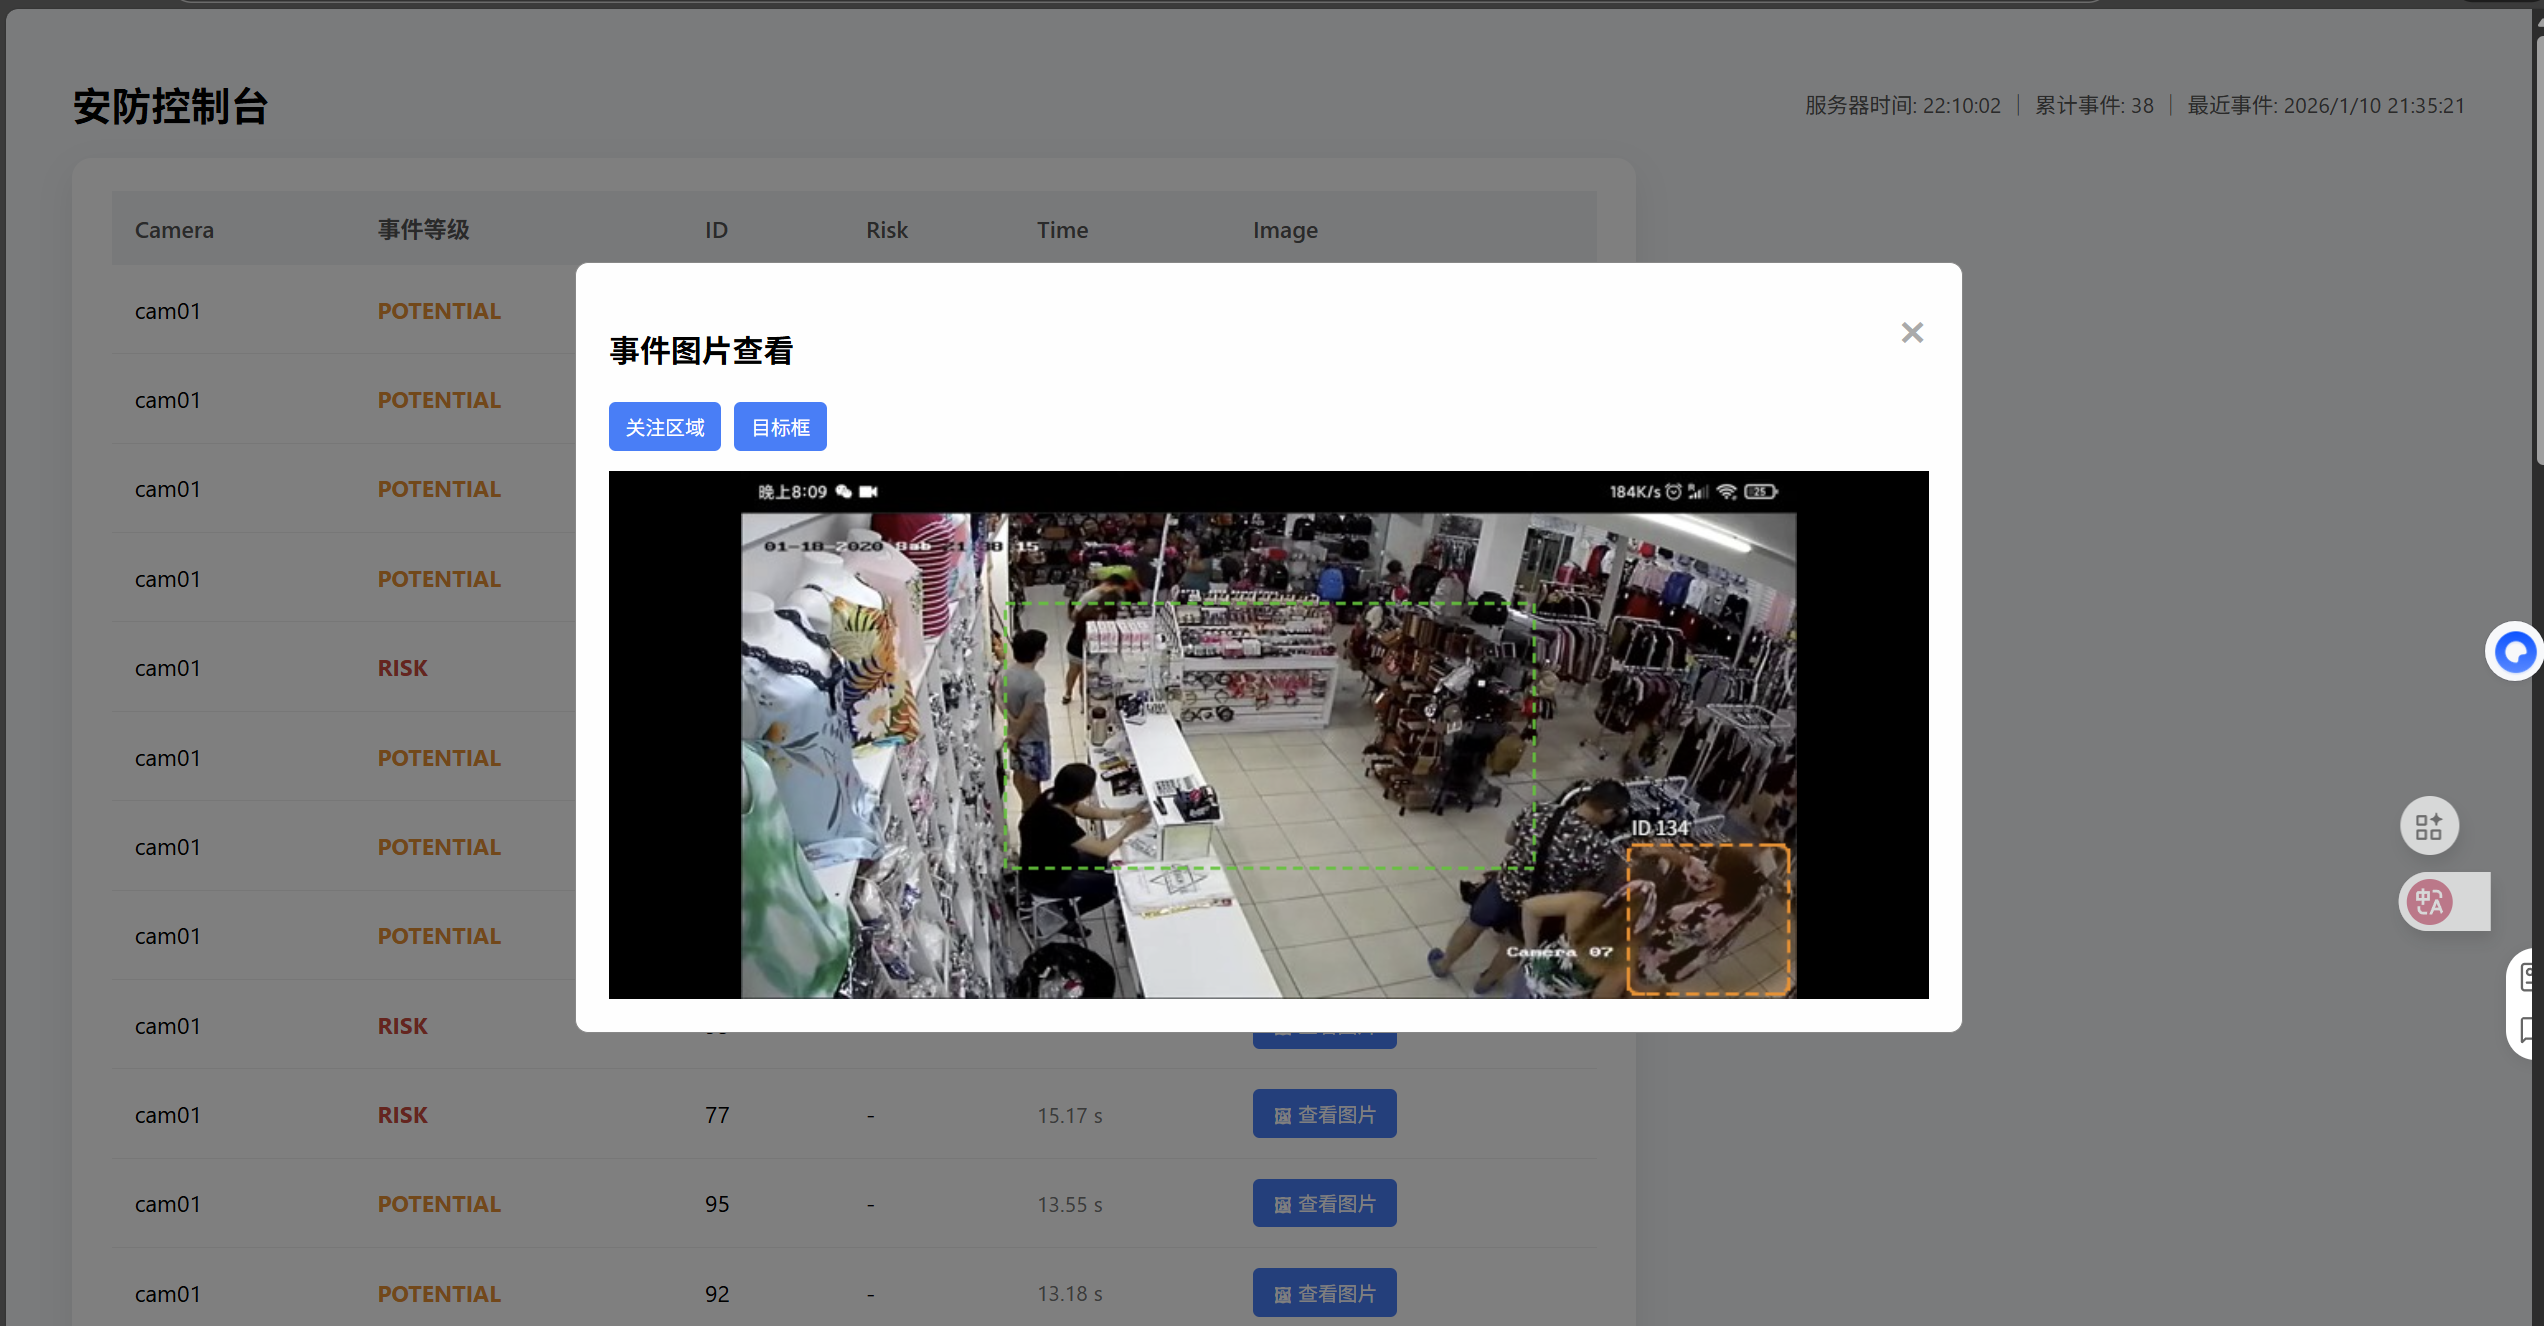
- 允许查看报警时刻的图片,并且可选择是否放上bbox和ROI
不管怎么样还是先给个效果图:
后端部分就贴个代码吧,后续解读一下:
// TRAE version

const express = require("express");
const multer = require("multer");
const path = require("path");

const app = express();
const PORT = 3000;

app.use(express.json());

// 配置 Multer 存储
const storage = multer.diskStorage({
    destination: function (req, file, cb) {
        cb(null, 'public/uploads/')
    },
    filename: function (req, file, cb) {
        // 保留原始扩展名,添加时间戳防止重名
        const uniqueSuffix = Date.now() + '-' + Math.round(Math.random() * 1E9);
        cb(null, uniqueSuffix + path.extname(file.originalname));
    }
});

const upload = multer({ storage: storage });

// 视频上传接口
app.post("/api/upload", upload.single('file'), (req, res) => {
    if (!req.file) {
        return res.status(400).json({ error: "No file uploaded" });
    }
    // 返回相对路径供前端访问
    const videoUrl = `/uploads/${req.file.filename}`;
    res.json({ url: videoUrl });
});

// 内存事件池
const events = [];
const lastEventTime = {};
let totalEvents = 0;
let lastEventTs = 0;

const nodes = new Map();
const remoteStatus = [
    { id: "cloud", name: "云端聚合", status: "ok", latency_ms: 42 },
    { id: "storage", name: "对象存储", status: "ok", latency_ms: 35 },
    { id: "msgbus", name: "消息总线", status: "degraded", latency_ms: 85 }
];
nodes.set("edge-01", { node_id: "edge-01", status: "ok", cpu: 28, mem: 44, ts: Date.now() });
nodes.set("edge-02", { node_id: "edge-02", status: "degraded", cpu: 62, mem: 71, ts: Date.now() - 15000 });

// Python / Jetson 上报接口
app.post("/api/event", (req, res) => {
    const event = req.body;

    // 基本字段校验(防脏数据)
    if (!event.camera_id || !event.track_id || !event.level) {
        return res.status(400).json({ error: "invalid event format" });
    }

    const key = `${event.camera_id}-${event.track_id}-${event.level}`;
    const now = Date.now();

    // 3 秒内同类事件去重
    if (lastEventTime[key] && now - lastEventTime[key] < 3000) {
        return res.json({ status: "ignored" });
    }

    lastEventTime[key] = now;

    console.log("📦 新事件:", event);

    events.unshift(event);
    if (events.length > 100) events.pop(); // 防止无限增长
    totalEvents += 1;
    lastEventTs = now;

    res.json({ status: "ok" });
});

// 前端拉取事件
app.get("/api/events", (req, res) => {
    res.json(events);
});

// 健康与概览
app.get("/api/health", (req, res) => {
    res.json({
        server_time: Date.now(),
        total_events: totalEvents,
        last_event_ts: lastEventTs
    });
});

// 远程端状态
app.get("/api/remote", (req, res) => {
    res.json(remoteStatus);
});

// 边缘节点状态上报与查询
app.post("/api/node_status", (req, res) => {
    const { node_id, status, cpu, mem } = req.body || {};
    if (!node_id) return res.status(400).json({ error: "node_id required" });
    const ts = Date.now();
    nodes.set(node_id, { node_id, status: status || "ok", cpu: cpu || 0, mem: mem || 0, ts });
    res.json({ status: "ok" });
});

app.get("/api/nodes", (req, res) => {
    res.json(Array.from(nodes.values()).sort((a, b) => b.ts - a.ts));
});

// 静态文件
app.use(express.static("public"));

app.listen(PORT, "0.0.0.0", () => {
    console.log(`🚀 Server running on http://0.0.0.0:${PORT}`);
});

 浙公网安备 33010602011771号