CleanCode(1): 编写干净清晰的 Python 代码的一种通用模块设计
下一篇: Clean Code(2): 清理 Python 空值比较
编写干净清晰的Python代码的一种通用设计
在 python 和 shell 之间选择
如果有Python环境,应该大部分时候都选择使用 Python 来编写系统。这是因为:
- Python 更易于维护,适合模块化设计(class, 多文件 import,层次文件夹支持,成熟的库依赖)
- Shell 脚本缺乏模块化设计,容易依赖大量的全局环境变量,难以阅读(模块和数据依赖关系)
所以:
- 如果你的项目内混合使用 Python 和 Shell,应该都是用 Python 来编写。
- 而不应该一会儿 Python,一会儿使用 Shell,带来不一致性以及维护上的困难,例如Python有成熟的命令行传参支持,Shell只有位置参数支持
设计Python的参数解析模块:环境变量,命令行参数和配置文件
一个有明显边界的 Python 模块,应该从一开始就设计好命令行参数解析模块和配置文件解析模块。参考的目录结构如下:
- xx_options.py
- xx_config.py
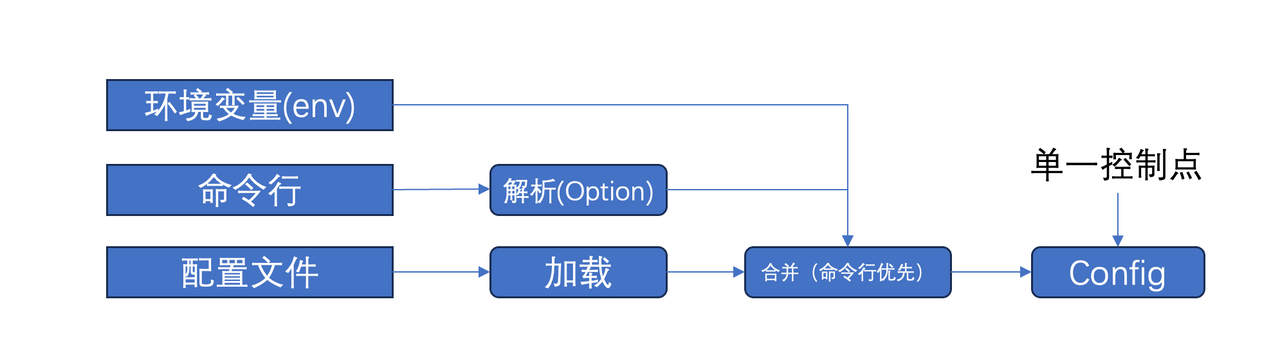
有一个常见的问题是:应该选择使用命令行的参数,还是配置文件的参数。一个清晰的原则是:
如果同一个配置字段,命令行传参就明确使用命令行传的参数,否则使用配置文件的参数。
命令行参数可以在设计上包含:
- 设计一组明确功能的字段,例如 --build-dir
- 功能字段可以根据目的,带前缀分组,例如
1. --build-dir, --build-batch-numbers ...
2. --test-data, --test-batch-numbers ...
3. 如果是多组共用的就可以去掉分组前缀作为公用参数 - 设计一个额外的公共自定义参数提供自由度,可以约定是一个json字符串
- --customize 或 --parms
xx_options.py 的设计一般是
import sys

class XXOptions:
  def __init__(self):
    self.build_dir_ = None
    self.test_data_ = None
    self.prams_ = None

  @property
  def build_dir(self):
    return self.build_dir_

  @property
  def test_data(self):
    return self.test_data_

  @property
  def prams(self):
    return self.prams_

  def setup(self):
    # 定义命令行参数
    pass

  def parse(self):
    # 解析,设置属性
    pass
xx_config.py 的设计一般是
class XXCOnfig:
  def __init__(self, config_path, options):
    self.config_path_ = config_path
    self.options = options # 从命令行来的参数
    self.build_dir_ = None
    self.test_data_ = None
    self.prams_ = options.prams

  @property
  def config_path(self):
    return self.config_path_

  @property
  def build_dir(self):
    return self.build_dir_

  @property
  def test_data(self):
    return self.test_data_

  @property
  def prams(self):
    # 允许子模块自由定制的命令行参数
    return self.prams_

  @property(self):
  def get_env(self, key):
     # 读取环境变量,做单一控制点,必要的校验
     return ...

  @property(self):
  def set_env(self, key):
     # 设置环境变量,做单一控制点,必要的校验以及白名单机制
     ...

  def setup(self):
    # 先从命令行装配
    self.__setup_from_options()

    # 再从配置文件装配,如果命令行已经装配就忽略配置文件对应配置
    self.__setup_from_config_path()

    # 如果环境变量影响配置,做必要的处理,不要让环境变量的修改和读取点扩散
    self.__setup_from_env()

  def dump(self):
    self.__dump_to_file()
经过这样的转换,config 就可以提供给下游的所有模块,作为必须的构造函数参数,config 隔离了命令行、配置文件,环境变量,甚至未来潜在的服务器配置 与 程序系统之间的边界。一个子模块的设计大概是这样的:
class XXAction1
  def __init__(self, config):
    # 所有的配置信息,从 config 获取
    self.config = config

    # 应该直接把 config 传递给子模块,而非传单个碎片参数
    self.sub_action = XXSubAction1(self.config)

class XXSubAction1
  def __init__(self, config):
    # 所有的配置信息,从 config 获取
    self.config = config
通过这种方式,我们也会让绝大部分的 class 之间传递参数保持干净,和参数数量很少。这里没有使用类继承,推荐使用组合而非继承来实现共用,绝大部分情况下,组合带来的设计是更干净的。这里没有把 options 传递给下游,因为options 已经被config处理过,策略部分固化在config里,但是保留了用户自定义部分 params 的透传,这样下游仍然可以实现按需的自定义参数传递和使用。实际上也可以近一步用 python 的 collections 的 ChanMap 吧 env,options,config 一次性融合:
from collections import ChainMap
context = ChainMap(env, options, config)
设计Python工具链的核心模型:目录结构模型

写程序的核心还是“数据结构”与“算法”。对于工具链系统,看上去很容易写成一堆零散的脚本,很灵活自由。但是这种灵活和自由往往带来系统设计上的缺失,一个关键的原因是没有建立起所处理对象的不变部分“数据结构”,也就是模型。
注意:
- 你应该在 Config 设计后,第一时间考虑你的 DirectoryModel 的设计,数据结构稳定了,「算法」才能围绕一个核心模型来稳定展开。
例如这样的一个目录结构约定:
 - config
   - <project>
     - config.json
 - output_dir
   - build
   - logs
   - repps_dir
     - base
       - <base_module_name>
         - common
     - <module_name>
但是这个结构是存在一堆隐式的约定中,并没有显式的在程序中构建起一个模型对象来语义化这个世界模型,会导致很多隐含的目录结构拼接和组合。
一个改进的方式是,建立起一个明确的目录结构模型:
class DirectoryModel:
  '''
  目录结构模型
  - config
   - <project>
     - config.yaml
  - output_dir
   - build
   - logs
   - repps_dir
     - base
       - <base_module_name>
         - common
     - <module_name>
  '''
  def __init__(self, config):
    self.config = config

  @property
  def root_dir(self):
     # 任何一个目录结构模型,都应该有个 root_dir
     ...

  @property
  def output_dir(self):
      ...

  @property
  def project_dir(self):
      ...

  @property
  def logs_dir(self):
      ...

  @property
  def build_dir(self):
      ...

  @property
  def repos_dir(self):
      ...

  @property
  def base_dir(self):
      ...
这部分模型应该单独出来一个子模块,这样整体类会变成这样:
class System:
  def __init__(self, config):
    self.config = config
    self.dir_model = DirectoryModel(config)
    self.sub_action = SubAction(config, dir_model)

class SubAction:
  def __init__(self, config, dir_model):
    self.config = config
    self.dir_model = dir_model
如果下层目录结构有类似的子目录结构约定,应该类似设计一个子模块的子目录结构模型。其中一个需要注意的点是:
每当下游对目录结构做拼接的时候,都要重新 review 下:这个目录结构是否应该由 DirectoryModel 直接提供,而非自己拼接?通过这种方式,我们就能逐渐区分:这是一个应该由上游提供的目录结构模型,还是应该由子子模块自己的目录模型提供。
设计管道处理模块:Action、Pipeline
一个工具链Python模块,一般是由层层的链式处理子程序构成的
因此,工具链 Python 程序的模块设计大部分可以归结为:
一组处理子程序(StageAction)构成的一个管道处理程序(Pipeline)
注意:
- 明确将 子 Action 设计成一个类,尽可能不要在一个函数里写大量代码实现一个Action 子类应做的事情
怎样组织这样的代码才能保持代码精简呢?
首先,明确设计每个 StageAction 的接口格式,仅仅约定即可,不需要设计父类。如下:
class SourceAction:
  def __init__(self, config, ..)
    self.config = config

  @property
  def name(self):
    return 'source'

  def run(self):
    ...

class BuildAction:
  def __init__(self, config, ..)
    self.config = config

  @property
  def name(self):
    return 'buld'

  def run(self):
    ...

class PackageAction:
  def __init__(self, config, ..)
    self.config = config

  @property
  def name(self):
    return 'package'

  def run(self):
    ...
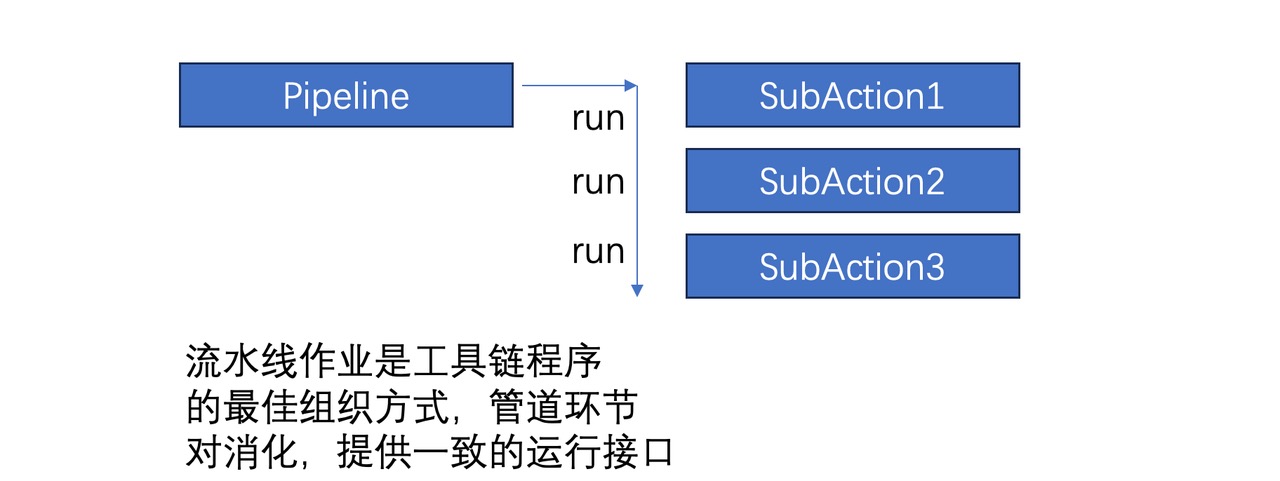
每个StageAction只需提供一个 run 方法即可。外层的Pipeline 程序使用起来大概这样:
class Piepeline:
  def __init__(self, config,..):
    self.config = config
    self.actions = [
        SourceAction(config, ..),
        BuildAction(config,..),
        PackageAction(config, ..),
        ...
    ]

  def run(self):
    for action in self.actions:
      if action.name in self.config.stages:
        action.run()
这里通过职责链,让StageAction在Pipeline里面的组合非常简单。
管道多阶段缓存与时间统计
当我们有了管道,有了多阶段 StageAction,如果希望:
- 程序可以重复运行,除非强制刷新,否则已经执行过的阶段不再重复执行
- 增加时间耗时统计
在上述设计下就可以比较便利的设计一个 SkipCache 和 TimeSpan 来解决。注意:
- 对于多道处理程序,一定要考虑缓存的设计,缓存的设计应该是多层级的:
- 管道处理的大环节的粒度
- 数据对象的小条目粒度
- 正确的缓存设计将节省所有人 365nm 次试错成本,考虑到m是我们一次处理数据的耗时,例如编译完300w+代码一遍的成本
- 不要裸用 time.time() ,大量碎片代码会把你的代码质量搞得很低
首先看下 SkipCache:
class SkipCache:
    def __init__(self, cache_path, clear_cache):
        self.cache_path = cache_path
        self.current_key = None
        self.enter_callback = None
        if not clear_cache and os.path.exists(self.cache_path):
            with open(self.cache_path, 'r') as f:
                self.key_value = json.load(f)
        else:
            self.key_value = {}
            with open(self.cache_path,'w') as f:
                json.dump(self.key_value, f, indent=4)

    def set_enter_callback(self, callback):
        self.enter_callback = callback

    def exit(self):
        self.key_value[self.current_key] = True
        self.current_key = None
        with open(self.cache_path,'w') as f:
            json.dump(self.key_value, f, indent=4)

    def enter(self, key):
        assert self.current_key is None
        if self.enter_callback is not None:
            self.enter_callback(key)
        if self.key_value.get(key):
            return False
        else:
            self.current_key = key
            return True
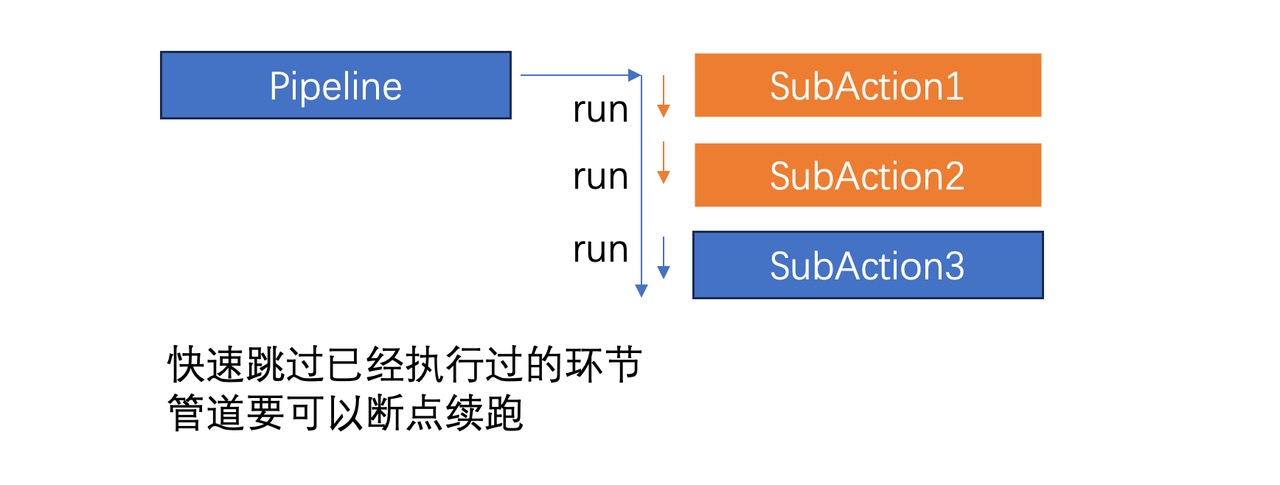
通过 SkipCache,Pipeline的 运行函数稍加修改就可以获得「断点续跑」能力
class Pipeline:
  ...
  def run(self):
    skip = SkipCache(self.config.skip_cache_path, self.config.clear_stage_cache)
    for action in self.actions:
      if action.name in self.config.stages:
        if skip.enter(action.name):
          action.run()
          skip.exit()
效果就是:
- 如果指定了 --clear-stage-cache,则会完整重跑
- 否则,同样的命令反复跑,已经执行过的Action不会再跑,断点续跑,这在反复排错过程中很有用,特别是前置处理流程很耗时的时候。
再进一步增加时间统计:
class TimeSpan:
    def __init__(self):
        self.records = {}
        self.last_name = None
        self.start = time.time()

    def step(self, name):
        now = time.time()
        self.records[name] = {
            'start': now
        }

        if self.last_name is not None:
            last_record = self.records[self.last_name]
            last_record['end'] = now
            elapsed_time = last_record['end'] - last_record['start']

            print("")
            print("------------------")
            print(f"The code: {self.last_name} took {elapsed_time/60} minus to run")
            print("------------------")
            print("")

        self.last_name = name

    def finish(self):
        self.step('finish')
        print("")
        print("------------------")
        now = time.time()
        total_elapsed_time = now - self.start
        has_section = False
        for name in self.records:
            record = self.records[name]
            if record.get('end') is not None:
                elapsed_time = record['end'] - record['start']
                print(f"The code: {name} took {elapsed_time/60} minus to run")
                has_section = True

        if has_section:
            print("------------------")
            print(f"The code: took {total_elapsed_time/60} minus to run")
            print(f"Done.")
            print("------------------")
            print("")
则 Pipeline 的run 方法可以再次调整:
class Pipeline:
  ...
  def run(self):
    skip = SkipCache(self.config.skip_cache_path, self.config.clear_stage_cache)
    timespan = TimeSpan()
    skip.set_enter_callback(lambda key: self.timespan.step(key))
    for action in self.actions:
      if action.name in self.config.stages:
        if skip.enter(action.name):
          action.run()
          skip.exit()
    timespan.finish()
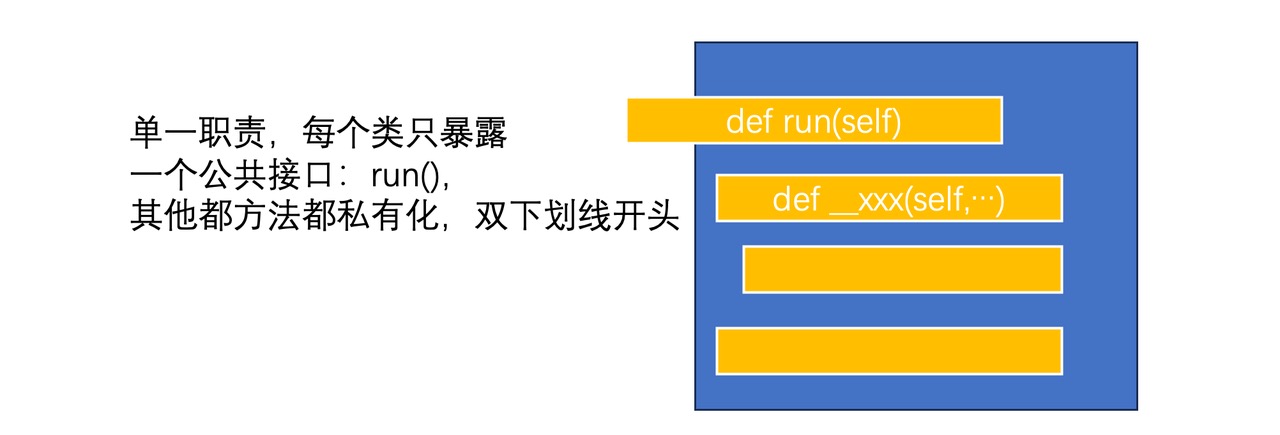
极简封装一个类:只提供一个 run 公共方法
注意:
- 尽可能保持单一职责原则,一个类只应该对外有越少的公共接口越好,其中最简化的就是只有一个 run,其他都是内部方法。
回顾下上面的例子。我们将内部的方法全部用 Python 私有 method 的规范来命名,内部方法都是采用双下划线前缀做明显的区分,这样每个处理类,对外只有少数的明显的对外方法,大部分情况下,只需要提供一个 run 方法即可。 这在 Python 里可以做的更近一步是把 run 方法都实现成 call 方法,但是为了简化,我们决定仅仅只用通常的 class 和 method 做抽象就够了,尽可能少引入语法糖。
这个类也展示了如何在 run 里清晰的表达代码内部子处理 method 的组织和编排。一般来说代码越是线性的越好。上面的这些内部方法的实现其实都是转发给子模块(SubAction)去做的,大部分时候就是构造对象,调用其 run 方法。
通过这种方式,代码可以组织的干净直接。
使用Monad的方式组合代码:
考虑结合Monad的思路(参考: https://builtin.com/software-engineering-perspectives/monads ),设计一个通用的可组合Runner:
from typing import Tuple
def sqaure_with_print_return(num: int) -> (int, str):
    logs = "Current num " + str(num);
    return (num * num, logs);
def bind(func, tuple: Tuple[int, str]):
   res = func(tuple[0])
   return (res[0], tuple[1] + res[1])
def unit(number: int):
   return (number, "");
print(bind(sqaure_with_print_return, (bind(sqaure_with_print_return, unit(2)))))
--------------------------------------------------------------------
Output
(16, 'Current num 2 Current num 4')
async/await 模式
使用 asyncio 的方式,可以在 Python 处理异步IO方面获得更干净整洁的代码编排。
import asyncio

async def process_1_1(ctx):
  # 函数内定义局部的小步骤分解
  async def step_1_1():
     asyncio.sleep(30)
     return 0, {}
  # 函数内定义局部的小步骤分解
  async def step_1_2():
     asyncio.sleep(30)
     return 0, {}
 # 函数内定义局部的小步骤聚合
  async def step_2(results):
     pass

  async def scheduler():
    # map:并发执行step_1_1和step_1_2
    results = await asyncio.gather(
      step_1_1(),
      step_1_2()
    )
    # reduce: 通过step_2聚合
    result = await step_2(results)
    return result

 result = await scheduler()
 return result

async def process_1_2(ctx):
  ...

async def process_2(ctx, results):
  ...

# 异步程序主入口
async def main():
   ctx  ={ ... }
   # map: 并发执行 process_1_1 和 process_1_2
   results = await asyncio.gather(
      process_1_1(ctx),
      process_1_2(ctx)
    )
    # reduce: 通过 process_2 做聚合动作
    result = await process_2(ctx, results)
    return result

if __name__=="__main__":
  asyncio.run(main)
参考:
- python event-loop的模拟实现,理解原理:https://sahandsaba.com/understanding-asyncio-node-js-python-3-4.html
- python async/await 完整用例:https://realpython.com/async-io-python/

 浙公网安备 33010602011771号