
Ai实现k8s pod调度:使用 MCP 服务将 Kagent 与 k8sgpt 进行集成
引言:
在
在本博客中,我们将讨论 Kagent 与 k8sgpt 的集成[cite: 1]。我也写过一篇关于 k8sgpt 的文章[cite: 1]。如果您对此还不了解,请
如果您是初学者,建议您先复习之前的博客,因为本文是之前内容的延伸[cite: 1]。
简而言之 — K8sgpt 是一个借助内置分析器来帮助发现 K8s 集群问题的项目,它利用大语言模型(LLM)作为“大脑”,为这些问题提供合理的推导和解决方案[cite: 1]。
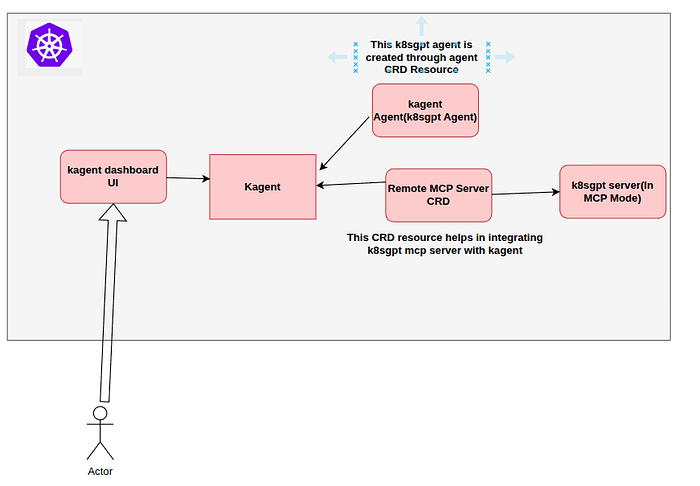
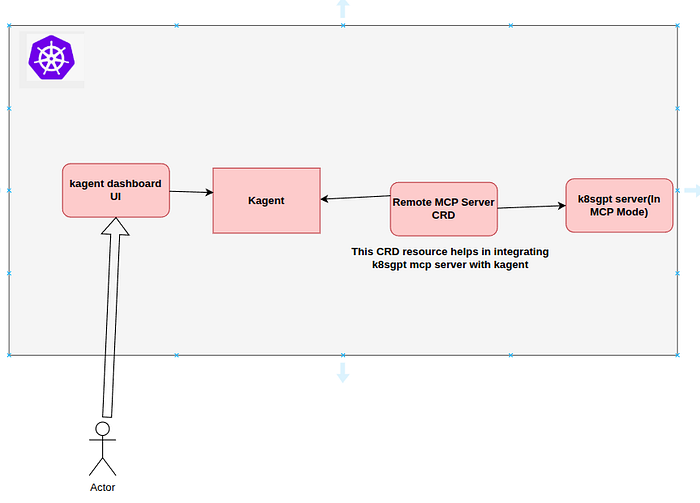
我们在本博客中要实现的目标:
Press enter or click to view image in full size
前置条件:
我不想重复赘述[cite: 1]。请参考之前的博客,并确保在继续之前已完成以下准备工作[cite: 1]:
-
Vagrant 虚拟机安装[cite: 1]
-
RKE2 集群搭建(非强制,您可以使用任何 K8s 集群)[cite: 1]
-
Cilium 安装(任何 CNI 都可以),创建负载均衡池(loadbalancer pool)和 l2announcement 策略[cite: 1]
-
Rook Ceph 安装(作为存储解决方案;如果您使用的是云端 K8s,也可以直接使用云存储)[cite: 1]
-
kagent 安装[cite: 1]
-
kagent 升级(已在第二篇博客中讲解)[cite: 1]
注意: 我使用的是 Google Gemini 模型(flash 或 pro)[cite: 1]。如果您使用的是其他提供商,请确保相应地更新配置值[cite: 1]。
完成上述所有操作后,您应该能够访问 kagent 的 Dashboard[cite: 1]。

在我的环境中,kagent UI / Dashboard 的访问地址是 192.168.31.202:8080[cite: 1]。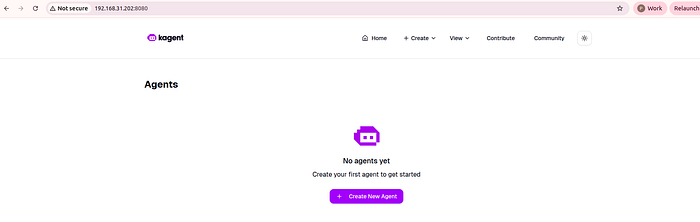
正如您在上面的截图中所见,由于我们禁用了默认 Agent,因此目前没有可用的 Agent[cite: 1]。
我们将在稍后部署 k8sgpt agent[cite: 1]。
在 MCP 模式下安装 k8sgpt 服务:
让我们以 MCP 模式安装 k8sgpt 服务[cite: 1]。
创建一个名为 “k8sgpt-mcpdeployment.yaml” 的文件,内容如下:[cite: 1]
---
apiVersion: v1
kind: Namespace
metadata:
  name: k8sgpt
---
apiVersion: v1
kind: ServiceAccount
metadata:
  name: k8sgpt
  namespace: k8sgpt
---
apiVersion: rbac.authorization.k8s.io/v1
kind: ClusterRole
metadata:
  name: k8sgpt-analyzer
rules:
  - apiGroups: \["*"\]
    resources: \["*"\]
    verbs: \["get", "list", "watch"\]
---
apiVersion: rbac.authorization.k8s.io/v1
kind: ClusterRoleBinding
metadata:
  name: k8sgpt-analyzer-binding
roleRef:
  apiGroup: rbac.authorization.k8s.io
  kind: ClusterRole
  name: k8sgpt-analyzer
subjects:
  - kind: ServiceAccount
    name: k8sgpt
    namespace: k8sgpt
---
apiVersion: apps/v1
kind: Deployment
metadata:
  name: k8sgpt-mcp
  namespace: k8sgpt
spec:
  replicas: 1
  selector:
    matchLabels:
      app: k8sgpt-mcp
  template:
    metadata:
      labels:
        app: k8sgpt-mcp
    spec:
      serviceAccountName: k8sgpt
      containers:
        - name: k8sgpt
          image: ghcr.io/k8sgpt-ai/k8sgpt:v0.4.24
          args:
            - serve
            - --mcp
            - --mcp-http
            - --mcp-port=8089
            - -v
          env:
          - name: K8SGPT_MODEL
            value: gemini-2.5-flash
          - name: K8SGPT_BACKEND
            value: googlevertexai
---
apiVersion: v1
kind: Service
metadata:
  name: k8sgpt-mcp
  namespace: k8sgpt
spec:
  selector:
    app: k8sgpt-mcp
  ports:
    - name: mcp
      port: 8089
      targetPort: 8089
  type: ClusterIP
注意: 请根据您使用的模型和后端更新环境变量 K8SGPT_MODEL 和 K8SGPT_BACKEND[cite: 1]。
让我们应用上述 YAML 文件[cite: 1]。
kubectl apply -f k8sgpt-mcpdeployment.yaml

等待 k8s pod 进入运行(Running)状态[cite: 1]。

到目前为止,我们已经实现了如下架构
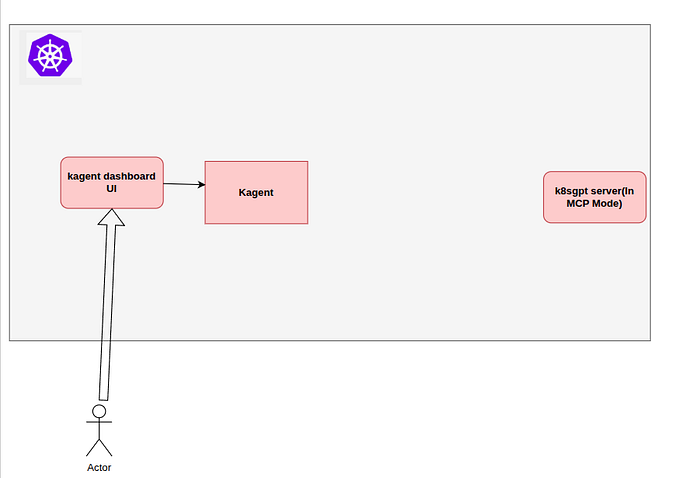
使用 remotemcpserver CRD 将 k8sgpt mcp 服务与 kagent 进行集成
下一步是使用 remotemcpserver CRD 将部署好的 k8sgpt mcp 服务与 kagent 集成[cite: 1]。Kagent 在安装时自带了一些 CRD,remotemcpserver 就是其中之一[cite: 1]。
创建一个名为 k8sgpt-remotemcpserver.yaml 的文件,内容如下
apiVersion: kagent.dev/v1alpha2
kind: RemoteMCPServer
metadata:
   name: k8sgpt-mcpserver
   namespace: kagent
spec:
  description: k8sgpt MCP Server
  url: http://k8sgpt-mcp.k8sgpt.svc.cluster.local:8089/mcp
  sseReadTimeout: 5m0s
  timeout: 30s
让我们应用上述 YAML 文件[cite: 1]。
kubectl apply -f k8sgpt-remotemcpserver.yaml

正如您在上面的截图中所见,在 kagent 命名空间中创建了一个 remotemcpserver CRD 资源
[
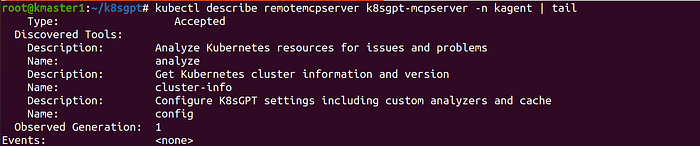
如果您使用 describe 命令查看该 remotemcpserver,它还会列出可用的工具[cite: 1]。
通过这种方式,我们成功将 k8sgpt 服务与 kagent 进行了集成[cite: 1]。
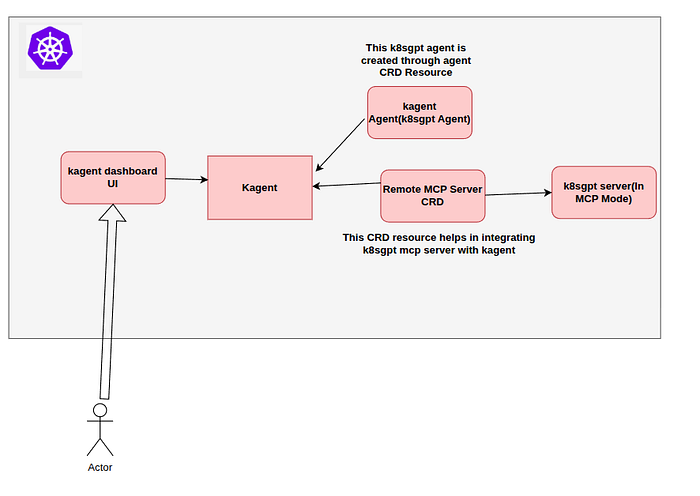
至此,我们已经完成了以下阶段
创建 k8sgpt Agent
下一步是创建一个 Agent,以便我们可以进行交互[cite: 1]。
创建一个名为 “k8sgpt-agent.yaml” 的文件,内容如下
apiVersion: kagent.dev/v1alpha2
kind: Agent
metadata:
name: k8sgpt-agent
namespace: kagent
spec:
declarative:
modelConfig: default-model-config
stream: true
systemMessage: |-
You're a helpful agent. Use k8sgpt analyze tool to troubleshoot issues in a kubernetes cluster
# Instructions
- Do not use k8sgpt explain mode at all.
- Use k8sgpt analyze tool to troubleshoot issues in a kubernetes cluster.
- If user question is unclear, ask for clarification before running any tools
- Always be helpful and friendly
- If you don't know how to answer the question DO NOT make things up, tell the user "Sorry, I don't know how to answer that" and ask them to clarify the question further
- If you are unable to help, or something goes wrong, refer the user to https://kagent.dev for more information or support.
# Response format:
- ALWAYS format your response as Markdown
- Your response will include a summary of actions you took and an explanation of the result
- If you created any artifacts such as files or resources, you will include those in your response as well
tools:
- mcpServer:
apiGroup: kagent.dev
kind: RemoteMCPServer
name: k8sgpt-mcpserver
toolNames:
- analyze
type: McpServer
description: this is k8sgpt agent
type: Declarative
注意: 如果您仔细观察该 YAML 文件,会发现我们在 tools 字段下引用了之前创建的 remotemcpserver[cite: 1]。
让我们应用上述 YAML 文件
kubectl apply -f k8sgpt-agent.yaml
Press enter or click to view image in full size

上述应用命令会在 kagent 命名空间中创建一个新的 Pod(Agent Pod)[cite: 1]。
请等待该 Pod 变成运行(Running)状态[cite: 1]。
几分钟后,Agent Pod 进入运行状态,Ready 列也确认了这一点
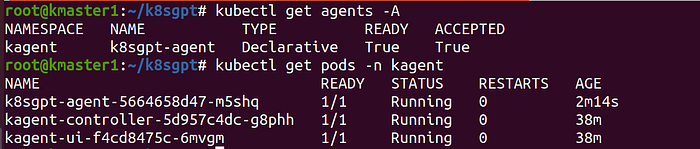
with this we have achieved the below setup(initially shown).
Press enter or click to view image in full size
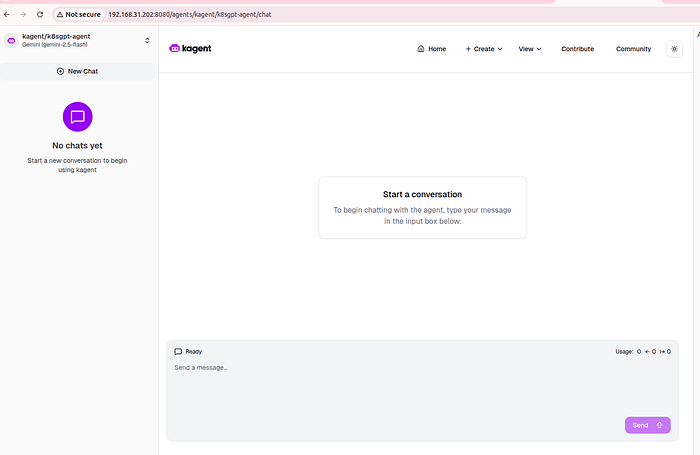
现在,如果您切换回 kagent 的 GUI 页面,应该会看到一个名为 “k8sgpt-agent” 的 Agent
Press enter or click to view image in full size
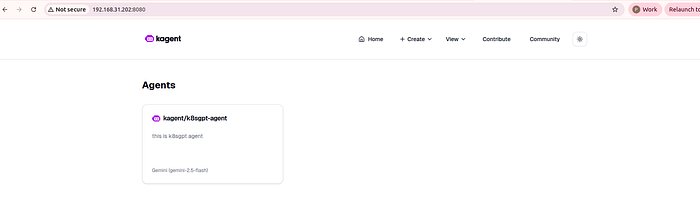
点击该 Agent 后,页面会跳转至对话界面,您可以在这里与 Agent 进行聊天或查询[
测试:
现在让我们测试几个场景[cite: 1]。
创建一个名为 “hungrypod.yaml” 的文件,内容如下
apiVersion: v1
kind: Pod
metadata:
  labels:
    run: hungrypod
  name: hungrypod
spec:
  containers:
  - image: purushothamkdr453/netshoot:v1
    name: hungrypod
    resources:
      requests:
         cpu: 15 # adjust this value as per your host machine configurations
这里我尝试调度一个需要 15 个 CPU 的 Pod[cite: 1]。在我的环境下,由于底层节点没有足够的 CPU,Pod 将进入 Pending(挂起)状态[cite: 1]。
让我们应用上述文件
kubectl apply -f hungrypod.yaml
Press enter or click to view image in full size
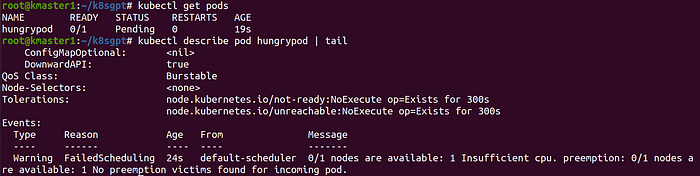
正如您在上面的截图中所见,Pod 进入了 Pending 状态,并且明确指出了原因[cite: 1]。
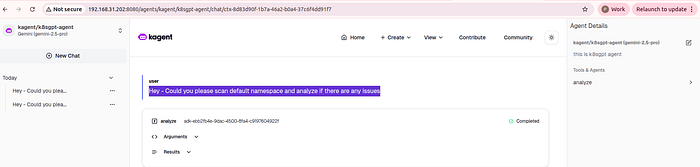
现在切换回 kagent k8sgpt Dashboard,发送如下查询请求:“Hey — Could you please scan default namespace and analyze if there are any issues”(嘿,能否请你扫描一下 default 命名空间并分析是否存在问题)[cite: 1]。
查询及其响应如下
Press enter or click to view image in full size
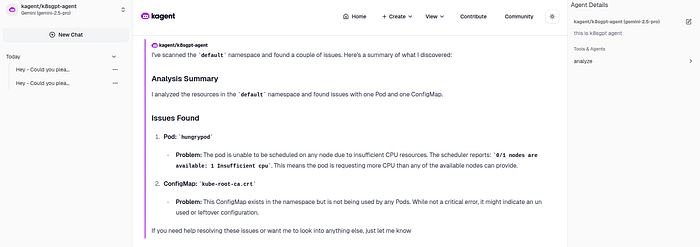
从截图中可以看到,hungrypod 的问题被列出了出来,同时给出了具体原因[cite: 1]。
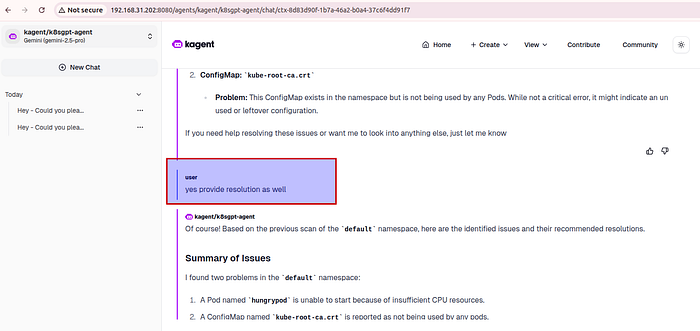
您还可以向它询问解决办法
Press enter or click to view image in full size
Press enter or click to view image in full size
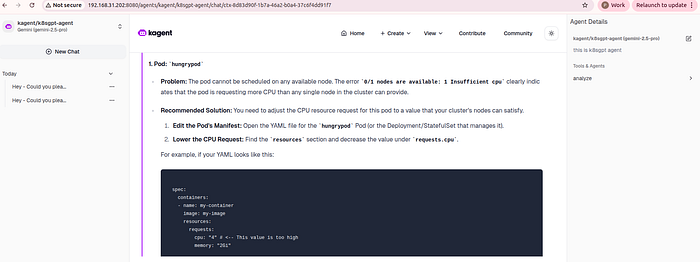
通过这种方式,我们可以将 k8sgpt 服务(MCP 模式)与 kagent 进行集成,用户可以通过图形界面来扫描集群并排查问题[cite: 1]。
本篇博客到此结束[cite: 1]。

 浙公网安备 33010602011771号