

Unity + NGUI 实现人物头顶UI的信息展示
1、思路:
(1)信息数据:需要展示属性信息
(2)信息的展示:负责显示UI属性信息
(3)UI的跟随:负责实现UI对人物的跟随
(4)UI的管理:负责对UI进行创建于回收,游戏中需要用到UI的地方都是与该脚本的交互。
2、将需要用到的UI资源打到一个图集中,以免出现大量人物的时候图集穿插造成不良的影响。
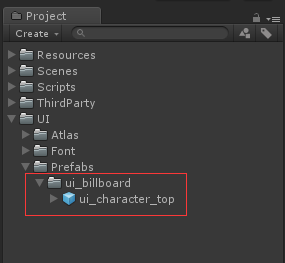
3、创建一个头顶UI预设,当道对应的目录下面:

为了测试的方便,在Resources下面也放一个做好的UI预设:
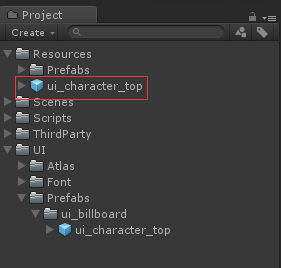
需要注意的是,做的这个预设是不带Panel的,因为希望可以把游戏展示的所有人物头顶UI信息放到同一个Panel下管理。
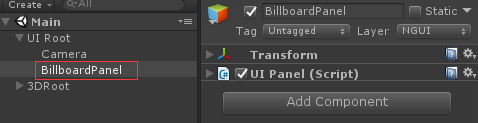
4、创建一个Panel,用来管理头顶的UI信息:
5、UI跟随脚本:
using UnityEngine;


/// <summary>
/// 2DUI跟随3D物体
/// </summary>
public class UIFollow3DPosition : MonoBehaviour
{
    public Transform targetTrans;           //2DUI需要跟随的3D目标
    public Camera targetCa;                 //照射的3D目标的摄像机
    public Vector3 offsetPos;               //2DUI需要在3D目标点的基础上做出的偏移量
    public float dis;                       //3D目标点与摄像机之间的距离,为了实现:3D目标点摄像机机发生变化的时候2DUI也跟随发生变化
    public float ratio;                     //2DUI的缩放比例

    [HideInInspector]
    public bool isAutoScale = false;        //控制2DUI是否发生缩放

    public const float FarDistance = 40f;   //3D目标点与摄像机的最大距离
    public const float NearDistance = 6.5f; //3D目标点与摄像机的最小距离
    public static Vector3 MaxScale = Vector3.one;
    public static Vector3 MinScale = new Vector3(0.5f, 0.5f, 0.5f);

    private Camera uiCa;                    //NGUI摄像机
    Transform selfTrans;                    //2DUI,因为该脚本是挂在2DUI上的
    GameObject selfObj;                     //2DUI
    Vector3 screenPos;                      //2DUI的屏幕坐标
    Vector3 curPos;                         //2DUI的世界坐标
    Vector3 backPos = new Vector3(3000, 0, 0);

    public Transform cachedTransform
    {
        get
        {
            if (trans == null)
                trans = transform;
            return trans;
        }
    }
    private Transform trans;

    void Awake()
    {
        selfTrans = transform;
        selfObj = gameObject;
        uiCa = UICamera.first.cachedCamera;
    }
    public void QuickUpdate()
    {
        LateUpdate();
    }
    void LateUpdate()
    {
        if (targetTrans != null && targetCa != null)
        {
            screenPos = targetCa.WorldToScreenPoint(targetTrans.position + offsetPos);
            if(screenPos.z < 0)
            {
                selfTrans.localPosition = backPos;
            }
            else
            {
                curPos = uiCa.ScreenToWorldPoint(screenPos);
                curPos.z = 0;
                selfTrans.position = curPos;
            }
            if(isAutoScale)
            {
                dis = Vector3.Distance(targetTrans.position, targetCa.transform.position);
                ratio = Mathf.Clamp01((dis - NearDistance) / (FarDistance - NearDistance));
                cachedTransform.localScale = Vector3.Lerp(MaxScale, MinScale, ratio);
            }
        }
    }
}
6、数据及展示的实现:
using System;
using System.Collections.Generic;
using System.Linq;
using System.Text;
using UnityEngine;

namespace Module.UI
{
    //头顶显示需要用到的是数据
    public class CharacterTopParam
    {
        public int level;
        public string name;

        public CharacterTopParam(int level, string name)
        {
            this.level = level;
            this.name = name;
        }
    }

    public class UI_Character_TopUI : MonoBehaviour
    {
        [SerializeField]
        UILabel lblInfo;

        GameObject obj = null;
        public GameObject cachedGameObjec
        {
            get
            {
                if (null == obj)
                    obj = gameObject;
                return obj;
            }
        }

        UIFollow3DPosition followPos = null;
        public UIFollow3DPosition FollowPos
        {
            get
            {
                if (null == followPos)
                {
                    followPos = cachedGameObjec.GetComponent<UIFollow3DPosition>();
                    followPos.isAutoScale = true;
                }
                return followPos;
            }
        }

        public void Show(CharacterTopParam param)
        {
            if (null != param)
            {
                lblInfo.text = string.Format("LV.{0} Name.{1}", param.level, param.name);
                cachedGameObjec.SetActive(true);
            }
        }

        public void Hide()
        {
            cachedGameObjec.SetActive(false);
        }

    }
}
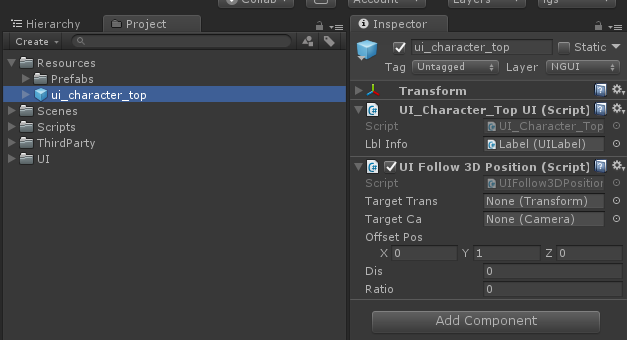
7、将以上两个脚本挂载到做好的UI预设上,并进行相应的设置:
8、UI管理脚本的实现:
using System.Collections;
using System.Collections.Generic;
using UnityEngine;

namespace Module.UI
{
    public class BillboardUIManager
    {
        static BillboardUIManager billboardMgr = null;
        public static BillboardUIManager BillboardMgr
        {
            get
            {
                if (null == billboardMgr)
                    billboardMgr = new BillboardUIManager();
                return billboardMgr;
            }
        }


        Transform childParent;

        public BillboardUIManager()
        {
            GameObject go = GameObject.Find("UI Root/BillboardPanel");
            childParent = NGUITools.AddChild(go).transform;
        }

        public void Destroy()
        {
            GameObject.Destroy(childParent.gameObject);
        }

        public void SetParentRootActive(bool active)
        {
            childParent.gameObject.SetActive(active);
        }

        Queue<UI_Character_TopUI> queueCharacterTopUI = new Queue<UI_Character_TopUI>();
        public UI_Character_TopUI GetCharacterTopUI(Transform target, Camera cam)
        {
            UI_Character_TopUI topUI = null;
            if (queueCharacterTopUI.Count <= 0)
            {
                Object go = Resources.Load("ui_character_top");
                if (go)
                {
                    GameObject prefab = GameObject.Instantiate(go) as GameObject;
                    prefab.transform.parent = childParent;
                    prefab.transform.localPosition = Vector3.zero;
                    prefab.transform.localRotation = Quaternion.identity;
                    prefab.transform.localScale = Vector3.one;
                    NGUITools.SetLayer(prefab, childParent.gameObject.layer);
                    topUI = prefab.GetComponent<UI_Character_TopUI>();
                }
            }
            else
            {
                topUI = queueCharacterTopUI.Dequeue();
            }


            topUI.FollowPos.targetTrans = target;
            topUI.FollowPos.targetCa = cam;
            topUI.FollowPos.offsetPos = new Vector3(0, 1, 0);

            return topUI;
        }

        void RecycleCharacterUI(UI_Character_TopUI topUI)
        {
            if (null != topUI)
            {
                topUI.Hide();
                queueCharacterTopUI.Enqueue(topUI);
            }
        }
    }
}
9,以上就是全部的核心逻辑,下面是调用逻辑:
using System.Collections;
using System.Collections.Generic;
using UnityEngine;
using Module.UI;

public class CubeCtrl : MonoBehaviour
{
    [SerializeField]
    Camera targetCam;

    float speed = 20.0f;

    Transform trans = null;
    public Transform Trans
    {
        get
        {
            if (null == trans)
                trans = transform;
            return trans;
        }
    }

    //Show UI Info
    UI_Character_TopUI characterTopUI = null;
    public UI_Character_TopUI CharacterTopUI
    {
        get
        {
            if (null == characterTopUI)
                characterTopUI = BillboardUIManager.BillboardMgr.GetCharacterTopUI(Trans, targetCam);
            return characterTopUI;
        }
    }

    void Start()
    {
        Trans.transform.rotation = Quaternion.identity;
        CharacterTopParam param = new CharacterTopParam(12, "我是方的");
        CharacterTopUI.Show(param);
    }

    void Update()
    {
        if (Input.GetKey(KeyCode.A))
        {
            Trans.Translate(-Time.deltaTime * speed, 0, 0);
        }
        else if (Input.GetKey(KeyCode.D))
        {
            Trans.Translate(Time.deltaTime * speed, 0, 0);
        }
        else if (Input.GetKey(KeyCode.W))
        {
            Trans.Translate(0, 0, Time.deltaTime * speed);
        }
        else if (Input.GetKey(KeyCode.S))
        {
            Trans.Translate(0, 0, -Time.deltaTime * speed);
        }
    }
}

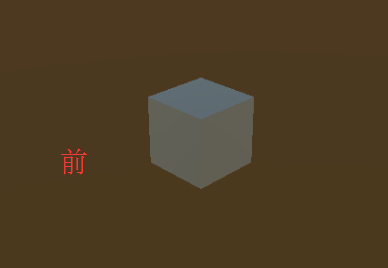
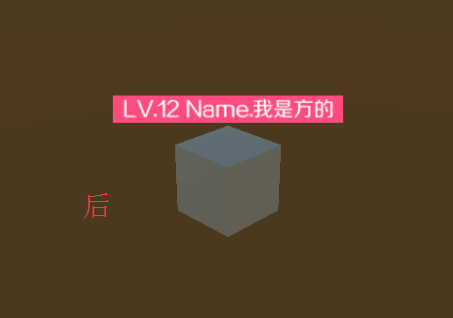
10、项目运行前后的效果对比图:
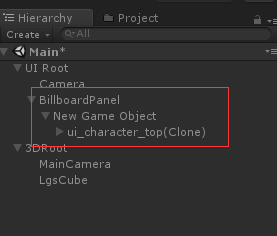
11、项目运行时候的结构:

 浙公网安备 33010602011771号