elasticsearch6.2.2安装
安装环境:cendos7.2
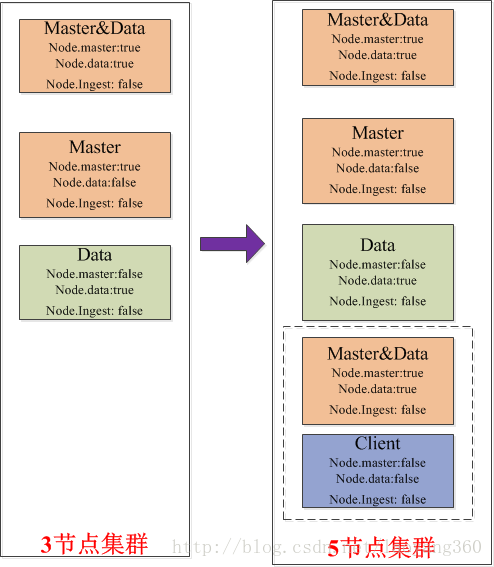
角色分配:本次安装节点为3个(不同机器),采用下图左侧方案
1.安装jdk1.8
参考:
http://www.cnblogs.com/libin2015/p/8086047.html
2.添加elasticsearch用户并修改密码
useradd elasticsearch
passwd elasticsearch
3.增加sudo免密码
vim /etc/sudoers

添加如下内容:

elasticsearch   ALL=(ALL)       NOPASSWD: ALL
4.获取elasticsearch安装包,解压,进入目录
wget https://artifacts.elastic.co/downloads/elasticsearch/elasticsearch-6.2.2.tar.gz
tar zxvf elasticsearch-6.2.2.tar.gz
cd elasticsearch-6.2.2/
5.修改elasticsearch.yml配置文件
vim config/elasticsearch.yml
修改如下配置项:
节点1:
cluster.name: es2018  #机器名称
node.name: node01    #节点名称
path.data: /var/lib/elasticsearch    #数据路径
path.logs: /home/elasticsearch/elasticsearch-6.2.2/logs    #日志路径
network.host: 0.0.0.0  #服务ip
http.port: 9200      #端口
discovery.zen.ping.unicast.hosts: ["172.30.154.74", "172.30.154.78"]  #单播请求主机列表
http.cors.enabled: true    #用了HTTP端口,允许REST请求
http.cors.allow-origin: "*"  #指定允许请求的范围
node.master: true  #允许选举master节点
node.data: false    #不存储数据
#node.ingest: false

(## cendos6.8 安装es5.6.4不需要此项配置)
action.auto_create_index: .security,.monitoring*,.watches,.triggered_watches,.watcher-history*,.ml* #x-pack使用,允许自动创建的索引名称
节点2:
cluster.name: es2018
node.name: node02
path.data: /var/lib/elasticsearch
path.logs: /home/elasticsearch/elasticsearch-6.2.2/logs
network.host: 0.0.0.0
http.port: 9200
discovery.zen.ping.unicast.hosts: ["172.30.154.74", "172.30.154.78"]
http.cors.enabled: true
http.cors.allow-origin: "*"
node.master: true  #允许选举master节点
node.data: true    #存储数据
#node.ingest: false
action.auto_create_index: .security,.monitoring*,.watches,.triggered_watches,.watcher-history*,.ml*

节点3:
cluster.name: es2018
node.name: node03
path.data: /var/lib/elasticsearch
path.logs: /home/elasticsearch/elasticsearch-6.2.2/logs
network.host: 0.0.0.0
http.port: 9200
discovery.zen.ping.unicast.hosts: ["172.30.154.74", "172.30.154.78"]
http.cors.enabled: true
http.cors.allow-origin: "*"
node.master: false  #不允许选举master节点
node.data: true    #存储数据
#node.ingest: false
action.auto_create_index: .security,.monitoring*,.watches,.triggered_watches,.watcher-history*,.ml*
6.修改jvm.options配置文件
vim config/jvm.options
内存调整为31G(根据主机情况调整)
-Xms31g
-Xmx31g
7.修改linux系统配置
vim /etc/security/limits.conf
添加以下内容:
# NS_PER_INSTALL
* soft nofile 65536
* hard nofile 65536
* soft nproc 131072
* hard nproc 131072

vim /etc/sysctl.conf
添加以下内容:
vm.max_map_count=262144

#cendos6.8需要修改下面内容
vim /etc/security/limits.d/90-nproc.conf
修改为2048
#* soft nproc 1024
* soft nproc 2048
配置完执行
sysctl -p
8.重复上述步骤,安装其他两节点。安装步骤相同,配置elasticsearch.yml稍有不同,参考第5步即可。
9.启动各节点
./bin/elasticsearch

#后台启动
#./bin/elasticsearch -d -p pid
#停止节点
#kill `cat pid`
10.验证
curl http://172.30.154.74:9200/

{
  "name" : "node01",
  "cluster_name" : "es2018",
  "cluster_uuid" : "Gk3P3i0YQyOiDLqdAWdCOA",
  "version" : {
    "number" : "6.2.2",
    "build_hash" : "10b1edd",
    "build_date" : "2018-02-16T19:01:30.685723Z",
    "build_snapshot" : false,
    "lucene_version" : "7.2.1",
    "minimum_wire_compatibility_version" : "5.6.0",
    "minimum_index_compatibility_version" : "5.0.0"
  },
  "tagline" : "You Know, for Search"
}
curl http://172.30.154.74:9200/_cat/nodes
172.30.154.79  6 70 1 0.33 0.20 0.16 di  - node03
172.30.154.78  4 73 0 0.33 0.35 0.41 mdi * node02
172.30.154.74 18 95 0 0.36 0.29 0.25 mi  - node01
#安装成功,主节点暂为node02
11.安装x-pack(可选)
X-Pack是一个Elastic Stack的扩展,将安全,警报,监视,报告和图形功能包含在一个易于安装的软件包中
在线安装:
./bin/elasticsearch-plugin install x-pack
离线安装:
wget https://artifacts.elastic.co/downloads/packs/x-pack/x-pack-6.2.2.zip
./bin/elasticsearch-plugin install file:///path/to/file/x-pack-6.2.2.zip

#注意路径
#每个节点都需要安装!!!
#安装是必须停掉elasticsearch进程,否则可能安装不成功!
12.修改elastic、kibana、logstash等用户密码
./bin/x-pack/setup-passwords interactive
按提示输入密码即可

#默认用户名密码为:
#用户名:elastic
#密码:changeme
13.启动elaticsearch,验证
打开浏览器,输入 http://172.30.154.74:9200/,提示输入密码,则x-pack安装成功
参考资料:
http://blog.csdn.net/laoyang360/article/details/78290484
https://www.elastic.co/guide/en/elasticsearch/reference/6.2/install-elasticsearch.html
https://www.elastic.co/guide/en/elasticsearch/reference/6.2/installing-xpack-es.html

 浙公网安备 33010602011771号