AQS 源码解读之解锁
在 AQS 源码解读之加锁中,线程 A 占用着锁没有释放。然后线程 B 和线程 C 都在 CHL 队列中排队,也就是执行了 parkAndCheckInterrupt 方法将自己挂起了。现在 CHL 队列的状态:
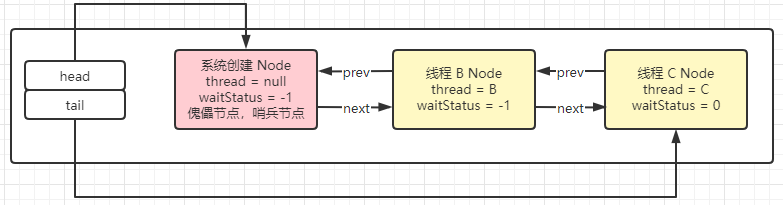
线程 A
unlock() 方法解析
ReentrantLock 类中的 unlock 方法
public void unlock() {
    sync.release(1);
}
sync 类中的 release 方法
public final boolean release(int arg) {
    // 主要是修改 state 的值和设置占用锁的线程
    if (tryRelease(arg)) {
        Node h = head;
        if (h != null && h.waitStatus != 0)
            unparkSuccessor(h);
        return true;
    }
    return false;
}
AbstractQueuedSynchronizer 类中的抽象 tryRelease 方法
protected boolean tryRelease(int arg) {
    throw new UnsupportedOperationException();
}
sync 类中的具体实现
// releases = 1
protected final boolean tryRelease(int releases) {
    // 获取 state 的值,之前被线程 A 设置成 1 现在一减等于 0
    int c = getState() - releases;// c = 0
    // 判断当前线程是否等于占用锁的线程
    if (Thread.currentThread() != getExclusiveOwnerThread())
        throw new IllegalMonitorStateException();
    boolean free = false;
    // c = 0 条件成立
    if (c == 0) {
        free = true;
        // 将当前占用锁的线程设置成 null
        setExclusiveOwnerThread(null);
    }
    // 将 AQS 中 state 的值设置成 0
    setState(c);
    // 返回 true
    return free;
}
sync 类中的 release 方法
public final boolean release(int arg) {
    // 主要是修改 state 的值和设置占用锁的线程
    if (tryRelease(arg)) {
        // head 现在指向的是傀儡节点
        Node h = head;
        // 通过上面的图可得 h.waitStatus = -1
        if (h != null && h.waitStatus != 0)
            unparkSuccessor(h);
        return true;
    }
    return false;
}
unparkSuccessor(h)
// node 等于傀儡节点
private void unparkSuccessor(Node node) {
	// node.waitStatus; = -1
    int ws = node.waitStatus;
    if (ws < 0)
    	// 通过比较并修改将傀儡节点的 waitStatus 的值改成 0
        compareAndSetWaitStatus(node, ws, 0);

    // 傀儡节点的后指针指向的是线程 B 对应的 Node 节点
    Node s = node.next;
    if (s == null || s.waitStatus > 0) {
        s = null;
        for (Node t = tail; t != null && t != node; t = t.prev)
            if (t.waitStatus <= 0)
                s = t;
    }
    if (s != null)
    	// 调用 unpark 方法唤醒挂起的线程 B
        LockSupport.unpark(s.thread);
}
总结
- 线程 A 调用 unlock 方法,主要就做了三件事:
- 第一件事就是将 AQS 中的变量 state 修改成 0;
- 第二件事就是将占用线程的 exclusiveOwnerThread 修改为 null;
- 第三件事就是唤醒 CLH 队列中被阻塞的指定线程。
线程 B
在 AQS 源码解读之加锁中,线程 B 执行了 parkAndCheckInterrupt 方法将自己挂起了,然后现在线程 A 执行了 unpark 方法,唤醒了线程 B。现在线程 B 要继续执行后面的代码。
private final boolean parkAndCheckInterrupt() {
    // 线程 B 被挂起在这个地方
    LockSupport.park(this);
    // 唤醒后判断线程是否被通知中断,否返回 false
    return Thread.interrupted();
}
acquireQueued
因为是自旋,所以这个时候 acquireQueued 方法还没有执行结束,继续执行下一次循环。
// node:线程 B 对应的 Node 节点  arg = 1
final boolean acquireQueued(final Node node, int arg) {
    boolean failed = true;
    try {
        boolean interrupted = false;
        for (;;) {
	        // 获取现在队列中的第一个节点也就是系统创建的 Node 节点
            final Node p = node.predecessor();
            if (p == head && tryAcquire(arg)) {
                setHead(node);
                p.next = null; // help GC
                failed = false;
                return interrupted;
            }
            if (shouldParkAfterFailedAcquire(p, node) &&
                parkAndCheckInterrupt())
                interrupted = true;
        }
    } finally {
        if (failed)
            cancelAcquire(node);
    }
}
tryAcquire
// acquires = 1
final boolean nonfairTryAcquire(int acquires) {
    // 现在是线程 B
    final Thread current = Thread.currentThread();
    // 由于线程 A 已经释放了锁并修改了 state 的值,所以现在等于 0
    int c = getState();
    if (c == 0) {
        // 通过比较并修改,将 state 的值改成 1
        if (compareAndSetState(0, acquires)) {
            // 将占用锁的线程设置成线程 B
            setExclusiveOwnerThread(current);
            return true;
        }
    }
    else if (current == getExclusiveOwnerThread()) {
        int nextc = c + acquires;
        if (nextc < 0) // overflow
            throw new Error("Maximum lock count exceeded");
        setState(nextc);
        return true;
    }
    return false;
}
经过 nonfairTryAcquire 方法的执行,现在线程 B 已经成功占用到锁。
// node:线程 B 对应的 Node 节点  arg = 1
final boolean acquireQueued(final Node node, int arg) {
    boolean failed = true;
    try {
        boolean interrupted = false;
        for (;;) {
	        // 获取现在队列中的第一个节点也就是系统创建的 Node 节点
            final Node p = node.predecessor();
            // tryAcquire 修改成功返回 true
            if (p == head && tryAcquire(arg)) {
            	// 将 CLH 队列中的头节点设置成线程 B 对应的 Node 节点
                setHead(node);
                // 将傀儡节点的尾指针设置为 null,为了方便进行垃圾回收
                p.next = null; // help GC
                failed = false;
                // 然后返回 false
                return interrupted;
            }
            if (shouldParkAfterFailedAcquire(p, node) &&
                parkAndCheckInterrupt())
                interrupted = true;
        }
    } finally {
        if (failed)
            cancelAcquire(node);
    }
}
setHead
private void setHead(Node node) {
	// 将头节点的值设置成 线程 B 对应的 Node 节点
    head = node;
    // 将 Node 节点中的线程设置为 null
    node.thread = null;
    // 将 Node 节点的前指针设置为 null
    node.prev = null;
}
经过这些步骤后此时 CLH 队列的情况是:
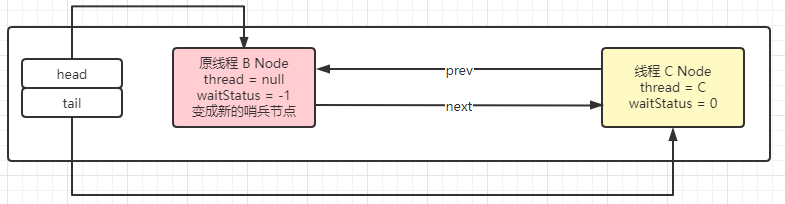
总结
AQS 就是通过 state 和 CLH 来管理线程,其中 lock 方法的主要作用就是查看 state 的值是不是等于 0,如果等于 0,就说没有人占用锁可以直接使用。如果不等于 0 的话就相当于有人占用锁了就需要排队了。
排队的话又牵扯出一个哨兵节点(傀儡节点),CLH 中的 Node 节点,代码会帮我们初始化一个 Node 节点作为哨兵节点,这个值一开始就是我们的头节点与尾节点。后面其他线程的 Node 节点就会直接在其后面进行连接。最后排队的线程会调用 LockSupport.park(this); 将自己挂起,等待其他线程执行完代码后再将自己唤醒。

 浙公网安备 33010602011771号