SpringCloud系列七:Hystrix 熔断机制(Hystrix基本配置、服务降级、HystrixDashboard服务监控、Turbine聚合监控)
声明:本文来源于MLDN培训视频的课堂笔记,写在这里只是为了方便查阅。
1、概念:Hystrix 熔断机制
2、具体内容
所谓的熔断机制和日常生活中见到电路保险丝是非常相似的,当出现了问题之后,保险丝会自动烧断,以保护我们的电器, 那么如果换到了程序之中呢?
当现在服务的提供方出现了问题之后整个的程序将出现错误的信息显示,而这个时候如果不想出现这样的错误信息,而希望替换为一个错误时的内容。
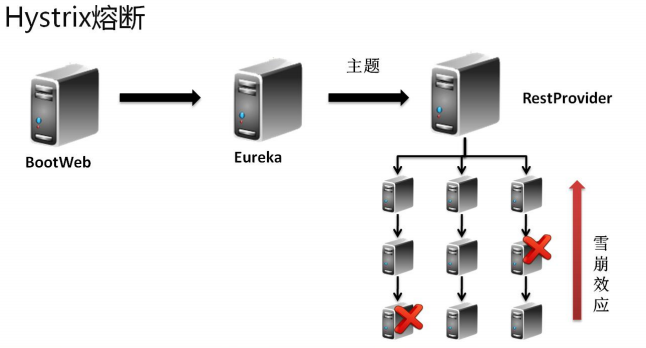
一个服务挂了后续的服务跟着不能用了,这就是雪崩效应
对于熔断技术的实现需要考虑以下几种情况:
· 出现错误之后可以 fallback 错误的处理信息;
· 如果要结合 Feign 一起使用的时候还需要在 Feign(客户端)进行熔断的配置。
2.1、Hystrix 基本配置
1、 【microcloud-provider-dept-hystrix-8001】修改 pom.xml 配置文件,追加 Hystrix 配置类:
        <dependency>
            <groupId>org.springframework.cloud</groupId>
            <artifactId>spring-cloud-starter-hystrix</artifactId>
        </dependency>
2、 【microcloud-provider-dept-hystrix-8001】修改 DeptRest 程序
package cn.study.microcloud.rest;

import javax.annotation.Resource;

import org.springframework.web.bind.annotation.PathVariable;
import org.springframework.web.bind.annotation.RequestMapping;
import org.springframework.web.bind.annotation.RequestMethod;
import org.springframework.web.bind.annotation.RestController;

import com.netflix.hystrix.contrib.javanica.annotation.HystrixCommand;

import cn.study.microcloud.service.IDeptService;
import cn.study.vo.Dept;

@RestController
public class DeptRest {
    @Resource
    private IDeptService deptService;
    @RequestMapping(value = "/dept/get/{id}", method = RequestMethod.GET)
    @HystrixCommand(fallbackMethod="getFallback")    // 如果当前调用的get()方法出现了错误,则执行fallback
    public Object get(@PathVariable("id") long id) {
        Dept vo = this.deptService.get(id) ;    // 接收数据库的查询结果
        if (vo == null) {    // 数据不存在,假设让它抛出个错误
            throw new RuntimeException("部门信息不存在!") ;
        }
        return vo ;
    }
    public Object getFallback(@PathVariable("id") long id) {    // 此时方法的参数 与get()一致
        Dept vo = new Dept() ;
        vo.setDeptno(999999L);
        vo.setDname("【ERROR】Microcloud-Dept-Hystrix");    // 错误的提示
        vo.setLoc("DEPT-Provider");
        return vo ;
    }


}
一旦 get()方法上抛出了错误的信息,那么就认为该服务有问题,会默认使用“@HystrixCommand”注解之中配置好的 fallbackMethod 调用类中的指定方法,返回相应数据。
3、 【microcloud-provider-dept-hystrix-8001】在主类之中启动熔断处理
package cn.study.microcloud;

import org.springframework.boot.SpringApplication;
import org.springframework.boot.autoconfigure.SpringBootApplication;
import org.springframework.cloud.client.circuitbreaker.EnableCircuitBreaker;
import org.springframework.cloud.client.discovery.EnableDiscoveryClient;
import org.springframework.cloud.netflix.eureka.EnableEurekaClient;
@SpringBootApplication
@EnableEurekaClient
@EnableCircuitBreaker
@EnableDiscoveryClient
public class Dept_8001_StartSpringCloudApplication {
    public static void main(String[] args) {
        SpringApplication.run(Dept_8001_StartSpringCloudApplication.class, args);
    }
}
现在的处理情况是:服务器出现了错误(但并不表示提供方关闭),那么此时会调用指定方法的 fallback 处理。
2.2、服务降级(服务回退)
所有的 RPC 技术里面服务降级是一个最为重要的话题,所谓的降级指的是当服务的提供方不可使用的时候,程序不会出现异常,而会出现本地的操作调用。
例如:在每年年底 12306 都是最繁忙的时候,那么在这个情况会发现有一些神奇的情况:当到了指定的时间大家开始抢票的 时候,如果你不抢,而后查询一些冷门的车次,票有可能查询不出来。因为这个时候会将所有的系统资源给抢票调度了,而其它的 服务由于其暂时不受到过多的关注,这个时候可以考虑将服务降级(服务暂停)。
服务的降级处理是在客户端实现的,与你的服务器端没有关系。
1、 【microcloud-service】扩充一个 IDeptService 的失败调用(服务降级)处理:
package cn.study.service.fallback;
import java.util.List;
import org.springframework.stereotype.Component;
import cn.study.service.IDeptClientService;
import cn.study.vo.Dept;
import feign.hystrix.FallbackFactory;
@Component
public class IDeptClientServiceFallbackFactory
        implements
            FallbackFactory<IDeptClientService> {

    @Override
    public IDeptClientService create(Throwable cause) {
        return new IDeptClientService() {
            @Override
            public Dept get(long id) {
                Dept vo = new Dept();
                vo.setDeptno(888888L);
                vo.setDname("【ERROR】Feign-Hystrix"); // 错误的提示
                vo.setLoc("Consumer客户端提供");
                return vo;
            }

            @Override
            public List<Dept> list() {
                return null;
            }

            @Override
            public boolean add(Dept dept) {
                return false;
            }
        };
    }

}
2、 【microcloud-service】修改 IDeptClientService 接口,追加本地的 Fallback 配置。
package cn.study.service;

import java.util.List;

import org.springframework.cloud.netflix.feign.FeignClient;
import org.springframework.web.bind.annotation.PathVariable;
import org.springframework.web.bind.annotation.RequestMapping;
import org.springframework.web.bind.annotation.RequestMethod;

import cn.study.commons.config.FeignClientConfig;
import cn.study.service.fallback.IDeptClientServiceFallbackFactory;
import cn.study.vo.Dept;
@FeignClient(value = "MICROCLOUD-PROVIDER-DEPT", configuration = FeignClientConfig.class, fallbackFactory = IDeptClientServiceFallbackFactory.class)
public interface IDeptClientService {
    @RequestMapping(method = RequestMethod.GET, value = "/dept/get/{id}")
    public Dept get(@PathVariable("id") long id);
    @RequestMapping(method = RequestMethod.GET, value = "/dept/list")
    public List<Dept> list();
    @RequestMapping(method = RequestMethod.POST, value = "/dept/add")
    public boolean add(Dept dept);
}
此时当服务不可用的时候就会执行“IDeptClientServiceFallbackFactory”类中返回的 IDeptClientService 接口的匿名对象信息。
3、 【microcloud-consumer-hystrix】修改 application.yml 配置文件,追加 feign 配置启用。
feign:
  hystrix:
    enabled: true
4、 【microcloud-consumer-hystrix】修改程序启动主类:
package cn.study.microcloud;

import org.springframework.boot.SpringApplication;
import org.springframework.boot.autoconfigure.SpringBootApplication;
import org.springframework.cloud.netflix.eureka.EnableEurekaClient;
import org.springframework.cloud.netflix.feign.EnableFeignClients;
import org.springframework.context.annotation.ComponentScan;
@SpringBootApplication
@EnableEurekaClient
@ComponentScan("cn.study.service,cn.study.microcloud")
@EnableFeignClients(basePackages={"cn.study.service"})
public class Consumer_80_StartSpringCloudApplication {
    public static void main(String[] args) {
        SpringApplication.run(Consumer_80_StartSpringCloudApplication.class,
                args);
    }
}
当追加上了“@ComponentScan("cn.mldn.service")”注解之后才可以进行包的扫描配置。
此时即使服务端无法继续提供服务了,由于存在有服务降级机制,也会保证服务不可用时可以得到一些固定的提示信息。
2.3、HystrixDashboard服务监控
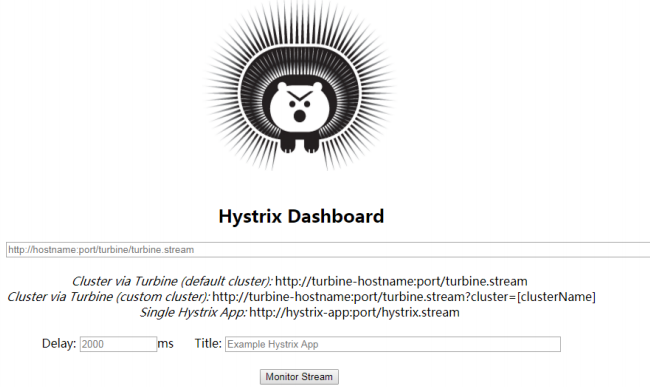
在 Hystrix 里面提供有一种监控的功能,那么这个功能就是“Hystrix Dashboard”,可以利用它来进行整体微服务的监控操作。
1、 首先为了方便监控,将建立一个新的监控项目:microcloud-consumer-hystrix-dashboard;
2、 【microcloud-consumer-hystrix-dashboard】修改项目中的 pom.xml 配置文件:
        <dependency>
            <groupId>org.springframework.cloud</groupId>
            <artifactId>spring-cloud-starter-hystrix</artifactId>
        </dependency>
        <dependency>
            <groupId>org.springframework.cloud</groupId>
            <artifactId>spring-cloud-starter-hystrix-dashboard</artifactId>
        </dependency>
3、 【microcloud-provider-*】所有的服务提供者之中都一定要提供有监控服务依赖库:
        <dependency>
            <groupId>org.springframework.boot</groupId>
            <artifactId>spring-boot-starter-actuator</artifactId>
        </dependency>
4、 【microcloud-consumer-hystrix-dashboard】修改 application.yml 配置文件,主要进行端口的配置:
server:
  port: 9001
5、 【microcloud-consumer-hystrix-dashboard】创建一个监控的主类:
package cn.study.microcloud;

import org.springframework.boot.SpringApplication;
import org.springframework.boot.autoconfigure.SpringBootApplication;
import org.springframework.cloud.netflix.hystrix.dashboard.EnableHystrixDashboard;
@SpringBootApplication
@EnableHystrixDashboard
public class HystrixDashboardApplication_9001 {
    public static void main(String[] args) {
        SpringApplication.run(HystrixDashboardApplication_9001.class, args);
    }
}
6、 修改 hosts 主机文件,增加主机列表:
127.0.0.1 dashboard.com
服务运行地址:http://dashboard.com:9001/hystrix;
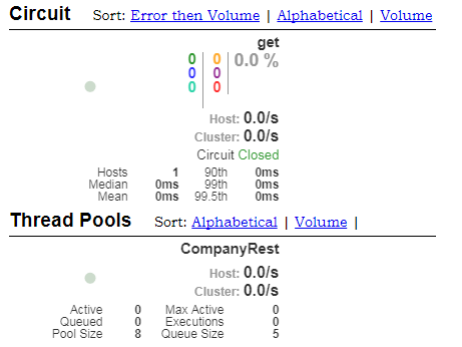
7、 得到 microcloud-provider-dept 的监控信息:http://studyjava:hello@dept-8001.com:8001/hystrix.stream;
· 如果此时要想获取监控信息必须去运行微服务;
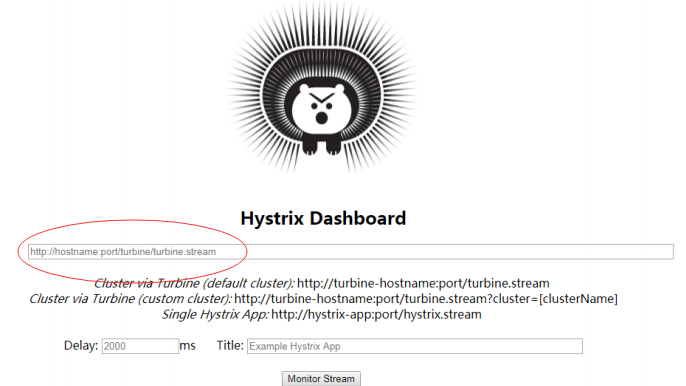
8、 将之前的监控的路径http://studyjava:hello@dept-8001.com:8001/hystrix.stream填写到之前启动好的 dashboard 程序页面之中;
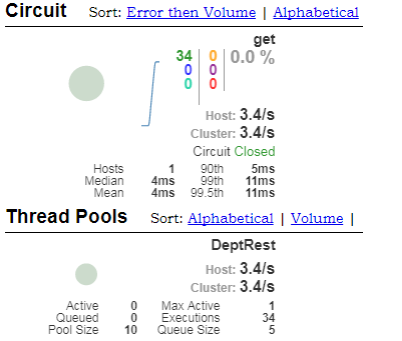
监控效果如下图所示:
2.4、Turbine 聚合监控
HystrixDashboard 主要的功能是可以针对于某一项微服务进行监控,但是如果说现在有许多的微服务需要进行整体的监控,那 么这种情况下就可以利用 turbine 技术来实现。
1、 下面准备出一个新的微服务:Company,这个微服务不打算使用 SpringSecurity 安全处理以及 Mybatis 数据库连接,只是做一 个简单的数据信息。通过一个已有的 microcloud-provider-hystrix-8001 复制一个新的项目:microcloud-provider-company-8101;
2、 【microcloud-provider-company-8101】修改项目中的 pom.xml 配置文件,将与安全有关的依赖包删除掉以及与数据库连接池、MyBatis 的相关的程序类或接口全部删除掉,只保留有用的包;
    <dependencies>
        <dependency>
            <groupId>org.springframework.boot</groupId>
            <artifactId>spring-boot-starter-actuator</artifactId>
        </dependency>
        <dependency>
            <groupId>org.springframework.cloud</groupId>
            <artifactId>spring-cloud-starter-hystrix</artifactId>
        </dependency>
        <dependency>
            <groupId>org.springframework.cloud</groupId>
            <artifactId>spring-cloud-starter-eureka</artifactId>
        </dependency>
        <dependency>
            <groupId>org.springframework.cloud</groupId>
            <artifactId>spring-cloud-starter-config</artifactId>
        </dependency>
        <dependency>
            <groupId>cn.study</groupId>
            <artifactId>microcloud-api</artifactId>
        </dependency>
        <dependency>
            <groupId>junit</groupId>
            <artifactId>junit</artifactId>
            <scope>test</scope>
        </dependency>
        <dependency>
            <groupId>org.springframework.boot</groupId>
            <artifactId>spring-boot-starter-jetty</artifactId>
        </dependency>
        <dependency>
            <groupId>org.springframework.boot</groupId>
            <artifactId>spring-boot-starter-web</artifactId>
        </dependency>
        <dependency>
            <groupId>org.springframework.boot</groupId>
            <artifactId>spring-boot-starter-test</artifactId>
            <scope>test</scope>
        </dependency>
        <dependency>
            <groupId>org.springframework</groupId>
            <artifactId>springloaded</artifactId>
        </dependency>
        <dependency>
            <groupId>org.springframework.boot</groupId>
            <artifactId>spring-boot-devtools</artifactId>
        </dependency>
    </dependencies>
3、 【microcloud-api】追加一个新的 VO 类:Company。
package cn.study.vo;

import java.io.Serializable;

@SuppressWarnings("serial")
public class Company implements Serializable {
    private String title ;
    private String note ;
    public String getTitle() {
        return title;
    }
    public void setTitle(String title) {
        this.title = title;
    }
    public String getNote() {
        return note;
    }
    public void setNote(String note) {
        this.note = note;
    }
    @Override
    public String toString() {
        return "Company [title=" + title + ", note=" + note + "]";
    }
}
4、 【microcloud-provider-company-8101】建立一个新的微服务的程序类:CompanyRest
package cn.study.microcloud.rest;

import org.springframework.web.bind.annotation.PathVariable;
import org.springframework.web.bind.annotation.RequestMapping;
import org.springframework.web.bind.annotation.RequestMethod;
import org.springframework.web.bind.annotation.RestController;

import com.netflix.hystrix.contrib.javanica.annotation.HystrixCommand;

import cn.study.vo.Company;

@RestController
public class CompanyRest {
    @RequestMapping(value = "/company/get/{title}", method = RequestMethod.GET)
    @HystrixCommand    // 如果需要进行性能监控,那么必须要有此注解
    public Object get(@PathVariable("title") String title) {
        Company vo = new Company() ;
        vo.setTitle(title);
        vo.setNote("www.study.cn");
        return vo ;
    }
}
5、 【microcloud-provider-company-8101】修改程序的启动主类:
package cn.study.microcloud;

import org.springframework.boot.SpringApplication;
import org.springframework.boot.autoconfigure.SpringBootApplication;
import org.springframework.cloud.client.circuitbreaker.EnableCircuitBreaker;
import org.springframework.cloud.client.discovery.EnableDiscoveryClient;
import org.springframework.cloud.netflix.eureka.EnableEurekaClient;
@SpringBootApplication
@EnableEurekaClient
@EnableCircuitBreaker
@EnableDiscoveryClient
public class Company_8101_StartSpringCloudApplication {
    public static void main(String[] args) {
        SpringApplication.run(Company_8101_StartSpringCloudApplication.class, args);
    }
}
6、 【microcloud-provider-company-8101】修改 application.yml 配置文件:
server:
  port: 8101
eureka:
  client: # 客户端进行Eureka注册的配置
    service-url:
      defaultZone: http://edmin:studyjava@eureka-7001.com:7001/eureka,http://edmin:studyjava@eureka-7002.com:7002/eureka,http://edmin:studyjava@eureka-7003.com:7003/eureka
  instance:
    lease-renewal-interval-in-seconds: 2 # 设置心跳的时间间隔(默认是30秒)
    lease-expiration-duration-in-seconds: 5 # 如果现在超过了5秒的间隔(默认是90秒)
    instance-id: dept-8001.com  # 在信息列表时显示主机名称
    prefer-ip-address: true     # 访问的路径变为IP地址
info:
  app.name: study-microcloud
  company.name: www.study.cn
  build.artifactId: $project.artifactId$
  build.version: $project.verson$
spring:
  application:
    name: microcloud-provider-company
7、 【microcloud-provider-company-8101】启动微服务,随后取得监控信息:
· 在 hosts 配置文件之中追加有一个映射路径:
127.0.0.1 company-8101.com
· 访问地址:http://company-8101.com:8101/company/get/hello;
· hystrix 监控地址:http://company-8101.com:8101/hystrix.stream;
8、 如 果 要 想 实 现 trubine 的 配 置 , 则需要建立一个 turbine项目模块 , 这个项目可以直接通过之前的 microcloud-consumer-hystrix-dashboard 模块进行复制为“microcloud-consumer-turbine”模块;
9、 【microcloud-consumer-turbine】修改 pom.xml 配置文件,追加 turbine 的依赖程序包:
        <dependency>
            <groupId>org.springframework.cloud</groupId>
            <artifactId>spring-cloud-starter-turbine</artifactId>
        </dependency>
10、 【microcloud-consumer-turbine】修改 application.yml 配置文件:
server:
  port: 9101  # turbine的监听端口为9101
eureka:
  client: # 客户端进行Eureka注册的配置
    service-url:
      defaultZone: http://edmin:studyjava@eureka-7001.com:7001/eureka,http://edmin:studyjava@eureka-7002.com:7002/eureka,http://edmin:studyjava@eureka-7003.com:7003/eureka
  instance:
    lease-renewal-interval-in-seconds: 2 # 设置心跳的时间间隔(默认是30秒)
    lease-expiration-duration-in-seconds: 5 # 如果现在超过了5秒的间隔(默认是90秒)
    instance-id: dept-8001.com  # 在信息列表时显示主机名称
    prefer-ip-address: true     # 访问的路径变为IP地址
turbine:
  app-config: MICROCLOUD-PROVIDER-COMPANY,MICROCLOUD-PROVIDER-DEPT  # 定义所有要监控的微服务信息
  cluster-name-expression: new String("default")  # 设置监控的表达式,通过此表达式表示要获取监控信息名称
11、 【microcloud-consumer-turbine】建立一个 turbine 的使用主类信息
package cn.study.microcloud;

import org.springframework.boot.SpringApplication;
import org.springframework.boot.autoconfigure.SpringBootApplication;
import org.springframework.cloud.netflix.hystrix.dashboard.EnableHystrixDashboard;
import org.springframework.cloud.netflix.turbine.EnableTurbine;
@SpringBootApplication
@EnableHystrixDashboard
@EnableTurbine
public class TurbineApplication_9101 {
    public static void main(String[] args) {
        SpringApplication.run(TurbineApplication_9101.class, args);
    }
}
12、 【microcloud-consumer-hystrix-dashboard】运行 hystrix-dashboard 监控程序;
13、 【microcloud-consumer-turbine】运行 trubine 聚合监控程序;
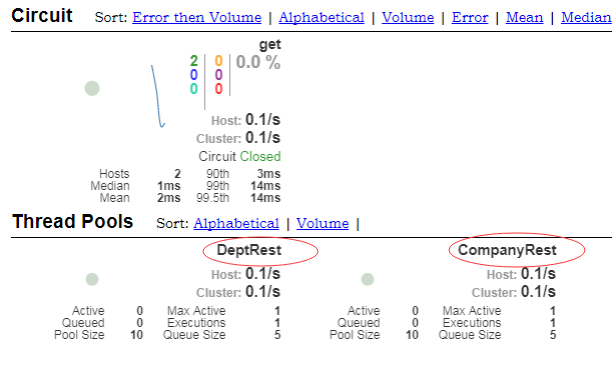
· 但是在正常启动 trubine 的时候出现了以下的错误提示信息,这是因为没有对有安全认证的微服务MICROCLOUD-PROVIDER-DEPT进行安全认证

· 修改 hosts 配置文件,追加一个映射路径:
127.0.0.1 turbine.com
· trubine 访问路径:http://turbine.com:9101/turbine.stream
14、 运行 HystrixDashboard 监控程序:http://dashboard.com:9001/hystrix.stream;
· 在监控的位置上填写之前设置好的 turbine 的访问地址看到的效果如下:
15、 【microcloud-security】如果现在需要 turbine 进行加密的微服务的访问操作,只能够采取一种折衷方案,就是要去修改整个项目中的安全策略,追加 WEB 安全策略配置:
package cn.study.microcloud.config;

import javax.annotation.Resource;

import org.springframework.context.annotation.Configuration;
import org.springframework.security.config.annotation.authentication.builders.AuthenticationManagerBuilder;
import org.springframework.security.config.annotation.web.builders.HttpSecurity;
import org.springframework.security.config.annotation.web.builders.WebSecurity;
import org.springframework.security.config.annotation.web.configuration.EnableWebSecurity;
import org.springframework.security.config.annotation.web.configuration.WebSecurityConfigurerAdapter;
import org.springframework.security.config.http.SessionCreationPolicy;
@Configuration
@EnableWebSecurity
public class WebSecurityConfig extends WebSecurityConfigurerAdapter {
    @Override
    public void configure(WebSecurity web) throws Exception {
        web.ignoring().antMatchers("/hystrix.stream","/turbine.stream") ;
    }

    @Resource
    public void configGlobal(AuthenticationManagerBuilder auth)
            throws Exception {
        auth.inMemoryAuthentication().withUser("studyjava").password("hello")
                .roles("USER").and().withUser("admin").password("hello")
                .roles("USER", "ADMIN");
    }
    @Override
    protected void configure(HttpSecurity http) throws Exception {
        // 表示所有的访问都必须进行认证处理后才可以正常进行
        http.httpBasic().and().authorizeRequests().anyRequest()
                .fullyAuthenticated();
        // 所有的Rest服务一定要设置为无状态,以提升操作性能
        http.sessionManagement()
                .sessionCreationPolicy(SessionCreationPolicy.STATELESS);
    }
}
现在所有的安全策略会自动抛开以上的两个访问路径,这种是基于 Bean 配置,如果要是你现在基于的是 application.yml 文件的配置,则就必须修改 application.yml 配置文件,追加如下内容:
security:
  ignored:
  - /hystrix.stream
  - /turbine.stream
这个时候如果启动之后没有出现任何的错误提示,那么就表示现在已经可以绕过了 Security 的配置而直接进行服务的访问了。

 浙公网安备 33010602011771号