
四、使用Spring AI实现MCP Client调用MCP Server
四、使用Spring AI实现MCP Client调用MCP Server
==================================================================================
==================================================================================
参考资料:
==================================================================================
同第一篇《一、MCP和Spring AI MCP》参考资料
spring AI实战:mcp客户端_spring-ai-starter-mcp-client-CSDN博客
==================================================================================
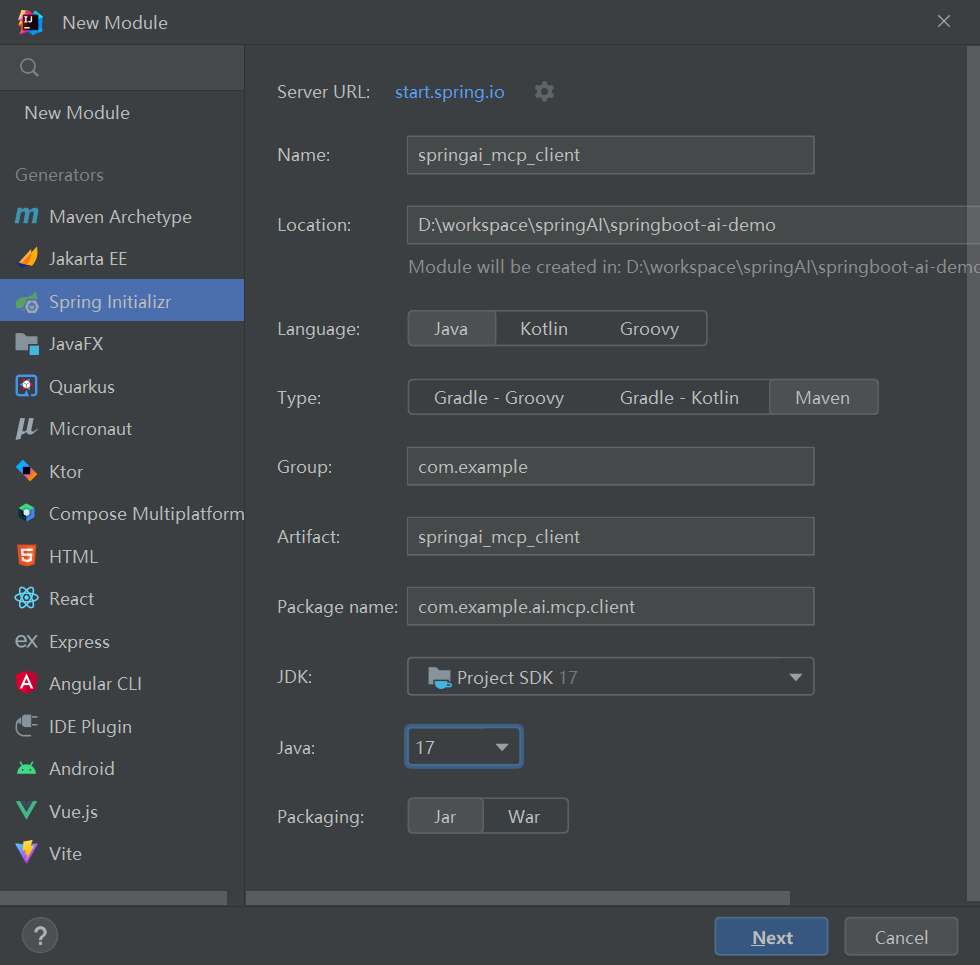
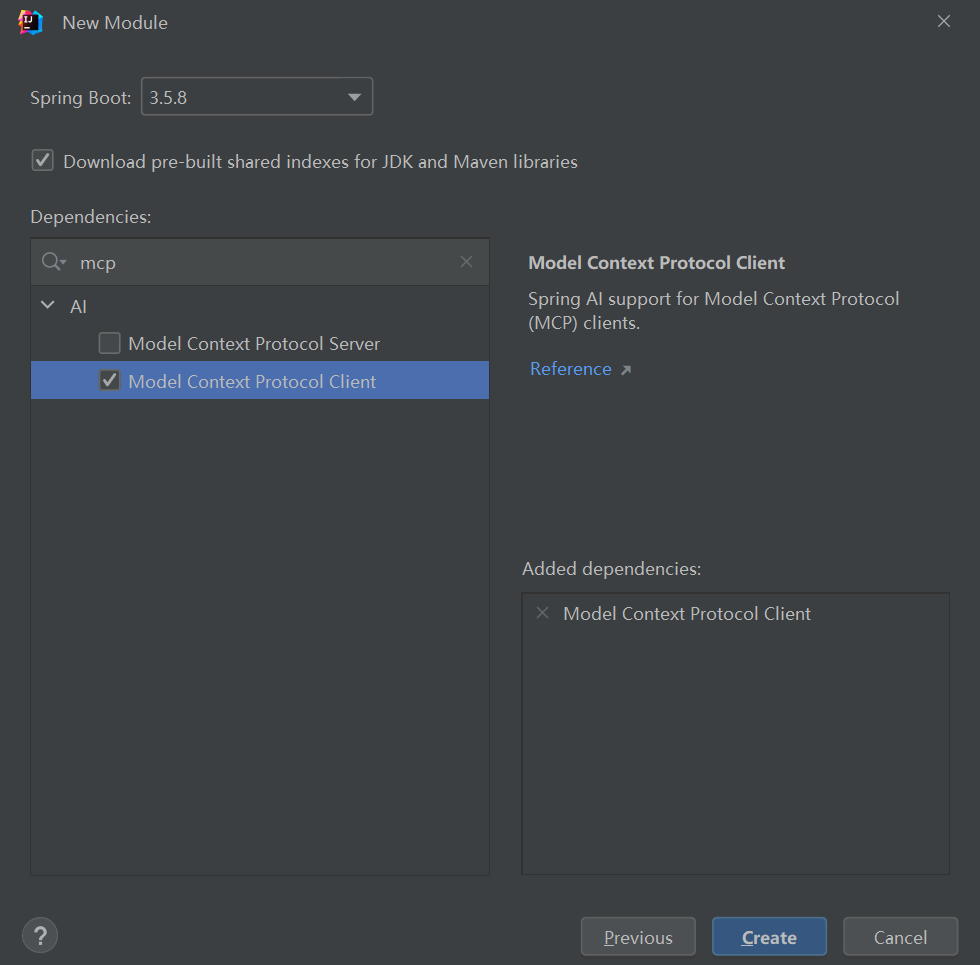
1、创建SpringBoot工程
1.1、application.yml
配置文件定义了一个基于 Spring AI 的异步 MCP 客户端,调用了SSE 和 Stdio 两种MCP服务,
server1采用SSE方式,连接指向http://localhost:9090;
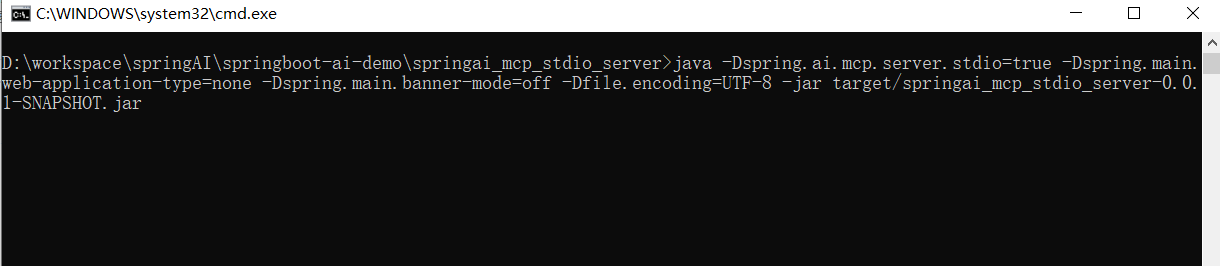
server2采用Stdio 方式,Stdio 通过 Java 命令启动,指定 Jar 文件位置。
同时集成大模型qwen3-max。读者需要把api-key替换为自己的key进行测试验证。
server:
  port: 8896

spring:
  ai:
    mcp:
      client:
        enabled: true
        name: springai_mcp_client
        version: 1.0.0
        request-timeout: 30s
        type: ASYNC
        toolcallback:
          enabled: true
        sse:
          connections:
            server1:
              url: http://localhost:9090
        stdio:
          connections:
            server2:
              command: java
              args:
                - -Dspring.ai.mcp.server.stdio=true
                - -Dspring.main.web-application-type=none
                - -Dspring.main.banner-mode=off
                - -Dfile.encoding=UTF-8
                - -jar
                - D:\workspace\springAI\springboot-ai-demo\springai_mcp_stdio_server\target\springai_mcp_stdio_server-0.0.1-SNAPSHOT.jar

    openai:
      # 注意去掉 /v1,Spring AI 会自动补
      base-url: https://dashscope.aliyuncs.com/compatible-mode
      api-key: ${BAILIAN_API_KEY}
      chat:
        options:
          #模型名称: qwen-plus  deepseek-v3  deepseek-r1
          model: qwen3-max
1.2、pom.xml
<?xml version="1.0" encoding="UTF-8"?>
<project xmlns="http://maven.apache.org/POM/4.0.0" xmlns:xsi="http://www.w3.org/2001/XMLSchema-instance"
         xsi:schemaLocation="http://maven.apache.org/POM/4.0.0 https://maven.apache.org/xsd/maven-4.0.0.xsd">
    <modelVersion>4.0.0</modelVersion>
    <parent>
        <groupId>org.springframework.boot</groupId>
        <artifactId>spring-boot-starter-parent</artifactId>
        <version>3.5.8</version>
        <relativePath/> <!-- lookup parent from repository -->
    </parent>
    <groupId>com.youzhuo</groupId>
    <artifactId>springai_mcp_client</artifactId>
    <version>0.0.1-SNAPSHOT</version>
    <name>springai_mcp_client</name>
    <description>springai_mcp_client</description>
    <url/>
    <licenses>
        <license/>
    </licenses>
    <developers>
        <developer/>
    </developers>
    <scm>
        <connection/>
        <developerConnection/>
        <tag/>
        <url/>
    </scm>
    <properties>
        <java.version>17</java.version>
        <spring-ai.version>1.1.0</spring-ai.version>
    </properties>
    <dependencies>
        <dependency>
            <groupId>org.springframework.boot</groupId>
            <artifactId>spring-boot-starter-web</artifactId>
        </dependency>

        <dependency>
            <groupId>org.springframework.ai</groupId>
            <artifactId>spring-ai-starter-model-openai</artifactId>
        </dependency>

        <dependency>
            <groupId>org.springframework.ai</groupId>
            <artifactId>spring-ai-starter-mcp-client</artifactId>
        </dependency>

        <dependency>
            <groupId>org.springframework.boot</groupId>
            <artifactId>spring-boot-starter-test</artifactId>
            <scope>test</scope>
        </dependency>
    </dependencies>
    <dependencyManagement>
        <dependencies>
            <dependency>
                <groupId>org.springframework.ai</groupId>
                <artifactId>spring-ai-bom</artifactId>
                <version>${spring-ai.version}</version>
                <type>pom</type>
                <scope>import</scope>
            </dependency>
        </dependencies>
    </dependencyManagement>

    <build>
        <plugins>
            <plugin>
                <groupId>org.springframework.boot</groupId>
                <artifactId>spring-boot-maven-plugin</artifactId>
            </plugin>
        </plugins>
    </build>

</project>
2、新建client
@SpringBootApplication
public class SpringaiMcpClientApplication {

    public static void main(String[] args) {
        SpringApplication.run(SpringaiMcpClientApplication.class, args);
    }

    @Bean
    public CommandLineRunner predefinedQuestions(ChatClient.Builder chatClientBuilder,
                                                 ToolCallbackProvider tools,
                                                 ConfigurableApplicationContext context) {
        return args -> {
            // 构建ChatClient并注入MCP工具
            var chatClient = chatClientBuilder
                    .defaultToolCallbacks(tools)
                    .build();

            // 创建Scanner对象用于接收用户输入
            Scanner scanner = new Scanner(System.in);

            System.out.println(">>> 欢迎使用问答系统!输入'exit'退出程序。");

            while (true) {
                // 提示用户输入问题
                System.out.print("\n>>> QUESTION: ");
                String userInput = scanner.nextLine();

                // 如果用户输入"exit",则退出循环
                if ("exit".equalsIgnoreCase(userInput)) {
                    System.out.println(">>> 已退出问答系统。");
                    break;
                }

                // 使用ChatClient与LLM交互
                try {
                    System.out.println("\n>>> ASSISTANT: " + chatClient.prompt(userInput).call().content());
                } catch (Exception e) {
                    System.out.println("\n>>> ERROR: 无法处理您的请求,请稍后再试。");
                    e.printStackTrace();
                }
            }

            // 关闭Spring上下文
            context.close();
            scanner.close();
        };
    }
}
3、运行测试
先启动MCP Server服务,再运行MCP Client,进行AI对话,观察日志输出结果,确定是否理解了用户的输入信息,并分别调用了对应的MCP Server服务。

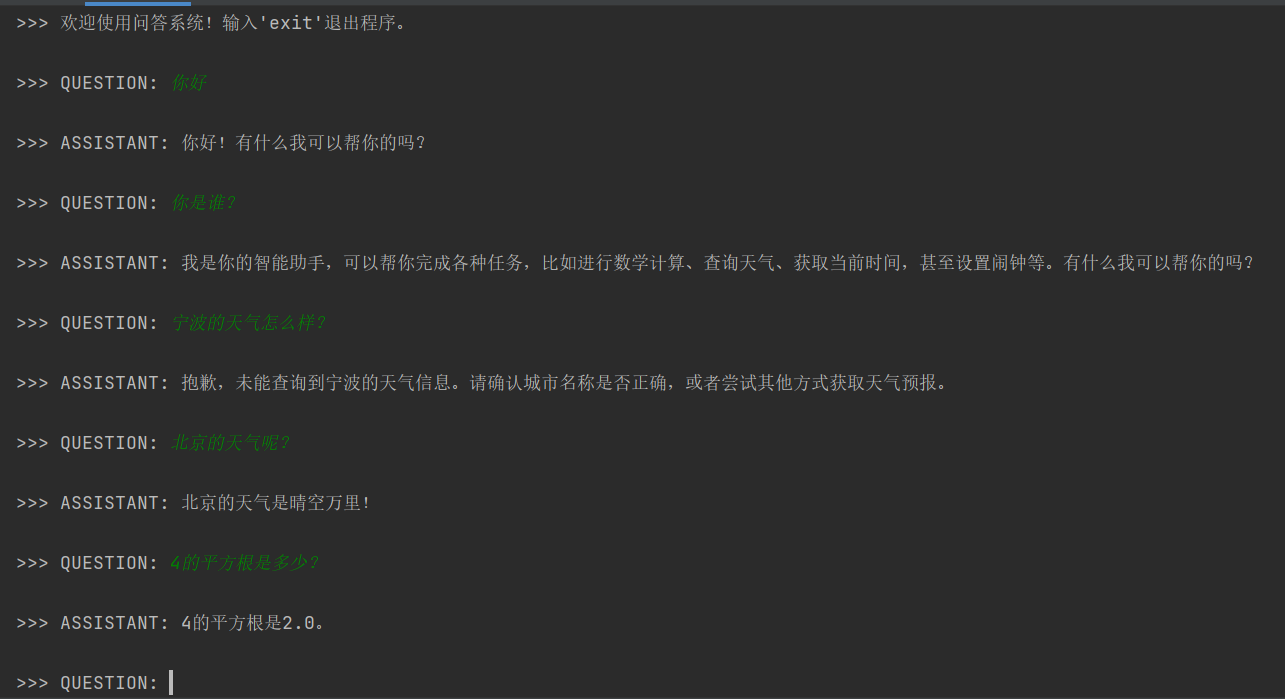


观察输出结果:
- 提问“你是谁?”,大模型回答:“我是你的智能助手,可以帮你完成各种任务,比如进行数学计算、查询天气、获取当前时间,甚至设置闹钟等。有什么我可以帮你的吗?”
说明大模型已经发现了时间和天气预报、算术运算两个MCP服务。
- 提问“宁波的天气怎么样?”,大模型回答:“抱歉,未能查询到宁波的天气信息。请确认城市名称是否正确,或者尝试其他方式获取天气预报。” 再问:“北京的天气呢?”大模型的回答:“北京的天气是晴空万里!”。调用了基于sse协议的MCP Server,可以到该服务后台查看日志,确定是否被调用。
- 提问“4的平方根是多少?”,大模型的回答:“4的平方根是2.0”。调用了基于stdio协议的MCP Server,可以到.log日志文件中查看日志,确定是否被调用。
通过验证结果表明:大模型根据用户的提问,选择了合适的工具进行回答,分别调用了对应的MCP Server服务。
本文来自博客园,作者:老羅,转载请注明原文链接:https://www.cnblogs.com/laoluo2025/p/19277359

 浙公网安备 33010602011771号