[Linux] 包管理器之【APT】
序
- 续:
概述:包管理器 APT
包管理器 APT
APT:Advanced Packaging Tool(现名)
解释: Advanced Packaging Tool(apt),作为 原始包管理器
DPKG的前端包管理工具(在线包管理器),是Linux下的一款安装包管理工具,是一个客户/服务器系统。
Debian GNU/Linux是Linux APT的缔造者。
初衷:是利用工具来解决软件安装时候的依赖性问题。
APT的核心功能:用于在Debian、Ubuntu和相关Linux发行版上安装、更新、删除和管理deb软件包。
APT是Debian系列发行版(如Ubuntu)使用的包管理工具。它通过.deb包来管理软件,且支持从网络仓库下载和安装软件。
apt是为交互使用而设计的。
最好在shell脚本中使用apt-get和apt-cache,因为它们在不同版本之间向后兼容,并且有更多选项和功能
大多数apt命令必须以具有sudo权限的用户身份运行
apt是Debian及其衍生产品的主要命令行包管理器,它提供了用于搜索、管理和查询的命令行工具、有关软件包的信息以及对所有功能的低级访问
作为操作的一部分,APT使用一个文件列出可获得软件包的镜像站点地址,这个文件就是/etc/apt/sources.list。
APT工作原理:
用户安装Linux APT客户端工具,查寻APT服务器端的资料库(repositories)上的
DEB/RPM软件包信息,并分析软件包之间的依赖性然后下载并进行安装。
APT通过自动获取软件包(从wan,lan,cdrom上)自动配置,自动编译和安装APT源。由此,可以很大程度上简化在Linux系统上安装和删除软件的过程。
DPKG包管理机制:
这个机制最早是由
Debian Linux社群所开发出来的。
透过dpkg的机制, Debian 提供的软体就能够简单的安装起来,同时还能提供安装后的软体资讯,实在非常不错。
只要是衍生于Debian的其他 Linux distributions 大多使用dpkg这个机制来管理软体的, 包括 Debian / B2D, Ubuntu 等等。
- dpkg 包管理器的由来:
最初只有.tar.gz的打包文件,用户必须编译每个他想在GNU/Linux上运行的软件。
用户们普遍认为系统很有必要提供一种方法来管理这些安装在机器上的软件包,当Debian诞生时,这样一个管理工具也就应运而生,它被命名为dpkg。
从而著名的“package”概念第一次出现于GNU/Linux系统中

很快一个新的问题难倒了GNU/Linux制作者,他们需要一个快速、实用、高效的方法来安装软件包。
当软件包更新时,这个工具应该能自动管理关联文件和维护已有配置文件。
Debian再次率先解决了这个问题,APT(Advanced Packaging Tool)作为dpkg的前端诞生了。
APT后来还被Conectiva改造用来管理rpm,并被其它Linux发行版本采用为它们的软件包管理工具。
APT源的提供方式
- 本地目录/CDROM: file://...
- FTP或HTTP服务: ftp://...、http://...
DEB软件包的来源
- Debian发布的DEB包集合
- 第三方、用户自定义的DEB包
APT常用命令
CASE: 编辑APT源(apt edit-sources)
# apt edit-sources
类比 vim
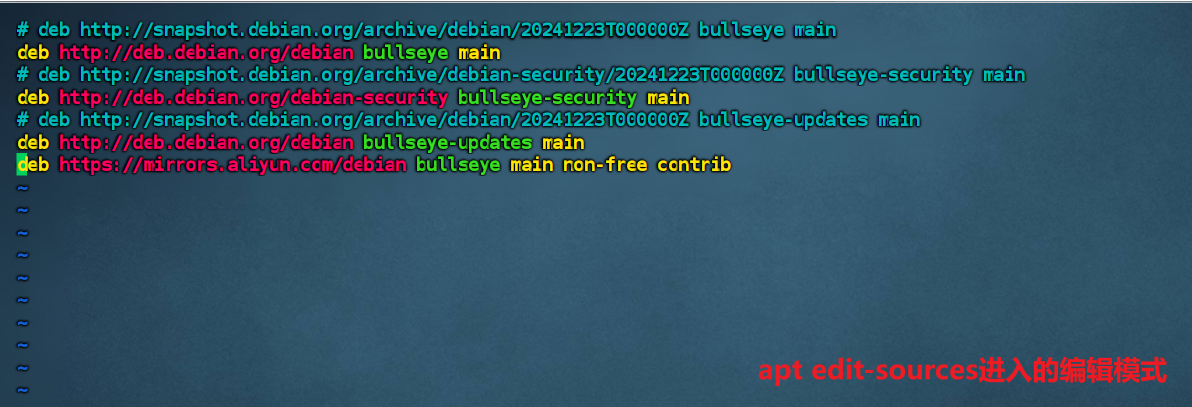
CASE: 查看APT源
cat /etc/apt/sources.list

运行日志
root@xxx:/# cat /etc/apt/sources.list
# deb http://snapshot.debian.org/archive/debian/20241223T000000Z bullseye main
deb http://deb.debian.org/debian bullseye main
# deb http://snapshot.debian.org/archive/debian-security/20241223T000000Z bullseye-security main
deb http://deb.debian.org/debian-security bullseye-security main
# deb http://snapshot.debian.org/archive/debian/20241223T000000Z bullseye-updates main
deb http://deb.debian.org/debian bullseye-updates main

root@xxx:/# apt install curl
Reading package lists... Done
Building dependency tree... Done
Reading state information... Done
E: Unable to locate package curl
- 还可以查看
/etc/apt/sources.list.d/目录下的文件,该目录用于存放额外的源列表文件:
ls /etc/apt/sources.list.d/
可以使用
cat查看这些文件的内容:
cat /etc/apt/sources.list.d/filename.list
CASE: 使用apt更新软件包数据库(apt-get update)
apt实际上在可用软件包的数据库上工作。
如果数据库没有更新,系统将不知道是否有更新的软件包可用。
这就是为什么在安装任何Linux系统之后,第一件事应该是更新apt数据库。
sudo apt-get update
运行此命令时,您将看到从各种服务器检索到的软件包信息。
此命令会从配置的源(通常在/etc/apt/sources.list文件中)拉取最新的软件包信息。
CASE: 使用apt升级已安装的软件包(apt-get upgrade)
- 更新软件包数据库后,可以升级已安装的软件包。最方便的方法是升级所有有可用更新的软件包。
您只需使用以下命令即可:
sudo apt-get upgrade
这将显示要升级的软件包数量和所有要升级的软件包
CASE:使用apt完全升级已安装的软件包(apt-get full-upgrade)
- 升级和完全升级的区别在于,如果需要升级整个系统,后者将删除已安装的软件包。
sudo apt-get full-upgrade
CASE:使用apt安装软件包(apt install {packageName})
- 安装软件包非常简单,只需运行以下命令:
sudo apt install {packageName}
CASE:使用apt移除软件包(apt remove/purge {packageName})
- 要删除已安装的软件包,请键入以下命令:
sudo apt remove {packageName}
还可以指定多个包,以空格分隔:
sudo apt remove package1 package2
remove命令将卸载给定的软件包,但可能会留下一些配置文件。
如果要删除包含所有配置文件的软件包,请使用purge(英译:净化/清洗)而不是remove。
CASE: 使用apt删除未使用的软件包(apt autoremove)
- 每当在系统上安装依赖于其他软件包的新软件包时,也会安装软件包依赖项。
删除包后,依赖项将保留在系统上。
这些剩余的软件包不再被其他任何东西使用,可以移除。
要删除不需要的依赖项,请使用以下命令:
sudo apt autoremove
CASE:使用apt生成软件包列表(apt list)
list命令允许您列出可用、已安装和可升级的软件包。
要列出所有可用的软件包,请使用以下命令:
sudo apt list
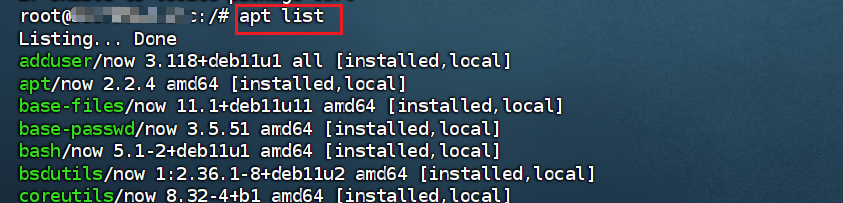
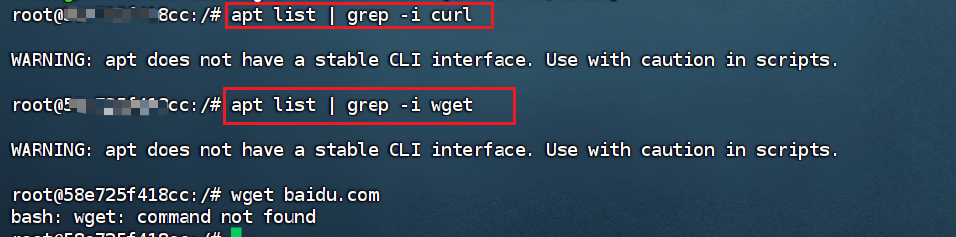
该命令将输出所有包的列表,包括有关包的版本和体系结构的信息。要了解是否安装了特定的软件包,可以使用
grep命令过滤输出
sudo apt list | grep {packageName}

CASE: 要仅列出已安装的软件包(apt list --installed)
sudo apt list --installed
CASE: 获取可升级软件包的列表(apt list --upgradeable)
- 在实际升级软件包之前,获取可升级软件包的列表可能很有用:
sudo apt list --upgradeable
CASE: 使用apt搜索软件包(apt search {packageName})
- 此命令允许您在可用软件包列表中搜索给定软件包:
sudo apt search {packageName}
如果找到,该命令将返回名称与搜索词匹配的包。
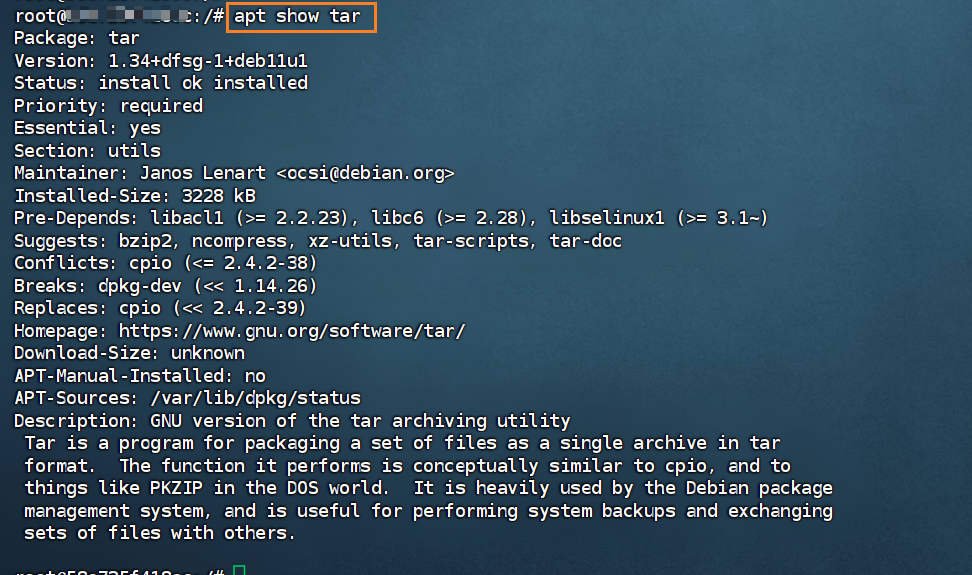
CASE: 使用apt显示软件包信息(apt show {packageName})
- 在删除或安装新软件包之前,有关软件包依赖项、安装大小、软件包源等的信息可能很有用。
要检索有关给定包的信息,请使用show命令:
sudo apt show {packageName}
CASE: 使用apt在不升级的情况下安装软件包(apt install <package_name> --no-upgrade)
- 如果出于某种原因,你想安装一个软件包,但不想升级,那么如果已经安装了,在这种情况下,您可以通过以下方式使用下述选项不升级:
sudo apt install <package_name> --no-upgrade
CASE: 使用apt只升级软件包(apt install <package_name> --only-upgrade)
- 如果只想升级软件包,但不想安装(如果尚未安装),可以使用以下命令进行升级:
sudo apt install <package_name> --only-upgrade
CASE: 使用apt安装软件的特定版本(apt install <package_name>=<version_number>)
- 默认情况下,将为应用程序安装存储库中可用的最新版本。但如果不想安装最新版本,可以指定版本号。您需要知道要安装的确切版本号。
只需使用包的名称添加=version。 [3]
sudo apt install <package_name>=<version_number>
CASE: 使用apt清理下载文件的存档(apt-get clean)
sudo apt-get clean
CASE: 使用apt下载软件源代码(apt-get source <packages>)
sudo apt-get source <packages>
CASE: 使用apt了解软件依赖关系(apt-cache depends <packages>)
sudo apt-cache depends <packages>
CASE: 使用apt检查软件依赖关系(apt-get check)
sudo apt-get check
CASE: 使用apt安装相关的编译环境(apt-get build-dep <packages>)
sudo apt-get build-dep <packages>
apt-cdrom 命令: 扫描光盘信息或将光盘做为安装源添加到sources.list
- 命令:
apt-cdrom
- 命令功能:扫描光盘信息或将光盘做为安装源添加到sources.list
- 语法格式:
apt-cdrom [选项]
- 常用选项
-m不挂载,阻止apt-cdrom挂载和卸载挂载点-d挂载点,指本地挂载光盘-v显示程序版本-h查看帮助add添加到光盘源列表ident调试工具,报告当前光盘和存储的文件名的信息
- 示例
# 将光驱中的光盘添加到sources.list文件源列表中做为系统安装源

root@localhost:~# apt-cdrom -m -d=/media add
Using CD-ROM mount point /media/
Identifying... [58ecf08394a7839a724e0c034df13779-2]
Scanning disc for index files...
Found 4 package indexes, 0 source indexes, 0 translation indexes and 1 signatures
This disc is called:
... ... ...
apt-cache 命令
- 命令简介
apt-cache是Debian和Ubuntu等Linux发行版中的一个命令行工具,用于查询和管理软件包的缓存信息。- 它是Advanced Packaging Tool (APT)软件包管理系统的一部分,用于提供高效的软件包搜索和查询功能。
apt-cache的实现原理:
- 软件包索引:APT系统会定期从软件源(如官方仓库)下载软件包索引文件,其中包含了所有可用软件包的信息,如名称、版本、依赖关系等。
- 本地缓存:当用户执行apt-get update命令时,APT会将软件包索引文件下载到本地缓存中,通常位于/var/cache/apt/archives/目录下。
- 查询缓存:当用户执行apt-cache命令时,它会直接读取本地缓存中的软件包索引文件,而不需要再次从软件源下载。
- 查询功能:apt-cache提供了多种查询功能,如搜索软件包、显示软件包信息、显示软件包依赖关系等。它可以根据用户提供的关键字在本地缓存中快速查找匹配的软件包。
apt-cache的优势和应用场景:
- 快速查询:由于apt-cache直接读取本地缓存,所以查询速度非常快,特别适用于需要频繁查询软件包信息的场景。
- 离线查询:即使没有网络连接,只要本地缓存中存在软件包索引,用户仍然可以使用apt-cache查询软件包信息。
- 管理软件包:apt-cache不仅可以查询软件包信息,还可以通过其他APT命令(如apt-get)进行软件包的安装、升级、删除等操作。
- 常用命令
# 用于清理APT缓存。APT使用一个缓存来存储已下载的软件包。当缓存过大或存在错误时,可能导致软件包安装或更新出错。使用该命令可以清理缓存,以便重新下载软件包。
apt-cache clean

# 用于清理过时的软件包。过时的软件包可能占用磁盘空间并导致一些问题。使用该命令可以清理掉这些过时的软件包。
apt-get autoclean


# 显示当前系统所使用的数据源的统计信息
apt-cache stats

# 按关键字查找软件包
apt-cache search

# 显示软件包详细信息
apt-cache show

# 显示指定软件包所依赖的软件包
apt-cache depends
apt-key : 管理Linux系统的软件包密钥
- 命令简述
https://manpages.debian.org/testing/apt/apt-key.8.en.html
管理Debian Linux系统中的软件包密钥 (Debian官网的声明:已遗弃的APT密钥管理工具)
每个发布的deb包,都是通过密钥认证的,apt-key用来管理密钥。
【Debian官网的命令描述】:
虽然已被遗弃,但apt-key(8)将在Debian 12和Ubuntu 24.04中持续可用。
apt-key用于管理apt用于对包进行身份验证的密钥列表。使用这些密钥进行身份验证的包将被认为是可信的。
不赞成使用apt-key,除非在维护脚本中使用apt-key del从主密钥环中删除现有的密钥。
如果希望使用apt-key,则需要额外安装GNU Privacy Guard套件(打包在gnupg中)。
root@xxx:/# apt-key list
E: gnupg, gnupg2 and gnupg1 do not seem to be installed, but one of them is required for this operation
root@xxx:/# apt-key adv --keyserver keyserver.ubuntu.com --recv-keys B7B3B788A8D3785C
E: gnupg, gnupg2 and gnupg1 do not seem to be installed, but one of them is required for this operation
- 语法
apt-key [--keyring filename] {add filename | del keyid | export keyid | exportall | list | finger | adv | update | net-update | {-v | --version} | {-h | --help}}
- 命令示例
apt-key list          # 列出已保存在系统中key。
apt-key add keyname   # 把下载的key添加到本地trusted数据库中。
apt-key del keyname   # 从本地trusted数据库删除key。
apt-key update        # 更新本地trusted数据库,删除过期没用的key。
FAQ for APT
Q: 本地APT源的制作/配置?
- 下载 Debian ISO安装包
mkdir -p /iso
cd /iso
wget https://cdimage.debian.org/cdimage/archive/11.11.0/amd64/iso-dvd/debian-11.11.0-amd64-DVD-1.iso

ln -s /iso/debian-11.11.0-amd64-DVD-1.iso /iso/debian.iso
ls -la /iso

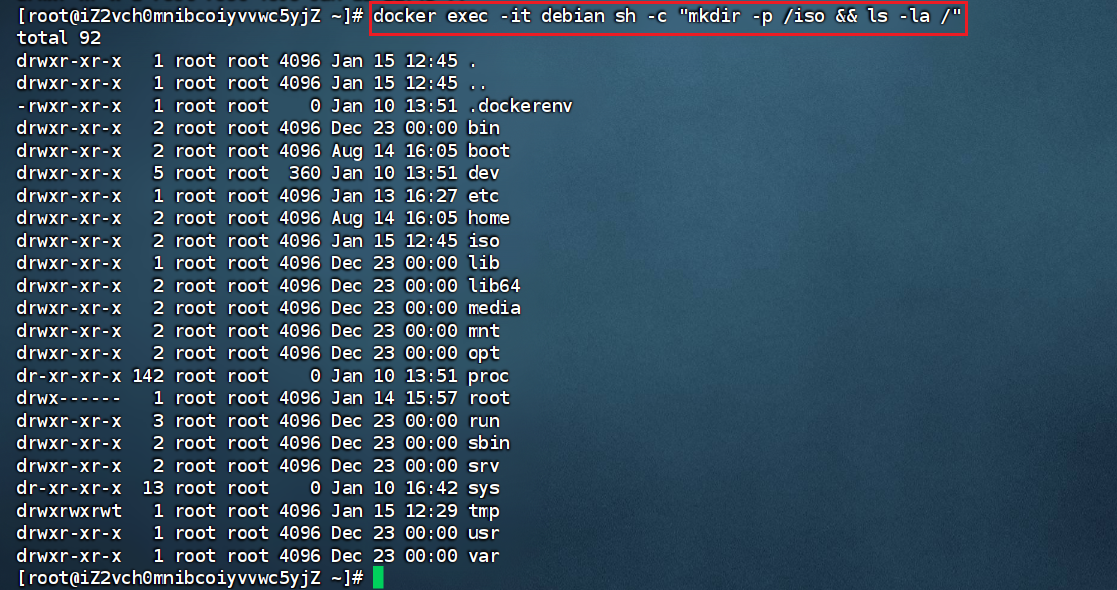
【补充/了解即可】:从宿主机 拷贝 debian iso 包到 debian 容器:
docker exec -it debian sh -c "mkdir -p /iso && ls -la /"
docker exec -it debian sh -c "mkdir -p /iso && ls -la /"
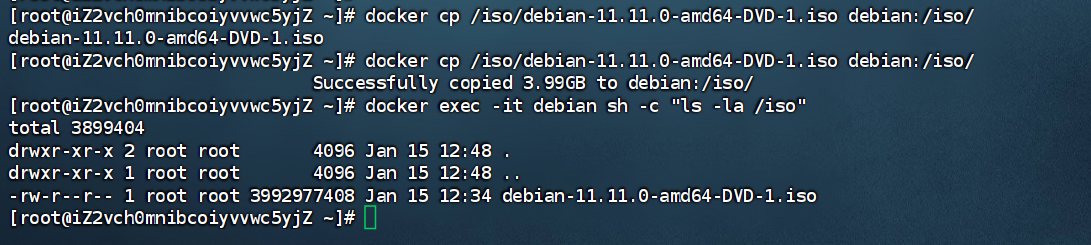
docker cp /iso/debian-11.11.0-amd64-DVD-1.iso debian:/iso/
docker exec -it debian sh -c "ls -la /iso"
- 用光盘的DEB包做APT源
## 挂载到本地目录 /mediat | 方式1
mount /dev/sr0 /media

或: 方式2 【推荐】
mkdir -p /mnt/os_iso
# [已注释] mount /iso/debian-11.11.0-amd64-DVD-1.iso /mnt/os_iso
echo "/iso/debian-11.11.0-amd64-DVD-1.iso /mnt/os_iso/ iso9660 defaults 0 0" >> /etc/fstab
mount -a
ls -la /mnt/os_iso/

## 查看光盘中的内容 | 方式1
root@localhost:~# ls /media
boot  casper  dists  EFI  install  isolinux  md5sum.txt  pics  pool  preseed  README.diskdefines  ubuntu


## 查看光盘中的内容 | 方式2
root@45ab3532cffb:/# ls -la /mnt/os_iso/
total 1213
dr-xr-xr-x 1 root root   4096 Aug 31 14:12 .
drwxr-xr-x 1 root root   4096 Jan 15 12:53 ..
dr-xr-xr-x 1 root root   2048 Aug 31 15:57 .disk
dr-xr-xr-x 1 root root   2048 Aug 31 14:05 EFI
-r--r--r-- 1 root root   9127 Aug 31 15:51 README.html
-r--r--r-- 1 root root    291 Mar  4  2017 README.mirrors.html
-r--r--r-- 1 root root     86 Mar  4  2017 README.mirrors.txt
-r--r--r-- 1 root root    543 Aug 31 14:05 README.source
-r--r--r-- 1 root root   5722 Aug 31 15:51 README.txt
-r--r--r-- 1 root root    146 Aug 31 14:05 autorun.inf
dr-xr-xr-x 1 root root   2048 Aug 31 14:05 boot
dr-xr-xr-x 1 root root   2048 Aug 31 14:05 css
lr-xr-xr-x 1 root root      1 Aug 31 14:05 debian -> .
dr-xr-xr-x 1 root root   2048 Aug 31 14:05 dists
dr-xr-xr-x 1 root root   4096 Aug 31 14:05 doc
dr-xr-xr-x 1 root root   2048 Aug 31 14:06 firmware
-r--r--r-- 1 root root 184032 Aug 27 06:14 g2ldr
-r--r--r-- 1 root root   8192 Aug 27 06:14 g2ldr.mbr
dr-xr-xr-x 1 root root   2048 Aug 31 14:05 install
dr-xr-xr-x 1 root root   2048 Aug 31 14:05 install.amd
dr-xr-xr-x 1 root root   6144 Aug 31 14:05 isolinux
-r--r--r-- 1 root root 622784 Aug 31 15:51 md5sum.txt
dr-xr-xr-x 1 root root   4096 Aug 31 14:05 pics
dr-xr-xr-x 1 root root   2048 Aug 31 14:10 pool
-r--r--r-- 1 root root 364571 Aug 27 06:14 setup.exe
dr-xr-xr-x 1 root root   2048 Aug 31 14:05 tools
-r--r--r-- 1 root root    233 Aug 31 14:05 win32-loader.ini
- 文件源列表做为系统安装源
方式1
root@localhost:~# apt-cdrom -m -d=/media add
Using CD-ROM mount point /media/
Identifying... [58ecf08394a7839a724e0c034df13779-2]
Scanning disc for index files...
Found 4 package indexes, 0 source indexes, 0 translation indexes and 1 signatures
This disc is called:
... ... ...
+ 添加CDROM源: 使用
apt-cdrom add命令可以将当前光盘驱动器中的Debian安装光盘添加到sources.list文件源列表中作为系统安装源。该命令会卸载CD设备,提示插入光盘,然后扫描光盘并复制索引文件。
-m,--no-mount: 不挂载CDROM,阻止apt-cdrom挂载和卸载挂载点。-d,--cdrom: 指定CDROM的挂载点,该挂载点必须在/etc/fstab文件中列出并且适当配置。-a,--thorough: 彻底扫描CDROM,检查可能的坏块-f,--fast:快速模式,假定文件有效且不需要检查。该选项只应在apt-cdrom已经在这张光盘运行过且没有任何错误的情况下使用。
方式2
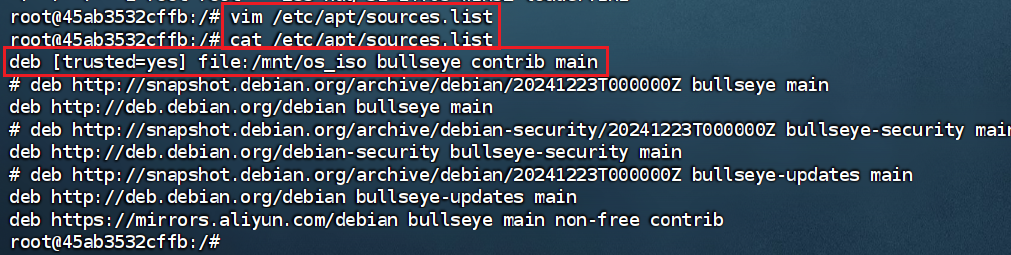
vim /etc/apt/sources.list,手动添加:
deb [trusted=yes] file:/mnt/os_iso bullseye contrib main
在
APT源地址中添加trusted=yes的作用是允许APT包管理器信任该源,从而避免在安装软件时出现NO_PUBKEY错误。
当你在sources.list文件中添加一个源地址时,如果该源没有GPG签名,APT默认不会信任该源,这会导致安装软件时出现错误。
- 查看APT源配置文件
root@xxx:/# cat /etc/apt/sources.list
deb [trusted=yes] file:/mnt/os_iso bullseye contrib main
# deb http://snapshot.debian.org/archive/debian/20241223T000000Z bullseye main
deb http://deb.debian.org/debian bullseye main
# deb http://snapshot.debian.org/archive/debian-security/20241223T000000Z bullseye-security main
deb http://deb.debian.org/debian-security bullseye-security main
# deb http://snapshot.debian.org/archive/debian/20241223T000000Z bullseye-updates main
deb http://deb.debian.org/debian bullseye-updates main
deb https://mirrors.aliyun.com/debian bullseye main non-free contrib

root@xxx:/# ls -la /etc/apt/

- 更新存储库索引
root@xxx:~# apt-get clean
root@xxx:/# apt-get update
Get:1 file:/mnt/os_iso bullseye InRelease
Ign:1 file:/mnt/os_iso bullseye InRelease
Get:2 file:/mnt/os_iso bullseye Release [20.0 kB]
Get:2 file:/mnt/os_iso bullseye Release [20.0 kB]
Get:3 file:/mnt/os_iso bullseye Release.gpg
Ign:3 file:/mnt/os_iso bullseye Release.gpg
Get:4 file:/mnt/os_iso bullseye/main amd64 Packages [1003 kB]
Ign:4 file:/mnt/os_iso bullseye/main amd64 Packages
Get:5 file:/mnt/os_iso bullseye/contrib amd64 Packages [399 B]
Ign:5 file:/mnt/os_iso bullseye/contrib amd64 Packages
Get:4 file:/mnt/os_iso bullseye/main amd64 Packages [1003 kB]
Get:5 file:/mnt/os_iso bullseye/contrib amd64 Packages [399 B]
Get:6 https://mirrors.aliyun.com/debian bullseye InRelease [116 kB]
Get:7 https://mirrors.aliyun.com/debian bullseye/contrib amd64 Packages [50.4 kB]
Get:8 https://mirrors.aliyun.com/debian bullseye/non-free amd64 Packages [96.4 kB]
Get:9 https://mirrors.aliyun.com/debian bullseye/main amd64 Packages [8066 kB]
Hit:10 http://deb.debian.org/debian bullseye InRelease
Get:11 http://deb.debian.org/debian-security bullseye-security InRelease [27.2 kB]
Get:12 http://deb.debian.org/debian bullseye-updates InRelease [44.1 kB]
Get:13 http://deb.debian.org/debian-security bullseye-security/main amd64 Packages [334 kB]
Fetched 8734 kB in 1min 2s (140 kB/s)
Reading package lists... Done
- 尝试安装软件
apt install apache2
Q: 如何配置网络APT源?
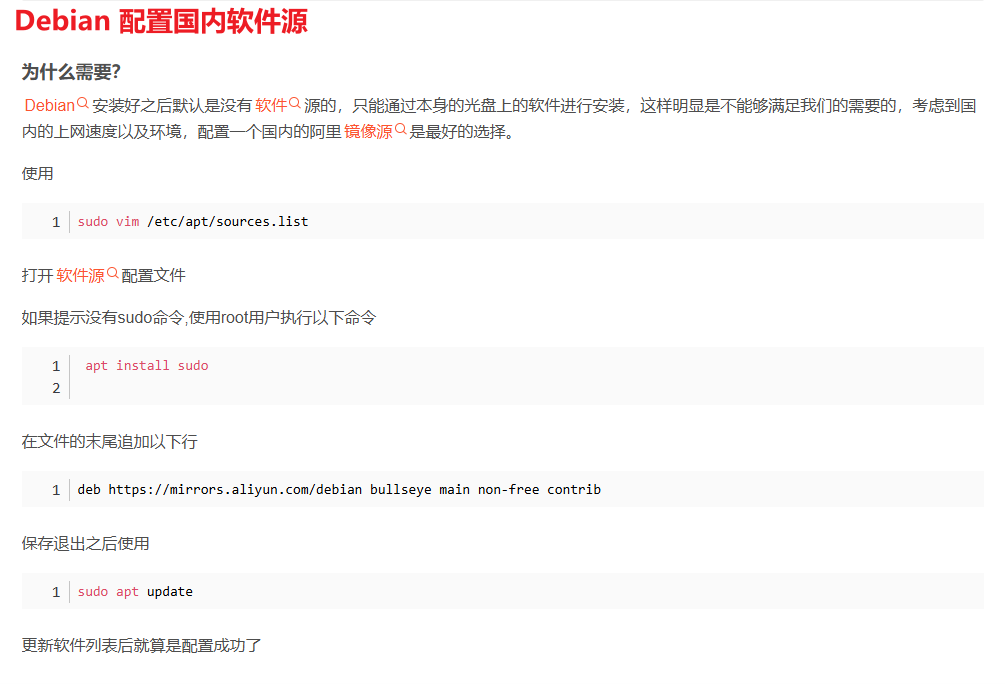
【最佳实践】Debian安装好之后默认是没有软件源的,只能通过本身的光盘上的软件进行安装,这样明显是不能够满足我们的需要的,考虑到国内的上网速度以及环境,配置一个国内的阿里镜像源是最好的选择。
如下仅仅是一个最快的简单配置方式
cp /etc/apt/sources.list /etc/apt/sources.list.bak

//文本末尾追加如下镜像源
sed -i '$a deb [trusted=yes] https://mirrors.aliyun.com/debian bullseye main non-free contrib' /etc/apt/sources.list
【正式开始】
- 备份配置文件
root@localhost:~# mv /etc/apt/sources.list /etc/apt/sources.list.bak
- 编写配置文件
以下配置文件内容选一即可,其他版本对应修改版本名称即可,版本名称见下表
| 版本号 | 版本名称 |
|---|---|
| 12.04LTS | precise |
| 14.04LTS | trusty |
| 16.04LTS | xenial |
| 18.04LTS | bionic |
| 20.04LTS | focal |
| 21.04 | hirsute |
| 21.14 | impish |
root@localhost:~# vim /etc/apt/sources.list
0)默认的源(debian:bullseye-slim)
docker镜像 :
debian:bullseye-slim内部的默认源
//镜像内部,查看默认的源
root@xxx:~# cat /etc/apt/sources.list
# deb http://snapshot.debian.org/archive/debian/20241223T000000Z bullseye main
deb http://deb.debian.org/debian bullseye main
# deb http://snapshot.debian.org/archive/debian-security/20241223T000000Z bullseye-security main
deb http://deb.debian.org/debian-security bullseye-security main
# deb http://snapshot.debian.org/archive/debian/20241223T000000Z bullseye-updates main
deb http://deb.debian.org/debian bullseye-updates main
1)阿里源(ubuntu 16.04)
# 默认注释了源码镜像以提高 apt update 速度,如有需要可自行取消注释
deb http://mirrors.aliyun.com/ubuntu/ xenial main
#deb-src http://mirrors.aliyun.com/ubuntu/ xenial main
deb http://mirrors.aliyun.com/ubuntu/ xenial-updates main
#deb-src http://mirrors.aliyun.com/ubuntu/ xenial-updates main
deb http://mirrors.aliyun.com/ubuntu/ xenial universe
#deb-src http://mirrors.aliyun.com/ubuntu/ xenial universe
deb http://mirrors.aliyun.com/ubuntu/ xenial-updates universe
#deb-src http://mirrors.aliyun.com/ubuntu/ xenial-updates universe
deb http://mirrors.aliyun.com/ubuntu/ xenial-security main
#deb-src http://mirrors.aliyun.com/ubuntu/ xenial-security main
deb http://mirrors.aliyun.com/ubuntu/ xenial-security universe
#deb-src http://mirrors.aliyun.com/ubuntu/ xenial-security universe
2)清华源(ubuntu 16.04)
# 默认注释了源码镜像以提高 apt update 速度,如有需要可自行取消注释
deb https://mirrors.tuna.tsinghua.edu.cn/ubuntu/ xenial main restricted universe multiverse
# deb-src https://mirrors.tuna.tsinghua.edu.cn/ubuntu/ xenial main restricted universe multiverse
deb https://mirrors.tuna.tsinghua.edu.cn/ubuntu/ xenial-updates main restricted universe multiverse
# deb-src https://mirrors.tuna.tsinghua.edu.cn/ubuntu/ xenial-updates main restricted universe multiverse
deb https://mirrors.tuna.tsinghua.edu.cn/ubuntu/ xenial-backports main restricted universe multiverse
# deb-src https://mirrors.tuna.tsinghua.edu.cn/ubuntu/ xenial-backports main restricted universe multiverse
deb https://mirrors.tuna.tsinghua.edu.cn/ubuntu/ xenial-security main restricted universe multiverse
# deb-src https://mirrors.tuna.tsinghua.edu.cn/ubuntu/ xenial-security main restricted universe multiverse
3)网易源(ubuntu 16.04)
# 默认注释了源码镜像以提高 apt update 速度,如有需要可自行取消注释
deb http://uni.mirrors.163.com/ubuntu/ xenial main restricted universe multiverse
#deb-src http://uni.mirrors.163.com/ubuntu/ xenial main restricted universe multiverse
deb http://uni.mirrors.163.com/ubuntu/ xenial-security main restricted universe multiverse
#deb-src http://uni.mirrors.163.com/ubuntu/ xenial-security main restricted universe multiverse
deb http://uni.mirrors.163.com/ubuntu/ xenial-updates main restricted universe multiverse
#deb-src http://uni.mirrors.163.com/ubuntu/ xenial-updates main restricted universe multiverse
deb http://uni.mirrors.163.com/ubuntu/ xenial-proposed main restricted universe multiverse
#deb-src http://uni.mirrors.163.com/ubuntu/ xenial-proposed main restricted universe multiverse
deb http://uni.mirrors.163.com/ubuntu/ xenial-backports main restricted universe multiverse
#deb-src http://uni.mirrors.163.com/ubuntu/ xenial-backports main restricted universe multiverse
4)搜狐源(ubuntu 16.04)
# 默认注释了源码镜像以提高 apt update 速度,如有需要可自行取消注释
deb http://mirrors.sohu.com/ubuntu/ xenial-updates main restricted
#deb-src http://mirrors.sohu.com/ubuntu/ xenial-updates main restricted
deb http://mirrors.sohu.com/ubuntu/ xenial universe
#deb-src http://mirrors.sohu.com/ubuntu/ xenial universe
deb http://mirrors.sohu.com/ubuntu/ xenial-updates universe
#deb-src http://mirrors.sohu.com/ubuntu/ xenial-updates universe
deb http://mirrors.sohu.com/ubuntu/ xenial multiverse
#deb-src http://mirrors.sohu.com/ubuntu/ xenial multiverse
deb http://mirrors.sohu.com/ubuntu/ xenial-updates multiverse
#deb-src http://mirrors.sohu.com/ubuntu/ xenial-updates multiverse
deb http://mirrors.sohu.com/ubuntu/ xenial-backports main restricted universe multiverse
#deb-src http://mirrors.sohu.com/ubuntu/ xenial-backports main restricted universe multiverse
5)中科大源(ubuntu 16.04)
# 默认注释了源码镜像以提高 apt update 速度,如有需要可自行取消注释
deb http://mirrors.ustc.edu.cn/ubuntu/ xenial-updates main restricted
#deb-src http://mirrors.ustc.edu.cn/ubuntu/ xenial-updates main restricted
deb http://mirrors.ustc.edu.cn/ubuntu/ xenial universe
#deb-src http://mirrors.ustc.edu.cn/ubuntu/ xenial universe
deb http://mirrors.ustc.edu.cn/ubuntu/ xenial-updates universe
#deb-src http://mirrors.ustc.edu.cn/ubuntu/ xenial-updates universe
deb http://mirrors.ustc.edu.cn/ubuntu/ xenial multiverse
#deb-src http://mirrors.ustc.edu.cn/ubuntu/ xenial multiverse
deb http://mirrors.ustc.edu.cn/ubuntu/ xenial-updates multiverse
#deb-src http://mirrors.ustc.edu.cn/ubuntu/ xenial-updates multiverse
deb http://mirrors.ustc.edu.cn/ubuntu/ xenial-backports main restricted universe multiverse
#deb-src http://mirrors.ustc.edu.cn/ubuntu/ xenial-backports main restricted universe multiverse

#deb http://security.ubuntu.com/ubuntu xenial-security main restricted
#deb-src http://security.ubuntu.com/ubuntu xenial-security main restricted
#deb http://security.ubuntu.com/ubuntu xenial-security universe
#deb-src http://security.ubuntu.com/ubuntu xenial-security universe
#deb http://security.ubuntu.com/ubuntu xenial-security multiverse
#deb-src http://security.ubuntu.com/ubuntu xenial-security multiverse
Q: 设置APT的源? (实操记录)
方式1(推荐)
- 推荐文献
Ubuntu 镜像 - https://developer.aliyun.com/mirror/ubuntu
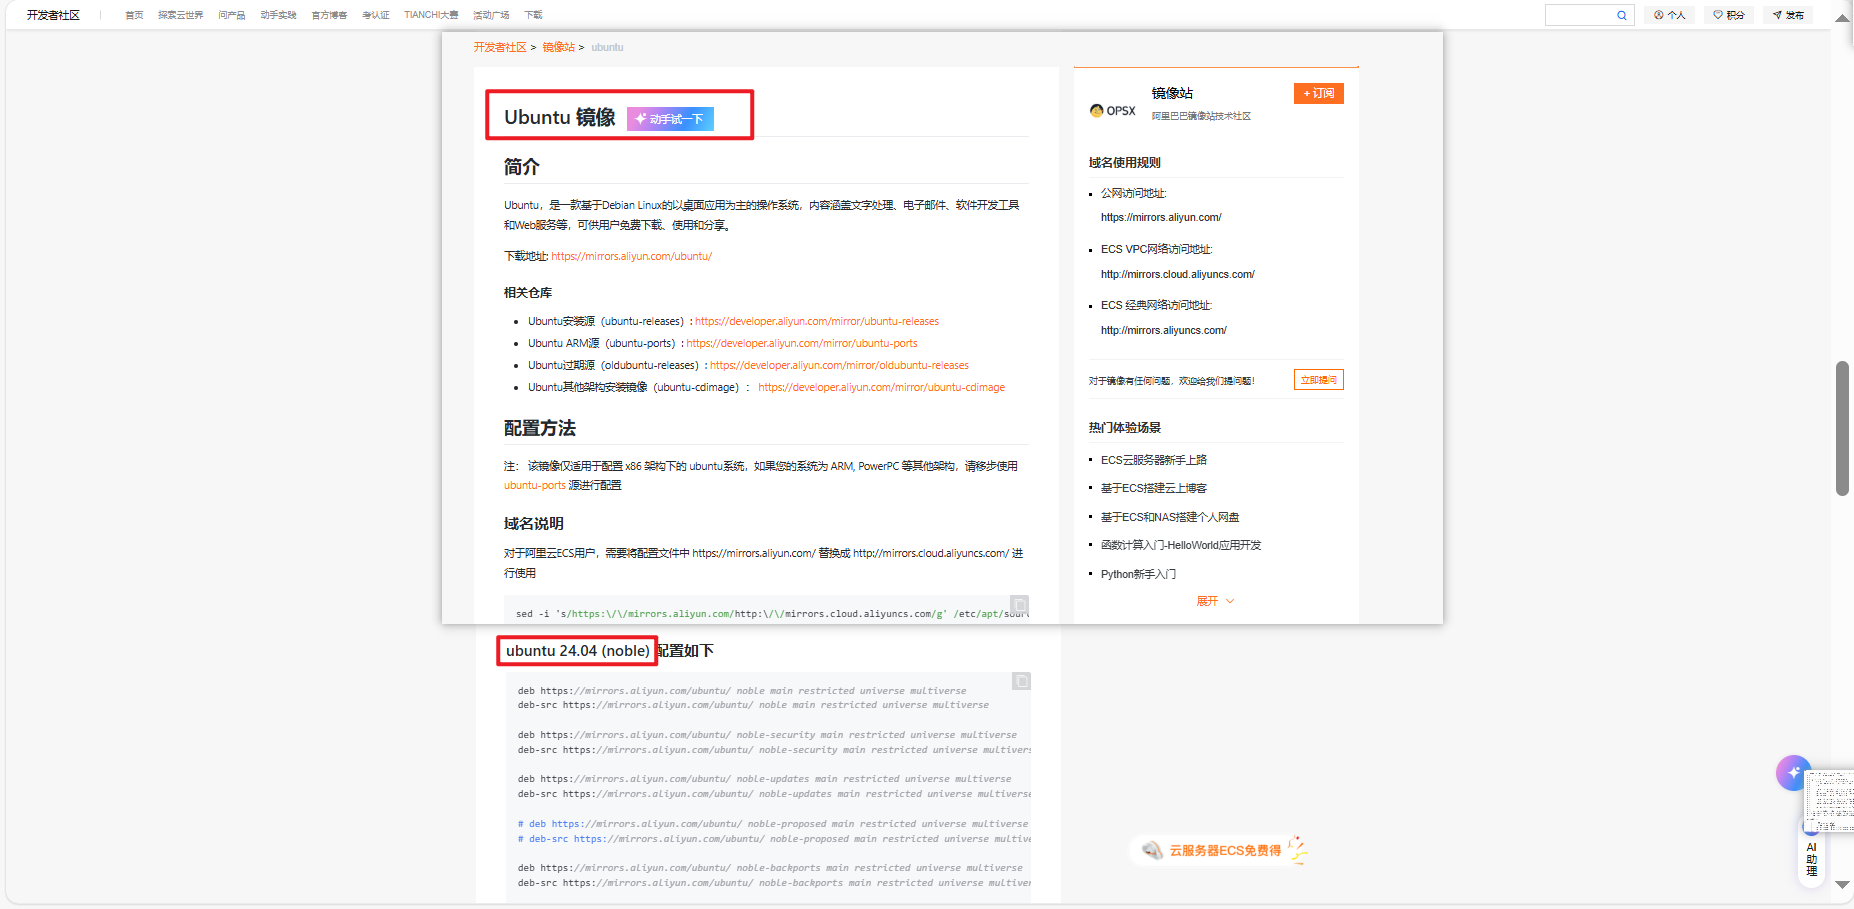
- 以物理机 Ubuntu 为例:
sed -i 's#http[s]*://[^/]*#http://mirrors.aliyun.com#g' /etc/apt/sources.list
apt-get update
- 以在 Docker 环境为例:
- Dockerfile
# OS: Ubuntu 24.04
FROM swr.cn-north-4.myhuaweicloud.com/xxx/eclipse-temurin:17-noble

COPY ./target/*.jar /app.jar
COPY ./target/classes/xxx/ /xxx/

# install : python + pip (前置操作: 更新 apt 源)
RUN sed -i 's#http[s]*://[^/]*#http://mirrors.aliyun.com#g' /etc/apt/sources.list \
  && apt-get update \
  && apt-get -y install vim \
  && apt-get -y install --no-install-recommends python3 python3-pip python3-venv \
  && python3 -m venv $HOME/.venv \
  && . $HOME/.venv/bin/activate \ # 注:Linux 中 高版本 Python (3.5以上),必须在虚拟环境下方可正常安装所需依赖包
  && pip install -i https://mirrors.aliyun.com/pypi/simple/ can cantools
#   && echo "alias python=python3" >> ~/.bashrc \ # Java程序的子进程调用中试验:未此行命令未生效;但开发者独自登录 docker 容器内,有生效
#   && echo '. $HOME/.venv/bin/activate' >> ~/.bashrc \ # Java程序的子进程调用中试验:未此行命令未生效;但开发者独自登录 docker 容器内,有生效
#   && echo 'export PYTHON=$HOME/.venv/bin/python' >> /etc/profile \ # Java程序的子进程调用中试验:未此行命令未生效;但开发者独自登录 docker 容器内,有生效

#  && echo '. /etc/profile' > $HOME/app.sh \ # Java程序的子进程调用中试验:未测通,有衍生问题未解决掉
#  && echo 'java ${JAVA_OPTS:-} -jar app.jar > /dev/null 2>&1 &' >> $HOME/app.sh \  # Java程序的子进程调用中试验:未测通,有衍生问题未解决掉
#  && echo 'java ${JAVA_OPTS:-} -jar app.jar' >> $HOME/app.sh \  # Java程序的子进程调用中试验:未测通,有衍生问题未解决掉
#  && chmod +x $HOME/app.sh \  # Java程序的子进程调用中试验:未测通,有衍生问题未解决掉
#  && chown 777 $HOME/app.sh  # Java程序的子进程调用中试验:未测通,有衍生问题未解决掉


EXPOSE 8080

# ENTRYPOINT exec sh $HOME/app.sh # Java程序的子进程调用中试验:未测通,有衍生问题未解决掉
ENTRYPOINT exec java ${JAVA_OPTS:-} -DPYTHON=$HOME/.venv/bin/python -jar app.jar # 通过 Java 获取 JVM 参数( System.getProperty("PYTHON") ) 方式获取 【 Python 可执行文件的绝对路径】的值
方式2(不推荐)
- 备份原来默认的源 ,并设置新的源
cp /etc/apt/sources.list /etc/apt/sources.list.bak
echo "" > /etc/apt/sources.list
echo "deb http://mirrors.aliyun.com/ubuntu/ xenial main" >> /etc/apt/sources.list
echo "deb http://mirrors.aliyun.com/ubuntu/ xenial-updates main" >> /etc/apt/sources.list
echo "deb http://mirrors.aliyun.com/ubuntu/ xenial universe" >> /etc/apt/sources.list
echo "deb http://mirrors.aliyun.com/ubuntu/ xenial-updates universe" >> /etc/apt/sources.list
echo "deb http://mirrors.aliyun.com/ubuntu/ xenial-security main" >> /etc/apt/sources.list
echo "deb http://mirrors.aliyun.com/ubuntu/ xenial-security universe" >> /etc/apt/sources.list
- 添加源仓库的公钥
apt-key adv --keyserver keyserver.ubuntu.com --recv-keys 3B4FE6ACC0B21F32 40976EAF437D05B5
此举是为了避免报错:
root@xxl-job-admin-xxx-xxx:/# apt-get update
Get:1 http://mirrors.aliyun.com/ubuntu xenial InRelease [247 kB]
Get:2 http://mirrors.aliyun.com/ubuntu xenial-updates InRelease [106 kB]
Err:1 http://mirrors.aliyun.com/ubuntu xenial InRelease
  The following signatures couldn't be verified because the public key is not available: NO_PUBKEY 40976EAF437D05B5 NO_PUBKEY 3B4FE6ACC0B21F32
Get:3 http://mirrors.aliyun.com/ubuntu xenial-security InRelease [106 kB]
Err:2 http://mirrors.aliyun.com/ubuntu xenial-updates InRelease
  The following signatures couldn't be verified because the public key is not available: NO_PUBKEY 40976EAF437D05B5 NO_PUBKEY 3B4FE6ACC0B21F32
Err:3 http://mirrors.aliyun.com/ubuntu xenial-security InRelease
  The following signatures couldn't be verified because the public key is not available: NO_PUBKEY 40976EAF437D05B5 NO_PUBKEY 3B4FE6ACC0B21F32
Reading package lists... Done
W: GPG error: http://mirrors.aliyun.com/ubuntu xenial InRelease: The following signatures couldn't be verified because the public key is not available: NO_PUBKEY 40976EAF437D05B5 NO_PUBKEY 3B4FE6ACC0B21F32
E: The repository 'http://mirrors.aliyun.com/ubuntu xenial InRelease' is not signed.
N: Updating from such a repository can't be done securely, and is therefore disabled by default.
N: See apt-secure(8) manpage for repository creation and user configuration details.
W: GPG error: http://mirrors.aliyun.com/ubuntu xenial-updates InRelease: The following signatures couldn't be verified because the public key is not available: NO_PUBKEY 40976EAF437D05B5 NO_PUBKEY 3B4FE6ACC0B21F32
E: The repository 'http://mirrors.aliyun.com/ubuntu xenial-updates InRelease' is not signed.
N: Updating from such a repository can't be done securely, and is therefore disabled by default.
N: See apt-secure(8) manpage for repository creation and user configuration details.
W: GPG error: http://mirrors.aliyun.com/ubuntu xenial-security InRelease: The following signatures couldn't be verified because the public key is not available: NO_PUBKEY 40976EAF437D05B5 NO_PUBKEY 3B4FE6ACC0B21F32
E: The repository 'http://mirrors.aliyun.com/ubuntu xenial-security InRelease' is not signed.
N: Updating from such a repository can't be done securely, and is therefore disabled by default.
N: See apt-secure(8) manpage for repository creation and user configuration details.
- 更新
root@xxl-job-admin-xxxx-xxxx:/# apt-get update
Get:1 http://mirrors.aliyun.com/ubuntu xenial InRelease [247 kB]
Get:2 http://mirrors.aliyun.com/ubuntu xenial-updates InRelease [106 kB]
Get:3 http://mirrors.aliyun.com/ubuntu xenial-security InRelease [106 kB]
Get:4 http://mirrors.aliyun.com/ubuntu xenial/main amd64 Packages [1201 kB]
Get:5 http://mirrors.aliyun.com/ubuntu xenial/universe amd64 Packages [7532 kB]
Get:6 http://mirrors.aliyun.com/ubuntu xenial-updates/universe amd64 Packages [1171 kB]
Get:7 http://mirrors.aliyun.com/ubuntu xenial-updates/main amd64 Packages [1269 kB]
Get:8 http://mirrors.aliyun.com/ubuntu xenial-security/universe amd64 Packages [740 kB]
Get:9 http://mirrors.aliyun.com/ubuntu xenial-security/main amd64 Packages [913 kB]
Fetched 12.8 MB in 2s (5703 kB/s)
Reading package lists... Done


root@xxl-job-admin-xxxx-xxxx:/# apt update
Hit:1 http://mirrors.aliyun.com/ubuntu xenial InRelease
Hit:2 http://mirrors.aliyun.com/ubuntu xenial-updates InRelease
Hit:3 http://mirrors.aliyun.com/ubuntu xenial-security InRelease
Hit:4 http://security.ubuntu.com/ubuntu noble-security InRelease
Hit:5 http://archive.ubuntu.com/ubuntu noble InRelease
Hit:6 http://archive.ubuntu.com/ubuntu noble-updates InRelease
Hit:7 http://archive.ubuntu.com/ubuntu noble-backports InRelease
Reading package lists... Done
Building dependency tree... Done
Reading state information... Done
52 packages can be upgraded. Run 'apt list --upgradable' to see them.
W: http://mirrors.aliyun.com/ubuntu/dists/xenial/InRelease: Key is stored in legacy trusted.gpg keyring (/etc/apt/trusted.gpg), see the DEPRECATION section in apt-key(8) for details.
W: http://mirrors.aliyun.com/ubuntu/dists/xenial-updates/InRelease: Key is stored in legacy trusted.gpg keyring (/etc/apt/trusted.gpg), see the DEPRECATION section in apt-key(8) for details.
W: http://mirrors.aliyun.com/ubuntu/dists/xenial-security/InRelease: Key is stored in legacy trusted.gpg keyring (/etc/apt/trusted.gpg), see the DEPRECATION section in apt-key(8) for details.
- 推荐文献
- 解决apt-get错误:The repository ‘http://mirrors.aliyun.com/ubuntu xenial InRelease‘ is not signed. - CSDN
一般是因为公钥缺少,apt无法验证软件包的签名。
sudo apt-key adv --keyserver keyserver.ubuntu.com --recv-keys 3B4FE6ACC0B21F32
Q: apt install xxx与apt-get install xxx的区别?
apt和apt-get都是Debian及其衍生发行版(如Ubuntu)中用于包管理的命令行工具。它们都用于安装、更新、删除软件包等操作,但有一些细微的差别:
- 用户界面和输出
- apt:
apt 提供了更友好的用户界面和更简洁的输出。
在安装和更新软件包时,apt 会自动处理依赖关系,并且在安装过程中显示进度条。
apt 会在操作完成后自动清理不必要的软件包(即自动运行apt autoremove)。
- apt-get:
apt-get 的输出更为详细,适合需要更多调试信息的用户。
apt-get 不会自动清理不必要的软件包,需要手动运行apt-get autoremove来清理。
- 命令行选项
- apt:
apt 提供了一些更现代的命令行选项,例如 apt install、apt update、apt upgrade 等。
apt 支持--simulate选项,用于模拟安装操作,显示将要安装的软件包列表,但不实际安装。
- apt-get:
apt-get 的命令行选项更为传统,例如 apt-get install、apt-get update、apt-get upgrade 等。
apt-get 也支持类似的模拟选项,如 apt-get -s install。
- 依赖关系处理
- apt:
apt 在处理依赖关系时更为智能,会自动解决依赖问题,并且在安装过程中提供更清晰的提示。
apt 会在安装前显示将要安装、升级、删除的软件包列表,让用户有更多机会确认操作。
- apt-get:
apt-get 也会处理依赖关系,但输出更为详细,可能会让用户感到信息过多。
apt-get 在安装前也会显示将要安装、升级、删除的软件包列表,但格式不如 apt 清晰。
- 性能
- apt:
apt 在某些情况下可能会比 apt-get 稍微慢一些,因为它会自动执行一些额外的操作,如自动清理不必要的软件包。
- apt-get:
apt-get 通常执行速度更快,因为它只执行用户指定的操作,不会自动执行额外的清理操作。
- 历史和兼容性
- apt-get:
apt-get 是较早的包管理工具,已经存在了很多年,许多脚本和自动化工具都使用 apt-get。
apt-get 在某些旧版本的Debian系统中可能更稳定。
- apt:
apt 是较新的工具,旨在提供更友好的用户体验。
apt 在较新的Debian和Ubuntu版本中更为推荐使用。
- 总结
- 新手用户:推荐使用
apt,因为它提供了更友好的用户界面和更简洁的输出。- 高级用户和自动化脚本:可以继续使用
apt-get,因为它提供了更多的详细信息和控制选项。- 在大多数情况下,
apt和apt-get可以互换使用,选择哪个工具主要取决于个人偏好。
Q: Ubuntu 的apt软件包兼容Debian吗?
+ Ubuntu的APT软件包兼容Debian。
Debian和Ubuntu都使用APT(Advanced Package Tool)作为主要的软件包管理工具
理论上,Debian应该能够安装和管理Ubuntu的软件包,因为它们都遵循相同的软件包格式(.deb)
Debian和Ubuntu之间有着密切的关系,Ubuntu是基于Debian的一个分支或衍生版。因此,Debian可以运行Ubuntu软件,但需要注意一些细节:
- 然而,由于
Ubuntu对软件包进行了筛选和调整,以适应自己的目标用户,因此在某些情况下,Debian用户可能需要手动解决【依赖关系】或【兼容性问题】。
- 实际操作的注意事项
- 依赖关系:Debian的软件包可能不包含Ubuntu软件所需的依赖项,或者依赖项的版本不兼容。
- 软件源:Ubuntu的软件包可能来源于Ubuntu特定的软件源,这些源在Debian上可能不可用。
- 更新和维护:由于Debian和Ubuntu的更新策略不同,某些软件在Debian上的版本可能较旧,或者缺乏最新的安全更新。
尽管Debian和Ubuntu在软件包管理上具有很高的兼容性,但在实际操作中可能会遇到依赖关系、软件源和更新维护等问题。
因此,在尝试运行Ubuntu软件之前,建议仔细检查依赖项,并考虑使用PPA或其他方法来解决兼容性问题。
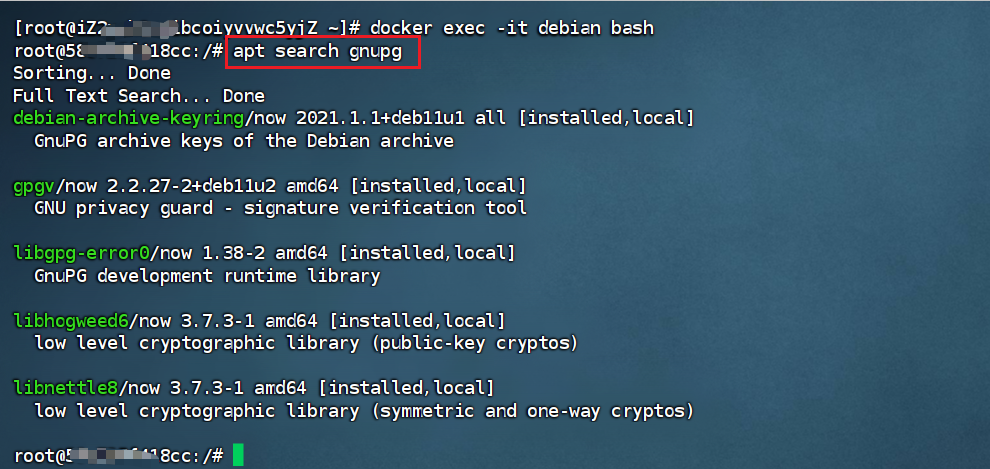
Q: 刚通过Docker镜像安装的Debian,使用apt-key命令配置APT的公钥时(apt-key adv --keyserver ...等)时,报:"E: gnupg, gnupg2 and gnupg1 do not seem to be installed, but one of them is required for this operation"
- 问题描述
刚通过Docker镜像安装的Debian,使用
apt-key命令配置APT的公钥时(apt-key adv --keyserver ...等)时,报:"E: gnupg, gnupg2 and gnupg1 do not seem to be installed, but one of them is required for this operation"
//docker run -it --name debian -d docker.1ms.run/debian:bullseye-slim
[root@yyyy ~]# docker run -it --name debian -d debian:bullseye-slim

//进入 docker 容器
[root@yyyy ~]# docker exec -it debian bash
root@xxx:/# apt-key list
E: gnupg, gnupg2 and gnupg1 do not seem to be installed, but one of them is required for this operation
root@xxx:/# apt-key adv --keyserver keyserver.ubuntu.com --recv-keys B7B3B788A8D3785C
E: gnupg, gnupg2 and gnupg1 do not seem to be installed, but one of them is required for this operation
E:
gnupg、gnupg2和gnupg1似乎没有安装,但此操作需要其中之一
- 问题分析
【Debian官网的命令描述】
虽然已被遗弃,但apt-key(8)将在Debian 12和Ubuntu 24.04中持续可用。
apt-key用于管理apt用于对包进行身份验证的密钥列表。使用这些密钥进行身份验证的包将被认为是可信的。
不赞成使用apt-key,除非在维护脚本中使用apt-key del从主密钥环中删除现有的密钥。
如果希望使用apt-key,则需要额外安装GNU Privacy Guard套件(打包在gnupg中)。
gpgv/now 2.2.27-2+deb11u2 amd64 [installed,local]
GNU privacy guard - signature verification tool
- 解决方法
- step1 配置一个可靠可用的APT源
root@xxx:/# mv /etc/apt/sources.list /etc/apt/sources.list.bak
root@xxx:/# echo "" > /etc/apt/sources.list
root@xxx:/# echo "# deb http://snapshot.debian.org/archive/debian/20241223T000000Z bullseye main" >> /etc/apt/sources.list
root@xxx:/# echo "deb http://deb.debian.org/debian bullseye main" >> /etc/apt/sources.list
root@xxx:/# echo "# deb http://snapshot.debian.org/archive/debian-security/20241223T000000Z bullseye-security main" >> /etc/apt/sources.list
root@xxx:/# echo "deb http://deb.debian.org/debian-security bullseye-security main" >> /etc/apt/sources.list
root@xxx:/# echo "# deb http://snapshot.debian.org/archive/debian/20241223T000000Z bullseye-updates main" >> /etc/apt/sources.list
root@xxx:/# echo "deb http://deb.debian.org/debian bullseye-updates main" >> /etc/apt/sources.list
root@xxx:/# echo "deb https://mirrors.aliyun.com/debian bullseye main non-free contrib" >> /etc/apt/sources.list

root@xxx:/# cat /etc/apt/sources.list
# deb http://snapshot.debian.org/archive/debian/20241223T000000Z bullseye main
deb http://deb.debian.org/debian bullseye main
# deb http://snapshot.debian.org/archive/debian-security/20241223T000000Z bullseye-security main
deb http://deb.debian.org/debian-security bullseye-security main
# deb http://snapshot.debian.org/archive/debian/20241223T000000Z bullseye-updates main
deb http://deb.debian.org/debian bullseye-updates main
deb https://mirrors.aliyun.com/debian bullseye main non-free contrib


root@xxx:/# apt-get clean
root@xxx:/# apt-get update
Err:1 https://mirrors.aliyun.com/debian bullseye InRelease
  Certificate verification failed: The certificate is NOT trusted. The certificate issuer is unknown.  Could not handshake: Error in the certificate verification. [IP: 8.141.190.240 443]
Get:2 http://deb.debian.org/debian bullseye InRelease [116 kB]
Get:3 http://deb.debian.org/debian-security bullseye-security InRelease [27.2 kB]
Get:4 http://deb.debian.org/debian bullseye-updates InRelease [44.1 kB]
Get:5 http://deb.debian.org/debian bullseye/main amd64 Packages [8066 kB]
Get:6 http://deb.debian.org/debian-security bullseye-security/main amd64 Packages [334 kB]
Get:7 http://deb.debian.org/debian bullseye-updates/main amd64 Packages [18.8 kB]
Fetched 8606 kB in 5min 29s (26.1 kB/s)
Reading package lists... Done
W: https://mirrors.aliyun.com/debian/dists/bullseye/InRelease: No system certificates available. Try installing ca-certificates.
W: Failed to fetch https://mirrors.aliyun.com/debian/dists/bullseye/InRelease  Certificate verification failed: The certificate is NOT trusted. The certificate issuer is unknown.  Could not handshake: Error in the certificate verification. [IP: 8.141.190.240 443]
W: Some index files failed to download. They have been ignored, or old ones used instead.
- step2
apt搜索gnupg、gnupg2和gnupg13个命令中能够支持安装的,安装即可
root@xxx:/# apt search gnupg
Sorting... Done
Full Text Search... Done
debian-archive-keyring/now 2021.1.1+deb11u1 all [installed,local]
  GnuPG archive keys of the Debian archive

gpgv/now 2.2.27-2+deb11u2 amd64 [installed,local]
  GNU privacy guard - signature verification tool

libgpg-error0/now 1.38-2 amd64 [installed,local]
  GnuPG development runtime library

libhogweed6/now 3.7.3-1 amd64 [installed,local]
  low level cryptographic library (public-key cryptos)

libnettle8/now 3.7.3-1 amd64 [installed,local]
  low level cryptographic library (symmetric and one-way cryptos)

root@xxx:/# apt search gnupg2
Sorting... Done
Full Text Search... Done

root@xxx:/# apt search gnupg1
Sorting... Done
Full Text Search... Done


root@xxx:/# apt install gnupg
Reading package lists... Done
Building dependency tree... Done
Reading state information... Done
The following additional packages will be installed:
  dirmngr gnupg-l10n gnupg-utils gpg gpg-agent gpg-wks-client gpg-wks-server gpgconf gpgsm libassuan0 libgpm2 libksba8 libldap-2.4-2 libldap-common
  libncursesw6 libnpth0 libreadline8 libsasl2-2 libsasl2-modules libsasl2-modules-db libsqlite3-0 pinentry-curses readline-common
Suggested packages:
  dbus-user-session libpam-systemd pinentry-gnome3 tor parcimonie xloadimage scdaemon gpm libsasl2-modules-gssapi-mit
  | libsasl2-modules-gssapi-heimdal libsasl2-modules-ldap libsasl2-modules-otp libsasl2-modules-sql pinentry-doc readline-doc
The following NEW packages will be installed:
  dirmngr gnupg gnupg-l10n gnupg-utils gpg gpg-agent gpg-wks-client gpg-wks-server gpgconf gpgsm libassuan0 libgpm2 libksba8 libldap-2.4-2
  libldap-common libncursesw6 libnpth0 libreadline8 libsasl2-2 libsasl2-modules libsasl2-modules-db libsqlite3-0 pinentry-curses readline-common
0 upgraded, 24 newly installed, 0 to remove and 0 not upgraded.
Need to get 9479 kB of archives.
After this operation, 19.5 MB of additional disk space will be used.
Do you want to continue? [Y/n] Y
Get:1 http://deb.debian.org/debian bullseye/main amd64 readline-common all 8.1-1 [73.7 kB]
Get:2 http://deb.debian.org/debian bullseye/main amd64 libreadline8 amd64 8.1-1 [169 kB]
Get:3 http://deb.debian.org/debian bullseye/main amd64 libassuan0 amd64 2.5.3-7.1 [50.5 kB]
Get:4 http://deb.debian.org/debian bullseye/main amd64 gpgconf amd64 2.2.27-2+deb11u2 [548 kB]
Get:5 http://deb.debian.org/debian bullseye/main amd64 libksba8 amd64 1.5.0-3+deb11u2 [123 kB]
...
Get:20 http://deb.debian.org/debian bullseye/main amd64 gpgsm amd64 2.2.27-2+deb11u2 [645 kB]
Get:21 http://deb.debian.org/debian bullseye/main amd64 gnupg all 2.2.27-2+deb11u2 [825 kB]
Get:22 http://deb.debian.org/debian bullseye/main amd64 libgpm2 amd64 1.20.7-8 [35.6 kB]
Get:23 http://deb.debian.org/debian bullseye/main amd64 libldap-common all 2.4.57+dfsg-3+deb11u1 [95.8 kB]
Get:24 http://deb.debian.org/debian bullseye/main amd64 libsasl2-modules amd64 2.1.27+dfsg-2.1+deb11u1 [104 kB]
Fetched 9479 kB in 7min 33s (20.9 kB/s)
debconf: delaying package configuration, since apt-utils is not installed
Selecting previously unselected package readline-common.
(Reading database ... 6670 files and directories currently installed.)
Preparing to unpack .../00-readline-common_8.1-1_all.deb ...
Progress: [  0%] [.................................................................................................................................]
Unpacking readline-common (8.1-1) .................................................................................................................]
Selecting previously unselected package libreadline8:amd64.........................................................................................]
Preparing to unpack .../01-libreadline8_8.1-1_amd64.deb ...
Unpacking libreadline8:amd64 (8.1-1) ..............................................................................................................]
Selecting previously unselected package libassuan0:amd64...........................................................................................]
Preparing to unpack .../02-libassuan0_2.5.3-7.1_amd64.deb ..
Unpacking libassuan0:amd64 (2.5.3-7.1) ............................................................................................................]
Selecting previously unselected package gpgconf....................................................................................................]
Preparing to unpack .../03-gpgconf_2.2.27-2+deb11u2_amd64.deb ...
Unpacking gpgconf (2.2.27-2+deb11u2) ..............................................................................................................]
Selecting previously unselected package libksba8:amd64.............................................................................................]
Preparing to unpack .../04-libksba8_1.5.0-3+deb11u2_amd64.deb ...
Unpacking libksba8:amd64 (1.5.0-3+deb11u2) ........................................................................................................]
Selecting previously unselected package libsasl2-modules-db:amd64..................................................................................]
Preparing to unpack .../05-libsasl2-modules-db_2.1.27+dfsg-2.1+deb11u1_amd64.deb ..
Unpacking libsasl2-modules-db:amd64 (2.1.27+dfsg-2.1+deb11u1) .....................................................................................]
Selecting previously unselected package libsasl2-2:amd64...........................................................................................]
Preparing to unpack .../06-libsasl2-2_2.1.27+dfsg-2.1+deb11u1_amd64.deb ..
Unpacking libsasl2-2:amd64 (2.1.27+dfsg-2.1+deb11u1) ..............................................................................................]
Selecting previously unselected package libldap-2.4-2:amd64........................................................................................]
Preparing to unpack .../07-libldap-2.4-2_2.4.57+dfsg-3+deb11u1_amd64.deb ...
Unpacking libldap-2.4-2:amd64 (2.4.57+dfsg-3+deb11u1) .............................................................................................]
Selecting previously unselected package libnpth0:amd64.............................................................................................]
Preparing to unpack .../08-libnpth0_1.6-3_amd64.deb ...
Unpacking libnpth0:amd64 (1.6-3) ...####...........................................................................................................]
...
Progress: [ 96%] [###########################################################################################################################......]
Setting up gnupg (2.2.27-2+deb11u2) ...########################################################################################################....]
Progress: [ 98%] [##############################################################################################################################...]
Processing triggers for libc-bin (2.31-13+deb11u11) ...##########################################################################################..]
root@xxx:/#
Q: 刚通过Docker镜像安装的Debian,安装软体(vim/curl等)时,报:"E: Unable to locate package {packageName}"
- 问题描述
在docker容器内使用VIM命令时,因为没有安装vim;所以提示安装;但是在安装过程中却抛出一下问题:
//docker run -it --name debian -d docker.1ms.run/debian:bullseye-slim
[root@yyyy ~]# docker run -it --name debian -d debian:bullseye-slim
58e725f418cc6700f4ad3b425ccd9bd43291d501e974bfb25c3eefa15eff8931

//进入 docker 容器
[root@yyyy ~]# docker exec -it debian bash
root@xxx:/# apt-get install vim
Reading package lists... Done
Building dependency tree
Reading state information... Done
E: Unable to locate package vim
wget https://http.kali.org/kali/pool/main/k/kali-archive-keyring/kali-archive-keyring_2022.1_all.deb --no-check-certificate
sudo apt install ./kali-archive-keyring_2022.1_all.deb
- 问题分析
查看当前默认的
apt源
root@xxx:~# cat /etc/apt/sources.list
# deb http://snapshot.debian.org/archive/debian/20241223T000000Z bullseye main
deb http://deb.debian.org/debian bullseye main
# deb http://snapshot.debian.org/archive/debian-security/20241223T000000Z bullseye-security main
deb http://deb.debian.org/debian-security bullseye-security main
# deb http://snapshot.debian.org/archive/debian/20241223T000000Z bullseye-updates main
deb http://deb.debian.org/debian bullseye-updates main
搜索APT内,目标软件是否可安装
root@xxx:~# apt search vim
Sorting... Done
Full Text Search... Done
验证与外网的网络连通性 //TODO
//无法使用 ping / curl / ssh / telnet / wget 等基础命令
- 解决方案
总体思路:清理并更新当前的 APT 源 或 修改为其他 APT 源
- 清理并更新 apt 源
apt-get clean

apt-get update
- 安装目标软体
apt-get install -y vim
apt-get install vim --fix-missing

apt-get install -y curl wget
- 参考文献
Q: 软件包的卸载(基于apt-get) 【必读】
- 在 Ubuntu 中,使用 apt-get 命令可以卸载软件包。以下是一些常用的卸载命令及其用途:
- 删除已安装的软件包
使用
apt-get remove命令可以删除已安装的软件包,但保留其配置文件
sudo apt-get remove package_name
- 删除软件包及其配置文件
使用
apt-get purge或apt-get --purge remove命令可以删除软件包及其配置文件
sudo apt-get purge package_name
- 自动删除无用的依赖包
使用
apt-get autoremove命令可以删除为了满足依赖而安装的,但现在不再需要的软件包
sudo apt-get autoremove
- 清理下载的软件包文件
使用
apt-get clean命令可以删除所有已下载的软件包文件
sudo apt-get clean
- 清理过期的下载文件
使用
apt-get autoclean命令可以删除已过期的下载文件
sudo apt-get autoclean
- 推荐文献
Y 推荐文献
- 《[Linux] Linux中安装软件的方式? - 博客园/千千寰宇》
- 《[Linux] 包管理器之综述【RPM/DPKG|YUM/APT】 - 博客园/千千寰宇》
- 阿里云 OPSX镜像站 - 阿里云 【推荐】
Ubuntu 镜像 - https://developer.aliyun.com/mirror/ubuntu
X 参考文献
APT的核心是依赖于一套名为dpkg的软件包管理系统,这使得Ubuntu和Debian能够共享相同的deb软件包格式。这一格式广泛应用于Linux生态系统,为两者提供了兼容性。

本文链接: https://www.cnblogs.com/johnnyzen
关于博文:评论和私信会在第一时间回复,或直接私信我。
版权声明:本博客所有文章除特别声明外,均采用 BY-NC-SA 许可协议。转载请注明出处!
日常交流:大数据与软件开发-QQ交流群: 774386015 【入群二维码】参见左下角。您的支持、鼓励是博主技术写作的重要动力!

 浙公网安备 33010602011771号