[Java SE/JDK/Spring] Java 国际化支持机制与本地资源配置管理
0 序言
在Spring context 与Spring IoC对ApplicationContext以及Context相关的设计模式进行了介绍。
ApplicationContext作为一个Context在应用的运行层提供了IoC容器、事件、国际化等功能接口。
Spring的国际化(i18n)功能是通过MessageSource接口实现的,他提供了MessageSource::getMessage方法从预设的资源中获取对应的数据。
1 JDK 国际化核心组件 : Java 标准资源绑定
1.1 java.util.ResourceBundle
概述
- 背景导入
在介绍
MessageSource之前,得先说清楚Java(J2SE)对国际化的基本实现——ResourceBundle,因为MessageSource是用它实现的。
ResourceBundle很好理解,他就是按照规范的格式放置*.properties资源文件,然后根据输入的语言环境来返回资源。
- 核心:在Java开发中,
ResourceBundle是一种方便地管理【本地化资源配置】的机制。
它可以使得程序能够根据当前系统环境的语言和国家/地区来自动加载相应的本地化资源文件,从而避免了硬编码和减少了重复的代码。
ResourceBundle类提供了软件国际化的捷径。通过此类,可以使您所编写的程序可以:- 轻松地本地化或翻译成不同的语言
- 一次处理多个语言环境
- 以后可以轻松地进行修改,支持更多的语言环境
说的简单点,这个类的作用就是读取资源属性文件(properties),然后根据.properties文件的名称信息(本地化信息),匹配当前系统的国别语言信息(也可以程序指定),然后获取相应的properties文件的内容。
step1 准备本地资源配置文件
ResourceBundle通过加载资源配置文件来实现本地化。
需要为每种语言和国家/地区准备一个对应的资源文件。
资源文件可以是.properties格式的文本文件,也可以是.class文件或.jar文件。
- 在资源文件中,需要为每个需要本地化的字符串指定一个属性名,然后为每个属性名分别提供该语言下的翻译。
例如,以下是一个名为
messages.properties的资源文件的示例:
greeting=Hello
farewell=Goodbye
- 在不同的语言和国家/地区下,可以为同一属性名提供不同的翻译。
例如,以下是名为
messages_fr.properties的法语资源文件的示例
greeting=Bonjour
farewell=Au revoir
- 资源文件的命名规范
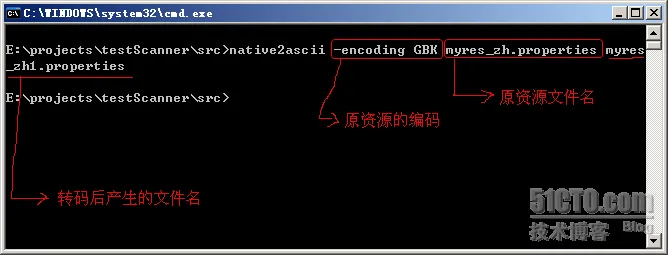
使用这个类,要注意的一点是,这个properties文件的名字是有规范的:一般的命名规范是: 自定义名_语言代码_国别代码.properties
如果是默认的,直接写为:自定义名.properties
比如:
myres_en_US.properties
myres_zh_CN.properties
myres.properties
当在中文操作系统下,如果
myres_zh_CN.properties、myres.properties两个文件都存在,则:优先会使用myres_zh_CN.properties;
当myres_zh_CN.properties不存在时候,会使用默认的myres.properties。
- 没有提供语言和地区的资源文件是系统默认的资源文件。
- 资源文件都必须是
ISO-8859-1编码。 - 因此,对于所有非西方语系的处理,都必须先将之转换为
Java Unicode Escape格式。
转换方法是通过
JDK自带的工具native2ascii.
step2 加载资源文件
方式1:java 应用程序中使用 ResourceBundle.getBundle 方法
- 在Java中,可以使用
ResourceBundle类来加载资源文件。ResourceBundle类提供了几种不同的构造函数来加载资源文件。
例如
ResourceBundle rb = ResourceBundle.getBundle("messages", Locale.getDefault());
这个语句会根据当前系统环境的默认语言和国家/地区来加载名为messages的资源文件。
如果系统环境是英语和美国,那么这个语句会加载messages.properties资源文件。
如果系统环境是法语和法国,那么这个语句会加载messages_fr.properties资源文件。
- 如果需要加载指定语言和国家/地区下的资源文件,可以使用带有
Locale参数的getBundle()方法。
例如:
Locale locale = new Locale("fr", "FR");
ResourceBundle rb = ResourceBundle.getBundle("messages", locale);
这个语句会加载名为messages_fr_FR.properties的法语/法国资源文件。
方式2:java 应用程序 log4j2 等日志框架在日志配置文件中直接加载和引用
- log4j2.properties
读取 application.properties 的配置项
${bundle:application:xx.yy.key}
step3 获取本地化资源配置值
方式1:java ResourceBundle
- 一旦成功加载了资源文件,就可以使用
ResourceBundle的getString()方法来获取本地化字符串。例如:
String greeting = rb.getString("greeting");
String farewell = rb.getString("farewell");
这些语句会从资源文件中获取属性名为greeting和farewell的本地化字符串,并将它们分别赋值给greeting和farewell变量。
如果无法找到指定的属性名,getString()方法会抛出MissingResourceException异常。
方式2:java 应用程序 log4j2 等日志框架在日志配置文件中直接加载和引用
略,参见step2
ResourceBundle 使用技巧
选择合适的资源文件格式
ResourceBundle支持多种资源文件格式,包括.properties、.xml和.class文件等。
对于简单的本地化字符串,
.properties格式通常是最常用的选择,因为它简单易用、易于编辑和本地化。
对于较复杂的本地化资源,如图像、声音、视频等,可能需要使用其他格式的资源文件。
例如,可以使用.class文件或.jar文件来包含图像或声音文件,并使用ResourceBundle的
ClassLoader.getSystemClassLoader()方法来加载这些文件
处理本地化字符串中的特殊字符
- 在本地化字符串中可能包含各种特殊字符,如换行符、制表符、Unicode字符等。如果直接将这些字符嵌入到资源文件中,可能会导致不必要的麻烦和错误。
为了避免这些问题,可以使用Java的转义字符来表示这些特殊字符。
例如,可以使用"\n"表示换行符,"\t"表示制表符,"\uXXXX"表示Unicode字符等。
处理缺失的本地化字符串
- 在某些情况下,可能存在某些语言下的本地化字符串没有提供配置项的情况。
为了避免程序出现MissingResourceException异常,可以在资源文件中为这些缺失的字符串提供一个默认的翻译,如英语翻译。
例如,以下是一个带有默认翻译的messages_fr.properties文件的示例:
greeting=Bonjour
farewell=Au revoir
warning=Attention: This message has no translation in French. Please refer to the English version.
这样,在法语环境下,如果无法找到某个属性名的本地化字符串,ResourceBundle就会自动返回该属性名的默认翻译,从而避免了程序出现异常。
处理动态本地化字符串
- 有些本地化字符串可能包含动态内容,如时间、日期、数字、货币等。
为了正确地本地化这些字符串,需要使用Java的格式化机制,如
MessageFormat和NumberFormat等。
例如,以下是一个使用MessageFormat来本地化动态字符串的示例:
String pattern = rb.getString("greeting");//"hello, {0}"
Object[] arguments = {"John"};
String greeting = MessageFormat.format(pattern, arguments);
这个示例中,pattern是一个包含占位符"
{0}"的本地化字符串,”{0}“表示需要替换为动态内容的位置。
arguments是一个包含实际动态内容的数组,它会按照顺序依次替换”{0}"的位置。
最后,MessageFormat.format()方法会返回一个本地化后的字符串。
处理多个资源文件
- 在一些情况下,可能需要使用多个资源文件来管理不同类型或不同用途的本地化资源。
在这种情况下,可以使用
ResourceBundle.Control类的方法来指定资源文件的搜索路径和加载顺序。
例如,可以使用
ResourceBundle.Control.getControl()方法来获取默认的ResourceBundle.Control实例,然后使用ResourceBundle.getBundle()方法来指定基础名称和Locale信息,以便查找合适的资源文件。
例如,以下是一个使用多个资源文件来管理本地化字符串的示例:
ResourceBundle.Control control = ResourceBundle.Control.getControl(ResourceBundle.Control.FORMAT_PROPERTIES);
ResourceBundle messages = ResourceBundle.getBundle("Messages", new Locale("fr"), control);
ResourceBundle errors = ResourceBundle.getBundle("Errors", new Locale("fr"), control);

String greeting = messages.getString("greeting");
String error = errors.getString("invalid_input");

System.out.println(greeting); // Bonjour
System.out.println(error); // Entrée invalide
在这个示例中,我们使用
ResourceBundle.Control.FORMAT_PROPERTIES指定了资源文件的格式为.properties文件
然后分别使用Messages和Errors作为基础名称来获取不同类型的资源文件。
这样,我们就可以轻松地管理不同类型的本地化资源,从而使程序更加可读和易于维护。
自定义资源加载器
- 如果默认的资源加载机制无法满足需求,我们还可以自定义资源加载器来实现更高级的功能。
- 自定义资源加载器需要继承java.util.ResourceBundle.Control类,并重写其中的方法来实现自定义逻辑。
例如,以下是一个使用自定义资源加载器来加载本地化字符串的示例:
public class MyResourceLoader extends ResourceBundle.Control {
    @Override
    public ResourceBundle newBundle(String baseName, Locale locale, String format, ClassLoader loader, boolean reload)
            throws IllegalAccessException, InstantiationException, IOException {
        String bundleName = toBundleName(baseName, locale);
        String resourceName = toResourceName(bundleName, "myproperties");
        InputStream stream = loader.getResourceAsStream(resourceName);
        if (stream != null) {
            try {
                return new PropertyResourceBundle(stream);
            } finally {
                stream.close();
            }
        } else {
            return super.newBundle(baseName, locale, format, loader, reload);
        }
    }
}

ResourceBundle.Control control = new MyResourceLoader();
ResourceBundle messages = ResourceBundle.getBundle("Messages", new Locale("fr"), control);

String greeting = messages.getString("greeting");

System.out.println(greeting); // Bonjour
- 在这个示例中,我们定义了一个名为MyResourceLoader的自定义资源加载器,并重写了其中的newBundle()方法来实现自定义资源加载逻辑。
然后,我们使用这个自定义资源加载器来获取Messages资源文件中的本地化字符串。
这样,我们就可以实现更高级的资源加载功能,从而满足更复杂的需求。
动态更新资源文件
- 有时候,在应用程序运行期间,可能需要动态地更新资源文件中的某些值。
在Java中,我们可以使用PropertyResourceBundle类来实现这个功能。
PropertyResourceBundle是ResourceBundle的一个子类,它可以读取.properties格式的资源文件,并将其转换为一个键值对的形式。
然后,我们可以通过这个键值对来动态地更新资源文件中的值。
例如,以下是一个使用PropertyResourceBundle来动态更新本地化字符串的示例:
// 加载资源文件
InputStream stream = new FileInputStream("Messages.properties");
PropertyResourceBundle bundle = new PropertyResourceBundle(stream);

// 动态更新本地化字符串
bundle.handleKey("greeting", (key, value) -> "Hello");

// 输出本地化字符串
String greeting = bundle.getString("greeting");
System.out.println(greeting); // Hello
在这个示例中,我们首先使用
FileInputStream来加载Messages.properties资源文件,然后将其转换为一个PropertyResourceBundle对象。
然后,我们使用handleKey()方法来动态地更新greeting这个键对应的值。
最后,我们使用getString()方法来获取更新后的本地化字符串。
这种动态更新资源文件配置的方式可以使应用程序更加灵活,能够快速响应变化。
但是需要注意的是,这种方式需要保证资源文件的正确性和一致性,否则可能会导致应用程序运行出错。
示例集
示例1
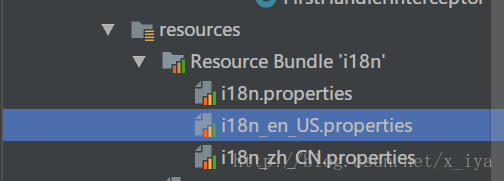
- Step1 我们有3个资源文件放置在
classpath的根目录(本例是放在src/main/resource)中,文件名分别为: - i18n_en_US.properties
- i18n_zh_CN.properties
- i18n_web_BASE64.properties
文件中的内容如下:
#i18n_en_US.properties
say=Hallo world!

#i18n_zh_CN.properties
say=\u5927\u5BB6\u597D\uFF01

#i18n_web_BASE64.properties
say=+-+-+-ABC
- Step2 然后,我们通过ResourceBundle类来使用这些i18n的资源文件:
public class I18nApp {

	public static void main(String[] args) {
        //使用当前操作系统的语言环境
		ResourceBundle rb = ResourceBundle.getBundle("i18n", Locale.getDefault());
		System.out.println(rb.getString("say"));

        //指定简体中文环境
        rb = ResourceBundle.getBundle("i18n", new Locale("zh", "CN"));
		System.out.println(rb.getString("say"));
        //通过预设指定简体英文环境
		rb = ResourceBundle.getBundle("i18n", Locale.SIMPLIFIED_CHINESE);
		System.out.println(rb.getString("say"));

        //指定美国英语
		rb = ResourceBundle.getBundle("i18n", Locale.US);
		System.out.println(rb.getString("say"));

        //使用自定义的语言环境
		Locale locale = new Locale("web", "BASE64");
		rb = ResourceBundle.getBundle("i18n", locale);
		System.out.println(rb.getString("say"));
	}
}
按照开发文档的要求:
- 使用
ResourceBundle加载的资源文件都必须放置在根目录 - 且必须按照
${resourceName}_${language}_${region}的方式来命名。这个命名方式正好能对应ResourceBundle::getBundle方法中的参数。
例如:
ResourceBundle.getBundle("i18n", new Locale("zh", "CN"))
- "i18n"对应
${name}- "zh"对应
${language}- 而“CN”对应$
这样我们就可以通过传导参数来使用不同的资源。
如果不指定${language}和${region},该文件就是一个默认文件。
Locale类预设了很多资源类型,比如:Locale.SIMPLIFIED_CHINESE、Locale.US,实际上他们就等价于new Locale("zh", "CN")和new Locale("en", "US")。只是Java的开发人员做了一些静态的预设。
除了预设内容的Locale,我们还可以像Locale locale = new Locale("web", "BASE64")这样添加自定义的内容,他对应名为i18n_web_BASE64.properties的资源文件。
示例2
-
定义三个资源文件,放到src的根目录下面(必须这样,或者你放到自己配置的calsspath下面。
-
myres.properties
bbb=thanks
- myres_en_US.properties
aaa=good
bbb=thanks
- myres_zh_CN.properties
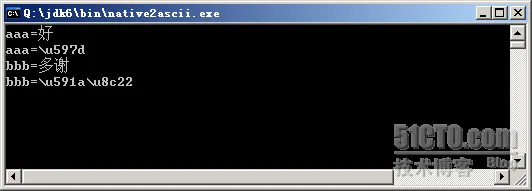
aaa=\u597d
bbb=\u591a\u8c22
- 使用
import java.util.Locale;
import java.util.ResourceBundle;

/**
* 国际化资源绑定测试
*
* @author leizhimin 2009-7-29 21:17:42
*/
public class TestResourceBundle {
        public static void main(String[] args) {
                Locale locale1 = new Locale("zh", "CN");
                ResourceBundle resb1 = ResourceBundle.getBundle("myres", locale1);
                System.out.println(resb1.getString("aaa"));

                ResourceBundle resb2 = ResourceBundle.getBundle("myres", Locale.getDefault());
                System.out.println(resb1.getString("aaa"));

                Locale locale3 = new Locale("en", "US");
                ResourceBundle resb3 = ResourceBundle.getBundle("myres", locale3);
                System.out.println(resb3.getString("aaa"));
        }
}
运行结果:
好
好
good

Process finished with exit code 0
如果使用默认的Locale,那么在英文操作系统上,会选择myres_en_US.properties或myres.properties资源文件。
参考文献
1.2 Locale
Locale 对象表示了特定的地理、政治和文化地区。
需要 Locale 来执行其任务的操作称为语言环境敏感的操作,它使用 Locale 为用户量身定制信息。例如,显示一个数值就是语言环境敏感的操作,应该根据用户的国家、地区或文化的风俗/传统来格式化该数值。
使用此类中的构造方法来创建 Locale:
- Locale(String language)
- Locale(String language, String country)
- Locale(String language, String country, String variant)
创建完 Locale 后,就可以查询有关其自身的信息。
使用 getCountry 可获取 ISO 国家代码,使用 getLanguage 则获取 ISO 语言代码。
可用使用 getDisplayCountry 来获取适合向用户显示的国家名。
同样,可用使用 getDisplayLanguage 来获取适合向用户显示的语言名。
有趣的是,getDisplayXXX 方法本身是语言环境敏感的,它有两个版本:一个使用默认的语言环境作为参数,另一个则使用指定的语言环境作为参数。
语言参数是一个有效的 ISO 语言代码。这些代码是由 ISO-639 定义的小写两字母代码。在许多网站上都可以找到这些代码的完整列表,如:
 http://www.loc.gov/standards/iso639-2/englangn.html 。
国家参数是一个有效的 ISO 国家代码。这些代码是由 ISO-3166 定义的大写两字母代码。在许多网站上都可以找到这些代码的完整列表,如:
 http://www.iso.ch/iso/en/prods-services/iso3166ma/02iso-3166-code-lists/list-en1.html 。
1.3 native2ascii | 中文资源文件的转码
如果觉得麻烦,可以直接将中文粘贴到里面,回车就可以看到转码后的结果了。
2 Spring 国际化 核心组件
2.1 MessageSource 接口
2.1.1 概述
ApplicationContext接口扩展了MessageSource接口,因而提供了消息处理的功能(i18n或国际化)。
与HierarchicalMessageSource一起使用,它还能够处理嵌套的消息,这些是spring提供的处理消息的基本接口。
2.1.2 核心方法
让我们快速浏览一下它所定义的方法:
- String getMessage(String code, Object[] args, String default, Locale loc)
用来从MessageSource获取消息的基本方法。如果在指定的locale中没有找到消息,则使用默认的消息。args中的参数将使用标准类库中的MessageFormat来作消息中替换值。
- String getMessage(String code, Object[] args, Locale loc)
本质上和上一个方法相同,其区别在:没有指定默认值,如果没找到消息,会抛出一个NoSuchMessageException异常。
- String getMessage(MessageSourceResolvable resolvable, Locale locale)
上面方法中所使用的属性都封装到一个MessageSourceResolvable实现中,而本方法可以指定MessageSourceResolvable实现。
2.1.3 ApplicationContext与MessageSource的工作原理
- 当一个
ApplicationContext被加载时,它会自动在context中查找已定义为MessageSource类型的bean。
此
bean的名称须为messageSource。
-
如果找到,则:所有对上述方法的调用将被委托给该
bean。 -
否则,
ApplicationContext会在其父类中查找是否含有同名的bean。如果有,就把它作为MessageSource。 -
如果它最终没有找到任何的消息源,一个空的
StaticMessageSource将会被实例化,使它能够接受上述方法的调用。
2.1.4 MessageSource 接口的实现
Spring目前提供了两个MessageSource的实现:
- ResourceBundleMessageSource
- StaticMessageSource
它们都继承
NestingMessageSource以便能够处理嵌套的消息。
StaticMessageSource很少被使用,但能以编程方式向消息源(Message Source)添加消息(Message)。
ResourceBundleMessageSource会用得更多一些,为此提供了一下实例化的示例:
<beans>
  <bean id="messageSource"
        class="org.springframework.context.support.ResourceBundleMessageSource">
    <property name="basenames">
      <list>
        <value>format</value>
        <value>exceptions</value>
        <value>windows</value>
      </list>
    </property>
  </bean>
</beans>
2.1.5 SpringMVC中MessageSource的获取方法
// 资源文件ApplicationResources.properties放在src目录下,也就是classes目录
// 配置文件messages.xml也放在src目录下,也就是classes目录
// 第1种方法
MessageSource resources = new ClassPathXmlApplicationContext("messages.xml");
String msg = resources.getMessage("XXXXX", new String[] { "OOOOO" }, null);

// 第2种方法
ReloadableResourceBundleMessageSource messageSource;
messageSource = new ReloadableResourceBundleMessageSource();
messageSource.setBasename("classpath:/ApplicationResources");
messageSource.setUseCodeAsDefaultMessage(true);
msg = messageSource.getMessage("XXXXX", new String[] { "OOOOO" }, Locale.CHINA);

// 第3种方法 | 此方式中, messageSource Bean 是配置在 spring-servlet.xml 中的
WebApplicationContext wac = RequestContextUtils.getWebApplicationContext(request);
msg = wac.getMessage("XXXXX", new String[] { "OOOOO" }, Locale.CHINA);
2.2 ResourceBundleMessageSource
2.2.1 概述
ResourceBundleMessageSource: 提供国际化的类。
ResourceBundleMessageSource的底层实现依赖于java.util.ResourceBundle
说的简单点,这个类的作用就是读取资源属性文件(.properties)
然后,根据.properties文件的名称信息(本地化信息),匹配当前系统的国别语言信息(也可以程序指定)
然后,获取相应的properties文件的内容。
2.2.2 配置步骤:示例1
ResourceBundleMessageSource的功能就是用Java标准库的ResourceBundle实现的,所以使用起来和ResourceBundle也差不多。
- Step1 首先,得将用于处理国际化资源的Bean添加到IoC容器中:
@Configuration
public class I18nApp {
	@Bean("messageSource")
	ResourceBundleMessageSource resourceBundleMessageSource() {
		ResourceBundleMessageSource messageSource = new ResourceBundleMessageSource();
		messageSource.setBasenames(new String[] { "i18n", "extend" });//添加资源名称
		return messageSource;
	}
}
或
<beans>
    <bean id="messageSource"
            class="org.springframework.context.support.ResourceBundleMessageSource">
        <property name="basenames">
            <list>
                <value>i18n</value>
                <value>extend</value>
            </list>
        </property>
    </bean>
</beans>
切记一定要标记id=messageSource。basenames这个Setter用于指定*.properties资源文件的名称,规则和前面介绍的ResourceBundle一样。
- Step2 然后,就可以通过
ApplicationContext::getMessage方法获取对应的资源了:
@Configuration
public class I18nApp {
	@Bean("messageSource")
	ResourceBundleMessageSource resourceBundleMessageSource() {
		ResourceBundleMessageSource messageSource = new ResourceBundleMessageSource();
		messageSource.setBasenames(new String[] { "i18n", "extend" });
		return messageSource;
	}

	public static void main(String[] args) {
		ApplicationContext context = new AnnotationConfigApplicationContext(I18nApp.class);
		System.out.println("Spring Default 1:" + context.getMessage("say", null, Locale.getDefault()));
		System.out.println("Spring Default 2:" + context.getMessage("say", null, null));
		System.out.println("Spring Chinese:" + context.getMessage("say", null, Locale.SIMPLIFIED_CHINESE));
		System.out.println("Spring Us English:" + context.getMessage("say", null, Locale.US));
		System.out.println("Spring Custom:" + context.getMessage("say", null, new Locale("web", "BASE64")));
		System.out.println("Spring Argument:" + context.getMessage("info", new String[] {"chkui"},null));
		System.out.println("Spring Info:" + context.getMessage("say", null, null));
	}
}
2.2.2 配置步骤:示例2
- Step1 新建国际化资源文件
# i18n_en_US.properties
message=welcome:{0}

# i18n_zh_CN.properties
message=欢迎:{0}
- Step2 配置 Spring Bean
<bean id="messageSource" class="org.springframework.context.support.ResourceBundleMessageSource">
    <property name="basename" value="i18n" />
</bean>
- Step3 使用
@Test
    public void test() {
        ApplicationContext context = new ClassPathXmlApplicationContext("SpringMVC.xml");
        System.out.println(context.getMessage("message", new Object[]{"lgh"}, Locale.SIMPLIFIED_CHINESE));
        System.out.println(context.getMessage("message", new Object[]{"lgh"}, Locale.US));
    }
@Controller
public class TestController {
    @Autowired
    private ResourceBundleMessageSource messageSource;
    @RequestMapping(value = "/test4", method = RequestMethod.GET)
    public String test4(Locale locale) {
        System.out.println(messageSource.getMessage("message", null, locale));
        return "i18n";
    }
}
2.3 占位符替换
注意上面的示例代码的这一行:
context.getMessage("info", new String[] {"chkui"},null))
这里的getMessage向方法传递了一个数组,它用于替换 资源文件中的占位符号。
在例子中我们除了
i18n还加载了一个extend.properties文件,文件内容如下:
info={0}\u5E05\u7684\u8BA9\u4EBA\u6CA1\u813E\u6C14\u3002
文件中的{0}表示这个位置用数组中的[0]位置的元素替换。
还有一点需要注意的是,*.properties文件输入中文等UTF-8的符号时需要保留上面这种ACSII的格式,现在大部分IDE都会自动处理的,切记不要为了方便看内容将*.properties的编码格式切换为UTF-8。
2.4 获取MessageSource接口
我们有三种方式获取MessageSource接口:
//直接使用
ApplicationContext context = new AnnotationConfigApplicationContext(I18nApp.class);
context.getMessage("say", null, Locale.getDefault()));

//MessageSourceAware(ApplicationContextAware)接口
public class ExtendBean implements MessageSourceAware {
	@Override
	public void setMessageSource(MessageSource messageSource) {
		this.setterMs = messageSource;
	}
}

//从容器直接注入
public class ExtendBean implements MessageSourceAware {
	@Autowired
	private MessageSource autowiredMs;
}
需要注意的是,使用@Autowired等方式直接获取MessageSource类型的数据得到的是添加到容器的那个Bean,而其他方式获取到的是ApplicationContext。
X 参考文献

本文链接: https://www.cnblogs.com/johnnyzen
关于博文:评论和私信会在第一时间回复,或直接私信我。
版权声明:本博客所有文章除特别声明外,均采用 BY-NC-SA 许可协议。转载请注明出处!
日常交流:大数据与软件开发-QQ交流群: 774386015 【入群二维码】参见左下角。您的支持、鼓励是博主技术写作的重要动力!

 浙公网安备 33010602011771号