[RN] 01 - Init: Try a little bit of React Native
后记:这本书博客味有点浓。
本篇涉及新建工程的若干套路,以及一点语法知识。
创建新工程
(1)
解决的一大核心问题:

(2)
使用Javascript的严格模式。
(3)
开发环境配置:
https://gist.github.com/platonish/f913e8a691ae811524f47bfb7710437b
亲测,可用,开始创建工程:
unsw@unsw-UX303UB$ npm install -g react-native-cli
/usr/local/node-v8.9.4-linux-x64/bin/react-native -> /usr/local/node-v8.9.4-linux-x64/lib/node_modules/react-native-cli/index.js
+ react-native-cli@2.0.1
updated 1 package in 1.176s

unsw@unsw-UX303UB$ ls -a
.  ..

unsw@unsw-UX303UB$ react-native init HelloWorld
This will walk you through creating a new React Native project in /root/android-workplace/HelloWorld
Installing react-native...
Consider installing yarn to make this faster: https://yarnpkg.com
npm WARN deprecated connect@2.30.2: connect 2.x series is deprecated
npm WARN deprecated gulp-util@3.0.8: gulp-util is deprecated - replace it, following the guidelines at https://medium.com/gulpjs/gulp-util-ca3b1f9f9ac5
npm notice created a lockfile as package-lock.json. You should commit this file.
npm WARN react-native@0.52.2 requires a peer of react@16.2.0 but none is installed. You must install peer dependencies yourself.
npm WARN optional SKIPPING OPTIONAL DEPENDENCY: fsevents@1.1.3 (node_modules/fsevents):
npm WARN notsup SKIPPING OPTIONAL DEPENDENCY: Unsupported platform for fsevents@1.1.3: wanted {"os":"darwin","arch":"any"} (current: {"os":"linux","arch":"x64"})

+ react-native@0.52.2
added 583 packages in 37.805s
Setting up new React Native app in /root/android-workplace/HelloWorld
Installing React...
npm WARN optional SKIPPING OPTIONAL DEPENDENCY: fsevents@1.1.3 (node_modules/fsevents):
npm WARN notsup SKIPPING OPTIONAL DEPENDENCY: Unsupported platform for fsevents@1.1.3: wanted {"os":"darwin","arch":"any"} (current: {"os":"linux","arch":"x64"})

+ react@16.2.0
added 1 package in 4.133s
Installing Jest...
npm WARN optional SKIPPING OPTIONAL DEPENDENCY: fsevents@1.1.3 (node_modules/fsevents):
npm WARN notsup SKIPPING OPTIONAL DEPENDENCY: Unsupported platform for fsevents@1.1.3: wanted {"os":"darwin","arch":"any"} (current: {"os":"linux","arch":"x64"})

+ babel-preset-react-native@4.0.0
+ babel-jest@22.1.0
+ react-test-renderer@16.2.0
+ jest@22.1.4
added 212 packages and updated 1 package in 19.407s
To run your app on iOS:
   cd /root/android-workplace/HelloWorld
   react-native run-ios
   - or -
   Open ios/HelloWorld.xcodeproj in Xcode
   Hit the Run button
To run your app on Android:
   cd /root/android-workplace/HelloWorld
   Have an Android emulator running (quickest way to get started), or a device connected
   react-native run-android

unsw@unsw-UX303UB$ cd HelloWorld/
unsw@unsw-UX303UB$ react-native start
Scanning folders for symlinks in /root/android-workplace/HelloWorld/node_modules (19ms)
┌──────────────────────────────────────────────────────────────────────────────┐
│                                                                              │
│  Running Metro Bundler on port 8081.                                         │
│                                                                              │
│  Keep Metro running while developing on any JS projects. Feel free to        │
│  close this tab and run your own Metro instance if you prefer.               │
│                                                                              │
│  https://github.com/facebook/react-native                                    │
│                                                                              │
└──────────────────────────────────────────────────────────────────────────────┘

Looking for JS files in
   /root/android-workplace/HelloWorld


Metro Bundler ready.

Loading dependency graph, done.


You can run the packager on another port.

$ react-native start --port=8088
Alternatively, find out what is using which ports on Windows with netstat.

$ netstat -a -b -o
Netstat gives you a PID, which you can use to kill the process.

$ taskkill /pid 1234
有可能是这两种情况导致的。

第一种,是没有注册、或者注册语句写错。正确的写法如下,引号中的AwesomeProject一定是这个项目的名称。

AppRegistry.registerComponent('AwesomeProject', () => AwesomeProject);
第二种,可能是8081端口被占用。那么如何测试这个错误呢?
步骤如下:

在项目文件夹中打开终端,输入react-native start
如果在结果中出现了Packager can't listen on port 8081,那么就证实了8081端口被占用了。
接下去要做的是再中断输入命令: lsof -n -i4TCP:8081,目的是列出被占用的端口列表
输入命令kill -9 <PID>,目的是删除对应PID的占用。这里的<PID>在第三步的端口列表中可以找到。
输入命令react-native run-ios重新启动项目即可。(我自己使用的是ios,如果是andriod,那么直接替换ios成andriod就可以了)
果然,删除后重新运行程序就没有这样的报错了,一切正常啦!太好了!
Android Studio模拟器可能提前占用8081,建议留给RN。
lsof -i :8081
列出8081谁在用,然后杀掉,腾出地方。
kill -9 <PID>
与服务器链接完成后,加载代码,运行成功!
unsw@unsw-UX303UB$ react-native run-android

问题来了,js code在哪里? Developing mobile apps with React Native in WebStorm!
之后便成了彻底的网页开发!
create-react-native-app
解决这个问题需要借助两个工具:
1. create-react-native-app(下文简称CRNA);
2. Expo(原名Exponent)。
好处:
使用 CRNA 创建 RN 应用只是不用安装 iOS 和 Android 的编译环境了,但是 node 还是必须的,然后通过下面的 node 命令安装 CRNA 这个工具。
它只包含了 JS 部分的代码。
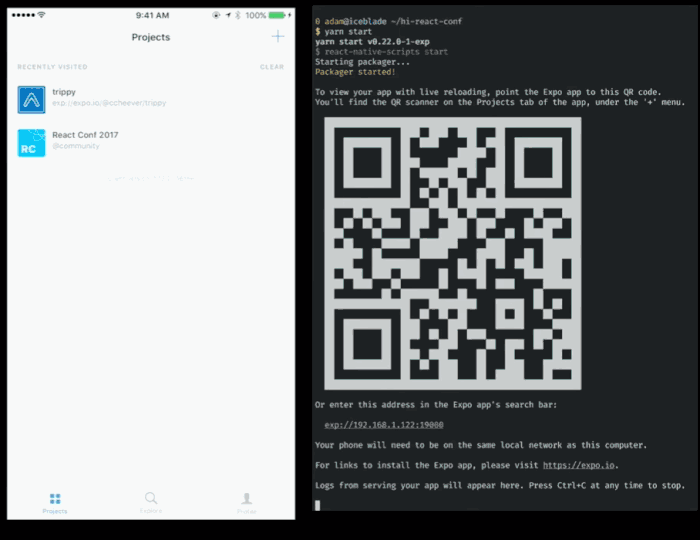
通过 npm start 启动该应用后,会生成一个二维码。
$ npm install -g create-react-native-app
$ npm start
可见,摆脱了react-native命令,也即是减少了对原生代码的依赖。
运行Github工程
配置好 React Native
Step 1:
Node.js 是一个基于 Chrome V8 引擎的 JavaScript 运行环境,其使用了一个事件驱动、非阻塞式 I/O 的模型,使其轻量又高效。
Node.js 的包管理器 npm,是全球最大的开源库生态系统,功能及其强大。
首先,在Ubuntu上安装NPM(Node Package Manger) (avaliable)
Step 2:
安装watchman: https://facebook.github.io/watchman/docs/install.html#installing-from-source
$ git clone https://github.com/facebook/watchman.git
$ cd watchman
$ git checkout v4.9.0  # the latest stable release
$ ./autogen.sh  # --> install libtool firstly, as following.
$ ./configure
$ make
$ sudo make install
间接安装,brew类似于apt-get,可以管理软件的安装和卸载。
Ubuntu 安装brew【不好,貌似还需要先安装ruby?烦】
直接安装更好:https://askubuntu.com/questions/625523/libtool-installed-but-not-on-path-after-installation
sudo apt-get install libtool
Step 3:
Ref: React Native开源项目如何运行(附一波开源项目)
git clone https://github.com/poberwong/react-native-gank.git
cd react-native-gank/
npm install  <-- react-native前必须执行的一个鬼东西
扩展:
开源项目为了减少空间,并没有提交node_mudules目录,需要我们自己安装。
unsw@unsw-UX303UB$ du -h --max-depth=1
108K	./ios
51M	./android
244M	./node_modules
76K	./jscore
7.8M	./.git
303M	.
node_modules 是整个项目的依赖, 里面包含什么呢?
包含的文件全部都写在package.json 文件中了。 这个文件是必不可少的。我们需要按照这个列表下载。
React native项目是通过nodejs构建的,所以在nodejs项目中都需要package.json 文件。
具体大家可以看看nodejs相关知识 ,七天学会 Nodejs。
Goto: [NodeJS] Basic knowledge about NodeJS due to React Native
开源项目汇总
https://github.com/liuhongjun719/react-native-DaidaiHelperNew 借贷助手
https://github.com/liuhongjun719/react-native-BabyHealth- 仿宝宝健康
https://github.com/nihgwu/react-native-sudoku 数独
https://github.com/attentiveness/reading reading
https://github.com/CoderGLM/ReactNativeLeaning
https://github.com/eesc88/programmer 云翻译客户端
https://github.com/jiangqqlmj/GaGaMall 嘎嘎商城
https://github.com/879479119/Bilibili-React-Native 仿B站客户端
https://github.com/Shuijwan/marvel漫威电影客户端
https://github.com/talentjiang/react_native_office公司移动OA办公客户端
https://github.com/yohnz/maoyanFilm仿猫眼电影客户端
https://github.com/soliury/noder-react-nativeCNode论坛客户端
https://github.com/Kennytian/LagouApp仿拉勾网客户端
https://github.com/SFantasy/WeiboReactNativeiOS新浪微博客户端
https://github.com/kailuo99/toutiaoiOS资讯头条APP
https://github.com/xiekw2010/react-native-gitfeedGithub客户端
https://github.com/iSimar/HackerNews-React-NativeHacker新闻客户端
https://github.com/starzhy/TheOneCoder码农客户端
https://github.com/tabalt/ReactNativeNews新闻客户端
https://github.com/vczero/React-Dou豆瓣搜索客户端
https://github.com/race604/ZhiHuDaily-React-Native知乎日报客户端

作者:于连林520wcf
链接:https://www.jianshu.com/p/240d5ab43a48
來源:简书
著作权归作者所有。商业转载请联系作者获得授权,非商业转载请注明出处。
开始运行项目
1. 启动虚拟机。
2. 启动服务:
unsw@unsw-UX303UB$ react-native start
3. 加载至虚拟机并运行。
unsw@unsw-UX303UB$ react-native run-android

(node:4467) [DEP0022] DeprecationWarning: os.tmpDir() is deprecated. Use os.tmpdir() instead.
Starting JS server...
Building and installing the app on the device (cd android && ./gradlew installDebug...
:app:preBuild UP-TO-DATE
:app:preDebugBuild UP-TO-DATE
:app:checkDebugManifest
:app:preReleaseBuild UP-TO-DATE
:app:prepareComAndroidSupportAppcompatV72301Library UP-TO-DATE
:app:prepareComAndroidSupportRecyclerviewV72301Library UP-TO-DATE
:app:prepareComAndroidSupportSupportV42301Library UP-TO-DATE
:app:prepareComFacebookFrescoDrawee081Library UP-TO-DATE
:app:prepareComFacebookFrescoFbcore081Library UP-TO-DATE
:app:prepareComFacebookFrescoFresco081Library UP-TO-DATE
:app:prepareComFacebookFrescoImagepipeline081Library UP-TO-DATE
:app:prepareComFacebookFrescoImagepipelineOkhttp081Library UP-TO-DATE
:app:prepareComFacebookReactReactNative0251Library UP-TO-DATE
:app:prepareOrgWebkitAndroidJscR174650Library UP-TO-DATE
:app:prepareDebugDependencies
:app:compileDebugAidl UP-TO-DATE
:app:compileDebugRenderscript UP-TO-DATE
:app:generateDebugBuildConfig UP-TO-DATE
:app:generateDebugAssets UP-TO-DATE
:app:mergeDebugAssets UP-TO-DATE
:app:generateDebugResValues UP-TO-DATE
:app:generateDebugResources UP-TO-DATE
:app:mergeDebugResources UP-TO-DATE
:app:bundleDebugJsAndAssets SKIPPED
:app:processDebugManifest UP-TO-DATE
:app:processDebugResources UP-TO-DATE
:app:generateDebugSources UP-TO-DATE
:app:processDebugJavaRes UP-TO-DATE
:app:compileDebugJavaWithJavac UP-TO-DATE
:app:compileDebugNdk UP-TO-DATE
:app:compileDebugSources UP-TO-DATE
:app:preDexDebug UP-TO-DATE
:app:dexDebug UP-TO-DATE
:app:validateDebugSigning
:app:packageDebug UP-TO-DATE
:app:zipalignDebug UP-TO-DATE
:app:assembleDebug UP-TO-DATE
:app:installDebug
Installing APK 'app-debug.apk' on 'Pixel_2_-_API_26(AVD) - 8.0.0'
Installed on 1 device.

BUILD SUCCESSFUL

Total time: 10.866 secs

This build could be faster, please consider using the Gradle Daemon: http://gradle.org/docs/2.4/userguide/gradle_daemon.html
Starting the app on emulator-5554 (/home/unsw/Android/Sdk/platform-tools/adb -s emulator-5554 shell am start -n com.reactnativegank/.MainActivity)...
Starting: Intent { cmp=com.reactnativegank/.MainActivity }

如此,我们通过上手demo 相关代码在这里,从而了解【props】和【state】 这些个概念。
// Top-level build file where you can add configuration options common to all sub-projects/modules.

buildscript {
    repositories {
        jcenter()
    }
    dependencies {
        classpath 'com.android.tools.build:gradle:2.2.2'

        // NOTE: Do not place your application dependencies here; they belong
        // in the individual module build.gradle files
    }
}

allprojects {
    repositories {
        mavenLocal()
        jcenter()
        maven {
            // All of React Native (JS, Obj-C sources, Android binaries) is installed from npm
            url "$rootDir/../node_modules/react-native/android"
        }
    }
}
distributionBase=GRADLE_USER_HOME
distributionPath=wrapper/dists
zipStoreBase=GRADLE_USER_HOME
zipStorePath=wrapper/dists
distributionUrl=https\://services.gradle.org/distributions/gradle-2.14.1-all.zip
(暂时跟着这篇学习方针走!挽救IT生涯!)
一、安装WebStorm
WebStorm 是jetbrains公司旗下一款JavaScript 开发工具。目前已经被广大中国JS开发者誉为“Web前端开发神器”、“最强大的HTML5编辑器”、“最智能的JavaScript IDE”等。与IntelliJ IDEA同源,继承了IntelliJ IDEA强大的JS部分的功能。
- Ubuntu14.14需要安装 JDK1.8 from reference:
步骤:
添加软件源
sudo add-apt-repository ppa:openjdk-r/ppa

更新源
sudo apt-get update

安装 openjdk-8-jdk
sudo apt-get install openjdk-8-jdk
然后就可以切换版本:
unsw@unsw-UX303UB$ sudo update-alternatives --config java
There are 2 choices for the alternative java (providing /usr/bin/java).

  Selection    Path                                            Priority   Status
------------------------------------------------------------
* 0            /usr/lib/jvm/java-7-openjdk-amd64/jre/bin/java   1071      auto mode
  1            /usr/lib/jvm/java-7-openjdk-amd64/jre/bin/java   1071      manual mode
  2            /usr/lib/jvm/java-8-openjdk-amd64/jre/bin/java   1069      manual mode

Press enter to keep the current choice[*], or type selection number: 2
update-alternatives: using /usr/lib/jvm/java-8-openjdk-amd64/jre/bin/java to provide /usr/bin/java (java) in manual mode
如此,pycharm,webstorm恢复使用,激活:http://blog.csdn.net/voke_/article/details/76418116
还有记得打开755权限至少。
接下来,安装一些插件,以及进行一些常用配置。比如RN组件库的安装,添加一些常用的Live Templates等。
- 配置React Native
Ref: Developing mobile apps with React Native in WebStorm

二、Flex布局
Flex 是 Flexible Box 的缩写,意为"弹性布局",用来为盒状模型提供最大的灵活性。
通过实例学习:
http://static.vgee.cn/static/index.html
http://www.ruanyifeng.com/blog/2015/07/flex-examples.html
布局工具:codepen
https://codepen.io/LandonSchropp/pen/KpzzGo
三、RN组件
现在的 App 大多都比较简单,无非就是布局的展示,网络数据的获取等等。
这里要说明的是,如果你是 Android 或 iOS 工程师,那你需要习惯一下 RN 处理 Json 数据的方式(或者说 Web 处理 Json 的方式),
我们通过网络请求回来的 Json Object 数据就可以直接进行操作,而不像 Native 开发,还需要通过什么额外的工具去进行 Json 的转换。这也是 Web 开发比较方便的地方。
无论 Json Object 转 Json 字符串,还是 Json 字符串转 Json Object,都是非常方便的。
如果非要把网络数据进行本地存储,那也很方便,通过解构赋值,直接就可以赋值给你创建的 Model 了。
JSON 与 JS 对象的关系
var obj = {a: 'Hello', b: 'World'}; //这是一个对象,注意键名也是可以使用引号包裹的
var json = '{"a": "Hello", "b": "World"}'; //这是一个 JSON 字符串,本质是一个字符串
JSON 和 JS 对象互转
要实现从对象转换为 JSON 字符串,使用 JSON.stringify() 方法:
var json = JSON.stringify({a: 'Hello', b: 'World'}); //结果是 '{"a": "Hello", "b": "World"}'
要实现从 JSON 转换为对象,使用 JSON.parse() 方法:
var obj = JSON.parse('{"a": "Hello", "b": "World"}'); //结果是 {a: 'Hello', b: 'World'}
四、网络请求(fetch)
- 传统 Ajax 指的是 XMLHttpRequest(XHR)
XMLHttpRequest 对象提供了对 HTTP 协议的完全的访问,包括做出 POST 和 HEAD 请求以及普通的 GET 请求的能力。
- 由 jQuery 的
$.ajax迁移到Fetch
jQuery 是一个“写的更少,但做的更多”的轻量级 JavaScript 库。【将要过时的东西】
- Fetch的必要性 (基于promise)
XMLHttpRequest 是一个设计粗糙的 API,不符合关注分离(Separation of Concerns)的原则,配置和调用方式非常混乱,而且基于事件的异步模型写起来也没有现代的 Promise,generator/yield,async/await 友好。Fetch 的出现就是为了解决 XHR 的问题。
- 一个对比:
var xhr = new XMLHttpRequest();

xhr.open('GET', url);
xhr.responseType = 'json';

xhr.onload = function() {
  console.log(xhr.response);
};

xhr.onerror = function() {
  console.log("Oops, error");
};

xhr.send();
使用 Fetch 后,顿时看起来好一点:
fetch(url).then(function(response) {
  return response.json();

}).then(function(data) {
  console.log(data);

}).catch(function(e) {
  console.log("Oops, error");

});
使用 ES6 的 箭头函数 后:
fetch(url).then(response => response.json())
  .then(data => console.log(data))
  .catch(e => console.log("Oops, error", e))
最终优化:
是有 Callback 的影子,然后让我们写异步代码就像写同步代码一样爽;但,这是还未流行的最新的ES7方法。
try {
  let response = await fetch(url);
  let data     = response.json();
  console.log(data);
} catch(e) {
  console.log("Oops, error", e);
}
// 注:这段代码如果想运行,外面需要包一个 async function
- Fetch API 基于 Promise 设计
有必要先学习一下 Promise,推荐阅读 MDN Promise 教程。旧浏览器不支持 Promise,需要使用 polyfill es6-promise 。
Promise 对象用于表示一个异步操作的最终状态(完成或失败),以及其返回的值。
这是流行的方法:ES6 的 Promise 对象,以及 test online【在线测试js代码的地方】。
then 和 catch
一个任务时
function helloWorld (ready) {
    return new Promise(function (resolve, reject) {
        if (ready) {
            resolve("Hello World!");
        } else {
            reject("Good bye!");
        }
    });
}

helloWorld(true).then(function (message) {
    alert(message);
}, function (error) {
    alert(error);
});
在 Promise 对象当中有两个重要方法————resolve 和 reject。
resolve 方法可以使 Promise 对象的状态改变成成功,同时传递一个参数用于后续成功后的操作,在这个例子当中就是 Hello World!字符串。
reject 方法则是将 Promise 对象的状态改变为失败,同时将错误的信息传递到后续错误处理的操作。
共三种状态:
-
-
Fulfilled 可以理解为成功的状态
-
Rejected 可以理解为失败的状态
-
Pending 既不是 Fulfilld 也不是 Rejected 的状态,可以理解为 Promise 对象实例创建时候的初始状态
-
多个任务时
unction printHello (ready) {
    return new Promise(function (resolve, reject) {
        if (ready) {
            resolve("Hello");
        } else {
            reject("Good bye!");
        }
    });
}

function printWorld () {
    alert("World");
}

function printExclamation () {
    alert("!");
}

printHello(true)
    .then(function(message){  // tast 1
        alert(message);
    })
    .then(printWorld)      // tast 2
    .then(printExclamation);   // tast 3
In addition,
catch 方法是 then(onFulfilled, onRejected) 方法当中 onRejected 函数的一个简单的写法,也就是说可以写成 then(fn).catch(fn),相当于 then(fn).then(null, fn)。使用 catch 的写法比一般的写法更加清晰明确。
Promise.all 和 Promise.race
Promise.all 可以接收一个元素为 Promise 对象的数组作为参数,当这个数组里面所有的 Promise 对象都变为 resolve 时,该方法才会返回。
var p1 = new Promise(function (resolve) {
    setTimeout(function () {
        resolve("Hello");
    }, 3000);
});

var p2 = new Promise(function (resolve) {
    setTimeout(function () {
        resolve("World");
    }, 1000);
});

Promise.all([p1, p2]).then(function (result) {
    console.log(result); // ["Hello", "World"]
});
In addition,
Promise.race,它同样接收一个数组,不同的是只要该数组中的 Promise 对象的状态发生变化(无论是 resolve 还是 reject)该方法都会返回。
五、props & state
网络请求结束后,肯定是少不了数据的展示和更新。
这时又会涉及到一个很重要的知识点,就是【props】和【state】,RN中所有数据的传递和控制,都离不开这两个部分。
所以,请务必在发起网络请求前就要搞懂这两个内容。
- 《React Native 知识11-Props (属性)与 State (状态)》——踏浪帅
- 《混合开发的大趋势之 - React Native Props (属性)》——王亟亟
- 《 混合开发的大趋势之 - React Native State (状态)》——王亟亟
Goto: [RN] React Native Practice 50 lectures
六、In the nutshell
-
基本原理

![]()

-
开发框架
From: React Native by Example
可见,就是写js文件罢了,那么JS的学习就成了接下来的重点 --> ECMAScript 6 入门
对于一个程序员来说,语言的学习不是个事儿!
/**
 * Sample React Native App
 * https://github.com/facebook/react-native
 * @flow
 */

import React, { Component } from 'react';
import {
  Platform,
  StyleSheet,
  Text,
  View
} from 'react-native';

const instructions = Platform.select({
  ios: 'Press Cmd+R to reload,\n' +
    'Cmd+D or shake for dev menu',
  android: 'Double tap R on your keyboard to reload,\n' +
    'Shake or press menu button for dev menu',
});

export default class App extends Component<{}> {
  render() {
    return (
      <View style={styles.container}>
        <Text style={styles.welcome}>
          Welcome to React Native!
        </Text>
        <Text style={styles.instructions}>
          To get started, edit App.js
        </Text>
        <Text style={styles.instructions}>
          {instructions}
        </Text>
      </View>
    );
  }
}

const styles = StyleSheet.create({
  container: {
    flex: 1,
    justifyContent: 'center',
    alignItems: 'center',
    backgroundColor: '#F5FCFF',
  },
  welcome: {
    fontSize: 20,
    textAlign: 'center',
    margin: 10,
  },
  instructions: {
    textAlign: 'center',
    color: '#333333',
    marginBottom: 5,
  },
});
到此为止,就是对当前移动开发的一些整体理解,有了知识地图,下一步就开始步步前进!
为什么要搞这个东西?因为任何算法和技术都需要一个平台来展示。

 浙公网安备 33010602011771号