

目标检测初体验(二)自制人脸检测功能
之前笔者在学习OpenCV的时候,曾经接触过人脸检测,那时候我们只需要一个函数就能轻松实现人脸检测。关于如何在OpenCV中实现人脸检测功能,可以参考文章:OpenCV神技——人脸检测,猫脸检测 。那时候的感觉是,CV是如此的神奇,而人脸检测正是笔者迈向CV的关键一步。
以前,笔者从没想过能自己实现人脸检测功能,直到不久前接触了目标检测,接触了darknet,脑海中就有了“自制人脸检测”这个想法。如果能够使用darknet来自己实现人脸检测功能,那该是多么酷的一件事情啊!
经过近两天的探索,笔者终于琢磨出了如何利用darknet来实现人脸检测功能,本文将会分享这方面的经历。本着化繁为简的原则,本文将尽可能轻松地帮助你理解如何来实现人脸检测功能。
数据集
如果想实现人脸检测功能,相关的数据集是必不可少的。那么,数据集从何而来呢?一种办法是自己采集,自己标注,这是最原始的办法,费事费力,但能帮助你理解AI的苦逼之处(其实AI并不像表明展示的那么光鲜)。幸运的是,已经有不少有心人帮助我们做了数据采集方面的工作(真的应该感谢他们,所以说要学会分享)。
人脸检测的相关数据集可以参考网址:http://shuoyang1213.me/WIDERFACE/index.html,该网址收集了大量人脸检测的标注数据和图像,也可以让你尝试自己的目标检测的模型的效果,在某种程度上有点类似于ImageNet的意味。我们需要下载的数据集如下:
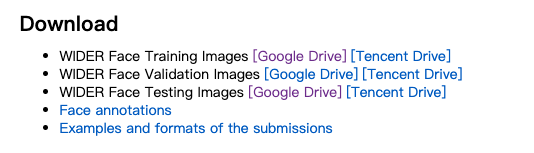
笔者下载了WIDER Face Training Images和标注数据Face annotations。训练图片一共12880张,分为62个类型,分为不同的场景。在标注数据中,内容如下
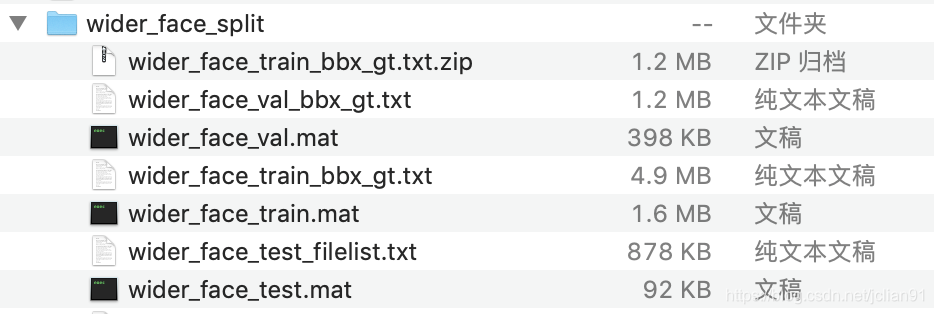
我们所需要的人脸检测的标注数据(图形框,box)在文件wider_face_train_bbx_gt.txt中,前几行如下:
0--Parade/0_Parade_marchingband_1_849.jpg
1
449 330 122 149 0 0 0 0 0 0
0--Parade/0_Parade_Parade_0_904.jpg
1
361 98 263 339 0 0 0 0 0 0
0--Parade/0_Parade_marchingband_1_799.jpg
21
78 221 7 8 2 0 0 0 0 0
78 238 14 17 2 0 0 0 0 0
113 212 11 15 2 0 0 0 0 0
134 260 15 15 2 0 0 0 0 0
163 250 14 17 2 0 0 0 0 0
201 218 10 12 2 0 0 0 0 0
182 266 15 17 2 0 0 0 0 0
245 279 18 15 2 0 0 0 0 0
304 265 16 17 2 0 0 0 2 1
328 295 16 20 2 0 0 0 0 0
389 281 17 19 2 0 0 0 2 0
第一行为图片名称,第二行为人脸数量,第三行为人脸框的标注数据,前四个分别为左,上,宽度,高度,依次类推,一张图片中会有多个人脸标注的结果。
有了上述的数据集,我们还需要将这些图片和标注数据转换为darknet支持的格式。为此,笔者写了一个Python脚本,代码(get_human_face_label_data.py)如下:
# -*- coding: utf-8 -*-
# author: Jclian91
# place: Pudong Shanghai
# time: 2020/5/11 10:51 下午

import os, re, json, traceback
from random import shuffle
import cv2
from collections import defaultdict

img_dir = "../WIDER_train"

img_count = 0
file_list = []
for root, dirs, files in os.walk(img_dir):
    for file in files:
        img_count += 1
        file_list.append(os.path.join(root, file))

print("Total image number: %d" % img_count)

# make directory
if not os.path.exists("../human_face_train_images"):
    os.system("mkdir ../human_face_train_images")
if not os.path.exists("../human_face_train_labels"):
    os.system("mkdir ../human_face_train_labels")
if not os.path.exists("../human_face_val_images"):
    os.system("mkdir ../human_face_val_images")
if not os.path.exists("../human_face_val_labels"):
    os.system("mkdir ../human_face_val_labels")

# shuffle the files
shuffle(file_list)

# get label data
with open("wider_face_train_bbx_gt.txt", "r", encoding="utf-8") as h:
    content = [_.strip() for _ in h.readlines()]

# get labeled data into arrange form
line_index = []
for i, line in enumerate(content):
    if "." in line:
        line_index.append(i)

line_index.append(len(content)+1)

segments = []
for j in range(len(line_index)-1):
    segments.append(content[line_index[j]: line_index[j+1]])

img_box_dict = defaultdict(list)
for segment in segments:
    for i in range(2, len(segment)):
        img_box_dict[segment[0].split('/')[-1]].append(segment[i].split()[:4])

# copy images to rights place and write correct labeled data into txt file
# train data
train_part = 0.8
for i in range(int(train_part * img_count)):
    print(i, file_list[i])
    file = file_list[i].split('/')[-1]
    os.system("cp %s ../human_face_train_images/%s" % (file_list[i], file))
    with open("../human_face_train.txt", "a", encoding="utf-8") as f:
        f.write("human_face_train_images/%s" % file + "\n")

    img = cv2.imread(file_list[i], 0)
    height, width = img.shape
    with open("../human_face_train_labels/%s" % file.replace(".jpg", ".txt"), "w", encoding="utf-8") as f:
        for label in img_box_dict[file]:
            left, top, w, h = [int(_) for _ in label]
            # to avoid any of the coordinate becomes 0
            if left == 0:
                left = 0.1
            if top == 0:
                top = 0.1
            if w == 0:
                w = 0.1
            if h == 0:
                h = 0.1
            x_center = (left + w/2)/width
            y_center = (top + h/2)/height
            f.write("0 %s %s %s %s\n" % (x_center, y_center, w/width, h/height))

# val data
for i in range(int(train_part * img_count)+1, img_count):
    print(i, file_list[i])
    file = file_list[i].split('/')[-1]
    os.system("cp %s ../human_face_val_images/%s" % (file_list[i], file))
    with open("../human_face_val.txt", "a", encoding="utf-8") as f:
        f.write("human_face_val_images/%s" % file + "\n")

    img = cv2.imread(file_list[i], 0)
    height, width = img.shape
    with open("../human_face_val_labels/%s" % file.replace(".jpg", ".txt"), "w", encoding="utf-8") as f:
        for label in img_box_dict[file]:
            left, top, w, h = [int(_) for _ in label]
            # to avoid any of the coordinate becomes 0
            if left == 0:
                left = 0.1
            if top == 0:
                top = 0.1
            if w == 0:
                w = 0.1
            if h == 0:
                h = 0.1
            x_center = (left + w/2)/width
            y_center = (top + h/2)/height
            f.write("0 %s %s %s %s\n" % (x_center, y_center, w/width, h/height))
运行该脚本后,产生的结果如下:
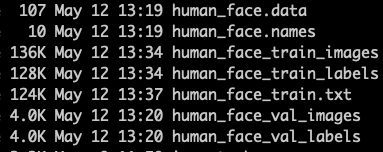
我们有必要对这个输出结果做一些了解。首先是human_face.names,该文件只有一行,内容为human face,也就是目标检测的类别只有一类,名称为human face。human_face.data内容如下:
classes= 1
train = human_face_train.txt
valid = human_face_val.txt
names = human_face.names
backup = backup
该文件表明,目标检测的类别数量(class)为1,训练数据的信息位于human_face_train.txt,验证数据的信息位于human_face_val.txt,类别名称(names)位于文件human_face.mames中,训练好的模型文件位于backup文件夹。
在human_face_train.txt中,存储训练图片的路径,并且有其对应的标注数据位于human_face_train_labels文件夹下,关于该标注数据的格式,简单来说,就是每行一个标注样本,第一个数字为类别id,后面的数字分别为标注框的横向中心点和纵向中心点,以及标注框的宽度和高度。具体的内容不再这里展示,有兴趣的读者可以参考上面的Python代码,并不会很难。
事实上,由于笔者在GPU上运行上面代码,复制图片和生成标注数据的过程很慢,因此,当复制到大约2000张图片的时候,笔者就停止了该程序,因此,实际参与训练的图片只有大约2000张。
如何使用darknet?
关于如何使用darknet来训练自己的目标检测的数据,网址已经有不少热心的作者贡献了自己的经验,因此,笔者也只是向他们学习而已。
第一步,应该是编译darknet,主要是Makefile文件的前几行:
GPU=0
CUDNN=0
OPENCV=0
OPENMP=0
DEBUG=0
一般,只需要改动GPU相关部分,如果不使用GPU,则设置GPU=0;如果需要使用GPU,则设置GPU=1。编译该Makefile文件,如果在使用GPU环境下编译不通过,则需要将Makefile中第24行的NVCC=nvcc改为Cuda的完整路径。
接着,我们在修改cfg文件夹下的yolov3-tiny.cfg文件,改动如下:
Line 3: set batch=24 → using 24 images for every training step
Line 4: set subdivisions=8 → the batch will be divided by 8
Line 127: set filters=(classes + 5)*3   → in our case filters=18
Line 135: set classes=1  →  the number of categories we want to detect
Line 171: set filters=(classes + 5)*3  → in our case filters=18
Line 177: set classes=1   → the number of categories we want to detect
因为只有一个类别,所以上述的设置是符合要求的。
然后,我们需要下载预训练的模型文件weights/darknet53.conv.74,下载网址为:https://pjreddie.com/media/files/darknet53.conv.74 。
为了方便我们训练,写一个Shell脚本train.sh,如下:
./darknet detector train human_face.data cfg/yolov3-tiny.cfg ./weights/darknet53.conv.74 -gpus 3,4,5,6,7,8
注意,在上述的脚本中我们使用GPU训练,不使用GPU的话,训练速度很慢。在训练了一个下午后,模型的avg loss大约为4点多,(关于更多的模型训练的评估指标,比如IOU,Total loss, Accuracy for Class等在这里不详细叙述),GPU因为out of memery而停止,事实上,一般我们要等到模型的avg loss大约为0.06才停止。
尽管如此,我们在2000张图片上训练了一下午后,保存的模型还是很有效果的。
模型预测
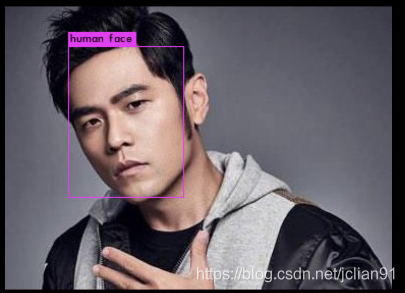
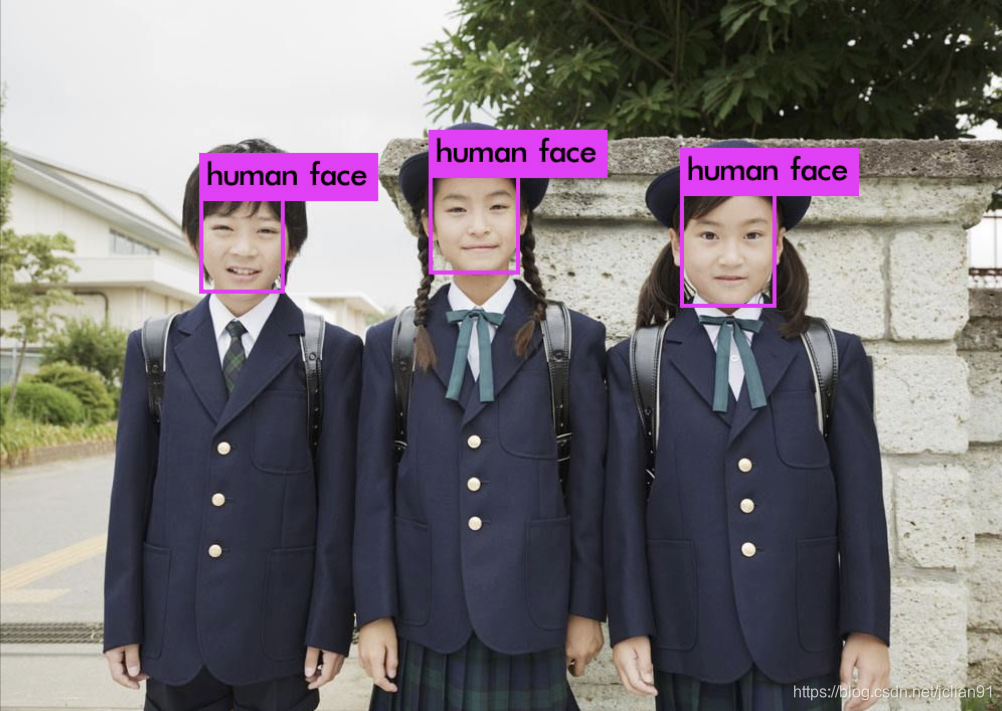
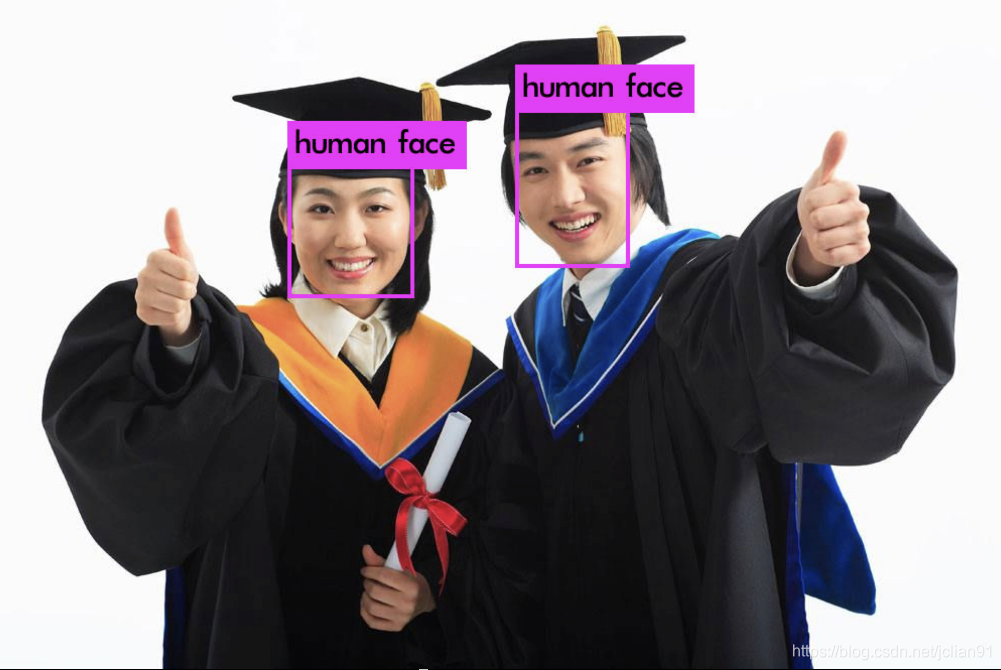
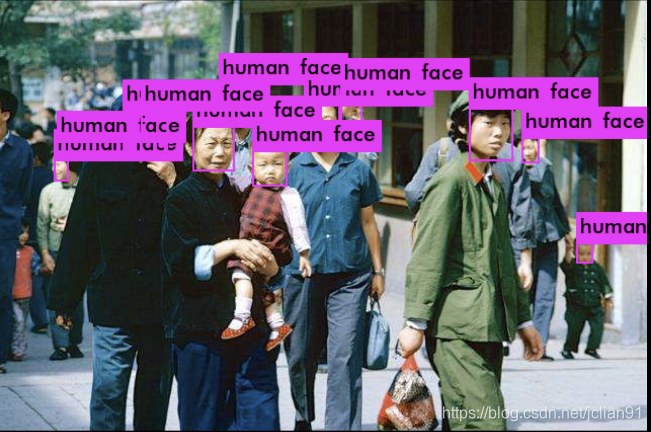
接下来就是最激动人心的时刻,因为我们要利用刚才训练好的模型来进行人脸检测!
预测的Shell脚本(test.sh)如下:
./darknet detector test human_face.data cfg/yolov3-tiny.cfg backup/yolov3-tiny.backup data/walk_persons.jpeg -thresh 0.5 -gpus 3,4,5,6,7,8
接下来,笔者将会给出一系列的预测效果,不需要过多解释,上图即可。另外,由于图片中设计到人物,因此笔者不希望被误会侵犯肖像权,首先图片都是公开图片,其次这只是计算机试验,不代表任何情感,只是一个实验。
总结
利用darknet,我们可以方便地实现目标检测,上述的人脸检测只是其中的一个例子。
在实际使用darknet过程中,GPU经常会出现Segmentation fault (core dumped)错误,笔者暂时还无法解决。
关于该人脸检测项目,笔者会在适当的时候公开源码,欢迎大家关注我的Github,地址为:https://github.com/percent4 。
后续笔者会做进一步的研究,感谢大家的阅读和关注~
参考文章
- 人脸检测数据集网站:http://shuoyang1213.me/WIDERFACE/index.html
- darknet的Github网站:https://github.com/pjreddie/darknet
- [深度学习] 使用Darknet YOLO 模型破解中文验证码点击识别: https://www.cnblogs.com/codefish/p/10104320.html
- YOLO3 darknet训练自己的数据: https://zhuanlan.zhihu.com/p/45852709

 浙公网安备 33010602011771号