
征程 6 | 平台 QAT 精度一致性问题分析流程
QAT 训练完成后,从 torch qat 伪量化模型到 征程 6 板端部署 hbm 模型之间,有模型 export 导出、convert 转定点、插入前处理节点以及 compile 编译等步骤,在这些步骤中,如果出现精度不一致的情况,说明存在一致性问题。一致性问题分为两类:
- 用户侧问题。例如:前后处理不一致,代码误用导致训练部署图不一致的问题等。
- 工具侧问题。例如:查表算子转定点(非线性函数使用多项式近似或分段线性近似来代替精确计算)、不同硬件对于浮点/定点实现不一致、rgb/yuv444 转 nv12 存在信息损失等,由于神经网络具有一定的鲁棒性,若不存在代码误用以及工具 bug 的情况下,板端 hbm 模型精度 与 torch qat 伪量化模型之间的误差很小。
不论哪类一致性问题,您都可以参考本文进行排查。
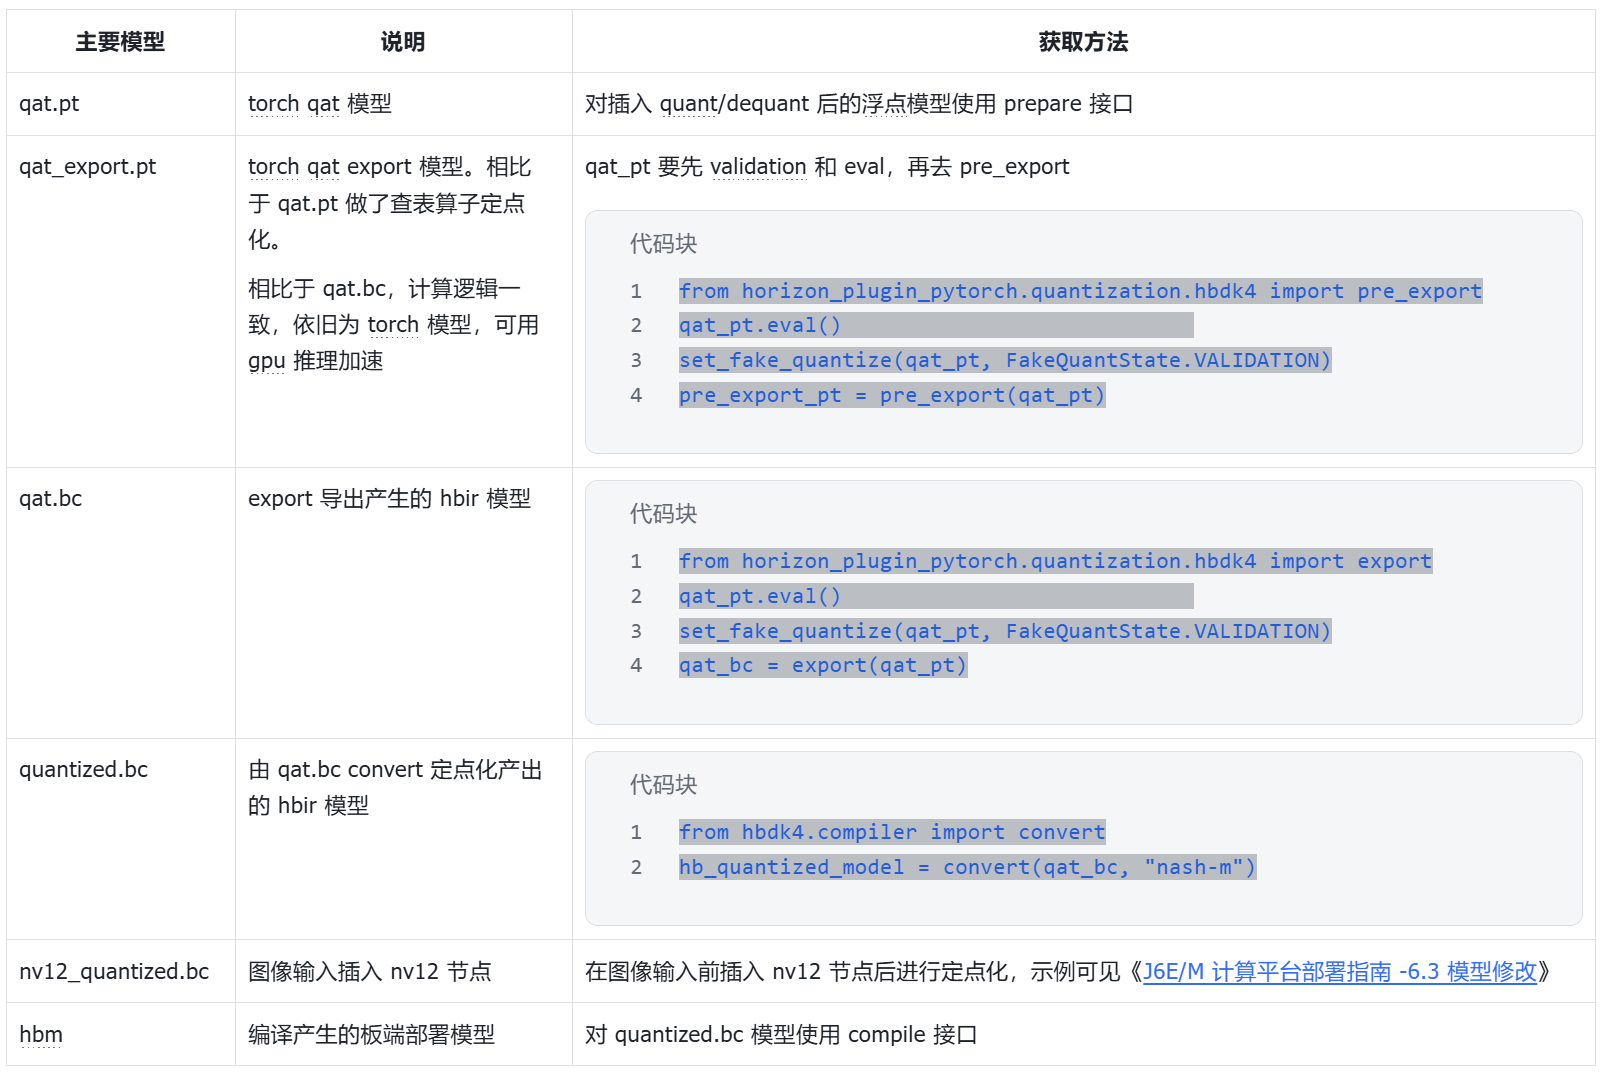
1.基础定义
一致性问题从 API 分割看,主要包括 export 前后、convert 前后、compile 前后,在分析过程中,可能还会引入查表算子转定点(pre_export)、插入 nv12 节点前后(insert_nv12)、删除首尾节点前后(remove_op)的一致性问题,在深入分析之前,大家先统一各阶段模型的概念:

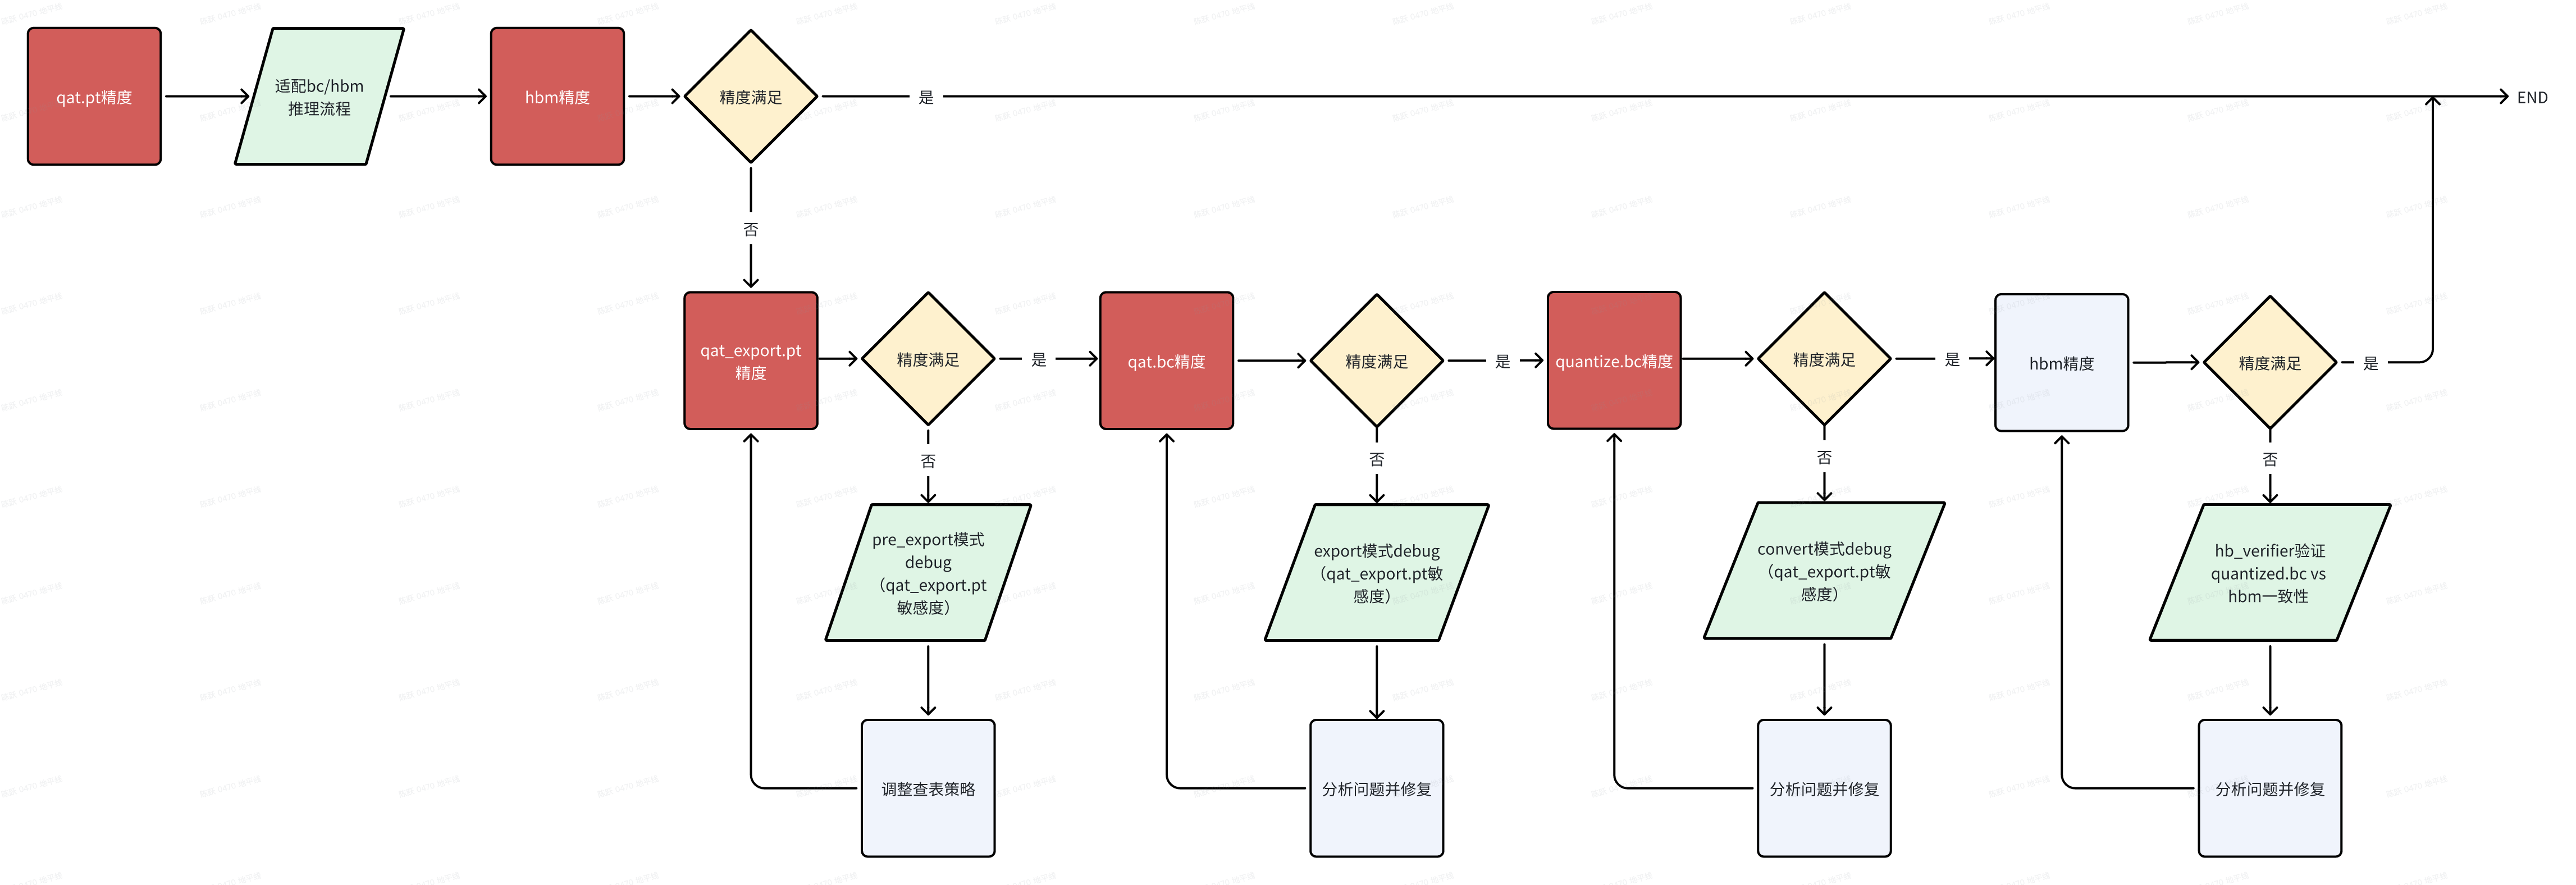
2. 一致性问题定位流程
当出现一致性问题时,大家先确认自己的 horizon-plugin-pytorch、horizon-plugin-profiler、hbdk4-compiler 已升级到最新版本(本文发布时为 OE3.5.0,最新版本获取可见地平线算法工具链官网),然后按照如下流程确认一致性问题发生阶段,参考下文介绍的每个阶段一致性定位方法进行排查。
3.export 一致性分析
3.1 分析前提
- 分析 export 一致性时,请先确认 qat_model eval 精度与单帧可视化符合预期;
- qat.bc 与 qat_model eval 共用一套前后处理,保证不存在前后处理差异导致的一致性问题;
- qat.bc 多帧数据可视化均不符合预期;
3.2 分析思路
3.2.1 仅查表转定点
export 出现一致性问题时,通常需要先判断是否为 查表转定点导致的。具体方式为:将 qat_model 通过 pre_export 接口仅转查表,验证 pre_export_pt 可视化。
from horizon_plugin_pytorch.quantization.hbdk4 import pre_export
pre_export_pt = pre_export(qat_pt)
pre_export_ret = qat_export_pt(example_input) # 查表转定点后模型的推理结果,可以验证此时精度/可视化是否损失
- 若 pre_export_pt 多帧可视化 or 验证集精度指标 符合预期:说明查表算子没问题,跳过该章节
- 若 pre_export_pt 多帧可视化 or 验证集精度指标 不符合预期:说明是查表算子转定点引起的问题,需要排查具体是哪个查表造成的。
参考如下代码,运行 QAT debug 工具来分析查表算子的误差 qat_pt_vs_pre_export_pt(QAT debug 工具详细用法可见 《工具链在线手册-量化感知训练-开发指南-精度调优工具使用指南》)
from horizon_plugin_profiler import QuantAnalysis
from horizon_plugin_pytorch.quantization.hbdk4 import pre_export

# qat.pt和qat.export.pt跑一致性敏感度和逐层对比
qa = QuantAnalysis(qat_pt, pre_export_pt, "pre_export", out_dir="./qatpt_vs_qatexportpt")
qa.set_bad_case(bad_example_input)
qa.run()
qa.compare_per_layer()
qa.sensitivity()
- 【定位具体查表 op】若从 debug 工具产出物中未分析出是哪个(些)查表算子造成的一致性问题,可根据 plugin debug 工具的敏感度排序,设置敏感度高的部分 查表 op 取消转定点,缩小问题 op 范围。如果将部分 查表 op 取消转定点后,pre_export_pt 精度上升/可视化正常,则说明确实是这些 查表 op 导致。
# 此接口需要在 load qat.ckpt后添加
from horizon_plugin_pytorch.quantization.hbdk4 import pre_export
pre_export_pt = pre_export(qat_pt)
# output_xxx_sensitive_ops.txt top1
pre_export_pt.get_submodule("model.pts_bbox_head_pvb._generated_sin_0.sin").quantized_forward = False

# 取消多个查表转定点时
# op_fallback_list = set()
# op_fallback_list.add("header.cls_header.type_encoder.1.var_mean.mean")
# op_fallback_list.add("backbone.traj_encoder.mlp2.nn.2.lut")
# for op_name in op_fallback_list:
#     module = pre_export_pt.get_submodule(op_name)
#     module.quantized_forward = False
- 【查表转定点常见解决方案】常见有一致性问题的查表 op:rsqrt、reciprocal、sin/cos 等,可尝试增大 num_tables 的数值来优化查表算子的一致性,用于拟合非线性函数的表项 num_tables 需配置为 6 的倍数,不同查表 op 默认 num_tables 不同,经验看,num_tables 超出 126 后对查表一致性几乎不再有收益。在 qat_model 加载权重后,在 pre_export 前配置 num_tables,配置示例如下:
qat_model._generated_rsqrt_0.rsqrt.num_tables = 108
常见有一致性问题的查表 op:sin/cos 算子,发现输入范围较大(超出-pi~pi 一个周期),可以将 sin/cos 替换为 plugin 的自定义算子,并配置 single_period=True,然后重新 calib/qat(替换后,性能会差一点点,因此未工具层面自动替换)。
import horizon_plugin_pytorch.nn as hnn
class modelnet(nn.module):
    def __init__(self,):
        ...
        self.sin=hnn.Sin(single_period=True)
        self.cos=hnn.Cos(single_period=True)
也可以自行处理 sin/cos 输入,按照周期性将输入处理到[-pi, pi)之间,并重新 calib/qat。
x = x - 2 * torch.floor(x * ( 0.5 / torch.pi) + 0.5) * torch.pi
若上述方案无法解决查表阶段的问题,请准备好 qatpt_vs_qatexportpt 产出物中的 txt 文件,在地平线开发者社区-工具链板块上提问。
3.2.2 图一致性
在确认仅查表转定点 pre_export_pt 模型的精度/多帧可视化符合预期后,若 qat.bc 依旧存在精度问题,请优先检查 export 通路代码中是否存在 if 部署逻辑(只有部署才走的通路),若存在,先尝试不走部署逻辑 export 生成 qat_bc,验证此时 qat_bc 可视化是否符合预期。
- 若符合预期:说明 if 逻辑造成图不一致影响了权重加载或代码有误。
对于图不一致的排查方法,还可以查看 fx_graph.txt,从中获取到模型中 op/module 的上下游调用关系,排查导出计算图是否发生改变。例如当存在算子 called times 为 0 未被调用的情况,可以通过 Graph 定位到上下文算子从而定位未被调用的原因(通常因为存在逻辑判断或循环次数变化);
# 模型Graph图结构信息
Graph:
opcode         name                                           target                                                                    args                                                                                           kwargs
-------------  ---------------------------------------------  ------------------------------------------------------------------------  ---------------------------------------------------------------------------------------------  -----------------------------
placeholder    input_0                                        input_0                                                                   ()                                                                                             {}
call_module    quant                                          quant                                                                     (input_0,)                                                                                     {}
call_module    traj_decoder_src_proj_0_0                      traj_decoder_src_proj.0.0                                                 (quant,)                                                                                       {}
call_function  __getitem__                                    <slot wrapper '__getitem__' of 'torch.Size' objects>                      (__get__, 0)                                                                                   {}
call_function  __getitem___1                                  <slot wrapper '__getitem__' of 'torch.Size' objects>                      (__get__, 1)                                                                                   {}
call_function  __getitem___2                                  <slot wrapper '__getitem__' of 'torch.Size' objects>                      (__get__, 2)                                                                                   {}
...
重点关注的 Graph 信息:
opcode为算子调用类型name为当前算子名称,需注意和model_check_result.txt中的module.submodule名称区别target为算子输出args为算子输入
- 若不符合预期:往下尝试 3.2.3 plugin debug 工具
3.2.3 plugin debug 工具
当 qat_export.pt 指标正常,qat.bc 精度指标不符合预期,且不存在图不一致问题时,需要运行 plugin debug 工具来分析“export”阶段一致性问题,
from horizon_plugin_profiler import QuantAnalysis

qa = QuantAnalysis(pre_export_pt, qat_bc, "export", out_dir="./pre_export_pt_vs_qatbc")
# torch 与 bc 可接受同一格式输入时,一起跑统计量
qa.set_bad_case(badcase)
qa.run()

# torch 与 bc 不可接受同一格式输入时,分开跑统计量,pt_badcase 与 bc_badcase 除格式外全部相同。
qa.set_bad_case(pt_badcase)
qa.run(run_baseline_model=True, run_analysis_model=False)
qa.set_bad_case(bc_badcase)
qa.run(run_baseline_model=False, run_analysis_model=True)

# 逐层对比
qa.compare_per_layer()

# qat.export.pt 跑一致性敏感度,qat_bc起到占位作用
qa = QuantAnalysis(pre_export_pt, qat_bc, "export", out_dir="./pre_export_pt_vs_qatbc")
qa.set_bad_case(pt_badcase)
qa.sensitivity()
判断正确运行 plugin debug 工具方法:
- compare_per_layer_out.txt:存在对比结果
- output_xxx_sensitive_ops.txt:敏感度有高有低,且最后几个算子的量化敏感度接近于 0
分析 pre_export_pt_vs_qatbc 阶段的 debug 工具产出物,若未发现问题所在或不知如何修改,请准备好 pre_export_pt_vs_qatbc 产出物中的 txt 文件 +qat.bc、qat.onnx,在地平线开发者社区-工具链板块上提问。
4. convert 一致性分析
4.1 分析前提
- 分析 convert 一致性时,说明 qat.bc 精度/可视化符合预期,quantized.bc 多帧数据可视化均不符合预期;
- qat.bc 与 quantized.bc 使用相同的输入和后处理,避免非模型部分引起的差异;
4.2 分析思路
4.2.1 征程 6EM 高一致性策略【OE3.5.0 为 beta 功能】
注意:
- 高一致性策略对查表转定点无影响,主要影响 convert 前后的一致性
- level0 全局开启会对 latency 有负面影响,大约 10~20%,甚至出现过 40% 的情况
- level2 对 latency 有正面收益,推荐优先使用 level2
- 高一致性策略仅适用于 征程 6EM
- 实现方式未来会进行优化,请大家使用时关注用户手册《QAT-训练部署一致性-高一致性 QAT 策略》章节
高一致性策略封装在 horizon_plugin_pytorch.qat_mode.ConsistencyStrategy 下,可以使用 set_consistency_level 接口设置策略。
当前支持五个等级( 0 - 4 )的策略,等级越高,一致性越好,但 QAT 精度可能受到轻微影响。推荐直接使用 level 2,在绝大多数情况下对 QAT 精度无影响,甚至可以改善因截断误差引起的精度问题,对性能和一致性有正收益。
对于未使用高一致性策略得到的 QAT 模型,如果希望不重训获得一致性更高的定点模型,可以在 prepare export 模型前设置一致性策略等级为 0(不重训的情况下只有 level 0 有效,level 1 - 4 需要设置等级后重训模型)。
from horizon_plugin_pytorch.qat_mode import ConsistencyStrategy

# 必须在 prepare 之前设置一致性策略
ConsistencyStrategy.set_consistency_level(2)
...
qat_pt = prepare(float_model)
...
qat_bc = export(qat_pt, example_inputs)
# 如果在prepare前设置 ConsistencyStrategy.set_consistency_level(0), 可以做如下检查
# print(qat_bc._high_precision_qpp)    # 需要是 true,不要用assert检查
# print(qat_bc._fuse_requantize)       # 需要是 false, 不要用assert检查

quantized_bc = convert(qat_bc, march)
level2 在 convert 阶段,linear 与 conv 会有一个 scale 的误差,其它 op 是对齐的
level4 在 convert 阶段,linear 与 conv 也会有一个 scale 的误差,但概率会降低到万分之几
linear 与 conv 将 bias 去掉,level4 在 convert 阶段将没有误差
4.2.2 plugin debug 工具
当采用高一致性策略未解决 convert 前后的一致性问题时,需要运行 plugin debug 工具来分析“convert”前后一致性问题,建议使用高一致性策略后的模型来对比分析,示例如下
from horizon_plugin_profiler import QuantAnalysis
from horizon_plugin_pytorch.quantization.hbdk4 import pre_export

# qat.bc 和 quantized.bc 跑逐层对比
qa = QuantAnalysis(qat_bc, quantized_bc, "convert", out_dir="./qatbc_vs_quantizedbc")
qa.set_bad_case(bad_example_input)
qa.run()
qa.compare_per_layer()

# qat.export.pt 跑一致性敏感度,quantzed_bc起到占位作用
qa = QuantAnalysis(pre_export_pt, quantized_bc, "convert", out_dir="./qatbc_vs_quantizedbc")
qa.set_bad_case(bad_example_input)    # 注意,此处bad_example_input与跑逐层的一致
qa.sensitivity()
判断正确运行 plugin debug 工具方法:
- compare_per_layer_out.txt:存在对比结果
- output_xxx_sensitive_ops.txt:敏感度有高有低,且最后几个算子的量化敏感度接近于 0
分析 qatbc_vs_quantizedbc 阶段的 debug 工具产出物,若未发现问题所在或不知如何修改,请准备好 qatbc_vs_quantizedbc 产出物中的 txt 文件 +qat.bc+qat.onnx+quantized.bc+quantized.onnx,在地平线开发者社区-工具链板块上提问。
4.2.3 分段转浮点
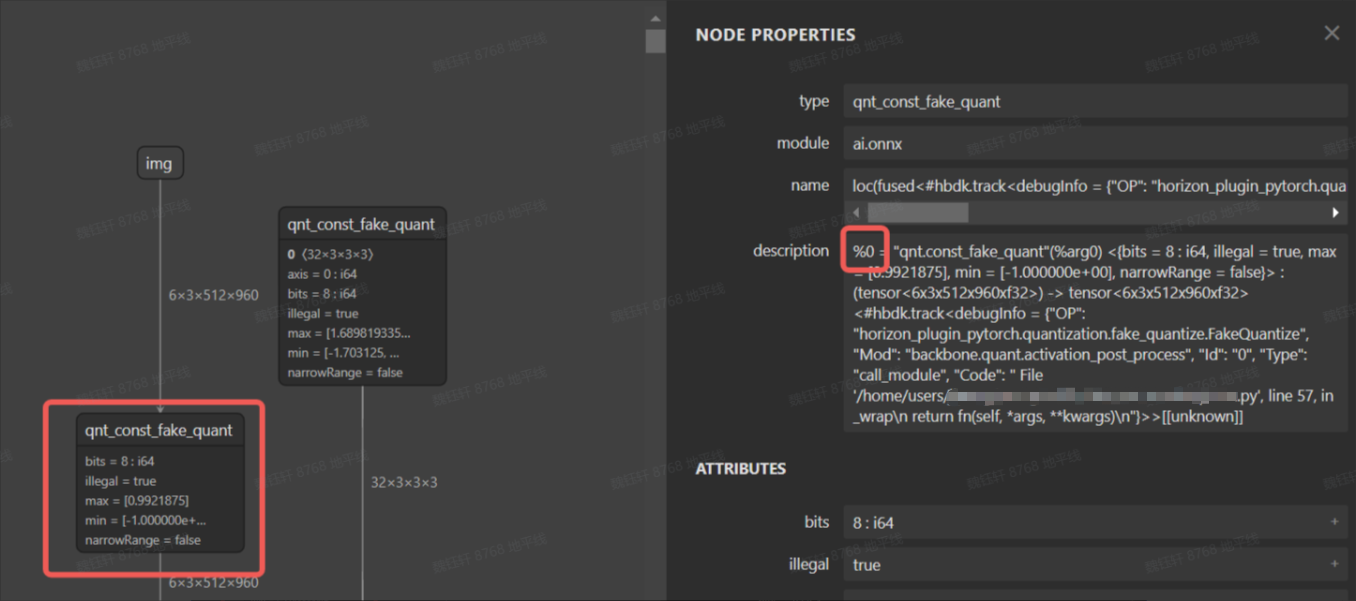
绝大部分情况下,plugin debug 工具都可以分析解决 convert 前后一致性问题,若您发现 plugin debug 工具失效或不想适配使用 plugin debug 工具,工具链还支持分段转浮点的方法来分析 convert 前后一致性,具体做法是将 qat.bc 中 某 op 或 一定范围的 op 配置为 CPU 算子,从而定位出引起 convert 定点化中掉点的 op。
在 qat.bc 模型中,每个节点都有一个 id,根据 id 将某些伪量化删除可以使得模型的一部分变成 cpu 算子,下图为 qat.onnx 的可视化图。
bc 编辑工具在 horizon_plugin_profiler/bc_editor/bc_editor.py,使用方式如下:
python bc_editor.py --bc_path qat.bc --new_bc_path new_qat.bc --config_path config.json
config.json 内容可以参考 horizon_plugin_profiler/bc_editor/config_template.json,指定需要删除的伪量化 op id,可以是一个区间 id,也可以是单个 op id,通过该方案,可很容易实现分段浮点。
{
    "remove_fake_quant": [[1, 100], 102]
}
问题确认后,若不知如何修改,请记录分析过程,在地平线开发者社区-工具链板块上提问。
5. nv12 节点插入一致性分析
板端视频通路传输给模型的数据格式为 nv12,通常算法同学会使用 RGB/YUV444 训练模型,由于 nv12 数据量是 RGB/YUV444 等格式的一半,因此必然存在信息损失,通常情况下,神经网络的鲁棒性是可以接受这种误差的。征程 6 工具链支持在模型前端插入一个前处理节点,以实现颜色空间转换(如 NV12 -> BGR),可由 BPU 进行加速,具体实现示例可见《J6 计算平台部署指南 -6.3 模型修改》。
5.1 分析前提
- 分析 nv12 节点插入一致性时,说明 quantized.bc 精度/可视化符合预期,nv12_quantized.bc 多帧数据可视化均不符合预期;
- quantized.bc 与 nv12_quantized.bc 使用相同的后处理,避免因后处理差异引入一致性问题;
5.2 分析思路
nv12 输入理论上对于模型输出影响很小,可以按照如下三个思路来挨个验证:
- nv12 节点插入代码误用
- nv12 输入数据准备差异
- 确实是 nv12 引入的误差(非 bug 类)
5.2.1 nv12 节点插入代码误用
nv12 节点插入具体细节请参考工具链用户手册 或 配套的迁移文档,常见的误用在 insert_image_preprocess 中的 mode 参数,具体示例如下,详见代码注释:
from hbdk4.compiler import save, convert, visualize, compile, load

    qat_model = load("qat.bc")
    quantized_hbir_model = convert(qat_model, march)
    save(quantized_hbir_model, "quantized_no_insert.bc")

    qat_model = load("qat.bc")
    func = qat_model.functions[0]
    for input in func.inputs[::-1]:
        # pyramid&resizer 只支持 NHWC 的 input layout,若原始输入layout为NHWC,则无需插入transpose
        node = input.insert_transpose(permutes=[0, 3, 1, 2])
        # 插入前处理节点,mode=None适用于使用YUV444训练的模型
        # node = node.insert_image_preprocess(mode=None, divisor=1, mean=[128, 128, 128], std=[128, 128, 128])
        # 插入前处理节点,mode="yuvbt601full2rgb"适用于使用RGB训练的模型
        node = node.insert_image_preprocess(mode="yuvbt601full2rgb", divisor=1, mean=[128, 128, 128], std=[128, 128, 128])
        node.insert_image_convert("nv12")

    quantized_insert = convert(qat_model, march)
    save(quantized_insert, "nv12_quantized.bc")
5.2.2 nv12 输入数据准备差异
推荐采用如下代码准备 nv12 数据
from hbdk4.compiler import load, visualize
import numpy as np
from PIL import Image

def generate_nv12(img):
    w,h = img.size
    # Convert images to YUV format
    yuv_img = img.convert('YCbCr')
    y_data, u_data, v_data = yuv_img.split()

    # Convert Y, U, and V channel data to byte streams
    y_data_bytes = y_data.tobytes()
    u_data_bytes = u_data.resize((u_data.width // 2, u_data.height // 2)).tobytes()
    v_data_bytes = v_data.resize((v_data.width // 2, v_data.height // 2)).tobytes()

    # Arrange the UV data in the form of UVUVUVUV...
    uvuvuv_data = bytearray()
    for u_byte, v_byte in zip(u_data_bytes, v_data_bytes):
        uvuvuv_data.extend([u_byte, v_byte])

    # Input for the hbir model
    y = np.frombuffer(y_data_bytes, dtype=np.uint8).reshape(1, h, w, 1).astype(np.uint8)
    # np.save("y_data.npy", y)
    uv = np.frombuffer(uvuvuv_data, dtype=np.uint8).reshape(1, h//2, w//2, 2).astype(np.uint8)
    # np.save("uv_data.npy", uv)
    return y, uv

# Generate random RGB values in the range 0-255
# image_data = np.random.randint(0, 256, (32, 32, 3), dtype=np.uint8)

# 建议读取使用场景中的真实图片
image = Image.open("test.jpg").convert("RGB")  # 转为RGB三通道
# 转成numpy数组,形状为 [H, W, 3]
image_data = np.array(image, dtype=np.uint8)

# Convert the numpy array to a PIL image
img = Image.fromarray(image_data)
y, uv = generate_nv12(img)
quantized_insert_inputs = {"_input_0_y": y, "_input_0_uv": uv}
5.2.3 非 bug 类 nv12 引入的误差
如果你的网络对 nv12 节点插入造成误差特别敏感,则需要将该误差带入到模型训练中,可参考如下代码:
import horizon_plugin_pytorch.nn.bgr_to_yuv444 as b2y
class BgrToYuv444(object):
    """
    BgrToYuv444 is used for color format convert.
    .. note::
        Affected keys: 'img'.
    Args:
        rgb_input (bool): The input is rgb input or not.
    """
    def __init__(self, affect_key: str = "img", rgb_input: bool = False):
        self.affect_key = affect_key
        self.rgb_input = rgb_input
    def __call__(self, data):
        if isinstance(data, dict) and self.affect_key not in data:
            return data
        image = data[self.affect_key] if isinstance(data, dict) else data
        ndim = image.ndim
        if ndim == 3:
            image = torch.unsqueeze(image, 0)
        if image.dtype is not torch.uint8:
            image = image.to(dtype=torch.uint8)
        if image.shape[1] == 6:
            image1 = b2y.bgr_to_yuv444(image[:, :3], self.rgb_input).float()
            image2 = b2y.bgr_to_yuv444(image[:, 3:], self.rgb_input).float()
            image = torch.cat((image1, image2), dim=1)
        else:
            image = b2y.bgr_to_yuv444(image, self.rgb_input)
            image = image.float()
        if ndim == 3:
            image = image[0]
        if isinstance(data, dict):
            data[self.affect_key] = image
            return data
        else:
            return image
其中,b2y 内部实现了 bgr->nv12->yuv444 的转换。
6.compile 一致性分析
6.1 分析前提
- 分析 compile 一致性时,说明 quantized.bc 或 nv12_quantized.bc 精度/可视化没问题。
- 模型中没有浮点算子时,可以做到小数点后 4 位一致,如果有浮点算子,由于不同硬件平台对浮点算子的 实现方式、支持精度(FP32/FP16)、底层数学库 等存在差异,存在差异是普遍存在的,不一定能做到小数点后 4 位对齐。
- bc 与 hbm 使用的前后处理一致。
6.2 分析思路
为了方便不同编码习惯的客户快速比对 compile 前后 bc 与 hbm 的一致性,工具链提供了三种分析方法:
- 使用命令行工具 hb_verifier 快速比对
- 使用 python API:hbdk 接口快速比对(推理速度相对较慢)
- 使用 python API:hbm_infer 接口快速比对(推理速度相对较快)
6.2.1 hb_verifier 工具
hb_verifier 比对 bc 与 hbm 一致性时,需要关注的信息如下:
bc 与 hbm 一致性比对时,输出信息如下:

比对示例如下:hbm 推理支持板端与 x86 仿真两种运行方式,二者结果是一样的,板端推理速度会更快一些。
hb_verifier -m quantized_nv12.bc,quantized_nv12.hbm -i y_data.npy,uv_data.npy --ip None,xx.xx.xx.xx
- 若一致:则一致性问题出现在前后处理没对齐。
- 若不一致:请准备好 quantized.bc 与 hbm,在地平线开发者社区-工具链板块上提问。
6.2.2 hbdk 接口推理
使用 hbdk 提供的 API 接口 hbm[0]。feed,在相同输入的情况下(可以是算法侧提供,也可以是软件侧提供),推理 quantized.bc 与 hbm(hbm 推理支持板端与 x86 仿真两种运行方式,二者结果是一样的,板端推理速度会更快一些),验证他们的输出一致性/可视化,带 nv12 节点的验证示例代码如下:
from hbdk4.compiler import load, Hbm
import numpy as np
from PIL import Image

def generate_nv12(img):
    w,h = img.size
    # Convert images to YUV format
    yuv_img = img.convert('YCbCr')
    y_data, u_data, v_data = yuv_img.split()

    # Convert Y, U, and V channel data to byte streams
    y_data_bytes = y_data.tobytes()
    u_data_bytes = u_data.resize((u_data.width // 2, u_data.height // 2)).tobytes()
    v_data_bytes = v_data.resize((v_data.width // 2, v_data.height // 2)).tobytes()

    # Arrange the UV data in the form of UVUVUVUV...
    uvuvuv_data = bytearray()
    for u_byte, v_byte in zip(u_data_bytes, v_data_bytes):
        uvuvuv_data.extend([u_byte, v_byte])

    # Input for the hbir model
    y = np.frombuffer(y_data_bytes, dtype=np.uint8).reshape(1, h, w, 1).astype(np.uint8)
    # np.save("y_data.npy", y)
    uv = np.frombuffer(uvuvuv_data, dtype=np.uint8).reshape(1, h//2, w//2, 2).astype(np.uint8)
    # np.save("uv_data.npy", uv)
    return y, uv

def compare_arrays(array1, array2, decimal_places=2):
    """
    Compare two arrays for consistency up to a specified number of decimal places.

    Parameters:
    - array1: First numpy array.
    - array2: Second numpy array.
    - decimal_places: Number of decimal places to consider for alignment.

    Returns:
    - are_equal: True if arrays are consistent up to the specified decimal places, False otherwise.
    - max_difference: Maximum difference (absolute value) if arrays are not consistent, else 0.
    """
    # Round the arrays to the specified decimal places
    rounded1 = np.round(array1, decimals=decimal_places)
    rounded2 = np.round(array2, decimals=decimal_places)

    # Check equality
    are_equal = np.array_equal(rounded1, rounded2)

    # Calculate maximum difference if not equal
    max_difference = 0
    if not are_equal:
        max_difference = np.max(np.abs(array1 - array2))

    return are_equal, max_difference

hbir = load("./quantized_nv12_remove_stage3.bc")
hbm = Hbm("./quantized_nv12_remove_stage3.hbm")

# Create a random image with the shape (1, 512, 960, 3)
# Generate random RGB values in the range 0-255
image_data = np.random.randint(0, 256, (512, 960, 3), dtype=np.uint8)
# Convert the numpy array to a PIL image
img = Image.fromarray(image_data)
y, uv = generate_nv12(img)

inputs = {"input_0_y": y, "input_0_uv": uv}

# 分别进行hbir和Hbm推理
hbir_outputs = hbir[0].feed(inputs)
# print("hbir_outputs:", hbir_outputs)
hbm_x86_outputs = hbm[0].feed(inputs)        # x86推理
# print("hbm_x86_outputs:", hbm_x86_outputs)

# # 远程连接BPU,实现板端Hbm推理
# # 运行前需要安装 `hbdk4_runtime_aarch64`的wheel包,根据需要选择nash。
hbm_arrch64_outputs = hbm[0].feed(inputs, remote_ip="10.64.60.165", remote_port="22", remote_work_root="/map/xxx/")
# print("hbm_arrch64_outputs:", hbm_arrch64_outputs)

# 比较Hbir和hbm输出
for idx, v in enumerate(hbir[0].flatten_outputs):
    hbir_data = hbir_outputs[v.name]
    hbm_arrch64_data1 = hbm_x86_outputs[v.name]
    are_equal, max_difference = compare_arrays(hbir_data, hbm_arrch64_data1, decimal_places=4)
    if not are_equal:
        print("Maximum difference:", max_difference)
    else:
        print(f"{v.name} is equal!")
若不一致:请准备好 quantized.bc+hbm+ 复现脚本,在地平线开发者社区-工具链板块上提问。
6.2.3 hbm_infer 接口推理
使用 python 推理 quantized.bc,使用 hbm_infer 工具 推理 hbm(hbm_infer 工具详细介绍可参考用户手册《UCP-模型推理开发-模型推理工具介绍-hbm_infer 工具介绍》)。
输入数据的读取代码需要用户根据实际的目录和文件格式进行修改,如下示例是以。bin 文件为例,经过量化然后介入 bc 与 hbm 模型。如果是 numpy 或者 pkl 文件,需要根据实际情况进行读取和处理。
from hbdk4.compiler import load, Hbm
import numpy as np
from PIL import Image
import os
import pickle
import numpy as np
from hbm_infer.hbm_rpc_session_flexible import HbmRpcSession, init_server, deinit_server, init_hbm, deinit_hbm

if __name__ =="__main__":
    data_path="inputs"
    #删除
    hbir = load("./model_quantized_removequant.bc")
    hbm_path1="./modelp_remove_quan.hbm"
    hbm_rpc_server1 = init_server(host="xx.xx.xx.xx")  # 确保有root权限
    hbm_handle1 = init_hbm(hbm_rpc_server=hbm_rpc_server1, local_hbm_path=hbm_path1)
    hbm_model1 = HbmRpcSession(
        hbm_handle=hbm_handle1,
        hbm_rpc_server=hbm_rpc_server1,
    )
    # hbm.show_input_output_info()
    print("========= BEGIN test_validate ! =========")
    inputs=hbir[0].flatten_inputs
    input_data={}
    for i,input in enumerate(inputs):
        path=os.path.join(data_path,input.name,"0.bin")
        data=np.fromfile(path, dtype=np.float32).reshape(input.type.shape)
        scale=input.quant_info.scales[0]
        if input.type.torch_dtype=="torch.int16":
            dtype_=np.int16
            min_=-32768
            max_=32767
        if input.type.torch_dtype=="torch.int8":
            dtype_=np.int8
            min_=-128
            max_=127
        data = data / scale
        data = np.round(data )
        data= np.clip(data, min_, max_)
        data= data.astype(dtype_)
        np.save(f"{i}_quan.npy",data)
        input_data[input.name]=data

    hbir_outputs = hbir[0].feed(input_data)
    hbm_arrch64_outputs1 = hbm_model1(input_data)

    for idx, v in enumerate(hbir[0].flatten_outputs):
        hbir_data = hbir_outputs[v.name]
        hbm_arrch64_data1 = hbm_arrch64_outputs1[v.name]
        diff = np.abs(hbm_arrch64_data - hbm_arrch64_data1).reshape(np.prod(hbm_arrch64_data.shape))
        print(f"{v.name} max error is {max(diff)}")
    hbm_model.close_server()        # 删除log
    deinit_server(hbm_rpc_server)   # 删除板端 server 文件,避免资源占用
    deinit_hbm(hbm_handle)          # 删除板端 hbm 文件,避免资源占用
若不一致:请准备好 quantized.bc+hbm+ 复现脚本,在地平线开发者社区-工具链板块上提问。

 浙公网安备 33010602011771号