
6.第五篇 安装keepalived与Nginx
二进制安装kubernetes 1.17.0版本时,要想对kube-apiserver高可用,有很多种方式方法可供选择,网上大部分使用Haproxy+keepalived、Nginx+keepalived、或者单独使用Nginx等,条条大路通罗马,只要根据公司或者个人掌握的知识点进行选择即可,工具没有好坏之分,关键看什么人使用,这里我们选择使用Nginx+keepalived(Nginx在1.9.0版本及以后,都新增了TCP代理支持,还是很好使用的,不过需要在编译时,指定负载均衡模块stream)。
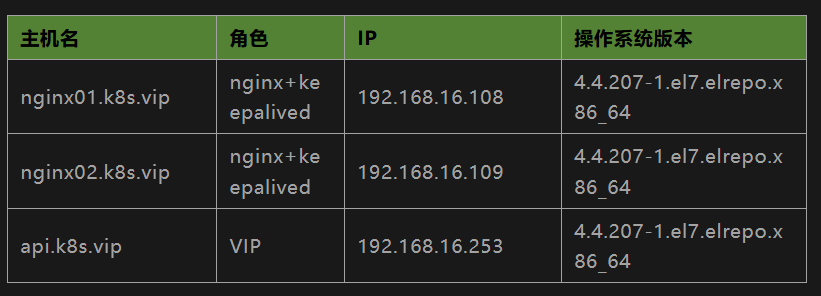
部署Nginx
登录nginx01.k8s.vip,下载并安装,如下脚本,此过程中有可能遇到有些库文件或者依赖不存在的情况,可根据实际情况解决。
#!/bin/bash

# 创建安装目录及nginx日志目录
mkdir -p /data/nginx/ /data/logs/nginx

# 下载nginx
cd /data/
wget http://nginx.org/download/nginx-1.16.1.tar.gz
tar -zxf nginx-1.16.1.tar.gz && cd nginx-1.16.1

# 编译安装
./configure --with-stream --without-http --prefix=/data/nginx --without-http_uwsgi_module
make && make install
注意要编译--with-stream这个模块,否则不能使用TCP代理,安装完成后,配置文件修改如下
[root@nginx01 conf]# cat nginx.conf
#user nobody;
worker_processes 4;
events {
    worker_connections 1024;
}

stream {
    log_format main '$remote_addr [$time_local]'
                        '$protocol $status $bytes_sent $bytes_received'
                        '$session_time "$upstream_addr" '
                        '"$upstream_bytes_sent" "$upstream_bytes_received" "$upstream_connect_time"';

    access_log /data/logs/nginx/access.log main;
    error_log /data/logs/nginx/error.log warn;
    upstream backend {
        hash $remote_addr consistent;
        server 192.168.16.104:6443 max_fails=3 fail_timeout=30s;
        server 192.168.16.105:6443 max_fails=3 fail_timeout=30s;
        server 192.168.16.106:6443 max_fails=3 fail_timeout=30s;
    }
    server {
        listen *:8443;
        proxy_connect_timeout 1s;
        proxy_pass backend;
    }
}
[root@nginx01 conf]# pwd
/data/nginx/conf
[root@nginx01 conf]#
启动并验证
[root@nginx01 conf]# /data/nginx/sbin/nginx -t
nginx: the configuration file /data/nginx/conf/nginx.conf syntax is ok
nginx: configuration file /data/nginx/conf/nginx.conf test is successful
[root@nginx01 conf]# /data/nginx/sbin/nginx
[root@nginx01 conf]# netstat -antp | grep 8443
tcp 0      0 0.0.0.0:8443            0.0.0.0:* LISTEN 31759/nginx: master
[root@nginx01 conf]#
登录nginx02.k8s.vip,按上面操作部署,执行即可完成nginx的安装及配置。
部署keepalived
keepalived起初是为LVS设计,专门用来监控集群中realserver的状态,如果服务器节点出现异常或故障,keepalived可以及时检测到,并将故障服务器从集群系统中剔除,不需要人工干预。后来它被应用到Linux服务器的各种应用中,目前它已经是Linux服务器上面的一个轻量级的高可用解决方案,应该广泛,目前引入了VRRP协议等。在Linux服务器上面,安装方式极其简单如下。
[root@nginx01 conf]# yum install -y keepalived
安装完成后,默认配置在/etc/keepalived/keepalived.conf下面,在这里简单配置如下:
[root@nginx01 ~]# cat /etc/keepalived/keepalived.conf
! Configuration File for keepalived


global_defs {
   notification_email {
   }
   router_id kube_api
}

vrrp_script check_nginx {
    script "killall -0 nginx"
    interval 3
    weight 5
}

vrrp_instance nginx-vip {
    unicast_src_ip 192.168.16.108
    unicast_peer {
        192.168.16.109
    }
    state MASTER #实例初始状态,实际的MASTER和BACKUP是启动后选举决定的
    interface eth0 #指定VIP绑定的在哪张网卡上面
    virtual_router_id 51 #设置虚拟路由ID,相同集群相同,不同集群不同原则
    priority 100 #优先级,优先级高的被竞选为Master
    advert_int 1 #检查的时间间隔,默认是1秒
    authentication {
        auth_type PASS #认证方式选择官方推荐的PASS,还有一个AH
        auth_pass 12345  #认证密码
    }
    virtual_ipaddress {
        192.168.16.253  # 设置VIP
    }
    track_script {
        check_nginx
    }
}

virtual_server 192.168.16.253 443 {
  delay_loop 5  #健康检查时间间隔
  persistence_timeout 1800 #会话保持时间
  protocol TCP #使用协议是TCP

  real_server 192.168.16.108 8443 {
    weight 1
    TCP_CHECK {
      connect_port 8443
      connect_timeout 3
    }
  }

  real_server 192.168.16.109 8443 {
    weight 1
    TCP_CHECK {
      connect_port 8443
      connect_timeout 3
    }
  }
}
[root@nginx01 ~]#
登录nginx02.k8s.vip,配置如下
[root@nginx02 ~]# cat /etc/keepalived/keepalived.conf
! Configuration File for keepalived

global_defs {
   notification_email {
   }
   router_id kube_api
}

vrrp_script check_nginx {
    script "killall -0 nginx"
    interval 3
    weight 5
}

vrrp_instance nginx-vip {
    unicast_src_ip 192.168.16.109
    unicast_peer {
        192.168.16.108
    }
    state BACKUP
    interface eth0
    virtual_router_id 51
    priority 90
    advert_int 1
    authentication {
        auth_type PASS
        auth_pass 12345
    }
    virtual_ipaddress {
        192.168.16.253
    }
    track_script {
        check_nginx
    }
}

virtual_server 192.168.16.253 443 {
  delay_loop 5
  persistence_timeout 1800
  protocol TCP

  real_server 192.168.16.108 8443 {
    weight 1
    TCP_CHECK {
      connect_port 8443
      connect_timeout 3
    }
  }

  real_server 192.168.16.109 8443 {
    weight 1
    TCP_CHECK {
      connect_port 8443
      connect_timeout 3
    }
  }
}
[root@nginx02 ~]#
两台服务器分别启动服务如下
[root@nginx01 ~]# systemctl start keepalived
查看运行结果
[root@nginx01 ~]# ip a
1: lo: <LOOPBACK,UP,LOWER_UP> mtu 65536 qdisc noqueue state UNKNOWN qlen 1
    link/loopback 00:00:00:00:00:00 brd 00:00:00:00:00:00
    inet 127.0.0.1/8 scope host lo
       valid_lft forever preferred_lft forever
2: eth0: <BROADCAST,MULTICAST,UP,LOWER_UP> mtu 1500 qdisc pfifo_fast state UP qlen 1000
    link/ether 06:2f:16:00:07:6e brd ff:ff:ff:ff:ff:ff
    inet 192.168.16.108/24 brd 192.168.16.255 scope global eth0
       valid_lft forever preferred_lft forever
    inet 192.168.16.253/32 scope global eth0
       valid_lft forever preferred_lft forever
[root@nginx01 ~]#
现在把nginx01上面的keepalived stop,然后登录nginx02查看如下
[root@nginx02 ~]# ip a
1: lo: <LOOPBACK,UP,LOWER_UP> mtu 65536 qdisc noqueue state UNKNOWN qlen 1
    link/loopback 00:00:00:00:00:00 brd 00:00:00:00:00:00
    inet 127.0.0.1/8 scope host lo
       valid_lft forever preferred_lft forever
2: eth0: <BROADCAST,MULTICAST,UP,LOWER_UP> mtu 1500 qdisc pfifo_fast state UP qlen 1000
    link/ether 06:37:46:1e:17:6d brd ff:ff:ff:ff:ff:ff
    inet 192.168.16.109/24 brd 192.168.16.255 scope global eth0
       valid_lft forever preferred_lft forever
    inet 192.168.16.253/32 scope global eth0
       valid_lft forever preferred_lft forever
[root@nginx02 ~]#
把nginx01上面的keepalived start后,VIP又会飘移到nginx01上面.
总结
keepalived的使用方式多种多样,只要能到达所想要的结果即可,这里使用的是类似配置LVS的方式,指定realserver。
至此我们的Nginx+Keepalived即安装完成,后面在部署kubernetes时,我们就可以使用这里的VIP 192.168.16.253,把它解析成api.k8s.vip来使用。

 浙公网安备 33010602011771号