
一、简介
官方文档:https://shardingsphere.apache.org/document/current/cn/user-manual/shardingsphere-proxy/
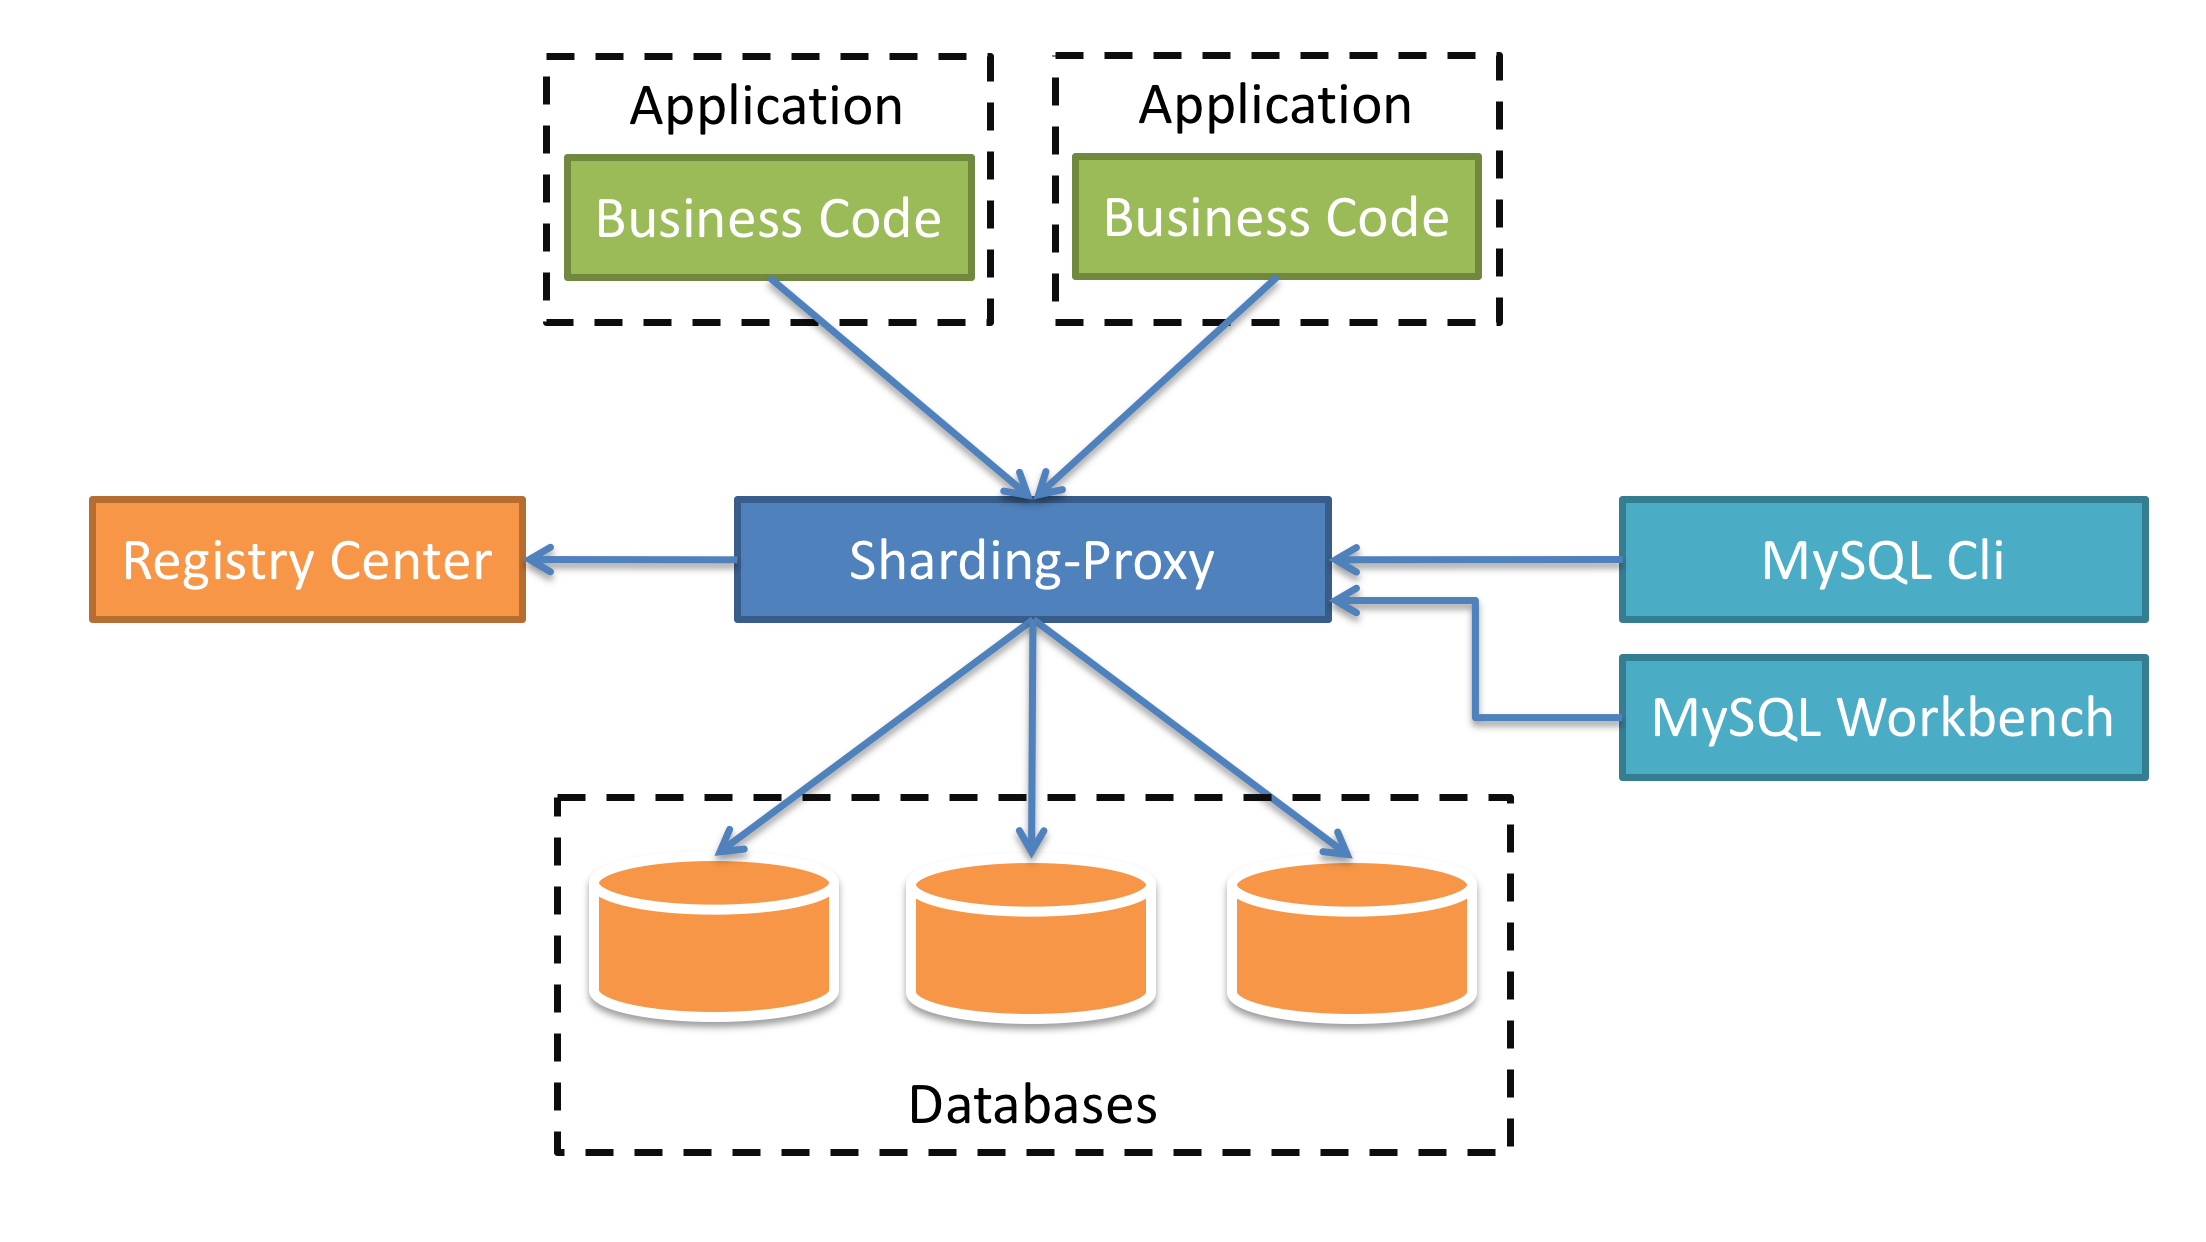
ShardingSphere-Proxy 是 Apache ShardingSphere 的第二个产品。 它定位为透明化的数据库代理端,提供封装了数据库二进制协议的服务端版本,用于完成对异构语言的支持。 目前提供 MySQL 和 PostgreSQL 版本,它可以使用任何兼容 MySQL/PostgreSQL 协议的访问客户端(如:MySQL Command Client, MySQL Workbench, Navicat 等)操作数据,对 DBA 更加友好。
- 向应用程序完全透明,可直接当做 MySQL/PostgreSQL 使用。
- 适用于任何兼容 MySQL/PostgreSQL 协议的的客户端。
二、使用
1、数据分片
1、下载 ShardingSphere-Proxy ,并解压文件
2、配置认证服务,修改文件 conf/server.yaml ,打开相关注释即可
 1 authentication:
 2   users:
 3     root:
 4       password: root
 5     sharding:
 6       password: sharding
 7       authorizedSchemas: sharding_db
 8
 9 props:
10   max.connections.size.per.query: 1
11   acceptor.size: 16  # The default value is available processors count * 2.
12   executor.size: 16  # Infinite by default.
13   proxy.frontend.flush.threshold: 128  # The default value is 128.
14     # LOCAL: Proxy will run with LOCAL transaction.
15     # XA: Proxy will run with XA transaction.
16     # BASE: Proxy will run with B.A.S.E transaction.
17   proxy.transaction.type: LOCAL
18   proxy.opentracing.enabled: false
19   proxy.hint.enabled: false
20   query.with.cipher.column: true
21   sql.show: false
22   allow.range.query.with.inline.sharding: false
3、配置数据分片规则,修改文件 conf/config-sharding.yaml
sql及配置参考:【ShardingSphere】ShardingSphere-JDBC 快速入门
 1 schemaName: sharding_db
 2
 3 dataSources:
 4   ds_0:
 5     url: jdbc:mysql://127.0.0.1:3306/demo_ds_0?serverTimezone=UTC&useSSL=false
 6     username: root
 7     password:
 8     connectionTimeoutMilliseconds: 30000
 9     idleTimeoutMilliseconds: 60000
10     maxLifetimeMilliseconds: 1800000
11     maxPoolSize: 50
12   ds_1:
13     url: jdbc:mysql://127.0.0.1:3306/demo_ds_1?serverTimezone=UTC&useSSL=false
14     username: root
15     password:
16     connectionTimeoutMilliseconds: 30000
17     idleTimeoutMilliseconds: 60000
18     maxLifetimeMilliseconds: 1800000
19     maxPoolSize: 50
20
21 shardingRule:
22   tables:
23     t_order:
24       actualDataNodes: ds_${0..1}.t_order_${0..1}
25       tableStrategy:
26         inline:
27           shardingColumn: order_id
28           algorithmExpression: t_order_${order_id % 2}
29       keyGenerator:
30         type: SNOWFLAKE
31         column: order_id
32     t_order_item:
33       actualDataNodes: ds_${0..1}.t_order_item_${0..1}
34       tableStrategy:
35         inline:
36           shardingColumn: order_id
37           algorithmExpression: t_order_item_${order_id % 2}
38       keyGenerator:
39         type: SNOWFLAKE
40         column: order_item_id
41   bindingTables:
42     - t_order,t_order_item
43   defaultDatabaseStrategy:
44     inline:
45       shardingColumn: user_id
46       algorithmExpression: ds_${user_id % 2}
47   defaultTableStrategy:
48     none:
3、使用mysql 客户端,进行测试即可
2、读写分离
1、在上面配置的基础上,修改文件 conf/config-master_slave.yaml
 1 schemaName: master_slave_db
 2
 3 dataSources:
 4   master_ds:
 5     url: jdbc:mysql://127.0.0.1:3306/demo_ds_master?serverTimezone=UTC&useSSL=false
 6     username: root
 7     password:
 8     connectionTimeoutMilliseconds: 30000
 9     idleTimeoutMilliseconds: 60000
10     maxLifetimeMilliseconds: 1800000
11     maxPoolSize: 50
12   slave_ds_0:
13     url: jdbc:mysql://127.0.0.1:3306/demo_ds_slave_0?serverTimezone=UTC&useSSL=false
14     username: root
15     password:
16     connectionTimeoutMilliseconds: 30000
17     idleTimeoutMilliseconds: 60000
18     maxLifetimeMilliseconds: 1800000
19     maxPoolSize: 50
20   slave_ds_1:
21     url: jdbc:mysql://127.0.0.1:3306/demo_ds_slave_1?serverTimezone=UTC&useSSL=false
22     username: root
23     password:
24     connectionTimeoutMilliseconds: 30000
25     idleTimeoutMilliseconds: 60000
26     maxLifetimeMilliseconds: 1800000
27     maxPoolSize: 50
28
29 masterSlaveRule:
30   name: ms_ds
31   masterDataSourceName: master_ds
32   slaveDataSourceNames:
33     - slave_ds_0
34     - slave_ds_1
2、使用mysql 客户端,进行测试即可


 浙公网安备 33010602011771号